标签:
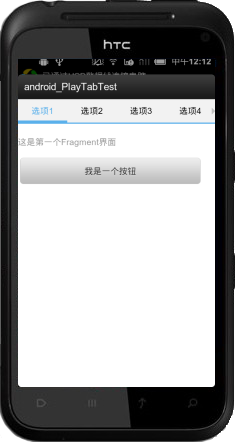
这是一个可滑动的标签栏的自定义控件,参考此文章http://blog.csdn.net/fx_sky/article/details/8990573,我将主要的功能整合成一个类,配上2个特定的布局即可使用。
效果图:


主要布局文件:
<?xml version="1.0" encoding="utf-8"?>
   <LinearLayout xmlns:android="http://schemas.android.com/apk/res/android"
    android:layout_width="match_parent"
    android:layout_height="match_parent"
    android:orientation="vertical" >
        <RelativeLayout
                android:id="@+id/rl_nav"
                android:layout_width="fill_parent"
                android:layout_height="wrap_content"
                android:layout_gravity="top" >

                <RadioGroup
                    android:id="@+id/rg_nav_content"
                    android:layout_width="fill_parent"
                    android:layout_height="38dip"
                    android:layout_alignParentTop="true"
                    android:background="#F2F2F2"
                    android:orientation="horizontal" >
                </RadioGroup>

                <ImageView
                    android:id="@+id/iv_nav_indicator"
                    android:layout_width="1dip"
                    android:layout_height="5dip"
                    android:layout_alignParentBottom="true"
                    android:background="#FF0000"
                    android:contentDescription="@string/mygo_share"
                    android:scaleType="matrix" />
            </RelativeLayout>
        </LinearLayout>
标签的布局:
sync_nav_radiogroup_item.xml
<?xml version="1.0" encoding="utf-8"?>
<RadioButton xmlns:android="http://schemas.android.com/apk/res/android"
    android:layout_width="0dip"
    android:layout_height="fill_parent"
    android:background="#F2F2F2"
    android:button="@null"
    android:checked="true"
    android:gravity="center"
    android:textSize="15sp" />
以下是工具类代码:
import android.app.Activity;
import android.content.Context;
import android.support.v4.view.ViewPager;
import android.util.AttributeSet;
import android.util.DisplayMetrics;
import android.view.LayoutInflater;
import android.view.View;
import android.view.ViewGroup;
import android.view.animation.LinearInterpolator;
import android.view.animation.TranslateAnimation;
import android.widget.HorizontalScrollView;
import android.widget.ImageView;
import android.widget.RadioButton;
import android.widget.RadioGroup;
import android.widget.RadioGroup.OnCheckedChangeListener;

public class SyncHorizontalScrollView extends HorizontalScrollView {

    private View view;
    private ImageView leftImage;
    private ImageView rightImage;
    private int windowWitdh = 0;
    private Activity mContext;
    private RadioGroup rg_nav_content;
    private ImageView iv_nav_indicator;
    private LayoutInflater mInflater;
    private int count;// 屏幕显示的标签个数
    private int indicatorWidth;// 每个标签所占的宽度
    private int currentIndicatorLeft = 0;// 当前所在标签页面的位移
    private ViewPager mViewPager;
    private int scrollX;

    public SyncHorizontalScrollView(Context context) {
        super(context);
        // TODO Auto-generated constructor stub
    }

    public SyncHorizontalScrollView(Context context, AttributeSet attrs) {
        super(context, attrs);
        // TODO Auto-generated constructor stub
    }

    /**
     *
     * 方法描述:
     * @param mViewPager
     * @param leftImage 左箭頭
     * @param rightImage 右箭頭
     * @param tabTitle 標籤欄的名稱
     * @param count 一頁顯示的標籤個數
     * @param context
     * <pre>
     * 修改日期      修改人       修改说明
     * 2014-2-17   chen     新建
     * </pre>
     */
    public void setSomeParam(ViewPager mViewPager, ImageView leftImage,
            ImageView rightImage, String[] tabTitle, int count, Activity context) {
        this.mContext = context;
        this.mViewPager = mViewPager;
        // this.view = view;
        mInflater = LayoutInflater.from(context);
        this.view = mInflater.inflate(R.layout.sync_hsv_item, null);
        this.addView(view);
        this.leftImage = leftImage;
        this.rightImage = rightImage;
        DisplayMetrics dm = new DisplayMetrics();
        context.getWindowManager().getDefaultDisplay().getMetrics(dm);
        windowWitdh = dm.widthPixels;
        this.count = count;
        indicatorWidth = windowWitdh / count;
        init(tabTitle);
    }

    private void init(String[] tabTitle) {
        rg_nav_content = (RadioGroup) view.findViewById(R.id.rg_nav_content);
        iv_nav_indicator = (ImageView) view.findViewById(R.id.iv_nav_indicator);
        initIndicatorWidth();
        initNavigationHSV(tabTitle);
        setListener();
    }

    // 初始化滑动下标的宽
    private void initIndicatorWidth() {
        ViewGroup.LayoutParams cursor_Params = iv_nav_indicator
                .getLayoutParams();
        cursor_Params.width = indicatorWidth;
        iv_nav_indicator.setLayoutParams(cursor_Params);
    }

    // 添加顶部标签
    private void initNavigationHSV(String[] tabTitle) {
        rg_nav_content.removeAllViews();
        for (int i = 0; i < tabTitle.length; i++) {
            RadioButton rb = (RadioButton) mInflater.inflate(
                    R.layout.sync_nav_radiogroup_item, null);
            rb.setId(i);
            rb.setText(tabTitle[i]);
            rb.setLayoutParams(new LayoutParams(indicatorWidth,
                    LayoutParams.MATCH_PARENT));
            rg_nav_content.addView(rb);
        }
        RadioButton rb = (RadioButton) mInflater.inflate(
                R.layout.sync_nav_radiogroup_item, null);
        rg_nav_content.addView(rb);

    }

    private void setListener() {
        rg_nav_content
                .setOnCheckedChangeListener(new OnCheckedChangeListener() {
                    @Override
                    public void onCheckedChanged(RadioGroup group, int checkedId) {
                        if (rg_nav_content.getChildAt(checkedId) != null) {
                            moveAnimation(checkedId);
                            mViewPager.setCurrentItem(checkedId); // ViewPager
                            // 跟随一起 切换
                        }
                    }
                });
    }
    //动画移动效果
    private void moveAnimation(int checkedId){
        TranslateAnimation animation = new TranslateAnimation(currentIndicatorLeft,
                indicatorWidth * checkedId,0f, 0f);
        animation.setInterpolator(new LinearInterpolator());
        animation.setDuration(100);
        animation.setFillAfter(true);

        // 执行位移动画
        iv_nav_indicator.startAnimation(animation);

        // 记录当前 下标的距最左侧的 距离
        currentIndicatorLeft = indicatorWidth * checkedId;
        scrollX = (checkedId > 1 ? currentIndicatorLeft: 0)- indicatorWidth * 2;
        this.post(runnable);
    }

    // 模拟点击事件
    public void performLabelClick(int position) {
        if (rg_nav_content != null && rg_nav_content.getChildCount() > position) {
            ((RadioButton) rg_nav_content.getChildAt(position)).performClick();
        }
    }

    private Runnable runnable = new Runnable() {

        @Override
        public void run() {
            // TODO Auto-generated method stub
            smoothScrollTo(scrollX, 0);
        }
    };

    // 显示和隐藏左右两边的箭头
    protected void onScrollChanged(int l, int t, int oldl, int oldt) {
        super.onScrollChanged(l, t, oldl, oldt);
        if (!mContext.isFinishing() && view != null && rightImage != null
                && leftImage != null) {
            if (view.getWidth() <= windowWitdh) {
                leftImage.setVisibility(View.GONE);
                rightImage.setVisibility(View.GONE);
            } else {
                if (l == 0) {
                    leftImage.setVisibility(View.GONE);
                    rightImage.setVisibility(View.VISIBLE);
                } else if (view.getWidth() - l == windowWitdh) {
                    leftImage.setVisibility(View.VISIBLE);
                    rightImage.setVisibility(View.GONE);
                } else {
                    leftImage.setVisibility(View.VISIBLE);
                    rightImage.setVisibility(View.VISIBLE);
                }
            }
        }
    }
    public int getIndicatorWidth(){
        return indicatorWidth;
    }
}
在调用时,先调用setSomeParam方法将需要用的的控件与数据传入,然后控件内部开始初始化。
由于项目有需求,要在进入此控件使用到的页面时,自动定位到某一个标签,在此需使用View.post方法执行HorizontalScrollView 控件的smoothScrollTo方法,才能确保进入页面后标签已定位。原因是scrollTo方法要等到界面显示完毕才能有效,而view.post方法也是在界面刷新完毕之后才执行。
定义一个performLabelClick方法,让外部调用此类来实现相应的页面跳转即可。
不过此处使用时有一个问题,就是从上一级页面跳转至此页面时,无法固定在最后一个标签位,调试时发现虽然执行了performLabelClick方法模拟点击事件,但是监听事件并没有被响应。暂时没找出问题所在。不过用了一个方法来解决此问题,即在调用initNavigationHSV方法添加标签时,为其多加一个空标签,宽度为0即可,这样即可解决标签栏上无法定位到最后一位的问题,因为真正的最后一位实际上是宽度为0的空标签。
如果大家有遇到此问题或是有解决方法,欢迎告知,谢谢。
附上代码下载地址:
http://www.oschina.net/code/snippet_1409622_33243
ViewPager + HorizontalScrollView 实现可滚动的标签栏
标签:
原文地址:http://www.cnblogs.com/zhujiabin/p/5313987.html