标签:
我们除了在
storyBoard中可以把控件进行约束,在代码中我们同样可以对其进行约束,使得你的app不管是在什么设备中,他的界面设计都不会发生改变;
//
//  ViewController.m
//  自动布局代码版
//
//  Created by Biaoac on 16/3/26.
//  Copyright © 2016年 scsys. All rights reserved.
//

#import "ViewController.h"

@interface ViewController ()

@end
//  使用 storyBoard ID  找到控制器
//    UIStoryboard *s = [UIStoryboard storyboardWithName:@"Main" bundle:[NSBundle mainBundle]];

//    ViewController *vc = [s instantiateViewControllerWithIdentifier:@"ViewController"];

/*
 //    使用storyboard 跳转页面   也可以用代码跳转
 //    右键拖拽 按钮  到另一个视图控制器  会弹出:
 1.show(push)
 2.present(模态)
 3.popover(ipad 弹出列表)
 */

/*
 横向:距离父视图左侧100、视图本身的宽度最小时100距离父视图右侧是100
 竖向:距离父视图顶部是150、视图本身高度最小是30

 使用可视化格式语言:VFL : Visual format language  描述

 H:表示的是水平方向,
 V:表示的是垂直方向;

 | :表示父视图

 - :本身表示一段距离

 - 距离 - 表示制定距离

 [字符串表示的视图] 参照视图

 [字符串表示的视图(视图的宽高或者最小最大的宽高、相对宽高)]  注意;小括号千万不要丢掉

 使用代码自动布局(AutorlayOut)的时候 frame就会失效, ——》 不需要再去设置视图的Frame

 使用代码自动布局的时候  需要禁用 translatesAutoresizingMaskIntoConstraints = No;

 使用自动布局的步骤:
 1、translatesAutoresizingMaskIntoConstraints = No;
 2、绑定视图与字符串
 3、添加约束


 */

@implementation ViewController

- (void)viewDidLoad {
    [super viewDidLoad];
//    [self demo1];
//    [self demo2];
//    [self demo3];
//    [self demo4];
    [self demo5];
}


/**
 *  创建视图的方法
 *
 *  @param view  需要创建视图的类名 字符串
 *  @param sView 添加到的目标 父视图
 *
 *  @return 创建好 并且添加到父视图上的 视图
 */

//在这里我们把创建视图的方法封装起来,在demo2.3、4、5、里使用
- (UIView *)creatView:(NSString *)view addToView:(UIView *)sView{
    UIView *myView = [[NSClassFromString(view) alloc]init];
    myView.translatesAutoresizingMaskIntoConstraints = NO;
    [sView addSubview:myView];
    return myView;
}

//我们先按照正常的流程来一遍
- (void)demo1{

    self.view.backgroundColor = [UIColor whiteColor];


    UIView *view = [[UIView alloc]init];
    view.backgroundColor = [UIColor orangeColor];
    [self.view addSubview:view];

    //    可视化语言:
    //    1、禁用
    view.translatesAutoresizingMaskIntoConstraints = NO;
    //    2、绑定视图和字符串
    NSDictionary *dic = NSDictionaryOfVariableBindings(view);
    //    3、添加约束
    /**
     *
     *    VisualFormat  VFL语句
     *    Options:基于哪个方向去布局
     *    metrics :绑定数值(NSNumber)与字符串
     *    views : 绑定视图与字符串的
     */
    [self.view addConstraints:[NSLayoutConstraint constraintsWithVisualFormat:@"H:|-100-[view(>=100)]-100-|" options:NSLayoutFormatAlignAllLeft metrics:nil views:dic]];
    //  H:|-100-[view(>=100)]-100-|
    //  V:|-150-[view(40)]
    [self.view addConstraints:[NSLayoutConstraint constraintsWithVisualFormat:@"V:|-150-[view(40)]" options:NSLayoutFormatAlignAllLeft metrics:nil views:dic]];


}
//然后我们在demo1的基础上又添加了一个View
- (void)demo2{

    UIView *view1 = [self creatView:@"UIView" addToView:self.view];
    view1.backgroundColor = [UIColor redColor];
    UIView *view2 = [self creatView:@"UIView" addToView:self.view];
    view2.backgroundColor = [UIColor cyanColor];
    //    2.绑定
    NSDictionary *dic = NSDictionaryOfVariableBindings(view1,view2);
    //    3.添加约束

    //view1:  //  H:|-100-[view1(>=100)]-100-|
    //  V:|-150-[view1(40)]
    [self.view addConstraints:[NSLayoutConstraint constraintsWithVisualFormat:@"H:|-100-[view1(>=100)]-100-|" options:NSLayoutFormatAlignAllLeft metrics:nil views:dic]];
    [self.view addConstraints:[NSLayoutConstraint constraintsWithVisualFormat:@"V:|-150-[view1(40)]" options:NSLayoutFormatAlignAllLeft metrics:nil views:dic]];
    //view2:   //   H:|-100-[view1(>=100)]-100-|
    //   V:[view1]-50-[view2(view1)]
    [self.view addConstraints:[NSLayoutConstraint constraintsWithVisualFormat:@"H:|-100-[view2(>=100)]-100-|" options:NSLayoutFormatAlignAllLeft metrics:nil views:dic]];
    [self.view addConstraints:[NSLayoutConstraint constraintsWithVisualFormat:@"V:[view1]-50-[view2(view1)]" options:NSLayoutFormatAlignAllLeft metrics:nil views:dic]];


}
//研究发现: 两个视图竖向是有交集的  我们就做了一下优化
- (void)demo3{


    UIView *view1 = [self creatView:@"UIView" addToView:self.view];
    view1.backgroundColor = [UIColor redColor];
    UIView *view2 = [self creatView:@"UIView" addToView:self.view];
    view2.backgroundColor = [UIColor cyanColor];
    //    2.绑定
    NSDictionary *dic = NSDictionaryOfVariableBindings(view1,view2);
    //    3.添加约束

    //view1:  //  H:|-100-[view1(>=100)]-100-|
    //  V:|-150-[view1(40)]
    [self.view addConstraints:[NSLayoutConstraint constraintsWithVisualFormat:@"H:|-100-[view1(>=100)]-100-|" options:NSLayoutFormatAlignAllLeft metrics:nil views:dic]];

    //view2:   //   H:|-100-[view1(>=100)]-100-|
    //   V:[view1]-50-[view2(view1)]
    [self.view addConstraints:[NSLayoutConstraint constraintsWithVisualFormat:@"H:|-100-[view2(>=100)]-100-|" options:NSLayoutFormatAlignAllLeft metrics:nil views:dic]];
    [self.view addConstraints:[NSLayoutConstraint constraintsWithVisualFormat:@"V:|-150-[view1(40)]-50-[view2(view1)]" options:NSLayoutFormatAlignAllLeft metrics:nil views:dic]];


}
//继续优化,使代码变的更加清晰,
- (void)demo4{

    UIView *view1 = [self creatView:@"UIView" addToView:self.view];
    view1.backgroundColor = [UIColor redColor];
    UIView *view2 = [self creatView:@"UIView" addToView:self.view];
    view2.backgroundColor = [UIColor cyanColor];
    NSDictionary *dic = NSDictionaryOfVariableBindings(view1,view2);
    //    /所有VFL语句的数组
    NSArray *constriants = @[@"H:|-100-[view1(>=100)]-100-|",@"H:|-100-[view2(>=100)]-100-|",@"V:|-150-[view1(40)]-50-[view2(view1)]"];
    for (int i=0; i<constriants.count; i++) {
        [self.view addConstraints:[NSLayoutConstraint constraintsWithVisualFormat:constriants[i] options:NSLayoutFormatAlignAllLeft metrics:nil views:dic]];
    }


}

//这次我们加上了 metrics  参数的使用   是用来绑定参数和字符串的方法 和绑定UIView是一样的
- (void)demo5{
    UIView *view1 = [self creatView:@"UIView" addToView:self.view];
    UIView *view2 = [self creatView:@"UIView" addToView:self.view];
    UIView *view3 = [self creatView:@"UIView" addToView:self.view];
    UIView *view4 = [self creatView:@"UIView" addToView:self.view];
    NSDictionary *dic = NSDictionaryOfVariableBindings(view1,view2,view3,view4);
    NSNumber *leftSpace = @100;
    NSNumber *rightSpace = @100;
    NSNumber *view1TopSpace = @150;
    NSNumber *view1MinWidth = @100;
    NSNumber *view1Hight = @40;
    NSNumber *view2TopSpace = @50;

    NSDictionary *metrics = NSDictionaryOfVariableBindings(leftSpace,rightSpace,view1MinWidth,view1Hight,view1TopSpace,view2TopSpace);


    NSArray *constraints = @[@"H:|-leftSpace-[view1(>=view1MinWidth)]-rightSpace-|",@"H:|-leftSpace-[view2(view1)]-rightSpace-|",@"V:|-view1TopSpace-[view1(view1Hight)]-view2TopSpace-[view2(view1)]"];
    for (int i=0; i<constraints.count; i++) {
        [self.view addConstraints:[NSLayoutConstraint constraintsWithVisualFormat:constraints[i] options:NSLayoutFormatAlignAllLeft metrics:metrics views:dic]];
    }


}


- (void)didReceiveMemoryWarning {
    [super didReceiveMemoryWarning];
    // Dispose of any resources that can be recreated.
}


@end
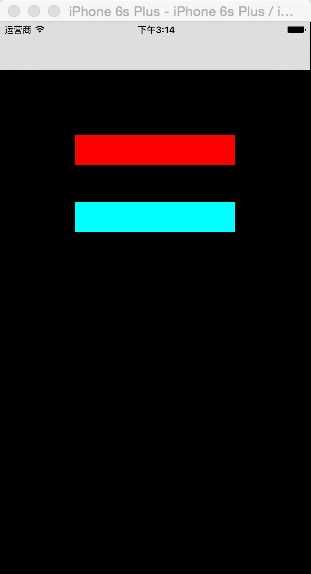
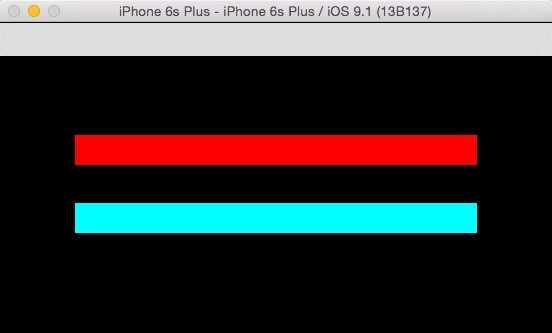
本人觉得代码中的注释还是很详细的,就不多嘴了,运行的结果如下;(看见没有,我就说没有影响吧 )
)


标签:
原文地址:http://www.cnblogs.com/Biaoac/p/5323012.html