标签:
1 直方图均衡化
直方图均衡化,是将给定图像的直方图改造成均匀分布的直方图,从而扩大像素灰度值的动态范围,达到增强图像对比度的效果。


1) 标准化直方图

rk - 第k个像素灰度值; nk - 像素灰度值为rk的像素数目;
MN - 图像中总的像素个数; [0, L-1] - 像素灰度值的范围
2) 直方图均衡化

3) 实例
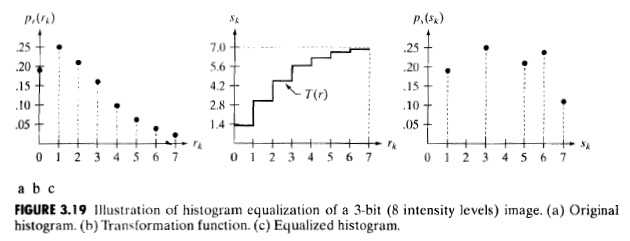
一幅灰度值范围是[0, L-1],64行64列的数字图像,其灰度分布如下表所示,求直方图均衡化之后的灰度分布。
| r(k) | n(k) | P(rk) |
| r(0) = 0 | 790 | 0.19 |
| r(1) = 1 | 1023 | 0.25 |
| r(2) = 2 | 850 | 0.21 |
| r(3) = 3 | 656 | 0.16 |
| r(4) = 4 | 329 | 0.08 |
| r(5) = 5 | 245 | 0.06 |
| r(6) = 6 | 122 | 0.03 |
| r(7) = 7 | 81 | 0.02 |
根据上述公式得, s(0)=1.33≈1,s(1)=3.08≈3,s(2)≈5,s(3)≈6,s(4)≈6,s(5)≈7,s(6)≈7,s(7)≈7
因为 r(k) -> s(k),所以 s(0)=1 有790个像素值。
r(3), r(4) -> s(3), s(4),且 s(3)=s(4)=6,故有像素值为6的像素数为 (656+329),同理可计算像素值为7的像素数。
将不同像素值对应的的像素数除以MN(图像的像素总数),便得到均衡化之后的灰度直方图,如下所示:

2 OpenCV中的函数
1) equalizeHist定义

void cv::equalizeHist(    InputArray        src,
                        OutputArray        dst )
/*
1) src
    Source 8-bit single channel image.
2) dst
    Destination image of the same size and type as src
*/
2) equalizeHist源码

void cv::equalizeHist( InputArray _src, OutputArray _dst )
{
    CV_Assert( _src.type() == CV_8UC1 );

    if (_src.empty())
        return;

    CV_OCL_RUN(_src.dims() <= 2 && _dst.isUMat(),
               ocl_equalizeHist(_src, _dst))

    Mat src = _src.getMat();
    _dst.create( src.size(), src.type() );
    Mat dst = _dst.getMat();

    Mutex histogramLockInstance;

    const int hist_sz = EqualizeHistCalcHist_Invoker::HIST_SZ;
    int hist[hist_sz] = {0,};
    int lut[hist_sz];

    EqualizeHistCalcHist_Invoker calcBody(src, hist, &histogramLockInstance);
    EqualizeHistLut_Invoker      lutBody(src, dst, lut);
    cv::Range heightRange(0, src.rows);

    if(EqualizeHistCalcHist_Invoker::isWorthParallel(src))
        parallel_for_(heightRange, calcBody);
    else
        calcBody(heightRange);

    int i = 0;
    while (!hist[i]) ++i;

    int total = (int)src.total();
    if (hist[i] == total)
    {
        dst.setTo(i);
        return;
    }

    float scale = (hist_sz - 1.f)/(total - hist[i]);
    int sum = 0;

    for (lut[i++] = 0; i < hist_sz; ++i)
    {
        sum += hist[i];
        lut[i] = saturate_cast<uchar>(sum * scale);
    }

    if(EqualizeHistLut_Invoker::isWorthParallel(src))
        parallel_for_(heightRange, lutBody);
    else
        lutBody(heightRange);
}
3 实例

#include "opencv2/imgcodecs.hpp"
#include "opencv2/highgui/highgui.hpp"
#include "opencv2/imgproc/imgproc.hpp"
#include <iostream>
#include <stdio.h>

using namespace cv;
using namespace std;

int main( int, char** argv )
{
  Mat src, dst;

  const char* source_window = "Source image";
  const char* equalized_window = "Equalized Image";

  // Load image
  src = imread( argv[1], 1 );

  if( src.empty() )
    { cout<<"Usage: ./Histogram_Demo <path_to_image>"<<endl;
      return -1;
    }

  // Convert to grayscale
  cvtColor( src, src, COLOR_BGR2GRAY );

  // Apply Histogram Equalization
  equalizeHist( src, dst );

  // Display results
  namedWindow( source_window, WINDOW_AUTOSIZE );
  namedWindow( equalized_window, WINDOW_AUTOSIZE );

  imshow( source_window, src );
  imshow( equalized_window, dst );

  // Wait until user exits the program
  waitKey(0);

  return 0;

}
摘自 <Digital Image Processing_3rd> 和 Opencv 3.1.0_tutorial
标签:
原文地址:http://www.cnblogs.com/xinxue/p/5290660.html