标签:


每个Activity包含一个PhoneWindow对象,PhoneWindow设置DecorView为应用窗口的根视图。在里面就是熟悉的TitleView和ContentView,没错,平时使用的setContentView()就是设置的ContentView。

当一个Activity启动时,会被要求绘制出它的布局。Android框架会处理这个请求,当然前提是Activity提供了合理的布局。绘制从根视图开始,从上至下遍历整棵视图树,每一个ViewGroup负责让自己的子View被绘制,每一个View负责绘制自己,通过draw()方法.绘制过程分三步走。
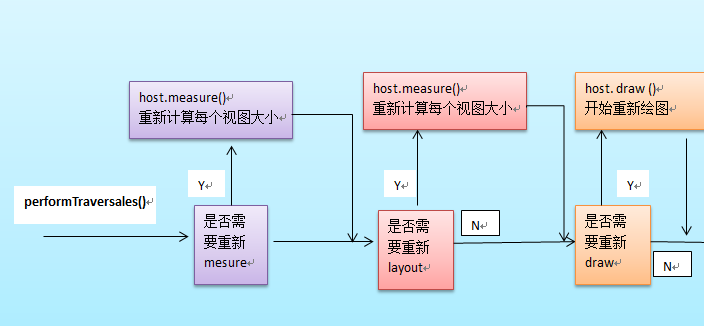
整个绘制流程是在ViewRoot中的performTraversals()方法展开的。部分源代码如下:
private void performTraversals() {
    ......
    //最外层的根视图的widthMeasureSpec和heightMeasureSpec由来
    //lp.width和lp.height在创建ViewGroup实例时等于MATCH_PARENT
    int childWidthMeasureSpec = getRootMeasureSpec(mWidth, lp.width);
    int childHeightMeasureSpec = getRootMeasureSpec(mHeight, lp.height);
    ......
    mView.measure(childWidthMeasureSpec, childHeightMeasureSpec);
    ......
    mView.layout(0, 0, mView.getMeasuredWidth(), mView.getMeasuredHeight());
    ......
    mView.draw(canvas);
    ......
}
在绘制之前当然要知道view的尺寸和绘制。所以先进行measu和layout(测量和定位)。如下图:
public final void measure(int widthMeasureSpec, int heightMeasureSpec) {
    //....

    //回调onMeasure()方法
    onMeasure(widthMeasureSpec, heightMeasureSpec);

    //more
}
EXACTLY计算view的实际大小,获得高宽存入mMeasuredHeight和mMeasureWidth,measure(int, int)传入的两个参数。MeasureSpec是一个32位int值,高2位为测量的模式,低30位为测量的大小。测量的模式可以分为以下三种。
精确值模式,当layout_width或layout_height指定为具体数值,或者为match_parent时,系统使用EXACTLY。
AT_MOST 最大值模式,指定为wrap_content时,控件的尺寸不能超过父控件允许的最大尺寸。
UNSPECIFIED 不指定测量模式,View想多大就多大,一般不太使用。
根据上面的源码可知,measure方法不可被重写,自定义时需要重写的是onMeasure方法
protected void onMeasure(int widthMeasureSpec, int heightMeasureSpec) {
        setMeasuredDimension(getDefaultSize(getSuggestedMinimumWidth(), widthMeasureSpec),
                getDefaultSize(getSuggestedMinimumHeight(), heightMeasureSpec));
    }
查看源码可知最终的高宽是调用setMeasuredDimension()设定的,如果不重写,默认是直接调用getDefaultSize获取尺寸的。
使用View的getMeasuredWidth()和getMeasuredHeight()方法来获取View测量的宽高,必须保证这两个方法在onMeasure流程之后被调用才能返回有效值。
Layout方法就是用来确定view布局的位置,就好像你知道了一件东西的大小以后,总要知道位置才能画上去。
mView.layout(0, 0, mView.getMeasuredWidth(), mView.getMeasuredHeight());
layout获取四个参数,左,上,右,下坐标,相对于父视图而言。这里可以看到,使用了刚刚测量的宽和高。
public void layout(int l, int t, int r, int b) {
    int oldL = mLeft;
    int oldT = mTop;
    int oldB = mBottom;
    int oldR = mRight;
    boolean changed = setFrame(l, t, r, b);
    if (changed || (mPrivateFlags & LAYOUT_REQUIRED) == LAYOUT_REQUIRED) {
        .....
        onLayout(changed, l, t, r, b);
        .....
}
当layout结束以后getWidth()与getHeight()才会返回正确的值。通过setFrame设置坐标。如果坐标改变过了,则重新进行定位。如果是View对象,那么onLayout是个空方法。因为定位是由ViewGroup确定的。
这里出现一个问题,getWidth/Height() and getMeasuredWidth/Height()有什么区别?
getWidth():View在設定好佈局後整個View的寬度。getMeasuredWidth():對View上的內容進行測量後得到的View內容佔據的寬度1 public void draw(Canvas canvas) { 2 ...... 3 /* 4 * Draw traversal performs several drawing steps which must be executed 5 * in the appropriate order: 6 * 7 * 1. Draw the background 8 * 2. If necessary, save the canvas‘ layers to prepare for fading 9 * 3. Draw view‘s content 10 * 4. Draw children 11 * 5. If necessary, draw the fading edges and restore layers 12 * 6. Draw decorations (scrollbars for instance) 13 */ 14 15 // Step 1, draw the background, if needed 16 ...... 17 if (!dirtyOpaque) { 18 drawBackground(canvas); 19 } 20 21 // skip step 2 & 5 if possible (common case) 22 ...... 23 24 // Step 2, save the canvas‘ layers 25 ...... 26 if (drawTop) { 27 canvas.saveLayer(left, top, right, top + length, null, flags); 28 } 29 ...... 30 31 // Step 3, draw the content 32 if (!dirtyOpaque) onDraw(canvas); 33 34 // Step 4, draw the children 35 dispatchDraw(canvas); 36 37 // Step 5, draw the fade effect and restore layers 38 ...... 39 if (drawTop) { 40 matrix.setScale(1, fadeHeight * topFadeStrength); 41 matrix.postTranslate(left, top); 42 fade.setLocalMatrix(matrix); 43 p.setShader(fade); 44 canvas.drawRect(left, top, right, top + length, p); 45 } 46 ...... 47 48 // Step 6, draw decorations (scrollbars) 49 onDrawScrollBars(canvas); 50 ...... 51 }
重点是第三步调用onDraw方法。其它几步都是绘制一些边边角角的东西比如背景、scrollBar之类的。其中dispatchDraw,是用来递归调用子View,如果没有则不需要。
onDraw方法是需要自己实现的,因为每个控件绘制的内容不同。主要用canvas对象进行绘制。
标签:
原文地址:http://www.cnblogs.com/jesonjason/p/5350024.html
