标签:
早就听说了dubbo的好处,但是在项目中一直没有使用的机会,所以一直不知道怎么使用。今天晚上有空,简单的学习一下
就当入个门,以后项目中遇到的话,那么使用起来就比较简单了,至于介绍的话,我就不总结了,其实就是很好的解决了分布式
管理的问题,并且操作起来非常的方便。
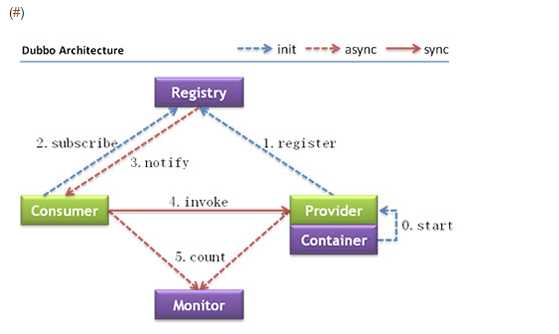
下面这张图是从官网上截图的

节点角色说明:
调用关系说明:
(1) 连通性:
(2) 健状性:
(3) 伸缩性:
(4) 升级性:
上面这些基本的概念看完,然后我们开始直接上代码吧。
我们先编写服务端代码:
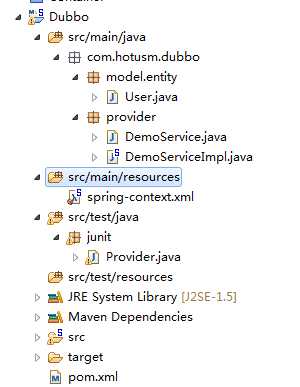
这是代码结构

下面是代码:
DemoService.java
package com.hotusm.dubbo.provider;

import java.util.List;

public interface DemoService {

    String sayHello();

    List<?> getAllUser();
}
DemoServiceImpl.java
package com.hotusm.dubbo.provider;
import java.util.ArrayList;
import java.util.List;
import java.util.Random;
import com.hotusm.dubbo.model.entity.User;
public class DemoServiceImpl implements DemoService {
public String sayHello() {
return "hello dubbo";
}
public List<?> getAllUser() {
List<User> list=new ArrayList<User>();
Random r=new Random();
for(int i=0;i<10;i++){
list.add(new User(""+r.nextInt(100)));
}
return list;
}
}
服务提供者的配置文件:
<?xml version="1.0" encoding="UTF-8"?>
<beans xmlns="http://www.springframework.org/schema/beans"
    xmlns:xsi="http://www.w3.org/2001/XMLSchema-instance"
    xmlns:dubbo="http://code.alibabatech.com/schema/dubbo"
    xsi:schemaLocation="http://code.alibabatech.com/schema/dubbo http://code.alibabatech.com/schema/dubbo/dubbo.xsd
        http://www.springframework.org/schema/beans http://www.springframework.org/schema/beans/spring-beans.xsd">


    <!-- 具体的实现bean -->
    <bean id="demoService" class="com.hotusm.dubbo.provider.DemoServiceImpl" />

    <!-- 提供方应用信息,用于计算依赖关系 -->
    <dubbo:application name="xixi_provider"  />

    <!-- 使用multicast广播注册中心暴露服务地址
    <dubbo:registry address="multicast://224.5.6.7:1234" />-->

    <!-- 使用zookeeper注册中心暴露服务地址 -->
    <dubbo:registry address="zookeeper://127.0.0.1:2182" />

    <!-- 用dubbo协议在20880端口暴露服务 -->
    <dubbo:protocol name="dubbo" port="20880" />

    <!-- 声明需要暴露的服务接口 -->
    <dubbo:service interface="com.hotusm.dubbo.provider.DemoService" ref="demoService" />

</beans>
然后我们就可以写一个测试类,将服务提供者给发布。
package junit;

import java.io.IOException;

import org.springframework.context.support.ClassPathXmlApplicationContext;

public class Provider {

    public static void main(String[] args) {
        ClassPathXmlApplicationContext atx=new ClassPathXmlApplicationContext("spring-context.xml");
        atx.start();

        try {
            System.out.println("server start... press any key to quit");
            System.in.read();
        } catch (IOException e) {
            e.printStackTrace();
        }

    }
}
dubbo有一个客户端,我们可以再客户端中看到提供者和消费者的情况,但是这个客户端需要自己安装
我们可以看到这里已经可以查看到服务提供者的信息了,点击进去还可以看到更多详细的信息,这里就不演示了。
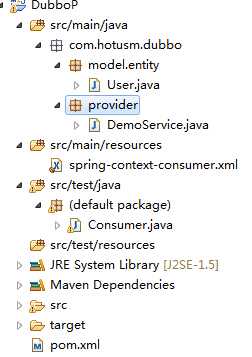
接下来我们再做一个消费者的例子,

注意这里的包名,实体名称,接口名称还是需要一样的,这点和webservice是一样的。
最主要还是配置文件
<?xml version="1.0" encoding="UTF-8"?>
<beans xmlns="http://www.springframework.org/schema/beans"
    xmlns:xsi="http://www.w3.org/2001/XMLSchema-instance"
    xmlns:dubbo="http://code.alibabatech.com/schema/dubbo"
    xsi:schemaLocation="http://www.springframework.org/schema/beans http://www.springframework.org/schema/beans/spring-beans.xsd
        http://code.alibabatech.com/schema/dubbo http://code.alibabatech.com/schema/dubbo/dubbo.xsd">

<!-- 消费方应用名,用于计算依赖关系,不是匹配条件,不要与提供方一样 -->
    <dubbo:application name="hehe_consumer" />

    <!-- 使用zookeeper注册中心暴露服务地址 -->
    <!-- <dubbo:registry address="multicast://224.5.6.7:1234" /> -->
    <dubbo:registry address="zookeeper://127.0.0.1:2182" />

    <!-- 生成远程服务代理,可以像使用本地bean一样使用demoService -->
    <dubbo:reference id="demoService"
        interface="com.hotusm.dubbo.provider.DemoService" />

</beans>
测试代码:
import java.io.IOException;
import java.util.List;

import org.springframework.context.support.ClassPathXmlApplicationContext;

import com.hotusm.dubbo.provider.DemoService;


public class Consumer {

    public static void main(String[] args) {
         ClassPathXmlApplicationContext context = new ClassPathXmlApplicationContext(
                    new String[] { "spring-context-consumer.xml" });
            context.start();

            DemoService demo = (DemoService) context.getBean("demoService"); //
            System.out.println(demo.sayHello());
            List<?> list = demo.getAllUser();
            System.out.println(list);
            try {
                System.out.println("connection... press any key to quit ");
                System.in.read();
            } catch (IOException e) {
                e.printStackTrace();
            }

    }
}
我们可以在控制台看到:
hello dubbo
[User [name=37], User [name=95], User [name=68], User [name=59], User [name=14], User [name=51], User [name=44], User [name=62], User [name=71], User [name=94]]
connection... press any key to quit
这样我们的例子也就写完了,dubbo也算是入门了吧。
下面再讲讲dubbo的管理页面怎么配置。
dubbo管理控制台开源部分主要包含: 提供者 路由规则 动态配置 访问控制 权重调节 负载均衡 负责人,等管理功能。
1、下载dubbo
我是测试安装在windows上的,先删除tomcat/webapps下自带的ROOT文件夹内容(替换tomcat的启动主页),将下载的war包解压到webapps/ROOT(可以先让tomcat自动解压 再把内容拷贝到root中去),如果是linux的话命令如下:
2、配置:
( windows 环境 解压的war包中自带有dubbo.properties 文件,直接修改就可以; linux上的话将dubbo.properties放在当前用户目录下,)修改zookeeper的地址
3、配置信息如下:
dubbo.registry.address=zookeeper://localhost:2181
dubbo.admin.root.password=root
dubbo.admin.guest.password=guest
这边使用的是zookeeper的注册中心。
启动tomcat:
说明:确定zookeeper启动后再去启动tomcat。
访问:
http://localhost:8080/dubbo-admin-2.5.4-SNAPSHOT (这是我的tomcat的访问路径)
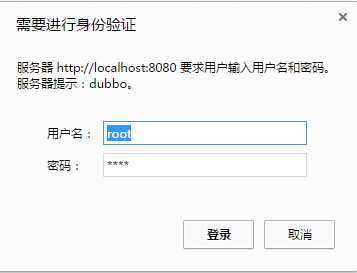
出现以下界面说明安装配置成功,登录密码为root/root

附war包下载地址:http://pan.baidu.com/s/1jHQiesY 密码:5eoq
标签:
原文地址:http://www.cnblogs.com/zr520/p/5361786.html