标签:
一:UITabBarController的简单介绍:
1.使用步骤:
(1)初始化UITabBarController
(2)设置UIWindow的rootViewController为UITabBarController
(3)创建相应的子控制器(viewcontroller)(让子控制器作为导航控制器的根视图控制器,最外层包装一层导航条)
(4)把子控制器添加到UITabBarController
2:加入方式:(1)[tb addChildViewController:c1];
(2)tb.viewControllers=@[c1,c2,c3,c4];
注意:展示的顺序和添加的顺序一致,和导航控制器中不同,展现在眼前的是第一个添加的控制器对应的View。导航控制器是压栈的过程
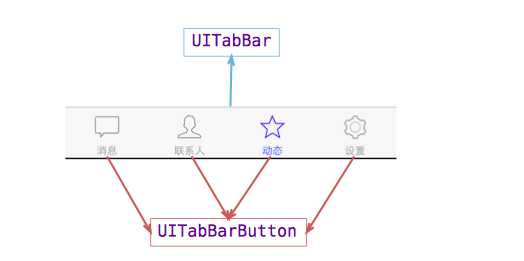
3.UITabBar
下方的工具条称为UITabBar ,如果UITabBarController有N个子控制器,那么UITabBar内部就会有N 个UITabBarButton作为子控件与之对应。
注意:UITabBarButton在UITabBar中得位置是均分的,UITabBar的高度为49。
在上面的程序中,UITabBarController有4个子控制器,所以UITabBar中有4个UITabBarButton,UITabBar的结构?大致如下图所示:
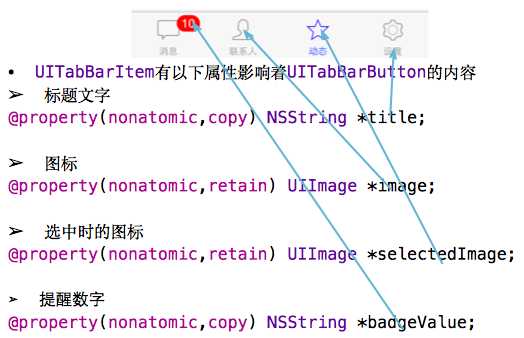
2.UITabBarButton
UITabBarButton?面显?什么内容,由对应子控制器的tabBarItem属性来决定
 c1.tabBarItem.title=@"消息";
 c1.tabBarItem.image=[UIImage imageNamed:@"tab_recent_nor"];
3:详细参考博文:http://www.cnblogs.com/wendingding/p/3775488.html
二:UITabBarController在项目中的应用
1:设置窗口的根视图控制器为CZTabBarController

2:
#import <UIKit/UIKit.h>

@interface CZTabBarController : UITabBarController

@end
#import "CZTabBarController.h"
#import "UIImage+Image.h"
#import "CZTabBar.h"
#import "CZHomeViewController.h"
#import "CZMessageViewController.h"
#import "CZDiscoverViewController.h"
#import "CZProfileViewController.h"
#import "CZNavigationController.h"
#import "CZUserTool.h"
#import "CZUserResult.h"
#import "CZComposeViewController.h"

@interface CZTabBarController ()<CZTabBarDelegate>

@property (nonatomic, strong) NSMutableArray *items;

@property (nonatomic, weak) CZHomeViewController *home;

@property (nonatomic, weak) CZMessageViewController *message;

@property (nonatomic, weak) CZProfileViewController *profile;

@end

@implementation CZTabBarController

#pragma mark - 懒加载存放tabBarItem的数组
- (NSMutableArray *)items
{
    if (_items == nil) {

        _items = [NSMutableArray array];

    }
    return _items;
}

- (void)viewDidLoad {
    [super viewDidLoad];

    // 1:添加所有子控制器
    [self setUpAllChildViewController];

    // 2:自定义tabBar
    [self setUpTabBar];

    //3: 每隔一段时间请求未读数
    [NSTimer scheduledTimerWithTimeInterval:2 target:self selector:@selector(requestUnread) userInfo:nil repeats:YES];
}

// 请求未读数
- (void)requestUnread
{
    // 请求微博的未读数
    [CZUserTool unreadWithSuccess:^(CZUserResult *result) {

        // 设置首页未读数
        _home.tabBarItem.badgeValue = [NSString stringWithFormat:@"%d",result.status];

        // 设置消息未读数
        _message.tabBarItem.badgeValue = [NSString stringWithFormat:@"%d",result.messageCount];

        // 设置我的未读数
        _profile.tabBarItem.badgeValue = [NSString stringWithFormat:@"%d",result.follower];

        // 设置应用程序所有的未读数
        [UIApplication sharedApplication].applicationIconBadgeNumber = result.totoalCount;


    } failure:^(NSError *error) {

    }];
}
#pragma mark - 设置自定义的tabBar
- (void)setUpTabBar
{
    /*
     1:self.tabBar所在控制器的tabBar,要想添加自定义的tabBar,需要移除系统自带的tabBar

     **/


    // 自定义tabBar
    CZTabBar *tabBar = [[CZTabBar alloc] initWithFrame:self.tabBar.frame];
    tabBar.backgroundColor = [UIColor whiteColor];

    // 设置代理
    tabBar.delegate = self;

    // 给tabBar传递tabBarItem模型
    tabBar.items = self.items;

    // 添加自定义tabBar
    [self.view addSubview:tabBar];

    // 移除系统的tabBar
    [self.tabBar removeFromSuperview];
}


#pragma mark - 当点击tabBar上的按钮调用,并切换视图
- (void)tabBar:(CZTabBar *)tabBar didClickButton:(NSInteger)index
{
    /*
     1:self.selectedIndex = index;此行代码很重要,执行此代码才会切换视图

     */

    if (index == 0 && self.selectedIndex == index) { // 点击首页,刷新
        [_home refresh];
    }

    self.selectedIndex = index;
}

#pragma mark - 点击加号按钮的时候调用
- (void)tabBarDidClickPlusButton:(CZTabBar *)tabBar
{
    /*
     1:presentViewController的时候,想要视图有导航条,就让它作为导航控制器的一个根视图控制器

     */
    // 创建发送微博控制器
    CZComposeViewController *composeVc = [[CZComposeViewController alloc] init];
    CZNavigationController *nav = [[CZNavigationController alloc] initWithRootViewController:composeVc];

    [self presentViewController:nav animated:YES completion:nil];
}

#pragma mark - 添加所有的子控制器
- (void)setUpAllChildViewController
{
    /*
     步骤:

     1:创建所有子控制器的对象,并给每个自控制器外层包装一个导航控制器 2:设置每个子控制器的tabBarItem上得选中未选中图片,还有每个子控制器的标题
     2:因为过程都是重复相同的代码,所以抽代码封装成一个方法供外界访问,提供的参数包括:image,selectedImage,title
     */


    // 首页
    CZHomeViewController *home = [[CZHomeViewController alloc] init];

    [self setUpOneChildViewController:home image:[UIImage imageNamed:@"tabbar_home"] selectedImage:[UIImage imageWithOriginalName:@"tabbar_home_selected"] title:@"首页"];
    _home = home;


    // 消息
    CZMessageViewController *message = [[CZMessageViewController alloc] init];
    [self setUpOneChildViewController:message image:[UIImage imageNamed:@"tabbar_message_center"] selectedImage:[UIImage imageWithOriginalName:@"tabbar_message_center_selected"] title:@"消息"];
    _message = message;

    // 发现
    CZDiscoverViewController *discover = [[CZDiscoverViewController alloc] init];
    [self setUpOneChildViewController:discover image:[UIImage imageNamed:@"tabbar_discover"] selectedImage:[UIImage imageWithOriginalName:@"tabbar_discover_selected"] title:@"发现"];


    // 我
    CZProfileViewController *profile = [[CZProfileViewController alloc] init];
    [self setUpOneChildViewController:profile image:[UIImage imageNamed:@"tabbar_profile"] selectedImage:[UIImage imageWithOriginalName:@"tabbar_profile_selected"] title:@"我"];
    _profile = profile;
}
#pragma mark - 添加每一个子控制器
- (void)setUpOneChildViewController:(UIViewController *)vc image:(UIImage *)image selectedImage:(UIImage *)selectedImage title:(NSString *)title
{
    //1:设置每个子控制器的标题(子控制器的标题与tabbar标题只需设置一次 navigationItem决定导航条上的内容 导航条上的内容由栈顶控制器的navigationItem决定
     vc.title = title;
    //2:设置每个字控制器tabBarItem
    vc.tabBarItem.image = image;
    vc.tabBarItem.selectedImage = selectedImage;
    // 3:保存tabBarItem模型到数组
    [self.items addObject:vc.tabBarItem];
    // 4:将子控制器作为导航控制器的根视图控制器
    CZNavigationController *nav = [[CZNavigationController alloc] initWithRootViewController:vc];
    //5:添加子控制器
    [self addChildViewController:nav];
}


@end
标签:
原文地址:http://www.cnblogs.com/learningios/p/5372240.html