标签:
前面在Tomcat中讲解了两个通道,BIO和NIO,我们这里来通过两端程序,简单模拟两个通道,找找异同点:
BIO:
1.
public class SocketServer {
public SocketServer() {
try {
int clientcount = 0; // 统计客户端总数
boolean listening = true; // 是否对客户端进行监听
ServerSocket server = null; // 服务器端Socket对象
try {
// 创建一个ServerSocket在端口2121监听客户请求
server = new ServerSocket(2121);
System.out.println("Server starts...");
} catch (Exception e) {
System.out.println("Can not listen to. " + e);
}
while (listening) {
// 客户端计数
clientcount++;
// 监听到客户请求,根据得到的Socket对象和客户计数创建服务线程,并启动之
new ServerThread(server.accept(), clientcount).start(); ====》一请求,一线程,这个就是模拟Tomcat的前端的
}
} catch (Exception e) {
System.out.println("Error. " + e);
}
}
public static void main(String[] args) {
new SocketServer();
}
}
上面的这一段代码,在Tomcat中实质就是Acceptor线程。
2.
对应Tomcat的工作线程实际上就是ServerThread这个类:
public class ServerThread extends Thread {
private static int number = 0; // 保存本进程的客户计数
Socket socket = null; // 保存与本线程相关的Socket对象
public ServerThread(Socket socket, int clientnum) {
this.socket = socket;
}
public void run() {
try {
BufferedReader in = new BufferedReader(new InputStreamReader(socket
.getInputStream()));
PrintWriter out = new PrintWriter(socket.getOutputStream()); //从socket中获取流
BufferedReader sysin = new BufferedReader(new InputStreamReader(
System.in));
System.out.println("[Client " + number + "]: " + in.readLine());
String line;
line = sysin.readLine(); //流式读取
while (!line.equals("bye")) { // 如果该字符串为 "bye",则停止循环
out.println(line);
out.flush(); 流式写入与刷新
System.out.println("[Server]: " + line);
System.out.println("[Client " + number + "]: " + in.readLine());
line = sysin.readLine();
}
out.close(); // 关闭Socket输出流
in.close(); // 关闭Socket输入流
socket.close(); // 关闭Socket
} catch (Exception e) {
System.out.println("Error. " + e);
}
}
}
上述的工作线程,直接在这里进行了处理,在Tomcat中,这个流程非常复杂,后续的代码一直延伸到Tomcat的后端容器当中。
总结一下,其实BIO的模式很明白,一线程一个请求,从上面的例子中已经看得很清晰,
而socket的读取是流式的读取,也就是从socket中获得流,直接通过java,io进行流的读取。
NIO:
public class NIOServer {
/*标识数字*/
private int flag = 0;
/*缓冲区大小*/
private int BLOCK = 4096;
/*接受数据缓冲区*/
private ByteBuffer sendbuffer = ByteBuffer.allocate(BLOCK);
/*发送数据缓冲区*/
private ByteBuffer receivebuffer = ByteBuffer.allocate(BLOCK);
private Selector selector;
public NIOServer(int port) throws IOException {
//======>这个相当于Tomcat中Acceptor线程,只不过这里对通道进行了再次包装,对SelectionKey进行传入,
// 打开服务器套接字通道
ServerSocketChannel serverSocketChannel = ServerSocketChannel.open();
// 服务器配置为非阻塞
serverSocketChannel.configureBlocking(false);
// 检索与此通道关联的服务器套接字
ServerSocket serverSocket = serverSocketChannel.socket();
// 进行服务的绑定
serverSocket.bind(new InetSocketAddress(port));
// 通过open()方法找到Selector
selector = Selector.open();
// 注册到selector,等待连接
serverSocketChannel.register(selector, SelectionKey.OP_ACCEPT);
System.out.println("Server Start----8888:");
}
private void listen() throws IOException {
//======> 这个相当于Tomcat中Poller线程,对前面包装的SelectionKey进行轮询,并通过handleKey传递到工作线程中去
while (true) {
// 选择一组键,并且相应的通道已经打开
selector.select();
// 返回此选择器的已选择键集。
Set<SelectionKey> selectionKeys = selector.selectedKeys();
Iterator<SelectionKey> iterator = selectionKeys.iterator();
while (iterator.hasNext()) {
SelectionKey selectionKey = iterator.next();
iterator.remove();
handleKey(selectionKey);
}
}
}
// 处理请求
//======>这下面直接就是工作线程,进入Tomcat容器的环节中,并最终返回调用的结果
private void handleKey(SelectionKey selectionKey) throws IOException {
// 接受请求
ServerSocketChannel server = null;
SocketChannel client = null;
String receiveText;
String sendText;
int count=0;
// 测试此键的通道是否已准备好接受新的套接字连接。
if (selectionKey.isAcceptable()) {
// 返回为之创建此键的通道。
server = (ServerSocketChannel) selectionKey.channel();
// 接受到此通道套接字的连接。
// 此方法返回的套接字通道(如果有)将处于阻塞模式。
client = server.accept();
// 配置为非阻塞
client.configureBlocking(false);
// 注册到selector,等待连接
client.register(selector, SelectionKey.OP_READ);
} else if (selectionKey.isReadable()) {
// 返回为之创建此键的通道。
client = (SocketChannel) selectionKey.channel();
//将缓冲区清空以备下次读取
receivebuffer.clear();
//读取服务器发送来的数据到缓冲区中
count = client.read(receivebuffer);
if (count > 0) {
receiveText = new String( receivebuffer.array(),0,count);
System.out.println("服务器端接受客户端数据--:"+receiveText);
client.register(selector, SelectionKey.OP_WRITE);
}
} else if (selectionKey.isWritable()) {
//将缓冲区清空以备下次写入
sendbuffer.clear();
// 返回为之创建此键的通道。
client = (SocketChannel) selectionKey.channel();
sendText="message from server--" + flag++;
//向缓冲区中输入数据
sendbuffer.put(sendText.getBytes());
//将缓冲区各标志复位,因为向里面put了数据标志被改变要想从中读取数据发向服务器,就要复位
sendbuffer.flip();
//输出到通道
client.write(sendbuffer);
System.out.println("服务器端向客户端发送数据--:"+sendText);
client.register(selector, SelectionKey.OP_READ);
}
}
/**
* @param args
* @throws IOException
*/
public static void main(String[] args) throws IOException {
// TODO Auto-generated method stub
int port = 8888;
NIOServer server = new NIOServer(port);
server.listen();
}
}
总结一下,上述的NIO程序中的几个阶段,可以反映出Tomcat的NIO的前端线程池的工作模式,只不过上面的代码是串行的,而Tomcat中是通过几个线程池进行交接的,每个线程池之间需要共享一些数据用于传递。
最后,在笔者编写NIO的程序出了几个几个错误,提醒一下各位,我们需要注意一下:
1.上述在每一次selectkey轮询出来的时候,需要注意最后一句话,例如当Accept事件发生后,SocketChannel需要改变自身关注的事件,因为这个时候如果还关注Accept事件,那相当于什么都发生不了,因为这个时候SocketChannel已经再发送数据了,相当于只有监测Read和Write事件才能拿到Socket的输入和输出。因此,可以看到当Accept事件发生后:
client.register(selector, SelectionKey.OP_READ);
重新注册Read事件。
再来看看Read事件的最后一句话,注册的是Write事件
client.register(selector, SelectionKey.OP_WRITE);
这个是因为读取完成后,立刻就要发送一些内容,所以需要改变SocketChannel的工作模式,将其置为WRITE模式。
同理,对于READ事件之后,同样立刻要读取客户端的数据,这个还得重新注册Read事件;
对于上述的通道模式的改变,Tomcat是将这些封装到NioChannel中,不断基于socket的工作模式进行切换。
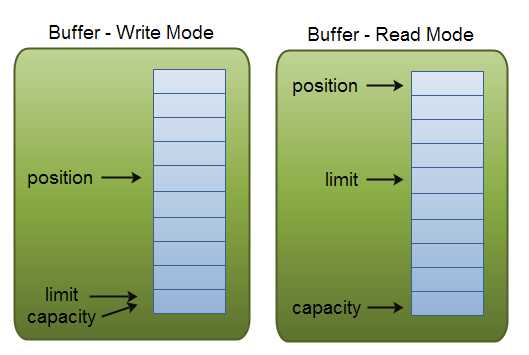
2.还有一个值得注意的事情,就是buffer缓冲区的flip操作,首先需要注意的是三个buffer的属性:
这三个属性,根据读模式和写模式的不同而不同
capacity:
- 容量,无论是写模式,还是读模式,容量都是固定的
- position:指当前的位置
- 写模式时,position表示当前的位置。初始的position值为0.当一个byte、long等数据写到Buffer后, position会向前移动到下一个可插入数据的Buffer单元。position最大可为capacity – 1.
读模式时,也是从某个特定位置读。当将Buffer从写模式切换到读模式,position会被重置为0. 当从Buffer的position处读取数据时,position向前移动到下一个可读的位置。
limit:最大能读/写的限制
在写模式下,Buffer的limit表示你最多能往Buffer里写多少数据。 写模式下,limit等于Buffer的capacity。
当切换Buffer到读模式时, limit表示你最多能读到多少数据。因此,当切换Buffer到读模式时,limit会被设置成写模式下的position值。换句话说,你能读到之前写入的所有数据(limit被设置成已写数据的数量,这个值在写模式下就是position)
我们明白上述的原理后,就不难理解,为啥上述的buffer经常要flip一下,flip方法将Buffer从写模式切换到读模式。调用flip()方法会将position设回0,并将limit设置成之前position的值,这样就相当于做好了读的准备,而上述代码中的sendbuffer立马要进行:
/输出到通道
client.write(sendbuffer);
这个client.write方法中,实际是先从buffer中进行读取字节,然后再发送到socket缓冲区中,因此虽然这个表面上看来没有读的意思,但实际上隐藏着读,因此flip操作也是必不可少的。
d.BIO连接器与NIO连接器的对比之二
标签:
原文地址:http://www.cnblogs.com/yuantongaaaaaa/p/5373683.html
