标签:
今天调布局的时候 想把界面做成横屏竖屏都可以的 突然发现之前理解的android:布局参数都是有问题的 今天贴出来 下次自己也记得
以下大部为用在RelativeLayout中的一些参数:
android:layout_above 将该控件的底部至于给定ID的控件之上,但不会左对齐,默认置于父窗口最左边,会覆盖最左边的控件
android:layout_below 将该控件的顶部至于给定ID的控件之下,但不会左对齐,默认置于父窗口最左边,会覆盖最左边的控件
android:layout_toLeftOf 将该控件的右边缘和给定ID的控件的左边缘对齐,默认置于父窗口最上面,会覆盖最上面的控件
android:layout_toRightOf 将该控件的左边缘和给定ID的控件的右边缘对齐,默认置于父窗口最上面,会覆盖最上面的控件
android:alignParentBottom 如果该值为true,则将该控件的底部和父控件的底部对齐,默认置于父窗口最左下,会覆盖最左下的控件
android:layout_alignParentLeft 如果该值为true,则将该控件的左边与父控件的左边对齐,默认置于父窗口最左上,会覆盖最左上的控件
android:layout_alignParentRight 如果该值为true,则将该控件的右边与父控件的右边对齐,默认置于父窗口最右上,会覆盖最右上的控件
android:layout_alignParentTop 如果该值为true,则将控件的顶部与父控件的顶部对齐,默认置于父窗口最左上,会覆盖最左上的控件
android:layout_alignBaseline该控件的baseline和给定ID的控件的baseline对齐,并置于父窗口最左边,会覆盖最左边的控件
android:layout_alignBottom 将该控件的底部边缘与给定ID控件的底部边缘对齐,并置于父窗口最左边,会覆盖最左边的控件
android:layout_alignLeft 将该控件的左边缘与给定ID控件的左边缘对齐,并置于父窗口最上边,会覆盖最上边的控件
android:layout_alignRight 将该控件的右边缘与给定ID控件的右边缘对齐,并置于父窗口最上边,会覆盖最上边的控件
android:layout_alignTop 将给定控件的顶部边缘与给定ID控件的顶部对齐,并置于父窗口最左边,会覆盖最左边的控件
原文:http://my.oschina.net/honeyming/blog/130761
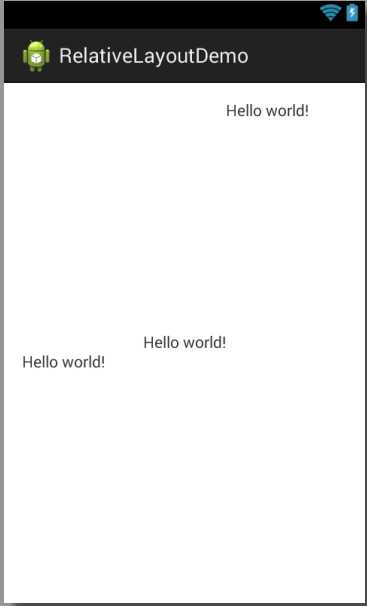
实例1介绍: -- 未加入对齐方式
<RelativeLayout xmlns:android="http://schemas.android.com/apk/res/android"
    xmlns:tools="http://schemas.android.com/tools"
    android:layout_width="match_parent"
    android:layout_height="match_parent"
    android:paddingBottom="@dimen/activity_vertical_margin"
    android:paddingLeft="@dimen/activity_horizontal_margin"
    android:paddingRight="@dimen/activity_horizontal_margin"
    android:paddingTop="@dimen/activity_vertical_margin"
    tools:context="com.example.relativelayoutdemo.MainActivity" >

    <TextView
        android:id="@+id/tv1"
        android:layout_width="wrap_content"
        android:layout_height="wrap_content"
        android:layout_centerInParent="true"
        android:text="@string/hello_world" />

    <TextView
        android:id="@+id/tv2"
        android:layout_width="wrap_content"
        android:layout_height="wrap_content"
        android:layout_below="@id/tv1"
        android:text="@string/hello_world" />

    <TextView
        android:layout_width="wrap_content"
        android:layout_height="wrap_content"
        android:layout_toRightOf="@id/tv1"
        android:text="@string/hello_world" />

</RelativeLayout>
效果:

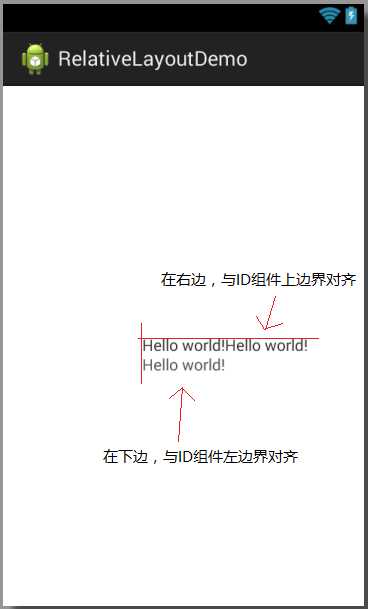
实例2介绍: -- 加入对齐方式 。在tv1下面的对齐方式是左边界对齐。在tv1右边的对齐方式是上边界对齐。
<RelativeLayout xmlns:android="http://schemas.android.com/apk/res/android"
    xmlns:tools="http://schemas.android.com/tools"
    android:layout_width="match_parent"
    android:layout_height="match_parent"
    android:paddingBottom="@dimen/activity_vertical_margin"
    android:paddingLeft="@dimen/activity_horizontal_margin"
    android:paddingRight="@dimen/activity_horizontal_margin"
    android:paddingTop="@dimen/activity_vertical_margin"
    tools:context="com.example.relativelayoutdemo.MainActivity" >

    <TextView
        android:id="@+id/tv1"
        android:layout_width="wrap_content"
        android:layout_height="wrap_content"
        android:layout_centerInParent="true"
        android:text="@string/hello_world" />

    <TextView
        android:id="@+id/tv2"
        android:layout_width="wrap_content"
        android:layout_height="wrap_content"
        android:layout_below="@id/tv1"
        android:layout_alignLeft="@id/tv1"
        android:text="@string/hello_world" />

    <TextView
        android:layout_width="wrap_content"
        android:layout_height="wrap_content"
        android:layout_toRightOf="@id/tv1"
        android:layout_alignTop="@id/tv1"
        android:text="@string/hello_world" />

</RelativeLayout>
结果:

layout layout_alignLeft跟layout_toLeftOf
标签:
原文地址:http://www.cnblogs.com/H-BolinBlog/p/5385166.html