标签:
最近做了个项目里面有个焦点图,觉得比较常见,所以搬到这里来,low的很,但是分享给哪些刚开始学习的人吧。
之前一直不知道怎么在里面添加代码,只能贴,现在终于找到了,不过有个用户体验不好的地方就是,我插入了代码之后我想修改怎么办,可能是我还不熟悉他强大的功能~我找不到~~~~~
废话不多说,开始吧。
首先将页面布局分好
 1 <!DOCTYPE html>
 2 <html>
 3 <head>
 4     <meta http-equiv="Content-Type" content="text/html; charset=utf-8" />
 5     <title></title>
 6     <meta charset="utf-8" />
 7     <link type="text/css" rel="stylesheet" href="WebUI/Css/demo1.css"/>
 8     <script src="WebUI/js/jquery-1.4.1.min.js"></script>
 9     <script src="WebUI/js/Animation.js"></script>
10 </head>
11 <body>
12     <!--最外层容器开始-->
13     <div class="pic-news">
14         <!--第二层容器开始-->
15         <div id="Home_A_B" class="pic">
16             <!--左边容器开始-->
17             <ul class="bigImg_Box fleft">
18                 <li title="第一张图片标题" h="第一张图片描述" class="active">
19                     <a target="_blank" title="第一张图片标题" href=""> <img src="1.jpg"> </a>
20                     <p class="slimImg" style="display:none;"><img src="2.jpg"></p>
21                 </li>
22
23                 <li title="第二张图片标题部分" h="第二张图片描述部分" class="noactive">
24                     <a target="_self" title="第二张图片标题部分内容标题部分内容" href="javascript://"> <img src="2.jpg"> </a>
25                     <p class="slimImg" style="display:none;"><img o src="3.jpg"></p>
26                 </li>
27
28                 <li title="第三张图片的标题部分" h="第三张图片的描述部分" class="noactive">
29                     <a target="_blank" title="第三张图片的标题部分" href="javascript://"> <img src="3.jpg"> </a>
30                     <p class="slimImg" style="display:none;"><img src="3.jpg"></p>
31                 </li>
32             </ul>
33             <!--左边容器结束-->
34             <!--右边容器开始-->
35             <ul class="slimImg_Box fright">
36                 <li><a href="javascript://"><img src="1.jpg"></a></li>
37                 <li><a href="javascript://"><img src="2.jpg"></a></li>
38                 <li><a href="javascript://"><img src="3.jpg"></a></li>
39                 <li class="checkBox" style="top: 0px;"></li>
40                 <!--红色选框-->
41             </ul>
42             <!--右边容器结束-->
43         </div>
44         <!--第二层容器结束-->
45         <div class="font">
46             <h3>
47                 <a href="javascript://">第一张图片标题</a>
48             </h3>
49             <p>第一张图片描述</p>
50         </div>
51
52     </div>
53     <!--最外层容器开始-->
54 </body>
55 </html>
demo1.css文件如下:写了些效果,因为数据是我动态加载的所以有些东西写的比较繁杂,也没时间来优化了,凑合看。
 1 ul { padding:0px;margin:0px;}
 2     ul li { padding:0px;margin:0px;list-style:none;}
 3 .fleft { float:left}
 4 .fright { float:right;}
 5 h3,p  {padding:0;margin:0;font-size:12px;font-family:Arial,\5B8B\4F53,sans-serif; color:#494949;font-weight:normal;}
 6 .pic-news{ background: #fff none repeat scroll 0 0;
 7     border: 1px solid #dad0b4;
 8     height: 310px;
 9     margin: 53px 0 0;
10     overflow: hidden;
11     padding: 12px;
12     position: relative;
13     width: 559px;}
14 .pic-news .pic{ width:559px; height:310px; overflow:hidden;position:relative;}
15 .pic-news .pic .bigImg_Box{ overflow:hidden;width:425px;height:310px;position:relative;}
16 .pic-news .pic .bigImg_Box li{ width:425px; height:310px; overflow:hidden;position:absolute;top:0px;left:0px;opacity:0;filter:alpha(opacity=0);-moz-opacity:0;-khtml-opacity:0;-webkit-opacity:0;}
17 .pic-news .pic .bigImg_Box li a{width:425px; height:310px; overflow:hidden; display:block;}
18 .pic-news .pic .bigImg_Box li a img{transform:scale(1.1);-webkit-transform:scale(1.1);-o-transform:scale(1.1);-ms-transform:scale(1.1);-moz-transform:scale(1.1);transition:transform 0.3s linear;-moz-transition:transform 0.3s linear;-o-transition:transform 0.3s linear;-webkit-transition:transform 0.3s linear;-ms-transition:transform 0.3s linear;}
19 .pic-news .pic .bigImg_Box li a img:hover{transform:scale(1);-moz-transform:scale(1);-o-transform:scale(1);-ms-transform:scale(1);-webkit-transform:scale(1);}
20 .pic-news .pic .bigImg_Box li.active{animation:700ms ease 0ms normal both 1 running focus;-moz-animation:700ms ease 0ms normal both 1 running focus;-webkit-animation:700ms ease 0ms normal both 1 running focus;-o-animation:700ms ease 0ms normal both 1 running focus;display:block;opacity:1;filter:alpha(opacity=100);-moz-opacity:100;-khtml-opacity:100;-webkit-opacity:100;}
21 .pic-news .pic .bigImg_Box .noactive{display:block;animation:700ms ease 0ms normal both 1 running nofocus;-moz-animation:700ms ease 0ms normal both 1 running nofocus;-webkit-animation:700ms ease 0ms normal both 1 running nofocus;-o-animation:700ms ease 0ms normal both 1 running nofocus;}
22 .pic-news .pic .slimImg_Box {width:123px;height:323px;overflow:hidden;position:relative;}
23 .pic-news .pic .slimImg_Box li{width:123px;height:96px;overflow:hidden;margin-bottom:12px;}
24 .pic-news .pic .slimImg_Box li a{width:123px;height:96px;overflow:hidden; display:block;}
25 .pic-news .pic .slimImg_Box li a img{width:100%;height:100%;}
26 .pic-news .pic .slimImg_Box .checkBox{cursor:pointer;position:absolute;top:0px;left:0px;z-index:5;width:113px;height:86px;border:5px solid #bb2225;}
27 .pic-news .font{ padding:4px 16px; text-align:center; position:absolute; overflow:hidden;width:393px;height:49px;bottom:12px;left:12px;background:#000;text-align:left;opacity:0.7;filter:alpha(opacity=0.7);}
28 .pic-news .font h3{font:18px/26px 微软雅黑;color:#fff;height:26px;overflow:hidden;width:393px;overflow:hidden;text-overflow:ellipsis;white-space:nowrap;}
29 .pic-news .font h3 a{font:18px/26px 微软雅黑;color:#fff;}
30 .pic-news .font p{font:14px/24px 微软雅黑;color:#cdcdcd;width:100%;height:24px;overflow:hidden;text-overflow:ellipsis;white-space:nowrap;}
Animation.js如下:
1 $(function () {
2     $(".slimImg_Box a").live("mouseover", function () {
3         var index = $(this).parent("li").index();//获取鼠标悬浮标签的序号
4         $(".checkBox").stop(true, false).animate({ "top": ($(this).height() + 12) * index + "px" });
5         $(".bigImg_Box li").eq(index).attr("class", "active").siblings("li").attr("class", "noactive");//配合css添加上一些效果
6         $("#Home_A_B").siblings(".font").find("h3 a").html($(".bigImg_Box li").eq(index).attr("title"));//拿到当前图片的标题
7         $("#Home_A_B").siblings(".font").find("p").html($(".bigImg_Box li").eq(index).attr("h"));//拿到当前图片的描述
8     });
9 })
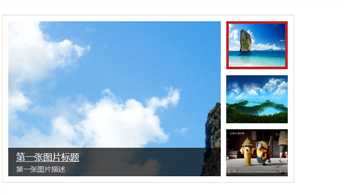
在来一个页面的效果图吧:

左边的大图显示了部分内容,右边的图片是全貌,有两种方法可以让左边大图显示全貌:一是给左边的图片img添加width:100%;height:100%;的样式;二是通过js算,我这边有封装好了的插件的,因为这个插件是针对项目的比较乱所以没贴出来。再次吐槽下这个编辑器,插入代码好爽,可是修改找不到,对左边图片有强烈的美观要求的话就自行添加样式吧。
这个是鼠标悬浮才能有效果的,有兴趣的人还可以优化下,添加interval让他自动走起来。
/***************************************************************************************************************************************************************************************/
标签:
原文地址:http://www.cnblogs.com/tl2f/p/5412565.html