标签:
1、本文主要对WCF的基本使用做简单化介绍,对于初学WCF的来说,初期对于配置文件的理解,比较烦躁吧,相信你看完了该文,能够达到深入浅出的感觉。
关于WCF的概念 和 应用场景,在此处不做详细介绍,可用参考如下博主的首页:
http://www.cnblogs.com/artech/archive/2007/02/26/656901.html
2、好了,开始创建我们的WCF类库、宿主、和测试项目吧。
首先,先看一下我的解决方案:
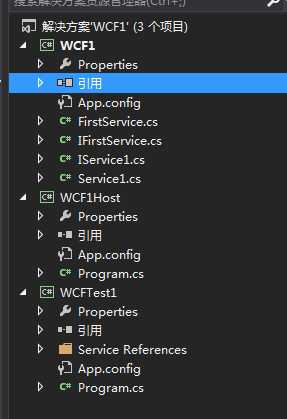
(1)、先创建一个WCF服务库

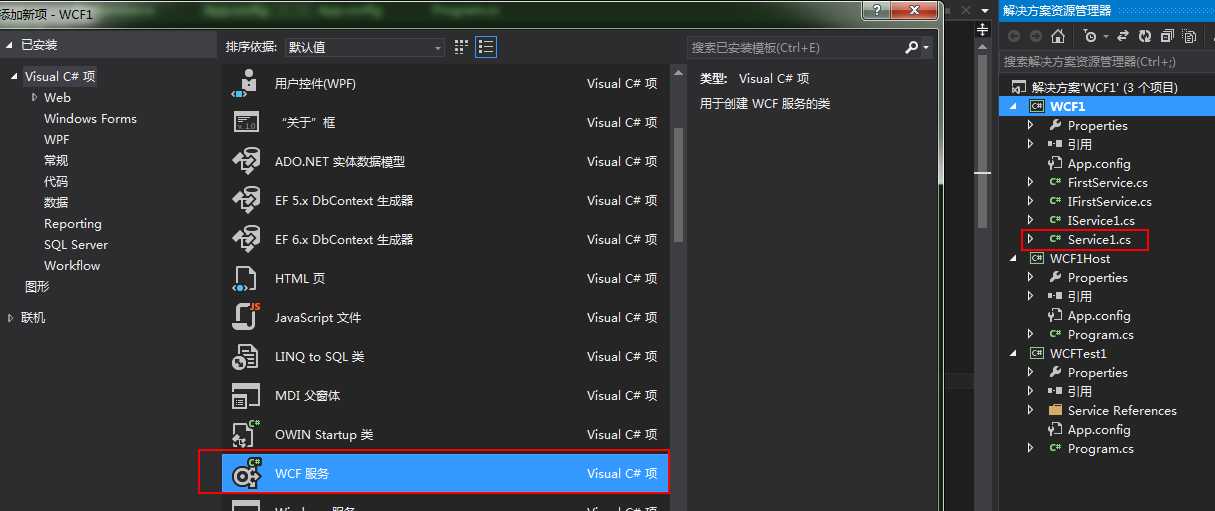
(2)添加新项,FirstService,这个是我自己新建的。
(3)系统会自动给我们创建了上面两个类,一个接口,一个实现:
对接口定义操作方法(这里的申明都不需要public等限定符):
    public interface IFirstService
    {
        [OperationContract]
        void DoWork();

        [OperationContract]
        string HelloWorld(string name);
    }
(4)、实现部分
    public class FirstService : IFirstService
    {
        public void DoWork()
        {
            Console.WriteLine("This is the method DoWork.");
        }

        public string HelloWorld(string name)
        {
            return "Hello" + name;
        }

    }
(5)由于我们创建了两个服务,所以系统会给我们自动生产他们的配置文件,在这里(我们对其只需了解,因为我们并没有使用它,
因为我们是将WCF类库寄宿于Console应用上,我们的配置文件并不是这个,但和这个很多是相同的)
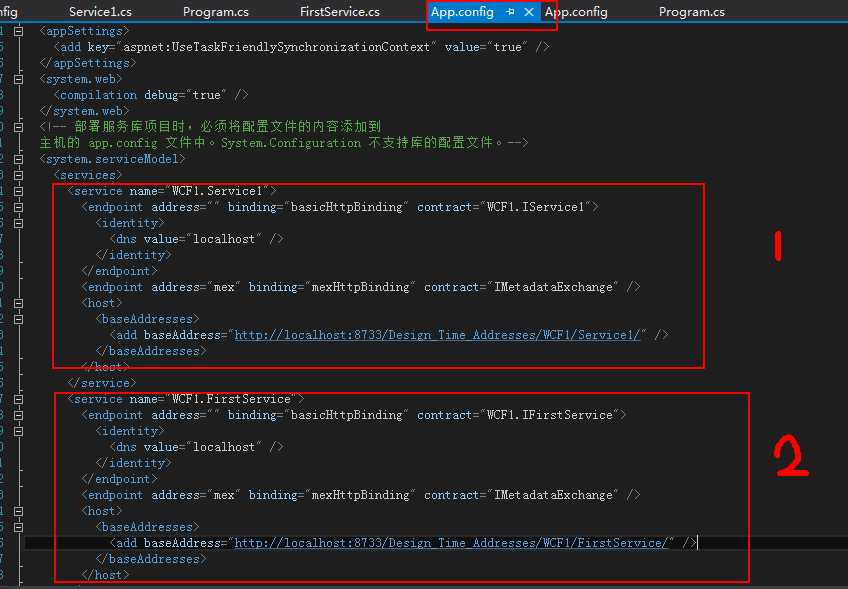
上图,对我们的两个服务进行了ABC的配置。我们可用将该类库设置为启动项直接运行,如下图,那么他就读取了该配置文件了。
请记住这个地址,会和我寄宿的地址不同。上面的也可以在VS提供的界面进行测试WCF服务。
接下来,我们将上面的库寄宿到控制台应用上。
创建控制台应用程序WCF1HOST,添加对 System.ServiceModel 和 上面 类库dll的引用;
代码如下:
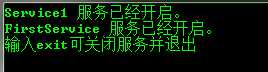
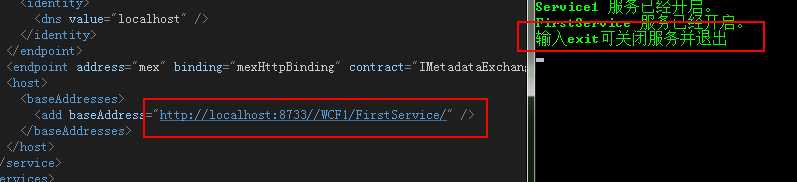
class Program    {
        static void Main(string[] args)
        {
            try
            {
                ServiceHost host1 = new ServiceHost(typeof(WCF1.Service1));
                host1.Open();
                Console.WriteLine("Service1 服务已经开启。");

                ServiceHost host2 = new ServiceHost(typeof(WCF1.FirstService));
                host2.Open();
                Console.WriteLine("FirstService 服务已经开启。");

                Console.WriteLine("输入exit可关闭服务并退出");
            }
            catch (Exception ex)
            {
                Console.WriteLine(ex.Message);
            }
            while (true)
            {
                string input = Console.ReadLine();
                if (input.Equals("exit"))
                {
                    break;
                }
                Console.WriteLine("服务继续...");
            }


            //单个服务
            //using (ServiceHost host = new ServiceHost(typeof(WCF1.FirstService)))
            //{
            //    try
            //    {
            //        host.Open();
            //        Console.WriteLine("FirstService 服务已经开启。");
            //        Console.ReadLine();
            //    }
            //    catch (Exception ex)
            //    {
            //        Console.WriteLine(ex.Message);
            //    }

            //}

            ////创建宿主的基地址,假如我们没有配置 App.config 那么我们就需要指定了。
            //Uri baseAddress = new Uri("http://localhost:8080/FirstService");
            ////创建宿主
            //using (ServiceHost host = new ServiceHost(typeof(WCF1.FirstService), baseAddress))
            //{
            //    //向宿主中添加终结点
            //    host.AddServiceEndpoint(typeof(WCF1.FirstService), new WSHttpBinding(), "");
            //    //将HttpGetEnabled属性设置为true
            //    ServiceMetadataBehavior smb = new ServiceMetadataBehavior();
            //    smb.HttpGetEnabled = true;
            //    //将行为添加到Behaviors中
            //    host.Description.Behaviors.Add(smb);
            //    //打开宿主
            //    host.Open();
            //    Console.WriteLine("WCF中的HTTP监听已启动....");
            //    Console.ReadLine();
            //    host.Close();
            //}
        }
    }
对于上面的注视部分,相信大家也很容易理解,这里给出了两种(一种读取配置文件、一种手动配置URI,我们建议配置URI)
我们查看App.config文件(如果没有就创建)
<?xml version="1.0" encoding="utf-8" ?>
<configuration>

  <system.serviceModel>

    <!--Bindings-->
    <bindings>
      <netHttpBinding>
        <binding name="IFirstServiceBinding"/>
      </netHttpBinding>
    </bindings>

    <!--Behavior-->
    <behaviors>
      <serviceBehaviors>
        <behavior>
          <serviceMetadata httpGetEnabled="True" httpsGetEnabled="True"/>
          <serviceDebug includeExceptionDetailInFaults="False" />
        </behavior>
      </serviceBehaviors>
    </behaviors>

    <!--Services-->
    <services>
      <service name="WCF1.Service1">
        <endpoint address="http://localhost:8888/Service1" binding="basicHttpBinding" contract="WCF1.IService1">
          <identity>
            <dns value="localhost" />
          </identity>
        </endpoint>
        <endpoint address="mex" binding="mexHttpBinding" contract="IMetadataExchange" />
        <host>
          <baseAddresses>
            <add baseAddress="http://localhost:8888/Service1" />
          </baseAddresses>
        </host>
      </service>

      <!--第二个Service-->
      <service name="WCF1.FirstService">
        <endpoint address="http://localhost:8888/FirstService" binding="basicHttpBinding" contract="WCF1.IFirstService">
          <identity>
            <dns value="localhost" />
          </identity>
        </endpoint>
        <endpoint address="mex" binding="mexHttpBinding" contract="IMetadataExchange" />
        <host>
          <baseAddresses>
            <add baseAddress="http://localhost:8888/FirstService" />
          </baseAddresses>
        </host>
      </service>

    </services>
    <!--结束多个Service-->


  </system.serviceModel>

</configuration>
可用看到:<services> 就是我们的服务,我们这里提供了两个服务,此处
baseAddress="http://localhost:8888/Service1 和我们的类库中的地址已经不同了。
但是配置确是相同的,都是配置ABC,这里的配置也是基本的标准配置。开启我们的寄宿程序如下:
最后,我们在客户端程序上测试,添加对两个服务的引用,如下
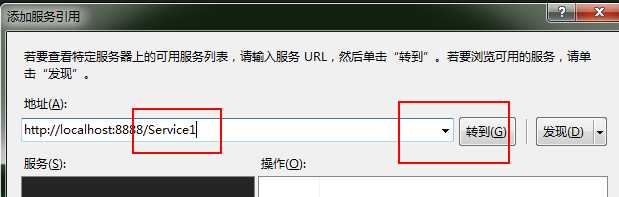
客户端调用服务引用,和调用类是一样的原理
class Program
    {
        static void Main(string[] args)
        {
       //创建服务类
            WCFTest1.MyService1.Service1Client sev1 = new MyService1.Service1Client();
            Console.WriteLine("调用:Service1.GetData Method: " + sev1.GetData(3));

            WCFTest1.MyFirstService.FirstServiceClient firstSev = new MyFirstService.FirstServiceClient();
            Console.WriteLine("调用:Service1.MyFirstService Method: " + firstSev.HelloWorld("weiyaowen"));
            Console.WriteLine("调用:Service1.HelloWorldAsync Method: " + firstSev.HelloWorldAsync("weiyaowen").Result);      //获取异步调用WCF的 Result

            Console.ReadLine();
        }
    }
查看客户端下的配置文件App.config
<?xml version="1.0" encoding="utf-8" ?>
<configuration>
    <startup>
        <supportedRuntime version="v4.0" sku=".NETFramework,Version=v4.5" />
    </startup>
    <system.serviceModel>
        <bindings>
            <basicHttpBinding>
                <binding name="BasicHttpBinding_IFirstService" />
                <binding name="BasicHttpBinding_IService1" />
            </basicHttpBinding>
        </bindings>
        <client>
          <!--以下是配置两个服务的地址,在我们添加了服务引用之后会自动添加-->
            <endpoint address="http://localhost:8888/FirstService" binding="basicHttpBinding"
                bindingConfiguration="BasicHttpBinding_IFirstService" contract="MyFirstService.IFirstService"
                name="BasicHttpBinding_IFirstService" />
          <!--IService1-->
            <endpoint address="http://localhost:8888/Service1" binding="basicHttpBinding"
                bindingConfiguration="BasicHttpBinding_IService1" contract="MyService1.IService1"
                name="BasicHttpBinding_IService1" />
        </client>
    </system.serviceModel>
</configuration>
上面的文件在添加了服务引用之后会自动生成,可用看到,和我们寄宿服务的地址一模一样的,这样我们的客户端就能够顺利的找到WCF服务的地址了。
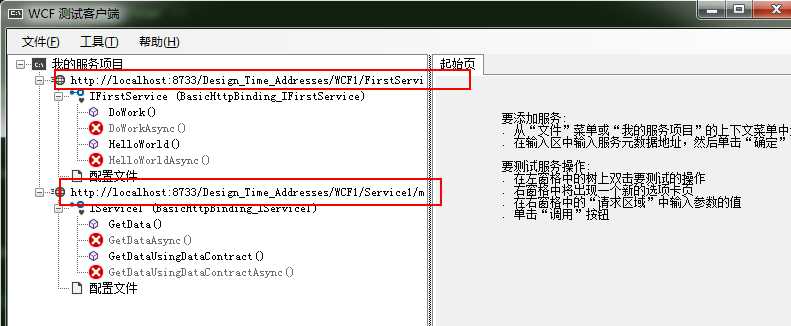
查看结果:

另外:在看看创建类库自动生产的配置,下面飘红的字体很明确的说了:主机的需要另外配置,那么我们可用选择拷贝过去咯,改下地址就OK了:
<?xml version="1.0" encoding="utf-8" ?>
<configuration>

  <appSettings>
    <add key="aspnet:UseTaskFriendlySynchronizationContext" value="true" />
  </appSettings>
  <system.web>
    <compilation debug="true" />
  </system.web>
  <!-- 部署服务库项目时,必须将配置文件的内容添加到
  主机的 app.config 文件中。System.Configuration 不支持库的配置文件。-->
  <system.serviceModel>
    <services>
      <service name="WCF1.Service1">
        <endpoint address="" binding="basicHttpBinding" contract="WCF1.IService1">
          <identity>
            <dns value="localhost" />
          </identity>
        </endpoint>
        <endpoint address="mex" binding="mexHttpBinding" contract="IMetadataExchange" />
        <host>
          <baseAddresses>
            <add baseAddress="http://localhost:8733//WCF1/Service1/" />
          </baseAddresses>
        </host>
      </service>
      <service name="WCF1.FirstService">
        <endpoint address="" binding="basicHttpBinding" contract="WCF1.IFirstService">
          <identity>
            <dns value="localhost" />
          </identity>
        </endpoint>
        <endpoint address="mex" binding="mexHttpBinding" contract="IMetadataExchange" />
        <host>
          <baseAddresses>
            <add baseAddress="http://localhost:8733//WCF1/FirstService/" />
          </baseAddresses>
        </host>
      </service>
    </services>
    <behaviors>
      <serviceBehaviors>
        <behavior>
          <!-- 为避免泄漏元数据信息,
          请在部署前将以下值设置为 false -->
          <serviceMetadata httpGetEnabled="True" httpsGetEnabled="True"/>
          <!-- 要接收故障异常详细信息以进行调试,
          请将以下值设置为 true。在部署前设置为 false
            以避免泄漏异常信息-->
          <serviceDebug includeExceptionDetailInFaults="False" />
        </behavior>
      </serviceBehaviors>
    </behaviors>
  </system.serviceModel>

</configuration>
我们完全可用在创建寄宿应用程序时,将该文件,只修改一下BaseAddress 就能够部署:如下测试。
分享共进步!
标签:
原文地址:http://www.cnblogs.com/imyao/p/5416254.html