标签:
一、基本知识
1、模版是独立于django的,可以独立运行。
2、产生TemplateSyntaxError异常的原因有
3、在django模版中可以处理复杂的数据类型,例如属性、方法。通过点运算符表示
>>> from django.template import Template, Context
>>> person = {‘name‘: ‘Sally‘, ‘age‘: ‘43‘}
>>> t = Template(‘{{ person.name }} is {{ person.age }} years old.‘)
>>> c = Context({‘person‘: person})
>>> t.render(c)
u‘Sally is 43 years old.‘
person是一个字典,在模版中需要使用person的属性,可以通过点运算符表示。给模版传递的是字典,用的是属性。
4、用点来引用方法,例如字符串有upper(),isdigit()方法。
注意:调用的方法必须没有参数,如果有参数,则不可以调用。
>>> from django.template import Template, Context
>>> t = Template(‘{{ var }} -- {{ var.upper }} -- {{ var.isdigit }}‘)
>>> t.render(Context({‘var‘: ‘hello‘}))
u‘hello -- HELLO -- False‘
>>> t.render(Context({‘var‘: ‘123‘}))
u‘123 -- 123 -- True‘
5、用点表示列表索引
注意:索引只能是自然数。

>>> from django.template import Template, Context
>>> t = Template(‘Item 2 is {{ items.2 }}.‘)
>>> c = Context({‘items‘: [‘apples‘, ‘bananas‘, ‘carrots‘]})
>>> t.render(c)
u‘Item 2 is carrots.‘
6、点用法小结,当模版中变量遇到点操作符时,解析器会按照如下顺序进行解析
也可以多层使用点运算符,例如:{{ person.name.upper }}
7、如果不想让对象使用某一个方法,修改函数的alters_data属性
def delete(self):
    # Delete the account
delete.alters_data = True
二、基本模版标签和过滤器
{% if variable %},{% else %},{% endif %}和python中差不多,只是需要有{% endif %}来结束一个{% if %}标签
如果想要测试多个条件,可以使用and,or,not。尽量避免混合使用,以至于逻辑混乱。可以使用一个逻辑关系来多次判断,比如condition1 or condition2 or condition3
如果必须混合使用逻辑关系,可以使用嵌套的{% if %}{% else %}标签。

{% if athlete_list %}
    {% if coach_list or cheerleader_list %}
        We have athletes, and either coaches or cheerleaders!
    {% endif %}
{% endif %}
注意:模版语言中没有{% elif %}标签。需要嵌套使用逻辑关系来表示。
2、for标签,可以循环一个列表
<ul>
{% for athlete in athlete_list %}
    <li>{{ athlete.name }}</li>
{% endfor %}
</ul>
其中,athlete是变量,athlete_list是列表。
也可以逆序循环一个列表,添加一个reversed到for标签中。
{% for athlete in athlete_list reversed %}
...
{% endfor %}
注意:没有跳出循环的break标签,也没有继续下一个循环的continue标签。
3、在for标签之内,有一个变量是forloop有一些属性,可以使用
4、ifequal/ifnotequal,比较两个值进行比较,看是否相等。可以有{% else %},是以{% ifequal %}开始,以{% endifequal %}结束,其中比较的可以是变量、字符串、数字

{% ifequal section ‘sitenews‘ %}
    <h1>Site News</h1>
{% else %}
    <h1>No News Here</h1>
{% endifequal %}
5、注释是由{# #}标签标注,是单行注释,也可以多行注释,使用{% comment %}块标签
{% comment %}
This is a
multi-line comment.
{% endcomment %}
三、创建独立模版文件
1、修改设置文件setting.py,需要添加存放template文件的目录
TEMPLATES = [
{
‘BACKEND‘: ‘django.template.backends.django.DjangoTemplates‘,
‘DIRS‘: [
os.path.join(BASE_DIR,‘template‘),
],
‘APP_DIRS‘: True,
‘OPTIONS‘: {
‘context_processors‘: [
‘django.template.context_processors.debug‘,
‘django.template.context_processors.request‘,
‘django.contrib.auth.context_processors.auth‘,
‘django.contrib.messages.context_processors.messages‘,
],
},
},
]
在‘DIRS‘: []key中添加模版文件的目录。使用相对路径,因为之前已经导入过os,获得了工程目录是BASE_DIR,所以在该工程下创建一个template目录。用path的join()方法连接起来。
2、创建模版文件
current_time.html保存到template文件夹里

 1 <html>
 2 <head>
 3     <title>curentTime</title>
 4
 5 </head>
 6
 7
 8 <body>
 9     <div>
10         <h1 style="color:red;">now is {{ now }} </h1>
11     </div>
12 </body>
13 </html>
在urlpatterns中添加
url(r‘^now/$‘, views.GetTime),
在视图文件中添加对应的函数,在视图中用到了from django.template.loader 的get_template

1 def GetTime(request):
2     tm = time.strftime("%Y-%m-%d %H:%M:%S")
3     t = get_template(‘current_time.html‘);
4     html = t.render(Context({‘now‘:tm}))
5     return HttpResponse(html);
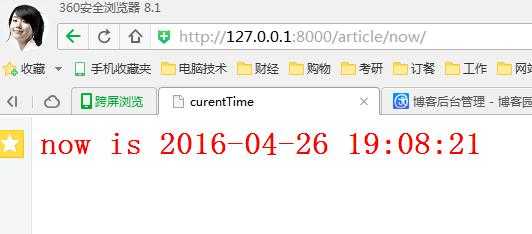
此时便可以访问网址了http://127.0.0.1:8000/article/now/,效果如下

3、简便方法就是使用django.shortcuts的render()函数,不再需要从from django.template.loader import get_template,和from django.template import Context,和from django.http import HttpResponse.因为render函数自己会装载模版、产生Context和template rendering并且返回一个HttpResponse对象。
参数说明:第一个参数是request,第二个参数是template文件名,第三个参数,如果有,应当是一个字典用于产生Context对象,来替换模版内的内容;如果没有提供字典,则默认是一个空字典。
修改view视图。

def GetTime(request):
    tm = time.strftime("%Y-%m-%d %H:%M:%S")

    return render(request, ‘current_time.html‘, {‘now‘:tm})
四、模版的其他一些特性
1、{% include %}模版标签,意思是包含其他模版内容。标签的参数是要被包含的模版的文件名,可以是一个变量名或者硬编码的文件名字符串。
例如:
{% include ‘nav.html‘ %}

{% include ‘includes/nav.html‘ %}

{% include template_name %}
第一个表示包含模版内的nav.html文件,第二个是include文件夹下的nav.html文件,第三个是包含template_name变量的文件。
例子如下:

 1 # mypage.html
 2
 3 <html>
 4 <body>
 5 {% include "includes/nav.html" %}
 6 <h1>{{ title }}</h1>
 7 </body>
 8 </html>
 9
10 # includes/nav.html
11
12 <div id="nav">
13     You are in: {{ current_section }}
14 </div>
注意:如果给的模版名没有找到,django的处理机制如下
2、模版继承,主要用于解决模版中,大量重复性的工作,可以抽取出来,单独形成一个文件,然后通过包含或者继承解决。
就是通过将共用的内容,抽取出来形成单个文件,将不同的内容形成block块,然后进行填充。
例如一个html文件

 1 <!DOCTYPE html>
 2 <html>
 3 <head>
 4     <title>The current time</title>
 5
 6 </head>
 7
 8
 9 <body>
10     <div>
11         <h1>My helpful timestamp site</h1>
12         <h1 style="color:red;">now is {{ now }} </h1>
13     </div>
14     <div>
15         <hr>
16         <p>Thanks for visiting my site.</p>
17     </div>
18 </body>
19 </html>
我们可以将其头部存储为header.html

<!DOCTYPE html>
<html>
<head>
将底部存储为footer.html

<hr>
    <p>Thanks for visiting my site.</p>
</body>
</html>
写一个模版框架,进行填充。下面是一个基模版,base.html

<!DOCTYPE html>
<html>
<head>
    <title>{% block title %}{% endblock %}</title>

</head>


<body>
    <p>this is current_time2.html file</p>
    <h1>My helpful time site</h1>
    {% block content %}{% endblock %}

    {% block footer%}
    <div>
        <hr>
        <p>Thanks for visiting my site.</p>
    </div>
    {% endblock %}
</body>
</html>
然后通过修改current_time.html文件,或者新建一个模版文件。为了方便,直接修改current_time.html文件,然后运行。修改后的文件如下:

{% extends "base.html"%}

{% block title %}the current time{% endblock %}

{% block content %}
<h1 style="color:red;text-align:center;">now is {{ now }} </h1>
{% endblock %}
工作流程:
首先加载current_time.html文件,看到{% extends %}说明这是一个子文件,模版引擎会加载父模版,在此为base.html
此时模版引擎看到{% block %}标签在base.html文件中,他将会用子模版中的内容进行替换。
如果没有在子模版中找到对应的block内容,会使用父模版中的内容替代。
在继承树中的模版,共享同一个Context对象。
3、模版继承的一些指导原则:
标签:
原文地址:http://www.cnblogs.com/zhaopengcheng/p/5437082.html