标签:
1. 栈式布局管理器(QStackedLayout)
(1)所有组件在垂直于屏幕的方向上被管理
(2)每次只有一个组件会显示在屏幕上(类似于窗口的Z-Order,但只能显示最顶层的)
(3)只有最顶层的组件会被最终显示
2. 栈式布局管理器的特点
(1)组件大小一致且充满父组件的显示区
(2)不能直接嵌套其它布局管理器,但可以将一些组件放入一个layout,再将这个layout作为一个Widget的布局管理器。最后通过QStackedLayout.addWidget以达到嵌套的目的。
(3)能够自由切换需要显示的组件
(4)每次能且仅能显示一个组件
3. QStackedLayout的用法概要
(1)int addWidget(QWidget* widget);
(2)QWidget* currentWidget();
(3)void setCurrentIndex(int index);
(4)int currentIndex();
4. 计时器的概念及用法:
(1)计时器的概念
①计时器是工程开发中非常重要的角色
②计时器用于每隔一定的时间触发一个消息
③计时器消息最终会被转化为函数调用
④宏观上,计时器在每个时间间隔会调用指定的函数
(2)使用方法
①编写计时器消息处理函数
②在程序中创建计时器对象
③连接计时器消息和消息处理函数
④设置计时器时间间隔并启动计时
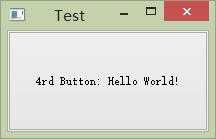
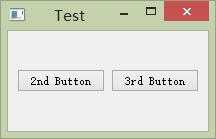
【编程实验】栈式布局和计时器的使用


//main.cpp

#include <QApplication>
#include "Widget.h"

int main(int argc, char *argv[])
{
    QApplication a(argc, argv);
    Widget w;
    w.show();

    return a.exec();
}
//Widget.h
#ifndef _WIDGET_H_
#define _WIDGET_H_

#include <QWidget>
#include <QPushButton>

class Widget : public QWidget
{
    Q_OBJECT
private:
    QPushButton TestBtn1;
    QPushButton TestBtn2;
    QPushButton TestBtn3;
    QPushButton TestBtn4;

    void initControl();

private slots:
    void timerTimeout();

public:
    Widget(QWidget* parent = 0);
    ~Widget();
};

#endif  //_WIDGET_H_
//Widget.cpp
#include "Widget.h"
#include <QStackedLayout>
#include <QHBoxLayout>
#include <QTimer>
#include <QDebug>

Widget::Widget(QWidget* parent):QWidget(parent),
    TestBtn1(this),TestBtn2(this),TestBtn3(this),TestBtn4(this)
{
   initControl();
}

void Widget::initControl()
{
    QStackedLayout* sLayout = new QStackedLayout();
    QHBoxLayout* hLayout = new QHBoxLayout();
    QWidget* widget = new QWidget();
    QTimer* timer = new QTimer(this);

    TestBtn1.setText("1st Button");
    TestBtn2.setText("2nd Button");
    TestBtn3.setText("3rd Button");
    TestBtn4.setText("4rd Button: Hello World!");

    //为了达到QStackedLayout可嵌套,先新成一个新的Widget
    //里面包含2个Button,并做水平布局排放
    TestBtn2.setParent(widget);
    TestBtn3.setParent(widget);

    hLayout->addWidget(&TestBtn2);
    hLayout->addWidget(&TestBtn3);
    widget->setLayout(hLayout);

    //生成栈式布局的各个组件
    sLayout->addWidget(&TestBtn1); //0
    sLayout->addWidget(widget);    //1,嵌套的widget
    sLayout->addWidget(&TestBtn4); //2

    sLayout->setCurrentIndex(0);

    setLayout(sLayout);

    connect(timer, SIGNAL(timeout()), this, SLOT(timerTimeout()));

    timer->start(2000);

}

void Widget::timerTimeout()
{
    //取出Widget当前的布局管理器
    QStackedLayout* sLayout = dynamic_cast<QStackedLayout*>(layout());

    if(sLayout != NULL)
    {
        int index = (sLayout->currentIndex() + 1) % sLayout->count();

        sLayout->setCurrentIndex(index);
    }
}

Widget::~Widget()
{

}
5. 小结
(1)QStackedLayout以栈的方式管理界面组件
(2)QStackedLayout中的组件最多只有一个显示
(3)QStackedLayout可以自由切换需要显示的组件
(4)QTimer是Qt中的计时器组件
(5)QTimer能够在指定的时间间隔触发消息
标签:
原文地址:http://www.cnblogs.com/5iedu/p/5451910.html