标签:
完整步骤
自定义View的步骤:
1、在res/values中自定义View的属性
2、在构造方法中遍历我们自定义的属性,并根据这些属性值对成员变量初始化
3、重写onMesure,测量view的宽高,view视图大小的将在这里最终确定,子类可以覆写onMeasure()方法实现自己的计算视图大小的方式,并最终通过setMeasuredDimension(width, height)保存计算结果。
4、重写onLayout(),确定view的位置。该函数主要是为ViewGroup类型布局子视图用的,自定义View时可以不重写此方法。
5、重写onDraw,绘制view的内容,将视图显示在屏幕上,到这里也就完成了整个的视图绘制工作。对于ViewGroup则不需要实现该函数,因为容器本身是“没有内容“的,其包含的子View已经实现了自己的绘制方法,因此只需要告诉子view绘制自己就可以了,也就是dispatchDraw()方法。
6、添加事件监听、回调方法
自定义属性支持的类型
reference:参考某一资源ID,   = "@drawable/图片ID"
color:颜色值,                           = "#00FF00"(不能引用colors中定义的值,若要引用请使用reference)boolean:布尔值,                     = "true"dimension:尺寸值,                 = "42dp"float:浮点值,                            = "0.7"integer:整型值,                       = "100"string:字符串,                         = "string"fraction:百分数,                      = "200%"enum:枚举值,    <attr name="orientation"> <enum name="vertical" value="1" />,        = "vertical"flag:位"或",        <attr name="windowSoftInputMode"> <flag name = "stateUnspecified" value= "0" /> <flag name = "stateUnchanged" value= "1" />,        = "stateUnspecified | stateUnchanged">属性定义时可以指定多种类型值,    <attr name = "background" format= "reference | color" />,        = "@drawable/图片ID 或 #00FF00"代码中获取设置的值:
重写onMeasure及三种测量模式
onMeasure(int widthMeasureSpec, int heightMeasureSpec)方法1、onMeasure()函数由包含这个View的具体的ViewGroup调用,因此两个参数widthMeasureSpec, heightMeasureSpec也是从这个ViewGroup中传入的。2、这两个参数是由ViewGroup中的layout_width、layout_height、padding,以及View自身的layout_margin、layout_width、layout_height、padding等共同决定的。另外,权值weight也是需要考虑的因素。3、这两个值的作用如对于heightMeasureSpec,这个值由高32位和低16位组成,高32位保存的值叫specMode,可以通过MeasureSpec.getMode()获取;低16位为specSize,可以由MeasureSpec.getSize()获取。那么specMode和specSize的作用又是什么呢?要想知道这一点,我们需要知道代码中的最后一行,所有的View的onMeasure()的最后一行都会调用setMeasureDimension()函数,它的的作用是:根据传进去的值确定View最终的视图大小。也就是说onMeasure()中之前所作的所有工作都是为了最后这一句话服务的。MeasureSpec.specMode的三种类型:在ViewGroup中,给View分配的空间大小并不是确定的,有可能随着具体的变化而变化,而这个变化的条件就是传到specMode中决定的1、EXACTLY(精确):指设置了明确的值(如android:layout_width="100dp"),其中包括MATCH_PARENT(因为这时值也是确定的)。这种模式下,由于我们已明确设置了view的宽度和高度,所以系统帮我们测量的结果就是我们要设置的结果,所以我们可以直接使用系统测量的值。2、AT_MOST(最大):表示子布局限制在一个最大值内,而在此范围内的具体大小并不确定,一般为WARP_CONTENT。在这种模式下,由于我们没有明确设置view的宽度和高度,具体的大小是可能变化的,所以系统帮我们测量的结果只是我们能设置的结果的最大允许值,所以我们不能直接使用系统测量的值,而要自己根据自己的需要手动设置大小。3、UNSPECIFIED:表示子布局想要多大就多大,基本使用不到。注意:RelativeLayout 是一个比较复杂的 ViewGroup,其中子 view 的大小不仅跟 layout_width、layout_height 属性相关,还和很多其他属性有关系(如align、toRight等),若自定义的view重写了onMeasure方法,但并没有处理这些情况下对View大小的影响,则在RelativeLayout中使用时可能会出现一些尺寸和我们预期的不一致的问题
【View】
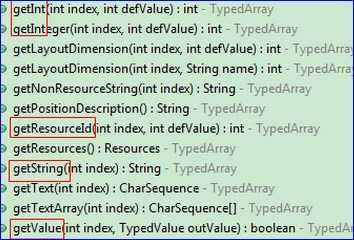
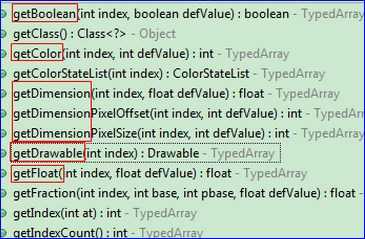
public class MyTitleView extends View implements OnClickListener {/**初始文本内容,在定义时赋初值,当在布局中没有定义时就是用默认值。注意:由于字体大小可能不是相等的,而这里初始化的值决定了文本框的大小,所以这里的初始值应该设置占用空间比较大的字符。这里以后可以再优化*/private String mTitleText = "8888";/**文本的颜色*/private int mTitleTextColor = Color.RED;/**文本字体大小*/private int mTitleTextSize;/**背景色*/private int mTitleBackgroundColor = Color.YELLOW;/**圆角大小*/private int mTitleRoundSize;/**绘制时文本绘制的范围*/private Rect mRect;private Paint mPaint;//画笔private Context mContext;//在【代码】里面创建对象的时候使用此构造方法public MyTitleView(Context context) {this(context, null);}//在【布局】文件中使用时,系统默认会调用两个参数的构造方法public MyTitleView(Context context, AttributeSet attrs) {this(context, attrs, 0);}public MyTitleView(Context context, AttributeSet attrs, int defStyle) {super(context, attrs, defStyle);mContext = context;initAttrs(context, attrs, defStyle);initRect();mTitleRoundSize = dp2px(5);setOnClickListener(this);}//初始化属性集private void initAttrs(Context context, AttributeSet attrs, int defStyle) {TypedArray typedArray = context.obtainStyledAttributes(attrs, R.styleable.MyTitleView, defStyle, 0);//获取我们在【属性集】中【定义】的自定义属性的集合int count = typedArray.getIndexCount();//获取我们在【布局】文件中【设置】的自定义属性的个数,若没有设置任何自定义的属性,则此值为0for (int i = 0; i < count; i++) {int attrIndex = typedArray.getIndex(i);//获取此属性的编号,此值是由R文件自动生成的,代表【属性集】中定义的属性的位置,第一个属性对应的编号为0switch (attrIndex) {case R.styleable.MyTitleView_titleText://=0mTitleText = typedArray.getString(attrIndex);// 获取【布局】文件中设置的值break;case R.styleable.MyTitleView_titleTextColor://=1mTitleTextColor = typedArray.getColor(attrIndex, Color.RED);//defValue:Value to return if the attribute is not defined or not a resource// 注意:布局中没设置此属性时代码根本执行不到这里,所以不能在此设置默认值,默认值建议直接在构造方法中初始化。break;case R.styleable.MyTitleView_titleBackground://=2mTitleBackgroundColor = typedArray.getColor(attrIndex, Color.YELLOW);break;case R.styleable.MyTitleView_titleTextSize://=3mTitleTextSize = typedArray.getDimensionPixelSize(attrIndex, 30);//能识别初代码中单位是sp(或dp)还是pxbreak;}}typedArray.recycle();//Give back a previously retrieved array, for later re-use.}//获取文本需要占用的空间大小private void initRect() {mPaint = new Paint();//如果有自定义大小,就用自定义的,否则设置一个默认的。因为定义成员时Context还不存在,所以放在这里赋初值。if (mTitleTextSize == 0) mTitleTextSize = dp2px(30);mPaint.setTextSize(mTitleTextSize);//单位为pxmRect = new Rect();mPaint.getTextBounds(mTitleText, 0, mTitleText.length(), mRect);//将初始文本的边界值封装到矩形mRect中}@Overridepublic void onClick(View v) {mTitleText = getRandomText();invalidate();//调用此方法主动刷新UI。If the view is visible, onDraw will be called at some point in the future。}@Override//测量view尺寸时的回调方法protected void onMeasure(int widthMeasureSpec, int heightMeasureSpec) {super.onMeasure(widthMeasureSpec, heightMeasureSpec);//设置宽度int width = 0;int width_size = MeasureSpec.getSize(widthMeasureSpec);//测量的值int width_mode = MeasureSpec.getMode(widthMeasureSpec);//测量模式switch (width_mode) {case MeasureSpec.EXACTLY:// 设置了具体的值或者是【MATCH_PARENT】时,可以直接使用测量的值width = getPaddingLeft() + getPaddingRight() + width_size;//Padding值+测量值break;case MeasureSpec.AT_MOST:// 当我们设置为【WARP_CONTENT】时,测量的值实际为【MATCH_PARENT】,不能使用,所以我们重新计算width = getPaddingLeft() + getPaddingRight() + mRect.width();//Padding值+文本实际占用空间break;}//设置高度int height = 0;int height_size = MeasureSpec.getSize(heightMeasureSpec);int height_mode = MeasureSpec.getMode(heightMeasureSpec);switch (height_mode) {case MeasureSpec.EXACTLY:height = getPaddingTop() + getPaddingBottom() + height_size;break;case MeasureSpec.AT_MOST:height = getPaddingTop() + getPaddingBottom() + mRect.height();break;}//设置控件实际大小setMeasuredDimension(width, height);}@Override//在onDraw中绘制【圆角矩形】的背景和随机生成的文字。只要图形稍有改变,此方法在就会调用protected void onDraw(Canvas canvas) {Log.i("bqt", "getMeasuredWidth()=" + getMeasuredWidth() + ",getMeasuredHeight()=" + getMeasuredHeight());//点击一次调用一次mPaint.setColor(mTitleBackgroundColor);canvas.drawRoundRect(new RectF(0, 0, getMeasuredWidth(), getMeasuredHeight()), mTitleRoundSize, mTitleRoundSize, mPaint);//绘制背景mPaint.setColor(mTitleTextColor);canvas.drawText(mTitleText, getWidth() / 2 - mRect.width() / 2, getHeight() / 2 + mRect.height() / 2, mPaint);//居中绘制文字}/*** 根据手机的分辨率从 dp 的单位 转成为 px(像素)*/public int dp2px(float dpValue) {final float scale = mContext.getResources().getDisplayMetrics().density;return (int) (dpValue * scale + 0.5f);}/*** 获取一个四位数字的随机数*/public String getRandomText() {Random random = new Random();Set<Integer> set = new HashSet<Integer>();while (set.size() < 4) {int randomInt = random.nextInt(10);set.add(randomInt);}StringBuffer sb = new StringBuffer();for (Integer i : set) {sb.append("" + i);}return sb.toString();}}
使用
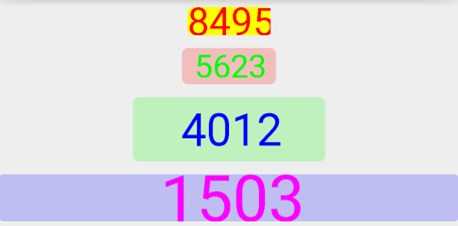
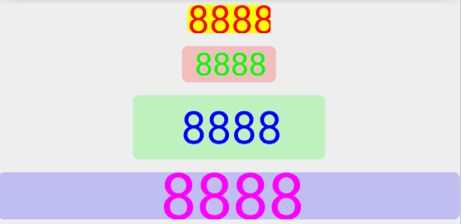 <LinearLayout xmlns:android="http://schemas.android.com/apk/res/android"xmlns:bqt="http://schemas.android.com/apk/res/com.bqt.myview"android:layout_width="match_parent"android:layout_height="match_parent"android:gravity="center_horizontal"android:orientation="vertical" ><com.bqt.myview.MyTitleViewandroid:layout_width="wrap_content"android:layout_height="wrap_content"android:layout_marginTop="10dp" /><com.bqt.myview.MyTitleViewandroid:layout_width="wrap_content"android:layout_height="wrap_content"android:layout_marginTop="10dp"android:paddingBottom="5dp"android:paddingLeft="10dp"android:paddingRight="10dp"android:paddingTop="5dp"bqt:titleBackground="#3f00"bqt:titleText="8888"bqt:titleTextColor="#0f0"bqt:titleTextSize="25sp" /><com.bqt.myview.MyTitleViewandroid:layout_width="150dp"android:layout_height="50dp"android:layout_marginTop="10dp"bqt:titleBackground="#30f0"bqt:titleText="8888"bqt:titleTextColor="#00f"bqt:titleTextSize="35sp" /><com.bqt.myview.MyTitleViewandroid:layout_width="match_parent"android:layout_height="wrap_content"android:layout_marginTop="10dp"bqt:titleBackground="#300f"bqt:titleText="8888"bqt:titleTextColor="#f0f"bqt:titleTextSize="50sp" /></LinearLayout>
自定义属性
<?xml version="1.0" encoding="utf-8"?><resources><!-- 注意,自定义属性定义好后顺序若变了必须clean一下工程好让R文件同步更新,否则运行时就会挂掉 --><declare-styleable name="MyTitleView"><attr name="titleText" format="string" /><attr name="titleTextColor" format="color" /><attr name="titleBackground" format="color" /><attr name="titleTextSize" format="dimension" /></declare-styleable></resources>
标签:
原文地址:http://www.cnblogs.com/baiqiantao/p/5460978.html