标签:
《SIFT原理与源码分析》系列文章索引:http://www.cnblogs.com/tianyalu/p/5467813.html
OpenCV提供FeatureDetector实现特征检测及匹配
class CV_EXPORTS FeatureDetector
{
public:
    virtual ~FeatureDetector();
    void detect( const Mat& image, vector<KeyPoint>& keypoints,
        const Mat& mask=Mat() ) const;
    void detect( const vector<Mat>& images,
        vector<vector<KeyPoint> >& keypoints,
        const vector<Mat>& masks=vector<Mat>() ) const;
    virtual void read(const FileNode&);
    virtual void write(FileStorage&) const;
    static Ptr<FeatureDetector> create( const string& detectorType );
protected:
    ...
};
FeatureDetetor是虚类,通过定义FeatureDetector的对象可以使用多种特征检测方法。通过create()函数调用:
Ptr<FeatureDetector> FeatureDetector::create(const string& detectorType);
OpenCV 2.4.3提供了10种特征检测方法:
initModule_nonfree();
至于其他几种算法,我就不太了解了 ^_^
一个简单的使用演示:
int main()
{

    initModule_nonfree();//if use SIFT or SURF
    Ptr<FeatureDetector> detector = FeatureDetector::create( "SIFT" );
    Ptr<DescriptorExtractor> descriptor_extractor = DescriptorExtractor::create( "SIFT" );
    Ptr<DescriptorMatcher> descriptor_matcher = DescriptorMatcher::create( "BruteForce" );
    if( detector.empty() || descriptor_extractor.empty() )
        throw runtime_error("fail to create detector!");

    Mat img1 = imread("images\\box_in_scene.png");
    Mat img2 = imread("images\\box.png");

    //detect keypoints;
    vector<KeyPoint> keypoints1,keypoints2;
    detector->detect( img1, keypoints1 );
    detector->detect( img2, keypoints2 );
    cout <<"img1:"<< keypoints1.size() << " points  img2:" <<keypoints2.size()
        << " points" << endl << ">" << endl;

    //compute descriptors for keypoints;
    cout << "< Computing descriptors for keypoints from images..." << endl;
    Mat descriptors1,descriptors2;
    descriptor_extractor->compute( img1, keypoints1, descriptors1 );
    descriptor_extractor->compute( img2, keypoints2, descriptors2 );

    cout<<endl<<"Descriptors Size: "<<descriptors2.size()<<" >"<<endl;
    cout<<endl<<"Descriptor‘s Column: "<<descriptors2.cols<<endl
        <<"Descriptor‘s Row: "<<descriptors2.rows<<endl;
    cout << ">" << endl;

    //Draw And Match img1,img2 keypoints
    Mat img_keypoints1,img_keypoints2;
    drawKeypoints(img1,keypoints1,img_keypoints1,Scalar::all(-1),0);
    drawKeypoints(img2,keypoints2,img_keypoints2,Scalar::all(-1),0);
    imshow("Box_in_scene keyPoints",img_keypoints1);
    imshow("Box keyPoints",img_keypoints2);

    descriptor_extractor->compute( img1, keypoints1, descriptors1 );
    vector<DMatch> matches;
    descriptor_matcher->match( descriptors1, descriptors2, matches );

    Mat img_matches;
    drawMatches(img1,keypoints1,img2,keypoints2,matches,img_matches,Scalar::all(-1),CV_RGB(255,255,255),Mat(),4);

    imshow("Mathc",img_matches);
    waitKey(10000);
    return 0;
}
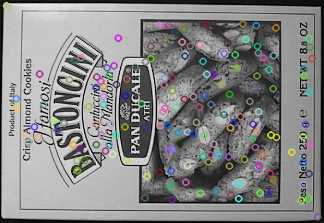
特征检测结果如图:

Box_in_scene

Box
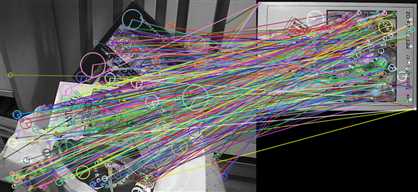
特征点匹配结果:

Match
另一点需要一提的是SimpleBlob的实现是有Bug的。不能直接通过 Ptr<FeatureDetector> detector = FeatureDetector::create("SimpleBlob"); 语句来调用,而应该直接创建 SimpleBlobDetector的对象:
        Mat image = imread("images\\features.jpg");
    Mat descriptors;
    vector<KeyPoint> keypoints;
    SimpleBlobDetector::Params params;
    //params.minThreshold = 10;
    //params.maxThreshold = 100;
    //params.thresholdStep = 10;
    //params.minArea = 10;
    //params.minConvexity = 0.3;
    //params.minInertiaRatio = 0.01;
    //params.maxArea = 8000;
    //params.maxConvexity = 10;
    //params.filterByColor = false;
    //params.filterByCircularity = false;
    SimpleBlobDetector blobDetector( params );
    blobDetector.create("SimpleBlob");
    blobDetector.detect( image, keypoints );
    drawKeypoints(image, keypoints, image, Scalar(255,0,0));
以下是SimpleBlobDetector按颜色检测的图像特征:

[1] Rosten. Machine Learning for High-speed Corner Detection, 2006
本文转自:http://blog.csdn.net/xiaowei_cqu/article/details/8652096
标签:
原文地址:http://www.cnblogs.com/tianyalu/p/5468010.html