标签:
1, lm_sensors安装
#yum install lm_sensors
…
#sensors-detect
出来的选项全部选yes
重启服务器
2, lm_sensors出力结果调整
命令sensors可以显示部件温度(机器不同显示的内容也不同)
[root@test sbin]# sensors
coretemp-isa-0000
Adapter: ISA adapter
Core 0: +40°C (high = +100°C)
coretemp-isa-0001
Adapter: ISA adapter
Core 1: +37°C (high = +100°C)
命令sensors –u <部件编号>可以单独取出指定部件的温度
[root@test sbin]# sensors -u coretemp-isa-0000
coretemp-isa-0000
Adapter: ISA adapter
Core 0: 40.00 (temp1)
temp1_crit: 100.00 (temp1_crit)
temp1_crit_alarm: 0.00 (temp1_crit_alarm)
把出力结果加工(根据实际情况加工)
例:
[root@test etc]# sensors -u coretemp-isa-0000 |grep Core |cut -d" " -f3|cut -d"." -f1
40
[root@test etc]# sensors -u coretemp-isa-0001 |grep Core |cut -d" " -f3|cut -d"." -f1
37
3, Zabbix_agentd.conf设置
在zabbix_agentd.conf中加入UserParameter
[root@test etc]# vi /usr/local/etc/zabbix_agentd.conf
……
### Option: UserParameter
# User-defined parameter to monitor. There can be several user-defined parameters.
# Format: UserParameter=<key>,<shell command>
# See ‘zabbix_agentd‘ directory for examples.
#
# Mandatory: no
# Default:
# UserParameter=
UserParameter=cputemp.core0,/usr/bin/sensors -u coretemp-isa-0000 |grep Core |cut -d" " -f3|cut -d"." -f1
UserParameter=cputemp.core1,/usr/bin/sensors -u coretemp-isa-0001 |grep Core |cut -d" " -f3|cut -d"." -f1
……
重启zabbix_agentd
[root@test etc]# /sbin/service zabbix_agentd restart
Stopping Zabbix Agent: [ OK ]
Starting Zabbix Agent: [ OK ]
4, Zabbix服务器端设置
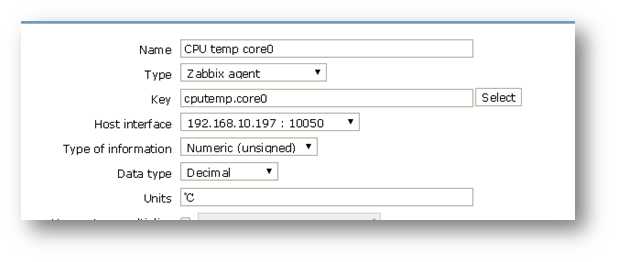
新建item,如下图,未显示的默认设置就好

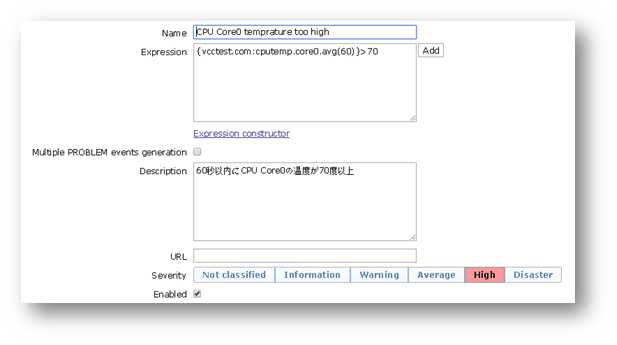
新建trigle,
例:

就可以监视起来了

标签:
原文地址:http://www.cnblogs.com/justbio/p/5469187.html