码迷,mamicode.com
首页 > 其他好文 > 详细

Quartz2D 编程指南(二)变换、图案、阴影

时间:2016-05-21 15:59:24      阅读:317      评论:0      收藏:0      [点我收藏+]

标签:


  1. 概览
  2. 图形上下文 
  3. 路径 
  4. 颜色与颜色空间
  5. 变换
  6. 图案
  7. 阴影
  8. 渐变
  9. 透明层
  10. Quartz 2D 中的数据管理
  11. 位图与图像遮罩
  12. CoreGraphics 绘制 Layer

5.变换

简介

  • Quartz 2D 绘制模型定义了两种独立的坐标空间:用户空间(用于表现文档页)和设备空间(用于表现设备的本地分辨率)。

  • 当我们需要一个点或者显示文档时, Quartz 会将用户空间坐标系统映射到设备空间坐标系统。当前映射关系的变换矩阵称为 CTM(current transformation matrix)。

Quartz变换函数

  • 我们可能使用 Quartz 内置的变换函数来操作 CTM 来方便的实现平移、旋转和缩放我们的绘图。

  • 我们可以不需要了解变换矩阵的数学含义而使用这些函数。

使用变换函数修改CTM

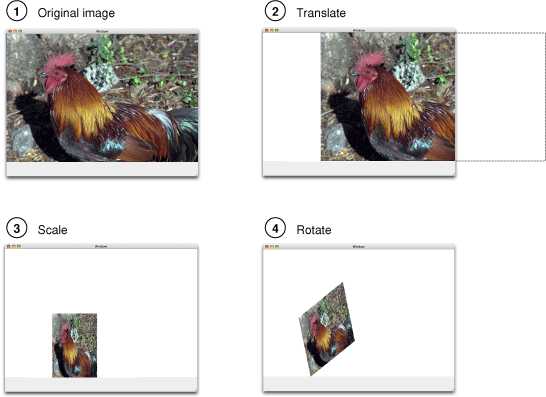
  • 调用 CGContextDrawImage (context, CGRectMake(0, 0, 50, 50), [UIImage imageNamed:@"image"].CGImage) 来绘制图片。

  • 调用 CGContextTranslateCTM(context, 100, 200) 来平移绘制图片。

  • 调用 CGContextRotateCTM(context, M_PI_4) 来旋转绘制图片。

  • 调用 CGContextScaleCTM(context, 0.5, 0.8) 来缩放绘制图片。

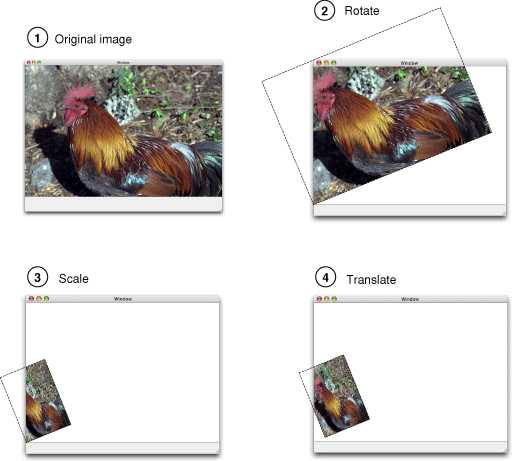
  • 联合变换将两个矩阵相乘来联接现价变换操作。调用 CGContextConcatCTM(context, affineTransform) 来实现联合变换或直接执行两个或多个变换操作而不恢复图形状态。

CGContextRef context = UIGraphicsGetCurrentContext();

CGContextTranslateCTM(context, 100, 200);//#1
CGContextRotateCTM(context, M_PI_4);

CGAffineTransform affineTransform = CGAffineTransformMakeScale(0.5, 0.8);//#2
CGContextConcatCTM(context, affineTransform);

CGContextDrawImage (context, CGRectMake(0, 0, 100, 100), [UIImage imageNamed:@"image"].CGImage);
  • 变换操作的顺序会影响到最终的效果。

技术分享
技术分享

创建仿射变换

  • 调用如下函数来创建仿射变换以便之后使用 CGContextConcatCTM(context, affineTransform) 应用到 CTM 上。
CGAffineTransform translateTransform = CGAffineTransformMakeTranslation(100, 200);
CGAffineTransform rotateTransform = CGAffineTransformMakeRotation(M_PI_4);
CGAffineTransform scaleTransform = CGAffineTransformMakeScale(0.5, 0.8);
CGContextConcatCTM(context, translateTransform);
CGContextConcatCTM(context, rotateTransform);
CGContextConcatCTM(context, scaleTransform);
  • 调用如下函数创建仿射变换并应用到指定仿射变换中。
CGAffineTransform translateTransform = CGAffineTransformTranslate(CGContextGetCTM(context), 100, 200);
CGAffineTransform rotateTransform = CGAffineTransformRotate(translateTransform, M_PI_4);
CGAffineTransform scaleTransform = CGAffineTransformScale(rotateTransform, 0.5, 0.8);
CGContextConcatCTM(context, scaleTransform);
  • 调用 CGAffineTransformInvert(scaleTransform) 来得到一个倒置矩阵。应用倒置矩阵将抵消原矩阵的变换效果。
CGAffineTransform invertTransform = CGAffineTransformInvert(scaleTransform);
CGContextConcatCTM(context, invertTransform);
  • 调用如下函数在几何结构上执行变换操作.
CGPoint applyPoint = CGPointApplyAffineTransform(CGPointMake(50, 50), translateTransform);
CGSize applySize = CGSizeApplyAffineTransform(CGSizeMake(100, 100), translateTransform);
CGRect applyRect = CGRectApplyAffineTransform(CGRectMake(0, 0, 100, 100), translateTransform);
  • 调用 CGAffineTransform CGAffineTransformMake(CGFloat a, CGFloat b, CGFloat c, CGFloat d, CGFloat tx, CGFloat ty) 来手动创建仿射变换。

技术分享

技术分享

判断仿射变换

  • 调用 CGAffineTransformEqualToTransform(invertTransform, scaleTransform) 判断仿射变换是否相等。

  • 调用 CGAffineTransformIsIdentity(invertTransform) 判断仿射变换是否为单位变换。单位变换没有平移、缩放和旋转操作。

  • Quartz 常量 CGAffineTransformIdentity 表示一个单位变换。

CGAffineTransformIsIdentity(invertTransform);
CGAffineTransformEqualToTransform(invertTransform, CGAffineTransformIdentity);

获取用户空间到设备空间的变换

  • 当使用 Quartz 2D 时,我们只是在用户空间下工作。Quartz 为我们处理用户空间和设备空间的转换。调用如下函数获取 Quartz 转换用户空间和设备空间的仿射变换。
CGAffineTransform userToDeviceTransform = CGContextGetUserSpaceToDeviceSpaceTransform(context);
  • 调用如下函数来转换用户空间和设备空间的几何体。
CGPoint deviceSpacePoint = CGContextConvertPointToDeviceSpace(context, CGPointMake(100, 200));
CGPoint userSpacePoint = CGContextConvertPointToUserSpace(context, deviceSpacePoint);
CGSize deviceSpaceSize = CGContextConvertSizeToDeviceSpace(context, CGSizeMake(100, 100));
CGSize userSpaceSize = CGContextConvertSizeToUserSpace(context, deviceSpaceSize);
CGRect deviceSpaceRect = CGContextConvertRectToDeviceSpace(context, CGRectMake(100, 200, 100, 100));
CGRect userSpaceRect = CGContextConvertRectToUserSpace(context, deviceSpaceRect);

图案

简介

  • 图案(Pattern)是反复绘制的单元,这些绘制单元重复地绘制到一个图形上下文中。我们可以像使用颜色一样使用这些图案。

  • 当我们使用图案来绘制时,Quartz 将页面分割成图案单元的集合,其中每个单元的大小为图案的大小,然后使用我们提供的回调函数来绘制这些单元格。

技术分享

图案骨架(Anatomy)

  • 我们可以指定水平和竖直方向上两个图案单元之间的间距。我们也可以指定间距为负数,这样图案单元便会重叠。

  • 当我们绘制一个图案单元时,Quartz 使用图案空间的坐标系统。图案空间是一个抽象空间,它会使用我们创建图案时指定的变换矩阵来映射到默认用户空间。我们可以修改变换矩阵来实现有趣的效果。

  • 当我们在图案空间上应用变换时,Quartz 只将变换应用于图案空间。

  • 图案空间坐标系与 UIKit 创建的图形上下文坐标系不同。当图案被应用到 UIKit 创建的图形上下文时,图案空间会自己进行适配。

着色图案和模板图案

  • 在 Quartz 2D 中,我们可以创建着色图案和模板图案两种图案。

  • 着色图案有与其相关的固有颜色。着色图案中的颜色是图案单元创建流程的一部分,而不是绘制流程的一部分。

  • 其它图案只限定了形状,颜色值是在绘制过程中指定的,而不是创建过程。因此可以被认为是模板图案(或者是非着色图案、甚至图像蒙板)。

平铺

  • 平铺是将模式单元格绘制到页面的某个部分的过程。

  • 用户空间定义的图案单元在渲染到设备时可能无法精确匹配,这是由用户空间单元和设备像素之间的差异导致的。所以 Quartz 提供了三个平铺选项,以在必要时调整。

  1. 无失真平铺: 以细微调整图案单元之间的间距为代价,但通常不超过一个设备像素。

  2. 最小失真恒定间距平铺:设定图案单元之间的间距,以细微调整单元大小为代价,但通常不超过一个设备像素。

  3. 恒定间距平铺:设定图案单元之间的间距,以调整图案单元大小为代价,以求尽快的平铺。

图案绘制原理

  • 我们可以像使用 CGContextSetFillColor(context, colors) 一样来使用 CGContextSetFillPattern(context, pattern, colors) 给上下文的路径进行填充或描边。

  • 当我们使用图案填充或描边时,Quartz 会按照以下指令来绘制每个图案单元。

  1. 保存图形状态
  2. 将当前转换矩阵应用到原始的图案单元上
  3. 连接 CTM 与图案变换矩阵
  4. 裁剪图案单元的边界矩形
  5. 调用绘制回调函数来绘制图案单元
  6. 恢复图形状态
  • 当绘制的区域过小而图案的空白或间距过大时可能由于裁剪而导致图案无法正常显示。

绘制着色图案

  • 绘制着色图案需要执行以下五步操作。
  1. 写一个绘制着色图案单元格的回调函数
  2. 设置着色图案的颜色空间
  3. 设置着色图案的骨架(Anatomy)
  4. 指定着色图案作为填充或描边模式
  5. 使用着色图案绘制

编写绘制着色图案单元格的回调函数

  • 当我们创建图案时需要传入如下回调函数来绘制图案单元。
void MyDrawColoredPattern (void *info, CGContextRef myContext) {
    CGFloat subunit = 5;

    CGSize size = {subunit, subunit};
    CGPoint point1 = {0,0}, point2 = {subunit, subunit}, point3 = {0,subunit}, point4 = {subunit,0};
    CGRect myRect1 = {point1, size}, myRect2 = {point2, size}, myRect3 = {point3, size}, myRect4 = {point4, size};

    CGContextSetRGBFillColor(myContext, 0, 0, 1, 0.5);
    CGContextFillRect(myContext, myRect1);
    CGContextSetRGBFillColor(myContext, 1, 0, 0, 0.5);
    CGContextFillRect(myContext, myRect2);
    CGContextSetRGBFillColor(myContext, 0, 1, 0, 0.5);
    CGContextFillRect(myContext, myRect3);
    CGContextSetRGBFillColor(myContext, .5, 0, .5, 0.5);
    CGContextFillRect(myContext, myRect4);
}

设置着色图案的颜色空间

  • 上述代码使用颜色来绘制图案单元。我们必须设置基本的模式颜色空间为 NULL,以确保Quartz 使用绘制路径指定的颜色来绘制。
CGColorSpaceRef patternSpace;
patternSpace = CGColorSpaceCreatePattern(NULL); // 创建模式颜色空间,并传递NULL作为参数
CGContextSetFillColorSpace(myContext, patternSpace); // 在模式颜色空间中设置填充颜色
CGColorSpaceRelease(patternSpace);

设置着色图案的骨架(Anatomy)

  • 图案骨架的基本信息保存在 CGPattern 对象中。调用 CGPatternCreate 函数来创建一个 CGPattern 对象。
CGPatternRef CGPatternCreate(void *info,
                             CGRect bounds,
                             CGAffineTransform matrix,
                             CGFloat xStep,
                             CGFloat yStep,
                             CGPatternTiling tiling,
                             bool isColored,
                             const CGPatternCallbacks *callbacks);
  1. info:是一个指针,指向我们要传递给绘制回调函数的数据
  2. bound:指定图案单元的大小
  3. matrix:指定图案的变换矩阵,它将图案空间坐标系统映射到图形上下文的默认坐标系统。如果希望两个坐标系统是一样的,则可以使用单位矩阵。
  4. xStep, yStep:指定单元之间的水平和竖直间距。
  5. tiling:平铺模式,可以是kCGPatternTilingNoDistortion、kCGPatternTilingConstantSpacingMinimalDistortion、kCGPatternTilingConstantSpacing
  6. isColored:指定图案单元是着色图案(true)还是模板图案(false)
  7. callbacks:是一个指向 CGPatternCallbacks 结构体的指针,定义如下。
struct CGPatternCallbacks {
    unsigned int version;
    CGPatternDrawPatternCallback __nullable drawPattern;
    CGPatternReleaseInfoCallback __nullable releaseInfo;
};
typedef struct CGPatternCallbacks CGPatternCallbacks;

7.1 version 为结构体的版本号,可以设置为 0。

7.2 drawPattern 指向绘制回调的指针。

7.3 releaseInfo 指向一个回调函数,该回调在释放 CGPattern 对象时被调用,以释放存储在我们传递给绘制回调的 info 参数中的数据。如果在这个参数中没有传递任何数据,则设置该域为 NULL。 

指定着色图案作为填充或描边图案

  • 调用 CGContextSetFillPattern(context, pattern, &alpha) 或 CGContextSetStrokePattern(context, pattern, &alpha) 来使用图案进行填充或描边。

  • 第三个参数为颜色数组。虽然着色图案提供了自己的颜色,我们仍然需要传递一个单一的 alpha 值来告诉 Quartz 在绘制时着色图案的透明度。

使用着色图案绘制

  • 在设置好填充或描边的图案后,我们的图案被当作“涂料”,只需要调用 CGContextDrawPath(context, kCGPathFill) 或其他快捷绘制方法进行绘制即可。

完整示例

  • 示例1
#define H_PATTERN_SIZE 10
#define V_PATTERN_SIZE 10
#define H_PSIZE H_PATTERN_SIZE + 5
#define V_PSIZE H_PATTERN_SIZE + 10

- (void)drawRect:(CGRect)rect {
    [super drawRect:rect];
    CGContextRef context = UIGraphicsGetCurrentContext();    
    MyColoredPatternPainting(context, self.bounds);
}

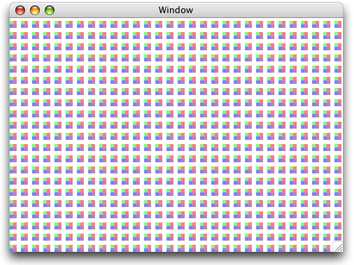
void MyDrawColoredPattern(void *info, CGContextRef myContext) {
    CGFloat subunit = 5;

    CGSize size = {subunit, subunit};
    CGPoint point1 = {0,0}, point2 = {subunit, subunit}, point3 = {0,subunit}, point4 = {subunit,0};
    CGRect myRect1 = {point1, size}, myRect2 = {point2, size}, myRect3 = {point3, size}, myRect4 = {point4, size};

    CGContextSetRGBFillColor (myContext, 0, 0, 1, 0.5);
    CGContextFillRect (myContext, myRect1);
    CGContextSetRGBFillColor (myContext, 1, 0, 0, 0.5);
    CGContextFillRect (myContext, myRect2);
    CGContextSetRGBFillColor (myContext, 0, 1, 0, 0.5);
    CGContextFillRect (myContext, myRect3);
    CGContextSetRGBFillColor (myContext, .5, 0, .5, 0.5);
    CGContextFillRect (myContext, myRect4);
}

void MyColoredPatternPainting(CGContextRef myContext, CGRect rect) {
    CGPatternRef pattern;
    CGColorSpaceRef patternSpace;
    CGFloat alpha = 1;
    static const CGPatternCallbacks callbacks = {0, &MyDrawColoredPattern, NULL};

    CGContextSaveGState(myContext);
    patternSpace = CGColorSpaceCreatePattern(NULL);
    CGContextSetFillColorSpace(myContext, patternSpace);
    CGColorSpaceRelease(patternSpace);

    pattern = CGPatternCreate(NULL,
                              CGRectMake (0, 0, H_PATTERN_SIZE, V_PATTERN_SIZE),
                              CGAffineTransformMake(1, 0, 0, 1, 0, 0),
                              H_PSIZE,
                              V_PSIZE,
                              kCGPatternTilingConstantSpacing,
                              true,
                              &callbacks);

    CGContextSetFillPattern(myContext, pattern, &alpha);
    CGPatternRelease(pattern);
    CGContextFillRect(myContext, rect);
    CGContextRestoreGState(myContext);
}
  • 示例2
- (void)drawRect:(CGRect)rect {
    [super drawRect:rect];
    CGContextRef context = UIGraphicsGetCurrentContext();
    CGContextAddEllipseInRect(context, self.bounds);

    CGColorSpaceRef patternSpace = CGColorSpaceCreatePattern(NULL);
    CGContextSetFillColorSpace(context, patternSpace);
    CGColorSpaceRelease(patternSpace);

    static const CGPatternCallbacks callBack = {0, &MyDrawColoredPattern, NULL};
    CGPatternRef pattern = CGPatternCreate(NULL, CGRectMake(0, 0, 16, 16), CGAffineTransformIdentity, 12, 12, kCGPatternTilingNoDistortion, true, &callBack);
    CGFloat alpha = 1.0;
    CGContextSetFillPattern(context, pattern, &alpha);
    CGPatternRelease(pattern);

    CGContextDrawPath(context, kCGPathFill);
}

绘制模板图案

  • 绘制模板图案的步骤与绘制着色图案类似。两者之间的区别在于你是如何设置颜色信息。

编写绘制模板图案单元的回调函数

  • 绘制模板模式单元格的回调与前面描述的绘制颜色模式单元格类似。不同的是绘制模式单元格回调不需要指定颜色值。
#define PSIZE 16

void MyDrawStencilStar(CGContextRef myContext) {
    int k;
    double r, theta;

    r = 0.8 * PSIZE / 2;
    theta = 2 * M_PI * (2.0 / 5.0);

    CGContextTranslateCTM(myContext, PSIZE/2, PSIZE/2);

    CGContextMoveToPoint(myContext, 0, r);
    for (k = 1; k < 5; k++) {
        CGContextAddLineToPoint(myContext,
                                r * sin(k * theta),
                                r * cos(k * theta));
    }
    CGContextClosePath(myContext);
    CGContextFillPath(myContext);
}

设置模板图案的颜色空间

  • 模板图案要求我们设置一个图案颜色空间用于 Quartz 的绘制。
CGPatternRef pattern;
CGColorSpaceRef baseSpace;
CGColorSpaceRef patternSpace;

baseSpace = CGColorSpaceCreateWithName(kCGColorSpaceGenericRGB);
patternSpace = CGColorSpaceCreatePattern (baseSpace); //创建一个模式颜色空间。该颜色空间指定如何表示模式的颜色。后面要设置模式的颜色时,必须使用这个颜色空间来进行设置
CGContextSetFillColorSpace (myContext, patternSpace); // 设置颜色空间来在填充模式时使用

CGColorSpaceRelease(patternSpace);
CGColorSpaceRelease(baseSpace);

设置模板图案的骨架(Anatomy)

  • 设置模板图案的骨架(Anatomy)与设置着色图案一样,不同的是 isColored 参数需要传递 false。

指定模板图案作为填充或描边图案

  • 调用 CGContextSetFillPattern(context, pattern, color) 或 CGContextSetStrokePattern(context, pattern, color) 来使用图案进行填充或描边。

  • 由于模板图案在绘制回调中不提供颜色值,所以我们必须传递一个颜色给填充或描边函数来告诉 Quartz 使用什么颜色。

static const CGFloat color[4] = {0, 1, 1, 0.5};transparent
CGContextSetFillPattern (context, pattern, color);

使用模板图案绘制

  • 在设置好填充或描边的图案后,我们的图案被当作“涂料”,只需要调用 CGContextDrawPath(context, kCGPathStroke) 或其他快捷绘制方法进行绘制即可。

完整示例

#define PSIZE 16

- (void)drawRect:(CGRect)rect {
    [super drawRect:rect];
    CGContextRef context = UIGraphicsGetCurrentContext();
    MyStencilPatternPainting(context);
}

void MyDrawStencilStar(void *info, CGContextRef myContext) {
    int k;
    double r, theta;

    r = 0.8 * PSIZE / 2;
    theta = 2 * M_PI * (2.0 / 5.0);

    CGContextTranslateCTM(myContext, PSIZE/2, PSIZE/2);

    CGContextMoveToPoint(myContext, 0, r);
    for (k = 1; k < 5; k++) {
        CGContextAddLineToPoint(myContext,
                                r * sin(k * theta),
                                r * cos(k * theta));
    }
    CGContextClosePath(myContext);
    CGContextFillPath(myContext);
}

void MyStencilPatternPainting(CGContextRef myContext) {
    CGPatternRef pattern;
    CGColorSpaceRef baseSpace;
    CGColorSpaceRef patternSpace;
    static const CGFloat color[4] = { 0, 1, 0, 1 };
    static const CGPatternCallbacks callbacks = {0, &MyDrawStencilStar, NULL};

    baseSpace = CGColorSpaceCreateDeviceRGB();
    patternSpace = CGColorSpaceCreatePattern(baseSpace);
    CGContextSetFillColorSpace(myContext, patternSpace);
    CGColorSpaceRelease(patternSpace);
    CGColorSpaceRelease(baseSpace);

    pattern = CGPatternCreate(NULL, CGRectMake(0, 0, PSIZE, PSIZE),
                              CGAffineTransformIdentity, PSIZE, PSIZE,
                              kCGPatternTilingConstantSpacing,
                              false, &callbacks);

    CGContextSetFillPattern (myContext, pattern, color);
    CGPatternRelease(pattern);
    CGContextFillRect(myContext,CGRectMake (0,0,PSIZE*20,PSIZE*20));
}

阴影

简介

  • 阴影有三个属性:x偏移量、y偏移量、模糊值。

阴影绘制原理

  • 阴影被设置后,任何绘制的对象都有一个阴影。默认的阴影颜色是用 RGBA 值 {0, 0, 0, 1.0 / 3.0} 填充的。

  • Quartz 中的阴影是图形状态的一部分。如何在设置阴影之前保存了图形状态,就可以通过恢复图形状态来关闭阴影。也可以通过设置阴影颜色为 NULL 来关闭阴影。

  • 调用如下函数来绘制阴影。

CGContextSetShadow(context, CGSizeMake(5, 5), 5);
CGContextSetShadowWithColor(context, CGSizeMake(5, 5), 5, [UIColor redColor].CGColor);

基于图形上下文的阴影绘制约定

  • 正值的 x 偏移量表示阴影位于图形对象的右侧。
  • 在 Mac OS X 中,正值的 y 偏移表示阴影位于图形对象的上方,这与 Quartz 2D 默认的坐标系匹配。
  • 在 iOS 中,如果我们用 Quartz 2D API 来创建 PDF 或位图图形上下文,则正值的 y 表示阴影位于图形对象的上方。
  • 在 iOS 中,如果图形上下文是由 UIKit 创建的,则正值的 y 表示阴影位于图形对象的下方。这与 UIKit 坐标系统相匹配。
  • 阴影绘制约定不受 CTM 影响

绘制阴影

  • 按照如下步骤来绘制阴影。
  1. 保存图形状态
  2. 调用函数 CGContextSetShadow,传递相应的值
  3. 使用阴影绘制所有的对象
  4. 恢复图形状态
  • 按照如下步骤来绘制彩色阴影。
  1. 保存图形状态
  2. 创建一个 CGColorSpace 对象,确保 Quartz 能正确地解析阴影颜色
  3. 创建一个 CGColor 对象来指定阴影的颜色
  4. 调用 CGContextSetShadowWithColor,并传递相应的值
  5. 使用阴影绘制所有的对象
  6. 恢复图形状态
- (void)drawRect:(CGRect)rect {
    [super drawRect:rect];
    CGContextRef context = UIGraphicsGetCurrentContext();
    MyDrawWithShadows(context, 300, 300);
}

void MyDrawWithShadows(CGContextRef myContext, float wd, float ht) {
    CGSize          myShadowOffset = CGSizeMake(-15,  20);
    CGFloat         myColorValues[] = {1, 0, 0, .6};
    CGColorRef      myColor;
    CGColorSpaceRef myColorSpace;

    CGContextSaveGState(myContext);

    CGContextSetShadow(myContext, myShadowOffset, 5);
    CGContextSetRGBFillColor(myContext, 0, 1, 0, 1);
    CGContextFillRect(myContext, CGRectMake (wd/3 + 75, ht/2 , wd/4, ht/4));

    myColorSpace = CGColorSpaceCreateDeviceRGB();
    myColor = CGColorCreate(myColorSpace, myColorValues);
    CGContextSetShadowWithColor(myContext, myShadowOffset, 5, myColor);
    CGContextSetRGBFillColor(myContext, 0, 0, 1, 1);
    CGContextFillRect(myContext, CGRectMake(wd/3 - 75, ht/2 - 100, wd/4, ht/4));

    CGColorRelease(myColor);
    CGColorSpaceRelease(myColorSpace);

    CGContextRestoreGState(myContext);
}

Quartz2D 编程指南(二)变换、图案、阴影

标签:

原文地址:http://www.cnblogs.com/weiboyuan/p/5514851.html

(0)
(0)
   
举报
评论 一句话评论(0
登录后才能评论!
© 2014 mamicode.com 版权所有  联系我们:gaon5@hotmail.com
迷上了代码!