标签:haproxy 详解
haproxy是一款高性能的负载均衡器,它提供后端高可用性、负载均衡以及基于TCP和http应用反向代理,支持虚拟主机的快速、可靠的解决方案。Haproxy特别适用于高负载web站点,在时下的硬件上完全可以支持数以万计的并发链接。并且他的运行模式使得它整合简单、安全,可以保护你的web服务器不被暴露在网络中。
Haproxy是事件驱动、单一进程模型,此模型支持非常大的并发连接数。模型的弊端是:在多核心系统上,这些程序通常扩展性差。
一、haproxy 安装配置
haproxy从CentOS 6.4加入了rh系的base源中,可以说是红帽的主流技术。可以看的出它性能的强悍。YUM安装即可,配置文件也不多,虽然宣传的特性堕入牛毛,从配置上看可以说是比较好配置的了。
/etc/haproxy/haproxy.cfg
/etc/sysconfig/haproxy
/usr/bin/halog
/usr/bin/iprange
/usr/lib/systemd/system/haproxy.service
/usr/sbin/haproxy
/usr/sbin/haproxy-systemd-wrapper
/usr/share/haproxy/400.http
/usr/share/haproxy/403.http
/usr/share/haproxy/408.http
/usr/share/haproxy/500.http
/usr/share/haproxy/502.http
/usr/share/haproxy/503.http
/usr/share/haproxy/504.http
它生成配置文件较少,主要是haproxy.conf文件,其他文件不用配置,下面还有很多状态页面,它可以利用ACL拦截报文,并返回状态页面。
在配置文件haproxy.conf配置文件中,配置命令格式为空格区分的:配置段名称定格写,配置段选项空一个tab再编写,配置没有符号。
主要分为以下几段配置:
global:配置进程及安全相关参数,性能调整相关参数和Debug参数
proxies:包含四个配置区域
defaults:各个配置区域的默认配置
listen:兼顾前端后端的单条配置
frontend;前端配置
backend:后端配置
haproxy作为透传式的反向代理,链接客户端和服务器端,frontend即指于客户端的配置,backend即指于服务器端的配置而ACL就是前端后端的粘合剂。
一、haproxy的简单代理配置
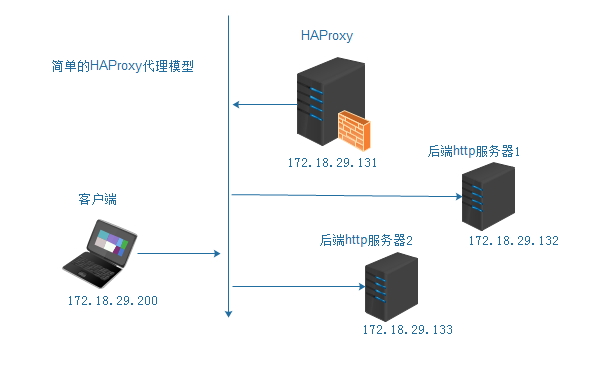
listen 可以配置单个前端和多个后端的简单设计;这里配置的拓扑为如下图:
环境配置为下表:
| 角色 | IP地址 | 软件 | 操作系统 |
| 负载均衡器 | 172.18.29.131 | haproxy | CentOS 7 |
| web真实主机1 | 172.18.29.132 | httpd | CentOS 7 |
| web真实主机2 | 172.18.29.133 | httpd | CentOS 7 |
这里简单配置两台http访问器,web服务器配置也可以在此基础上进行,这里只做简答的演示负载均衡效果,配置两个机器提供不同的主页显示,以示区分。
# yum -y install httpd
# echo "<h1>index page @backend srv#</h1>" > /var/www/html/index.html
# systemctl start httpd.service
保证在131服务器上能够远程访问真实服务器的主页,修改下/etc/haproxy/haproxy.conf:
global
    log         127.0.0.1 local2            # 全局log配置

    chroot      /var/lib/haproxy            # 设置chroot路径
    pidfile     /var/run/haproxy.pid
    maxconn     4000                        # 单进程最大连接数
    user        haproxy                     # 配置进程启动用户
    group       haproxy
    daemon                                  # 以守护进程模式运行

defaults
    mode                    http            # 配置为http模式
    log                     global          # 配置log为公共配置日志
    option                  httplog
    option                  dontlognull
    option http-server-close
    option forwardfor       except 127.0.0.0/8
    option                  redispatch
    retries                 3
    timeout http-request    10s
    timeout queue           1m
    timeout connect         10s
    timeout client          1m
    timeout server          1m
    timeout http-keep-alive 10s
    timeout check           10s
    maxconn                 3000


listen  websrvs *:80
    balance roundrobin
    server websrv1 172.18.29.132:80 check
    server websrv2 172.18.29.133:80 check
这里defaults和global配置全部沿用默认配置。
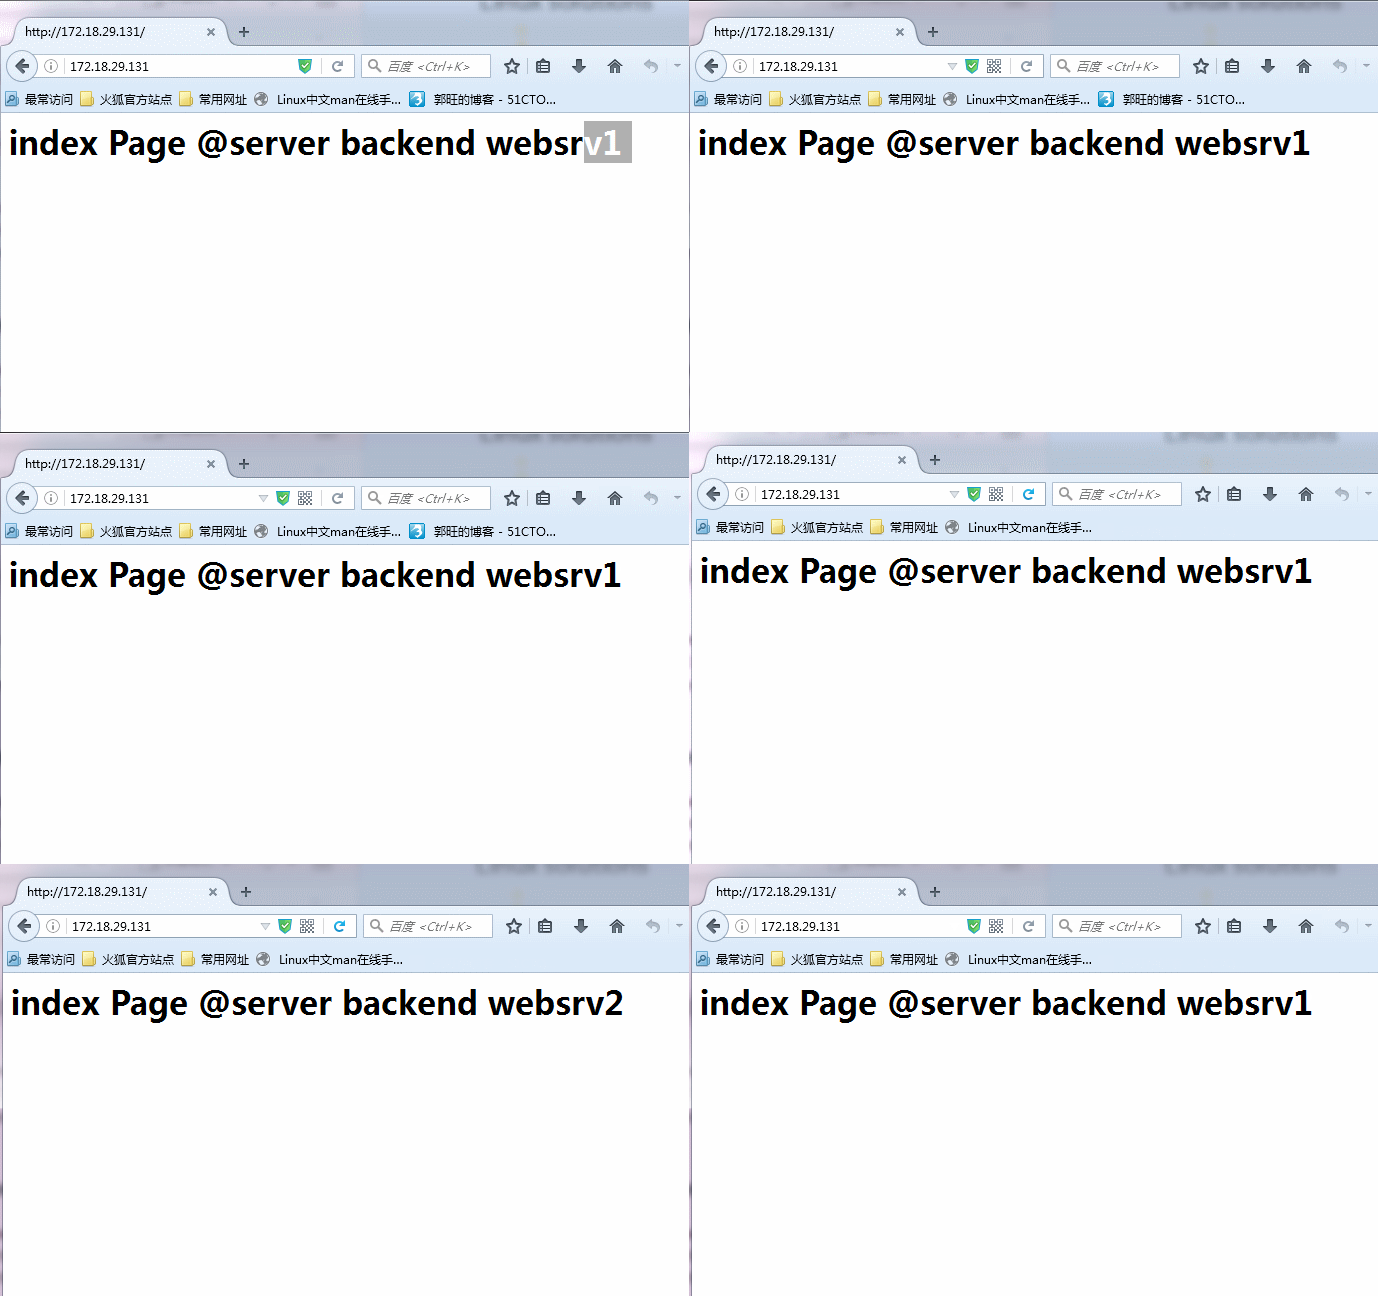
listen 指定前端后端,实例名称为websrvs,监听一个前端任意主机地址的http服务,负载均衡方式位轮询(roundrobin),分别为两个名为websrv1,websrv2 的后端主机,指定检测(check)健康情况。此时就启动haproxy服务,看到端口80已经被haproxy监听时,就可以简单请求前端调度器,可以发现已经能够负载均衡两个web服务器了!如图所示:
二、haproxy状态页面,状态页面
haproxyadmin时haproxy提供的代理状态web页面,同时也是管理页面。管理者可以轻松从中查看当前服务器状态和经过授权管理后端服务器。配置也相当简单。
添加行的listen 配置段
listen stats *:9001
    stats enable
    stats uri /haproxy?stats
    ststs realm "HAProxy stats auth "
    stats auth admin:admin
    stats admin if TRUE
其中,配置stats为状态页开关,其他选项都有默认值,stats uri为状态也请求路径,也可以修改,此时不做其他配置就可看到状态页面了;
stats realmSTRING 为授权提示配置。stats auth NAME:PASSWD为配置管理页面的明文密码对;stats admin if TRUE则指示在认证(auth)通过后,显示管理页面。由于它的强大功能,所以建议做认证,并修改默认uri。状态如图:
三、详细配置前端
ACL作为前端后端后端连接器,可以灵活把握报文流向,这里先介绍前端和后端的简单定义,再将使用ACL 调度机制。
示例:做一个简单动静分离:分离动态php页面到后端lamp服务器上,静态内容则调度到后端web站点上予以响应。
结构图:
物理添加两个lamp服务器,配置如下:
| 角色 | IP地址 | 软件 | OS |
| phpsrv1 | 172.18.29.141 | lamp | CentOS 6.6 |
| phpsrv1 | 172/..18.29.142 | lamp | CentOS 6.6 |
初始化lamp环境,这里使用模块化lamp环境:
yum -y install httpd php
echo "index.php Page @  phpsrv# <?php  phpinfo(); ?>" > /var/www/html/index.php
service httpd restart
在调度器端保证测试请求phpsrv1.phpsrv2的index.php页面。配置haproxy端:
backend websrvs
    balance roundrobin
    server websrv1 172.18.29.132 check weight 1
    server websrv2 172.18.29.133 check weight 2

backend phpsrvs
    balance roundrobin
    server phpsrv1 172.18.29.141 check weight 1
    server phpsrv2 172.18.29.142 check weight 2

frontend
    bind *:80
    acl php_pages path_end -i .php

    use_backend php_srvs if php_pages
    default_backend websrvs
四、haproxy调度算法演示
haroxy负载均衡算法,除了Nginx中同样常见的roundrobin,leastconn,源地址哈希,等方法,还可以基于cookie粘性完成持久链接。
1.roundrobin
前面为了演示效果,用的都是roundrobin 的调度算法;roundrobin是动态算法,可以动态调整负载加权,使后端服务器慢启动,不至于大量请求涌进来,造成阻塞。算法实现中后端主机数限制为4095台。
2.static-rr :静态的轮询,不支持慢启动机制,后端主机改变权值,那么需要重新启动haproxy服务,后端主机数目不限。
3. leastconn
在保持链接中,长连接会体现出最少链接的调度算法。
示例:对ssh服务做调度,采用最少连接算法
listen sshsrvs *:20002
   balance leastconn
   mode tcp
   server sshsrv1 172.18.29.132:22 check
   server sshsrv2 172.18.29.133:22 check
使用ssh -p root@172.18.29.131 可以分别链接到132,133两个服务器;且连接上的都是最少链接的真实服务器。
# ssh -p 20002 root@172.18.29.131
root@172.18.29.131‘s password:
Last login: Fri May 27 08:56:35 2016 from 172.18.29.131
[root@CentOS7_133 ~]#

# 可以看到主机名为133,再次从另一个客户端链接
# ssh -p 20002 root@172.18.29.131
root@172.18.29.131‘s password:
Last login: Fri May 27 08:56:35 2016 from 172.18.29.131
[root@CentOS7_132 ~]#
4.source 源地址hash算法
对比使用roundrobin和source调度算法
backend websrvs
    balance source
    server websrv1 172.18.29.132:80 check weight 1
    server websrv2 172.18.29.133:80 check weight 2

backend phpsrvs
    balance roundrobin
    server phpsrv1 172.18.29.141:80 check
    server phpsrv2 172.18.29.142:80 check

frontend splitsrvs
    bind *:80
    option httpchk
    acl phppages path_end -i .php

    use_backend phpsrvs if phppages
    default_backend websrvs
结果如图:可以看出roundrobin算法调度轮询请求,而source由于源地址没变,则调度不再变化。
5.uri 根据URL中后半部分选择算法,这里设置不同页面test1-test10.html作为测试
执行脚本,创建10个index页面:
for  i  in {1..10};do  echo “index$1.html  @ websrv# ” > /var/www/html/index$1.html ;done
# ls /var/www/html/index
index10.html  index3.html   index6.html   index9.html
index1.html   index4.html   index7.html   index.html
index2.html   index5.html   index8.html   index.php

haproxy 配置:
backend websrvs
    balance uri
    server websrv1 172.18.29.132:80 check
    server websrv2 172.18.29.133:80 check
多次请求多个页面可以发现调度uri调度运行调度:
[root@CentOS7_02_131 haproxy]# curl http://172.18.29.131/index1.html
index1 Page@websrv2
[root@CentOS7_02_131 haproxy]# curl http://172.18.29.131/index1.html
index1 Page@websrv2
[root@CentOS7_02_131 haproxy]# curl http://172.18.29.131/index1.html
index1 Page@websrv2
[root@CentOS7_02_131 haproxy]# curl http://172.18.29.131/index2.html
index2 Page@websrv1
[root@CentOS7_02_131 haproxy]# curl http://172.18.29.131/index2.html
index2 Page@websrv1
[root@CentOS7_02_131 haproxy]# curl http://172.18.29.131/index2.html
index2 Page@websrv1
[root@CentOS7_02_131 haproxy]# curl http://172.18.29.131/index3.html
index3 Page@websrv2
[root@CentOS7_02_131 haproxy]# curl http://172.18.29.131/index3.html
index3 Page@websrv2
[root@CentOS7_02_131 haproxy]# curl http://172.18.29.131/index3.html
index3 Page@websrv2
6.hdr(<name>) :根据请求报文中的<name>标识的头部值进行hash计算
示例:这里使用hdr(Host)进行测试:
设置两个域名解析:将172.18.29.131设置为不同的域名:
vim /etc/hots
172.18.29.131 www.magedu.com
172.18.29.131 bbs.magedu.com
172.18.29.131 web.magedu.com
修改调度方式:
backend websrvs
    balance hdr(Host)
    server websrv1 172.18.29.132:80 check
    server websrv2 172.18.29.133:80 check
再次请求报文
[root@CentOS7_02_131 haproxy]# curl http://www.magedu.com/
<h1>iunex.html Page @websrv2</h1>
[root@CentOS7_02_131 haproxy]# curl http://bbs.magedu.com/
<h1>iunex.html Page @websrv2</h1>
[root@CentOS7_02_131 haproxy]# curl http://bbs.magedu.com/
<h1>iunex.html Page @websrv2</h1>
[root@CentOS7_02_131 haproxy]# curl http://web.magedu.com/
“index.html @ websrv# ”
[root@CentOS7_02_131 haproxy]# curl http://web.magedu.com/
“index.html @ websrv# ”
[root@CentOS7_02_131 haproxy]# curl http://web.magedu.com/
“index.html @ websrv# ”
可以看出根据请求报文的Host首部,做了负载调度,这种情况主要用于虚拟主机的调度。
7.基于用户端cookie调度
haproxy可向响应报文中设置“Set-Cookie”头信息,设置有关调度的头信息:以后用户每次根据cookie信息请求服务器端,中间调度器,根据调度的头信息,保持用户端的会话,从而保持会话粘性。
haproxy配置:
backend websrvs
    balance roundrobin
    cookie SERVERID insert indirect nocache
    server websrv1 172.18.29.132:80 check  cookie websrv1
    server websrv2 172.18.29.133:80 check  cookie websrv2
此时一定要用浏览器查看,可以看到下面方框内请求报文携带了cookie,且设置的内容正是我们设置的cookie:
参数配置中:backend中配置的cookie指令:插入指定名称(示例:SERVERID),不将cookie交给后端真实主机(indirect),不缓存(nocache),这里不设置缓存是为了在外网用户使用正向代理缓存时不缓存cookie信息,一面正向代理后侧的用户全都使用该cookie访问调度器而造成会话粘性失败。另外这里不能使用curl命令测试,curl命令不指定cookie会退化为轮询算法。
以上算法都会使用hash功能的调度,都会有动态静态两种计算方法,计算方法有hash-type 命令指定:
hash-type <method> <function> <modifier>
<method>
map-based:基于权重取模计算
consistent:一致性hash算法,可以有效降低hash,部分服务器失效后的雪崩效应。
默认method为map-based,function为sdbm,modifier不指定,也就是基于权重取模计算。
这里只介绍到这里,如果错误,请批评指教。
本文出自 “深海鱼” 博客,请务必保留此出处http://kingslanding.blog.51cto.com/9130940/1783968
标签:haproxy 详解
原文地址:http://kingslanding.blog.51cto.com/9130940/1783968