标签:
说明:
php在编译安装时,nginx要想能够调用php提供动态php格式的网页,必须用FastCGI来实现,但 FastCGI只是一个框架,实现FastCGI框架的有PHP-FPM,但对于5.2.x版本的php来说,默认是不支持PHP-FPM的,需要打上php-fpm的补丁,对于5.3.2之前版本的也是需要打补丁的,而且打补丁的过程比较麻烦。好在5.3.3版 本的PHP-FPM被直接做进了源代码包中,在编译安装时只需启用PHP-FPM功能即可。
但如果要使用PHP-FPM的话,还需要提供以下几个功能:
构建编译环境:
yum -y install gcc openssl-devel zlib-devel pcre-devel
yum groupinstall "Developement Tools" "Development Libraries" -yt
首先安装Nginx:
wget http://nginx.org/download/nginx-1.0.14.tar.gz
tar zxvf nginx-1.0.14.tar.gz     #
useradd -s /sbin/nologin -M nginx
cd nginx-1.0.14

./configure   --prefix=/usr   --sbin-path=/usr/sbin/nginx   --conf-path=/etc/nginx/nginx.conf   --error-log-path=/var/log/nginx/error.log   --http-log-path=/var/log/nginx/access.log   --pid-path=/var/run/nginx/nginx.pid    --lock-path=/var/lock/nginx.lock   --user=nginx   --group=nginx   --with-http_ssl_module   --with-http_flv_module   --with-http_stub_status_module   --with-http_gzip_static_module   --http-client-body-temp-path=/var/tmp/nginx/client/   --http-proxy-temp-path=/var/tmp/nginx/proxy/   --http-fastcgi-temp-path=/var/tmp/nginx/fcgi/

make && make install
创建nginx的启动脚本:
vim /etc/init.d/nginxd
1 2 3 4 5 6 7 8 9 10 11 12 13 14 15 16 17 18 19 20 21 22 23 24 25 26 27 28 29 30 31 32 33 34 35 36 37 38 39 40 41 42 43 44 45 46 47 48 49 50 51 52 53 54 55 56 57 58 59 60 61 62 63 64 65 66 67 68 69 70 71 72 73 74 75 76 77 78 79 80 81 82 83 84 85 86 87 88 89 90 91 92 93 94 95 96 97 98 99 100 101 102 103 104 105 106 107 108 109 110 111 112 113 114 115 116 117 118 119 120 121 122 123 124 125 126 |
#!/bin/sh
#
# nginx - this script starts and stops the nginx daemon
#
# chkconfig:   - 85 15
# description:  Nginx is an HTTP(S) server, HTTP(S) reverse #               proxy and IMAP/POP3 proxy server
# processname: nginx
# config:      /etc/nginx/nginx.conf
# config:      /etc/sysconfig/nginx
# pidfile:     /var/run/nginx.pid

# Source function library.
. /etc/rc.d/init.d/functions

# Source networking configuration.
. /etc/sysconfig/network

# Check that networking is up.
[ "$NETWORKING" = "no" ] && exit 0

nginx="/usr/sbin/nginx"
prog=$(basename $nginx)

NGINX_CONF_FILE="/etc/nginx/nginx.conf"

[ -f /etc/sysconfig/nginx ] && . /etc/sysconfig/nginx

lockfile=/var/lock/subsys/nginx

make_dirs() {
   # make required directories
   user=`nginx -V 2>&1 | grep "configure arguments:" | sed ‘s/[^*]*--user=\([^ ]*\).*/\1/g‘ -`
   options=`$nginx -V 2>&1 | grep ‘configure arguments:‘`
   for opt in $options; do
       if [ `echo $opt | grep ‘.*-temp-path‘` ]; then
           value=`echo $opt | cut -d "=" -f 2`
           if [ ! -d "$value" ]; then
               # echo "creating" $value
               mkdir -p $value && chown -R $user $value
           fi
       fi
   done
}

start() {
    [ -x $nginx ] || exit 5
    [ -f $NGINX_CONF_FILE ] || exit 6
    make_dirs
    echo -n $"Starting $prog: "
    daemon $nginx -c $NGINX_CONF_FILE
    retval=$?
    echo
    [ $retval -eq 0 ] && touch $lockfile
    return $retval
}

stop() {
    echo -n $"Stopping $prog: "
    killproc $prog -QUIT
    retval=$?
    echo
    [ $retval -eq 0 ] && rm -f $lockfile
    return $retval
}

restart() {
    configtest || return $?
    stop
    sleep 1
    start
}

reload() {
    configtest || return $?
    echo -n $"Reloading $prog: "
    killproc $nginx -HUP
    RETVAL=$?
    echo
}

force_reload() {
    restart
}

configtest() {
  $nginx -t -c $NGINX_CONF_FILE
}

rh_status() {
    status $prog
}

rh_status_q() {
    rh_status >/dev/null 2>&1
}

case "$1" in
    start)
        rh_status_q && exit 0
        $1
        ;;
    stop)
        rh_status_q || exit 0
        $1
        ;;
    restart|configtest)
        $1
        ;;
    reload)
        rh_status_q || exit 7
        $1
        ;;
    force-reload)
        force_reload
        ;;
    status)
        rh_status
        ;;
    condrestart|try-restart)
        rh_status_q || exit 0
            ;;
    *)
        echo $"Usage: $0 {start|stop|status|restart|condrestart|try-restart|reload|force-reload|configtest}"
        exit 2
esac
|
chmod +x /etc/init.d/nginxd     #给予脚本执行权限
chkconfig --add nginxd        #加入开机启动选项中
chkconfig nginxd on          #设置开机自动启动
service nginxd  start       #启动nginx 服务
测试访问:
安装MySQL:
下载:
wget http://mysql.mirrors.hoobly.com/Downloads/MySQL-5.5/mysql-5.5.22.tar.gz
tar zxvf mysql-5.5.22.tar.gz
cd mysql-5.5.22-linux2.6-i686
/usr/sbin/groupadd mysql                           #添加mysql用户
/usr/sbin/useradd -g mysql mysql            #添加mysql组
编译:
./configure --prefix=/usr/local/mysql/ --enable-assembler --with-extra-charsets=complex --enable-thread-safe-client --with-big-tables --with-readline --with-ssl --with-embedded-server --enable-local-infile --with-plugins=partition,innobase,myisammrg
make&&make install
编译时出现错误:
../depcomp: line 571: exec: g++: not found
make[1]: *** [my_new.o] Error 127
make[1]: Leaving directory `/root/lnmpsrc/mysql-5.1.62/mysys‘
make: *** [all-recursive] Error 1
在其他安装g++的服务器上查看g++属于哪个包:
[root@vps ~]# find / -name g++
/usr/bin/g++
[root@vps ~]# rpm -qf /usr/bin/g++
gcc-c++-4.4.6-3.el6.i686
可以看出g++属于gcc-c++包
安装gcc-c++:
[root@vps ~]#yum install gcc-c++ -y
重新编译:
./configure --prefix=/usr/local/mysql/ --enable-assembler --with-extra-charsets=complex --enable-thread-safe-client --with-big-tables --with-readline --with-ssl --with-embedded-server --enable-local-infile --with-plugins=partition,innobase,myisammrg
make&&make install
改变/usr/local/mysql目录用户和属组:
chown -R mysql.mysql /usr/local/mysql
创建mysql数据库、日志存放目录
mkdir /mysql/{data,binlog,relaylog} -p
chown -R mysql.mysql /mysql
以mysql帐号建立数据表:
/usr/local/mysql/bin/mysql_install_db --basedir=/usr/local/mysql --datadir=/mysql/data --user=mysql
创建mysql配置文件:
vim /mysql/my.cnf
1 2 3 4 5 6 7 8 9 10 11 12 13 14 15 16 17 18 19 20 21 22 23 24 25 26 27 28 29 30 31 32 33 34 35 36 37 38 39 40 41 42 43 44 45 46 47 48 49 50 51 52 53 54 55 56 57 58 59 60 61 62 63 64 65 66 67 68 69 70 71 72 73 74 75 76 77 78 79 80 81 82 83 84 85 86 87 88 89 90 |
[client] character-set-server = utf8 port = 3306 socket = /tmp/mysql.sock [mysqld] character-set-server = utf8 replicate-ignore-db = mysql replicate-ignore-db = test replicate-ignore-db = information_schema user = mysql port = 3306 socket = /tmp/mysql.sock basedir = /usr/local/mysql datadir = /mysql/data log-error = /mysql/mysql_error.log pid-file = /mysql/mysql.pid open_files_limit = 10240 back_log = 600 max_connections = 5000 max_connect_errors = 6000 table_cache = 614 external-locking = FALSE max_allowed_packet = 32M sort_buffer_size = 1M join_buffer_size = 1M thread_cache_size = 300 #thread_concurrency = 8 query_cache_size = 512M query_cache_limit = 2M query_cache_min_res_unit = 2k default-storage-engine = MyISAM thread_stack = 192K transaction_isolation = READ-COMMITTED tmp_table_size = 246M max_heap_table_size = 246M long_query_time = 3 log-slave-updates log-bin = /mysql/data/binlog binlog_cache_size = 4M binlog_format = MIXED max_binlog_cache_size = 8M max_binlog_size = 1G relay-log-index = /mysql/relaylog/relaylog relay-log-info-file = /mysql/relaylog/relaylog relay-log = /mysql/relaylog/relaylog expire_logs_days = 30 key_buffer_size = 256M read_buffer_size = 1M read_rnd_buffer_size = 16M bulk_insert_buffer_size = 64M myisam_sort_buffer_size = 128M myisam_max_sort_file_size = 10G myisam_repair_threads = 1 myisam_recover interactive_timeout = 120 wait_timeout = 120 skip-name-resolve #master-connect-retry = 10 slave-skip-errors = 1032,1062,126,1114,1146,1048,1396 #master-host = 192.168.1.1 #master-user = username #master-password = password #master-port = 3306 server-id = 1 innodb_additional_mem_pool_size = 16M innodb_buffer_pool_size = 512M innodb_data_file_path = ibdata1:256M:autoextend innodb_file_io_threads = 4 innodb_thread_concurrency = 8 innodb_flush_log_at_trx_commit = 2 innodb_log_buffer_size = 16M innodb_log_file_size = 128M innodb_log_files_in_group = 3 innodb_max_dirty_pages_pct = 90 innodb_lock_wait_timeout = 120 innodb_file_per_table = 0 #log-slow-queries = /mysql/slow.log #long_query_time = 10 [mysqldump] quick max_allowed_packet = 32M |
管理mysql脚本:
vim /mysql/mysqld
1 2 3 4 5 6 7 8 9 10 11 12 13 14 15 16 17 18 19 20 21 22 23 24 25 26 27 28 29 30 31 32 33 34 35 36 37 38 39 40 41 42 |
#!/bin/sh
mysql_port=3306
mysql_username="admin"     #帐号密码可以自行创建
mysql_password="rootisnosafe"

function_start_mysql()
{
    printf "Starting MySQL...\n"
    /bin/sh /usr/local/mysql/bin/mysqld_safe --defaults-file=/mysql/my.cnf 2>&1 > /dev/null &
}

function_stop_mysql()
{
    printf "Stoping MySQL...\n"
    /usr/local/mysql/bin/mysqladmin -u ${mysql_username} -p${mysql_password} -S /tmp/mysql.sock shutdown
}

function_restart_mysql()
{
    printf "Restarting MySQL...\n"
    function_stop_mysql
    sleep 5
    function_start_mysql
}

function_kill_mysql()
{
    kill -9 $(ps -ef | grep ‘bin/mysqld_safe‘ | grep ${mysql_port} | awk ‘{printf $2}‘)
    kill -9 $(ps -ef | grep ‘libexec/mysqld‘ | grep ${mysql_port} | awk ‘{printf $2}‘)
}

if [ "$1" = "start" ]; then
    function_start_mysql
elif [ "$1" = "stop" ]; then
    function_stop_mysql
elif [ "$1" = "restart" ]; then
function_restart_mysql
elif [ "$1" = "kill" ]; then
function_kill_mysql
else
    printf "Usage: /mysql/mysqld {start|stop|restart|kill}\n"
fi
|
赋予脚本执行权限:
chmod +x /mysql/mysqld
启动mysql
/mysql/mysqld start
命令行管理mysql:
/usr/local/mysql/bin/mysql -u root -p -S /tmp/mysql.sock
创建一个具有root权限的用户:admin,密码为rootisnosafe
GRANT ALL PRIVILEGES ON *.* TO ‘admin‘@‘localhost‘ IDENTIFIED BY ‘rootisnosafe‘;
GRANT ALL PRIVILEGES ON *.* TO ‘admin‘@‘127.0.0.1‘ IDENTIFIED BY ‘rootisnosafe‘;
安装php:
先安装libevent和libiconv:
wget https://github.com/downloads/libevent/libevent/libevent-1.4.14b-stable.tar.gz
tar zxvf libevent-1.4.14b-stable.tar.gz
cd libevent-1.4.14b-stable
./configure&&make&&make install

wget http://ftp.gnu.org/pub/gnu/libiconv/libiconv-1.14.tar.gz
tar zxvf libiconv-1.14.tar.gz
cd  libiconv-1.14
./configure
make
make install
ln -sf /usr/local/lib/libiconv.so.2 /usr/lib/libiconv.so.2
现在安装php:
wget http://cn.php.net/distributions/php-5.4.0.tar.gz
tar zxvf php-5.4.0.tar.gz
cd php-5.4.0

./configure --prefix=/usr/local/php --with-mysql=/usr/local/mysql --with-mysqli=/usr/local/mysql/bin/mysql_config  --with-openssl --enable-fpm  --enable-mbstring --with-freetype-dir --with-jpeg-dir --with-png-dir --with-zlib --with-libxml-dir=/usr --enable-xml --with-iconv-dir=/usr/local

make ZEND_EXTRA_LIBS=‘-liconv‘        #因为-liconv的目录不是在/usr/local下所以安装时需要手动指定
make install
其中:
–with-mysql和–with-mysqli的路径是你mysql的具体所在的目录
–enable-fpm 启动fpm。其他都是些基本选项,简单易懂
cp php.ini-production /usr/local/php/etc/php.ini
修改配置文件:
vim /usr/local/php/etc/php-fpm.conf
1 2 3 4 |
pm.max_children = 50 pm.start_servers = 10 pm.min_spare_servers = 5 pm.max_spare_servers = 35 |
启动:
/usr/local/php/sbin/php-fpm &
检查是否正常启动:
netstat -tunlp|grep 9000
tcp        0      0 127.0.0.1:9000              0.0.0.0:*                   LISTEN      7826/php-fpm
将 /usr/local/php/sbin/php-fpm &加入到rc.local:
echo ‘/usr/local/php/sbin/php-fpm &‘ >>/etc/rc.local
配置fastcgi_params 文件:
vim /etc/nginx/fastcgi_params
将内容替换为:
1 2 3 4 5 6 7 8 9 10 11 12 13 14 15 16 17 18 19 |
fastcgi_param GATEWAY_INTERFACE CGI/1.1; fastcgi_param SERVER_SOFTWARE nginx; fastcgi_param QUERY_STRING $query_string; fastcgi_param REQUEST_METHOD $request_method; fastcgi_param CONTENT_TYPE $content_type; fastcgi_param CONTENT_LENGTH $content_length; fastcgi_param SCRIPT_FILENAME $document_root$fastcgi_script_name; fastcgi_param SCRIPT_NAME $fastcgi_script_name; fastcgi_param REQUEST_URI $request_uri; fastcgi_param DOCUMENT_URI $document_uri; fastcgi_param DOCUMENT_ROOT $document_root; fastcgi_param SERVER_PROTOCOL $server_protocol; fastcgi_param REMOTE_ADDR $remote_addr; fastcgi_param REMOTE_PORT $remote_port; fastcgi_param SERVER_ADDR $server_addr; fastcgi_param SERVER_PORT $server_port; fastcgi_param SERVER_NAME $server_name; # PHP only, required if PHP was built with --enable-force-cgi-redirect fastcgi_param REDIRECT_STATUS 200; |
最后修改nginx.conf配置文件:
1 2 3 4 5 6 7 8 9 10 11 12 13 |
vim /etc/nginx/nginx.conf
location ~ \.php$ {
            root           /www;
            fastcgi_pass   127.0.0.1:9000;
            fastcgi_index  index.php;
            fastcgi_param  SCRIPT_FILENAME  /scripts$fastcgi_script_name;
            include        fastcgi_params;
        }

location / {
            root   /www;
            index  index.php index.html index.htm;
        }
|
保存退出。
启动nginx :
service nginxd start
编辑/www/index.php:
1 2 3 |
<?php phpinfo(); ?> |
访问测试: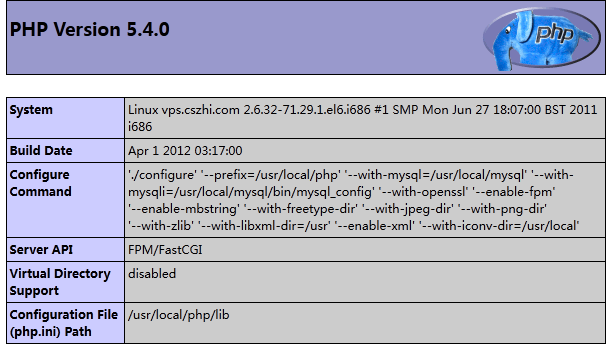
测试数据库连接:
编辑:/www/index.php
1 2 3 4 5 |
<?php
        $link=mysql_connect("localhost","admin","rootisnosafe");
        if($link) echo "OK";
        else echo "FAIL";
?>
|
刷新访问。
如果出现OK字样,表示连接正常。
除非注明,文章皆由( csz )原创,转载请标明本文地址
本文地址: http://www.cszhi.com/20120403/lnmp.html
标签:
原文地址:http://www.cnblogs.com/boystar/p/5123415.html