标签:
虽然之前也分析过View回执过程,但是如果让我自己集成ViewGroup然后自己重新onMeasure,onLayout,onDraw方法自定义View我还是会头疼。今天索性来系统的学习下。
/**
     * <p>
     * Measure the view and its content to determine the measured width and the
     * measured height. This method is invoked by {@link #measure(int, int)} and
     * should be overridden by subclasses to provide accurate and efficient
     * measurement of their contents.
     * </p>
     *
     * <p>
     * <strong>CONTRACT:</strong> When overriding this method, you
     * <em>must</em> call {@link #setMeasuredDimension(int, int)} to store the
     * measured width and height of this view. Failure to do so will trigger an
     * <code>IllegalStateException</code>, thrown by
     * {@link #measure(int, int)}. Calling the superclass‘
     * {@link #onMeasure(int, int)} is a valid use.
     * </p>
     *
     * <p>
     * The base class implementation of measure defaults to the background size,
     * unless a larger size is allowed by the MeasureSpec. Subclasses should
     * override {@link #onMeasure(int, int)} to provide better measurements of
     * their content.
     * </p>
     *
     * <p>
     * If this method is overridden, it is the subclass‘s responsibility to make
     * sure the measured height and width are at least the view‘s minimum height
     * and width ({@link #getSuggestedMinimumHeight()} and
     * {@link #getSuggestedMinimumWidth()}).
     * </p>
     *
     * @param widthMeasureSpec horizontal space requirements as imposed by the parent.
     *                         The requirements are encoded with
     *                         {@link android.view.View.MeasureSpec}.
     * @param heightMeasureSpec vertical space requirements as imposed by the parent.
     *                         The requirements are encoded with
     *                         {@link android.view.View.MeasureSpec}.
     *
     * @see #getMeasuredWidth()
     * @see #getMeasuredHeight()
     * @see #setMeasuredDimension(int, int)
     * @see #getSuggestedMinimumHeight()
     * @see #getSuggestedMinimumWidth()
     * @see android.view.View.MeasureSpec#getMode(int)
     * @see android.view.View.MeasureSpec#getSize(int)
     */
protected void onMeasure(int widthMeasureSpec, int heightMeasureSpec) {
        setMeasuredDimension(getDefaultSize(getSuggestedMinimumWidth(), widthMeasureSpec),
                getDefaultSize(getSuggestedMinimumHeight(), heightMeasureSpec));
}注释说的非常清楚。但是我还是要强调一下这两个参数:widthMeasureSpec和heightMeasureSpec这两个int类型的参数,看名字应该知道是跟宽和高有关系,但它们其实不是宽和高,而是由宽、高和各自方向上对应的模式来合成的一个值:其中,在int类型的32位二进制位中,31-30这两位表示模式,0~29这三十位表示宽和高的实际值.其中模式一共有三种,被定义在Android中的View类的一个内部类中:View.MeasureSpec:
android.view
public static class View.MeasureSpec
extends Object
A MeasureSpec encapsulates the layout requirements passed from parent to child. Each MeasureSpec represents a requirement for either the width or the height. A MeasureSpec is comprised of a size and a mode. There are three possible modes:
UNSPECIFIED
The parent has not imposed any constraint on the child. It can be whatever size it wants.
EXACTLY
The parent has determined an exact size for the child. The child is going to be given those bounds regardless of how big it wants to be.
AT_MOST
The child can be as large as it wants up to the specified size.
MeasureSpecs are implemented as ints to reduce object allocation. This class is provided to pack and unpack the <size, mode> tuple into the int.那具体MeasureSpec是怎么把宽和高的实际值以及模式组合起来变成一个int类型的值呢? 这部分是在MeasureSpce.makeMeasureSpec()方法中处理的:
public static int makeMeasureSpec(int size, int mode) {
            if (sUseBrokenMakeMeasureSpec) {
                return size + mode;
            } else {
                return (size & ~MODE_MASK) | (mode & MODE_MASK);
            }
        }
那我们如何从MeasureSpec值中提取模式和大小呢?该方法内部是采用位移计算.
/**
 * Extracts the mode from the supplied measure specification.
 *
 * @param measureSpec the measure specification to extract the mode from
 * @return {@link android.view.View.MeasureSpec#UNSPECIFIED},
 *         {@link android.view.View.MeasureSpec#AT_MOST} or
 *         {@link android.view.View.MeasureSpec#EXACTLY}
 */
public static int getMode(int measureSpec) {
    return (measureSpec & MODE_MASK);
}

/**
 * Extracts the size from the supplied measure specification.
 *
 * @param measureSpec the measure specification to extract the size from
 * @return the size in pixels defined in the supplied measure specification
 */
public static int getSize(int measureSpec) {
    return (measureSpec & ~MODE_MASK);
}为了能合理的去绘制定义View,你需要制定它的大小。复杂的自定义View通常需要根据屏幕的样式和大小来进行复杂的布局计算。你不应该假设你的屏幕上的View的大小。即使只有一个应用使用你的自定义View,也需要处理不同的屏幕尺寸、屏幕密度和横屏以及竖屏下的多种比率等。
虽然View有很多处理测量的方法,但他们中的大部分都不需要被重写。如果你的View不需要特别的控制它的大小,你只需要重写一个方法:onSizeChanged()。
onSizeChanged()方法会在你的View第一次指定大小后调用,在因某些原因改变大小后会再次调用。在上面PieChart的例子中,onSizeChanged()方法就是它需要重新计算表格样式和大小以及其他元素的地方。
下面就是PieChart.onSizeChanged()方法的内容:
// Account for padding
float xpad = (float)(getPaddingLeft() + getPaddingRight());
float ypad = (float)(getPaddingTop() + getPaddingBottom());

// Account for the label
if (mShowText) xpad += mTextWidth;

float ww = (float)w - xpad;
float hh = (float)h - ypad;

// Figure out how big we can make the pie.
float diameter = Math.min(ww, hh);自定义View最重要的就是展现样式。
onDraw()方法绘制自定义View最重要的步骤就是重写onDraw()方法。onDraw()方法的参数是Canvas对象。可以用它来绘制自身。Canvas类定义了绘制文字、线、位图和很多其他图形的方法。你可以在onDraw()方法中使用这些方法来指定UI.
在使用任何绘制方法之前,你都必须要创建一个Paint对象。
android.graphics框架将绘制分为两步:
Canvas处理。Paint处理。CanvasThe Canvas class holds the “draw” calls. To draw something, you need 4 basic components: A Bitmap to hold the pixels,
a Canvas to host the draw calls (writing into the bitmap), a drawing primitive (e.g. Rect, Path, text, Bitmap),
and a paint (to describe the colors and styles for the drawing).
Canvas():创建一个空的画布,可以使用setBitmap()方法来设置绘制的具体画布; Canvas(Bitmap bitmap):以bitmap对象创建一个画布,则将内容都绘制在bitmap上,bitmap不得为null; canvas.drawRect(RectF,Paint)方法用于画矩形,第一个参数为图形显示区域,第二个参数为画笔,设置好图形显示区域Rect和画笔Paint后,即可画图; canvas.drawRoundRect(RectF, float, float, Paint)方法用于画圆角矩形,第一个参数为图形显示区域,第二个参数和第三个参数分别是水平圆角半径和垂直圆角半径。 canvas.drawLine(startX, startY, stopX, stopY, paint):前四个参数的类型均为float,最后一个参数类型为Paint。表示用画笔paint从点(startX,startY)到点(stopX,stopY)画一条直线; canvas.drawLines (float[] pts, Paint paint)``pts:是点的集合,大家下面可以看到,这里不是形成连接线,而是每两个点形成一条直线,pts的组织方式为{x1,y1,x2,y2,x3,y3,……},例如float []pts={10,10,100,100,200,200,400,400};就是有四个点:(10,10)、(100,100),(200,200),(400,400)),两两连成一条直线;canvas.drawArc(oval, startAngle, sweepAngle, useCenter, paint):第一个参数oval为RectF类型,即圆弧显示区域,startAngle和sweepAngle均为float类型,分别表示圆弧起始角度和圆弧度数,3点钟方向为0度,useCenter设置是否显示圆心,boolean类型,paint为画笔; canvas.drawCircle(float,float, float, Paint)方法用于画圆,前两个参数代表圆心坐标,第三个参数为圆半径,第四个参数是画笔; canvas.drawBitmap(Bitmap bitmap, Rect src, Rect dst, Paint paint) 位图,参数一就是我们常规的Bitmap对象,参数二是源区域(这里是bitmap),参数三是目标区域(应该在canvas的位置和大小),参数四是Paint画刷对象,因为用到了缩放和拉伸的可能,当原始Rect不等于目标Rect时性能将会有大幅损失。canvas.drawText(String text, float x, floaty, Paint paint)渲染文本,Canvas类除了上 String类型的文本,参数二x轴,参数三y轴,参数四是Paint对象。canvas.drawPath (Path path, Paint paint),根据Path去画. java
Path path = new Path();
path.moveTo(10, 10); //设定起始点
path.lineTo(10, 100);//第一条直线的终点,也是第二条直线的起点
path.lineTo(300, 100);//画第二条直线
path.lineTo(500, 100);//第三条直线
path.close();//闭环
canvas.drawPath(path, paint);
PaintsetARGB(int a, int r, int g, int b) 设置Paint对象颜色,参数一为alpha透明值setAlpha(int a) 设置alpha不透明度,范围为0~255setAntiAlias(boolean aa)是否抗锯齿setColor(int color)设置颜色setTextScaleX(float scaleX)设置文本缩放倍数,1.0f为原始setTextSize(float textSize)设置字体大小setUnderlineText(String underlineText)设置下划线例如,Canvas提供了一个画一条线的方法,而Paint提供了指定这条线的颜色的方法。Canvas提供了绘制长方形的方法,而Paint提供了是用颜色填充整个长方形还是空着的方法。简单的说,Canvas指定了你想在屏幕上绘制的形状,而Paint指定了你要绘制的形状的颜色、样式、字体和样式等等。
所以,在你draw任何东西之前,你都需要创建一个或者多个Paint对象。下面的PieChart例子就是在构造函数中调用的init方法:
private void init() {
   mTextPaint = new Paint(Paint.ANTI_ALIAS_FLAG);
   mTextPaint.setColor(mTextColor);
   if (mTextHeight == 0) {
       mTextHeight = mTextPaint.getTextSize();
   } else {
       mTextPaint.setTextSize(mTextHeight);
   }

   mPiePaint = new Paint(Paint.ANTI_ALIAS_FLAG);
   mPiePaint.setStyle(Paint.Style.FILL);
   mPiePaint.setTextSize(mTextHeight);

   mShadowPaint = new Paint(0);
   mShadowPaint.setColor(0xff101010);
   mShadowPaint.setMaskFilter(new BlurMaskFilter(8, BlurMaskFilter.Blur.NORMAL));

...下面是PieChart完整的onDraw()方法:
protected void onDraw(Canvas canvas) {
   super.onDraw(canvas);

   // Draw the shadow
   canvas.drawOval(
           mShadowBounds,
           mShadowPaint
   );

   // Draw the label text
   canvas.drawText(mData.get(mCurrentItem).mLabel, mTextX, mTextY, mTextPaint);

   // Draw the pie slices
   for (int i = 0; i < mData.size(); ++i) {
       Item it = mData.get(i);
       mPiePaint.setShader(it.mShader);
       canvas.drawArc(mBounds,
               360 - it.mEndAngle,
               it.mEndAngle - it.mStartAngle,
               true, mPiePaint);
   }

   // Draw the pointer
   canvas.drawLine(mTextX, mPointerY, mPointerX, mPointerY, mTextPaint);
   canvas.drawCircle(mPointerX, mPointerY, mPointerSize, mTextPaint);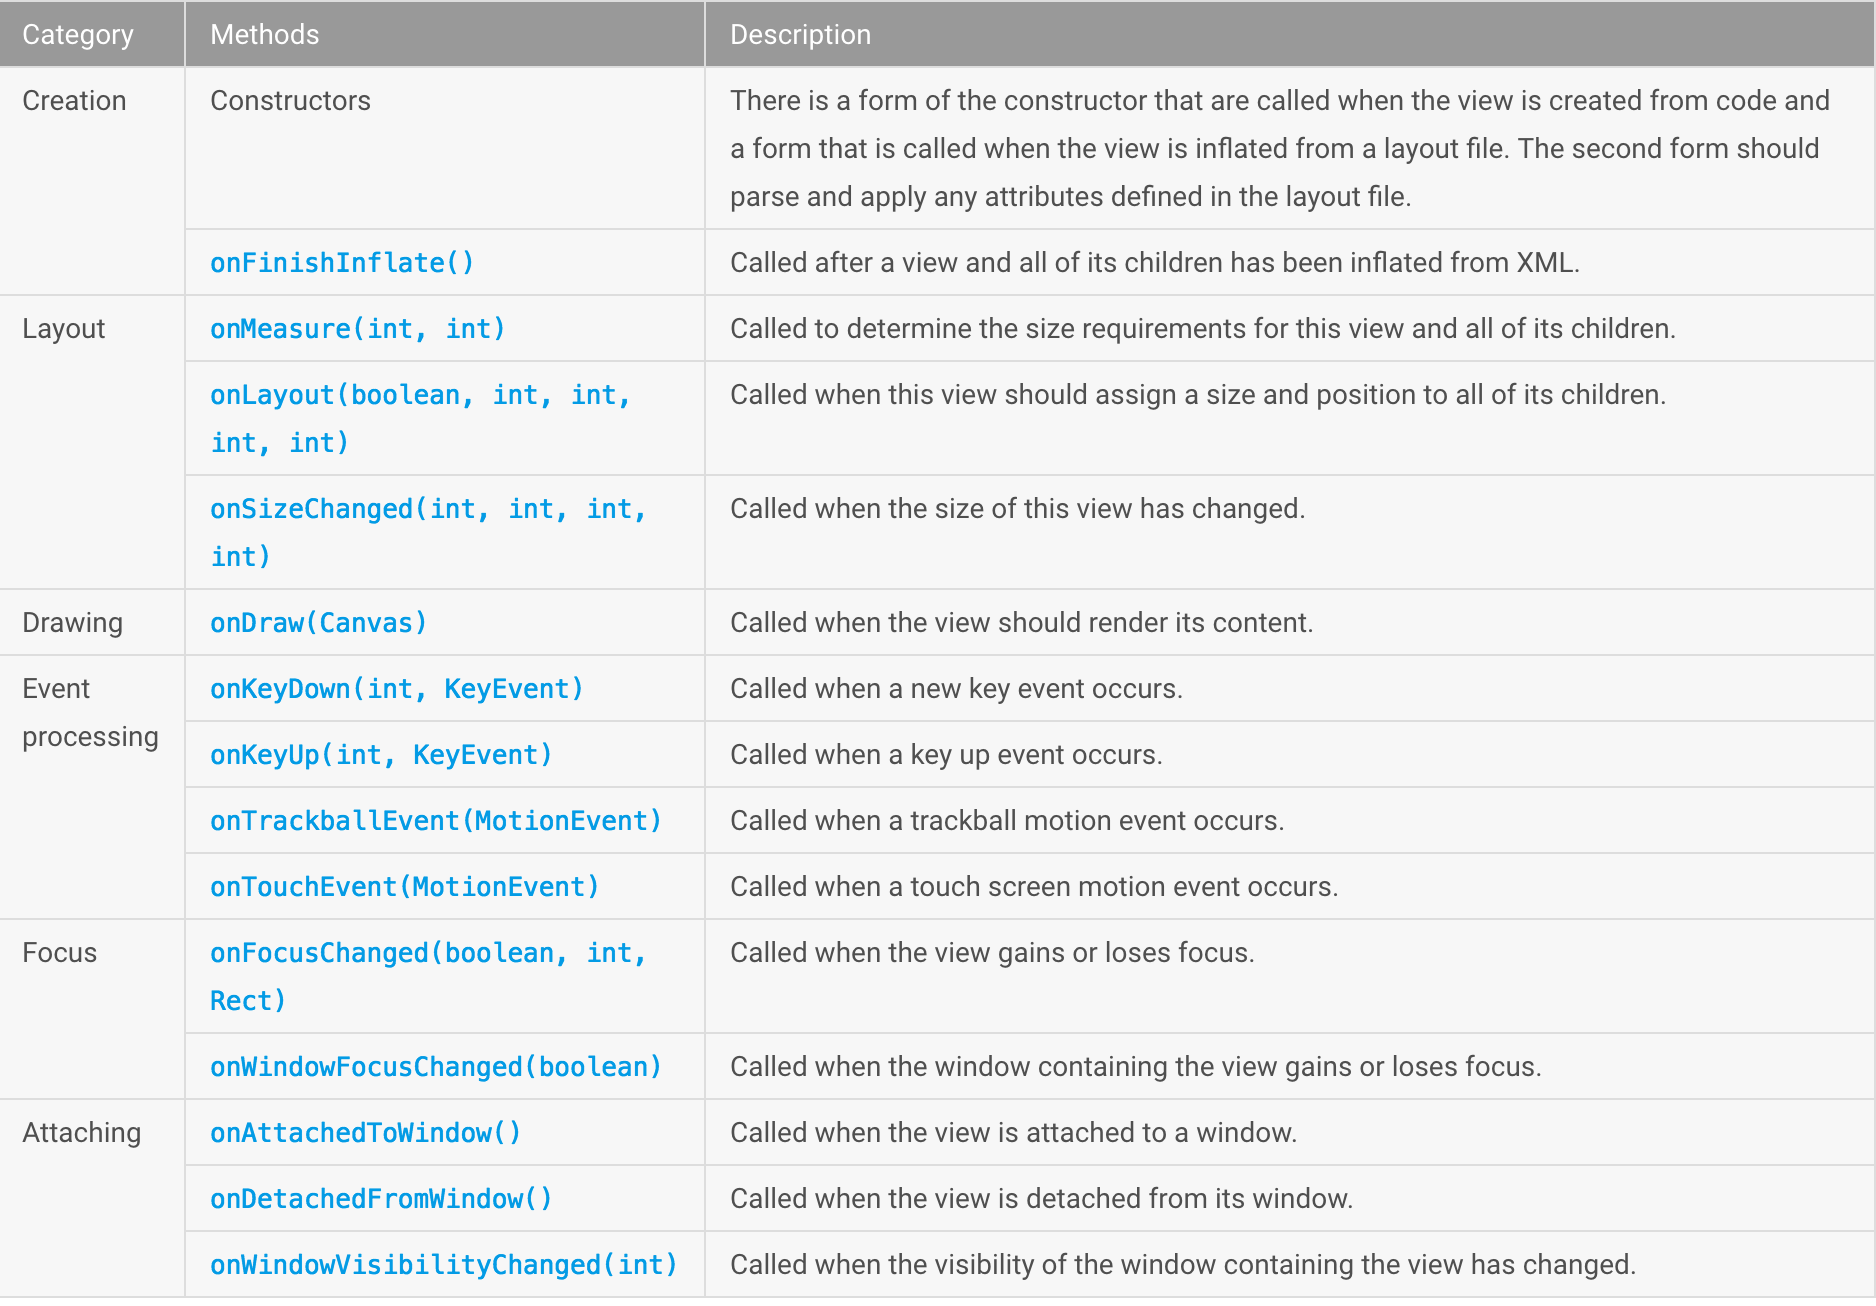
}下面是一张View绘制过程中框架调用的一些标准方法概要图:
下面来几个例子:
自定义开关:
public class ToogleView extends View {
    private int mSlideMarginLeft = 0;
    private Bitmap backgroundBitmap;
    private Bitmap slideButton;


    public ToogleView(Context context) {
        super(context);
        init(context);
    }

    public ToogleView(Context context, AttributeSet attrs) {
        super(context, attrs);
        init(context);
    }

    public ToogleView(Context context, AttributeSet attrs, int defStyleAttr) {
        super(context, attrs, defStyleAttr);
        init(context);
    }

    private void init(Context context) {
        backgroundBitmap = BitmapFactory.decodeResource(getResources(),
                R.drawable.toogle_bg);
        slideButton = BitmapFactory.decodeResource(getResources(),
                R.drawable.toogle_slide);
        this.setOnClickListener(new OnClickListener() {
            @Override
            public void onClick(View v) {
                if (mSlideMarginLeft == 0) {
                    mSlideMarginLeft = backgroundBitmap.getWidth() - slideButton.getWidth();
                } else {
                    mSlideMarginLeft = 0;
                }
                invalidate();
            }
        });
    }

    @Override
    protected void onMeasure(int widthMeasureSpec, int heightMeasureSpec) {
        super.onMeasure(widthMeasureSpec, heightMeasureSpec);
    }

    @Override
    protected void onLayout(boolean changed, int left, int top, int right, int bottom) {
        super.onLayout(changed, left, top, right, bottom);
    }

    @Override
    protected void onDraw(Canvas canvas) {
        super.onDraw(canvas);
        Paint paint = new Paint();
        paint.setAntiAlias(true);
    // 先画背景图
        canvas.drawBitmap(backgroundBitmap, 0, 0, paint);
    // 再画滑块,用mSlideMarginLeft来控制滑块距离左边的距离。
        canvas.drawBitmap(slideButton, mSlideMarginLeft, 0, paint);
}<LinearLayout android:layout_width="match_parent"
android:layout_height="match_parent"
android:orientation="vertical"
xmlns:android="http://schemas.android.com/apk/res/android" >
<com.charon.recyclerviewdemo.ToogleView
android:paddingLeft="50dp"
android:background="@android:color/holo_green_light"
android:layout_width="match_parent"
android:layout_height="wrap_content" />
</LinearLayout>
很明显显示的不对,因为高设置为warp_content了,但是界面显示的确实整个屏幕,而且paddingLeft也没生效,那该怎么做呢? 当然是重写onMeasure() 方法:
public class ToogleView extends View {
    private int mSlideMarginLeft = 0;
    private Bitmap backgroundBitmap;
    private Bitmap slideButton;


    public ToogleView(Context context) {
        super(context);
        init(context);
    }

    public ToogleView(Context context, AttributeSet attrs) {
        super(context, attrs);
        init(context);
    }

    public ToogleView(Context context, AttributeSet attrs, int defStyleAttr) {
        super(context, attrs, defStyleAttr);
        init(context);
    }

    private void init(Context context) {
        backgroundBitmap = BitmapFactory.decodeResource(getResources(),
                R.drawable.toogle_bg);
        slideButton = BitmapFactory.decodeResource(getResources(),
                R.drawable.toogle_slide);
        this.setOnClickListener(new OnClickListener() {
            @Override
            public void onClick(View v) {
                if (mSlideMarginLeft == 0) {
                    mSlideMarginLeft = backgroundBitmap.getWidth() - slideButton.getWidth();
                } else {
                    mSlideMarginLeft = 0;
                }
                invalidate();
            }
        });
    }

    @Override
    protected void onMeasure(int widthMeasureSpec, int heightMeasureSpec) {
        int measureWidth = MeasureSpec.getSize(widthMeasureSpec);
        int measureWidthMode = MeasureSpec.getMode(widthMeasureSpec);

        int measureHeight = MeasureSpec.getSize(heightMeasureSpec);
        int measureHeightMode = MeasureSpec.getMode(heightMeasureSpec);
        int width;
        int height;
        if (MeasureSpec.EXACTLY == measureWidthMode) {
            width = measureWidth;
        } else {
            width = backgroundBitmap.getWidth();
        }

        if (MeasureSpec.EXACTLY == measureHeightMode) {
            height = measureHeight;
        } else {
            height = backgroundBitmap.getHeight();
        }

        setMeasuredDimension(width, height);
    }

    @Override
    protected void onLayout(boolean changed, int left, int top, int right, int bottom) {
        super.onLayout(changed, left, top, right, bottom);
    }

    @Override
    protected void onDraw(Canvas canvas) {
        super.onDraw(canvas);
        Paint paint = new Paint();
        paint.setAntiAlias(true);
        canvas.drawBitmap(backgroundBitmap, getPaddingLeft(), 0, paint);
        canvas.drawBitmap(slideButton, mSlideMarginLeft + getPaddingLeft(), 0, paint);
    }

}
这样就可以了。简单的说明一下,就是如果当前的模式是EXACTLY那就把父View传递进来的宽高设置进来,如果是AT_MOST或者UNSPECIFIED的话就使用背景图片的宽高。
最后再来一个自定义ViewGroup的例子:
之前的引导页面都是通过类似ViewPager这种方法左右滑动,现在想让他上下滑动,该怎么弄呢?
public class VerticalLayout extends ViewGroup {
    public VerticalLayout(Context context) {
        super(context);
    }
    public VerticalLayout(Context context, AttributeSet attrs) {
        super(context, attrs);
    }

    public VerticalLayout(Context context, AttributeSet attrs, int defStyleAttr) {
        super(context, attrs, defStyleAttr);
    }

    @Override
    protected void onLayout(boolean changed, int l, int t, int r, int b) {

    }
}继承ViewGroup必须要重写onLayout方法。其实这也很好理解,因为每个ViewGroup的排列方式不一样,所以让子类来自己实现是最好的。
当然畜类重写onLayout之外,也要重写onMeasure。
代码如下,滑动手势处理的部分就不贴了。
    @Override
    protected void onMeasure(int widthMeasureSpec, int heightMeasureSpec) {
        int measureSpec = MeasureSpec.makeMeasureSpec(mScreenHeight
                * getChildCount(), MeasureSpec.getMode(heightMeasureSpec));
        super.onMeasure(widthMeasureSpec, measureSpec);
        measureChildren(widthMeasureSpec, heightMeasureSpec);
    }

    @Override
    protected void onLayout(boolean changed, int l, int t, int r, int b) {
        // 就像猴子捞月一样,让他们一个个的从上往下排就好了
        if (changed) {
            int childCount = getChildCount();
            for (int i = 0; i < childCount; i++) {
                View child = getChildAt(i);
                if (child.getVisibility() != View.GONE) {
                    child.layout(l, i * mScreenHeight, r, (i + 1)
                            * mScreenHeight);
                }
            }
        }
    }
参考部分:
- http://blog.csdn.net/cyp331203/article/details/40736027
标签:
原文地址:http://blog.csdn.net/charon_chui/article/details/51602847