标签:
这篇的参考官方代码示例Cameras,代码在https://github.com/phmongeau/SplitScreen/tree/master/src。
首先用Windows的画图画了几个格,大小是20*20的。
然后参照官方代码示例,写了一段代码:
 1 package org
 2 {
 3     import org.flixel.FlxState;
 4     import org.flixel.FlxTilemap;
 5
 6     /**
 7      * ...
 8      * @author QuanJP quanjp1996@gmail.com
 9      */
10     public class GameState extends FlxState
11     {
12
13         [Embed(source = "../maptile.png")] private var ImgTile:Class;
14
15         protected var map:FlxTilemap;
16
17         public function GameState()
18         {
19             var data:Array = [    2, 2, 2, 1, 1, 1, 2,
20                                 2, 0, 2, 1, 1, 2, 0,
21                                 2, 2, 2, 1, 2, 0, 0];
22             map = new FlxTilemap();
23             map.loadMap(FlxTilemap.arrayToCSV(data, 7), ImgTile, 20, 20);
24             add(map);
25         }
26
27     }
28
29 }
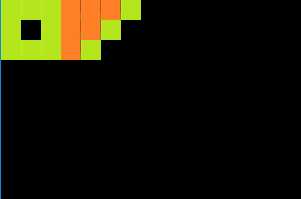
随便写写的地图数据,编译后变成这样:

不知道为什么,没有显示出红色部分。
还是分析一下代码吧。下面是我注释的代码,当然,代码是原作者Adam Atomic写的,我只是加注释。
 1         /**
 2          * 凭借一个字符串数据和瓷砖图像加载一个瓷砖地图。
 3          *
 4          * @param    MapData            一系列以‘,‘和‘\n‘划定指标指示瓷砖应该以什么顺序进去。
 5          * @param    TileGraphic        您想要使用的瓷砖,排成一条在MapData对应数字。
 6          * @param    TileWidth        瓷砖宽度 (e.g. 8) - 不设置默认为瓷砖位图的宽度。
 7          * @param    TileHeight        瓷砖宽度 (e.g. 8) - 不设置默认为瓷砖的宽度。
 8          * @param    AutoTile        是否使用自动瓷砖贴图算法加载地图。  Setting this to either AUTO or ALT will override any values you put for StartingIndex, DrawIndex, or CollideIndex.
 9          * @param    StartingIndex    Used to sort of insert empty tiles in front of the provided graphic.  Default is 0, usually safest ot leave it at that.  Ignored if AutoTile is set.
10          * @param    DrawIndex        Initializes all tile objects equal to and after this index as visible. Default value is 1.  Ignored if AutoTile is set.
11          * @param    CollideIndex    Initializes all tile objects equal to and after this index as allowCollisions = ANY.  Default value is 1.  Ignored if AutoTile is set.  Can override and customize per-tile-type collision behavior using <code>setTileProperties()</code>.
12          *
13          * @return    A pointer this instance of FlxTilemap, for chaining as usual :)
14          */
15         public function loadMap(MapData:String, TileGraphic:Class, TileWidth:uint=0, TileHeight:uint=0, AutoTile:uint=OFF, StartingIndex:uint=0, DrawIndex:uint=1, CollideIndex:uint=1):FlxTilemap
16         {
17             auto = AutoTile;
18             _startingIndex = StartingIndex;
19
20             //基于数据字符串辨别地图维度。
21             var columns:Array;
22             var rows:Array = MapData.split("\n"); //用‘\n’把输入的MapData分成字符串数组
23             heightInTiles = rows.length;//地图高度(以格子数计)就是rows的长度
24             _data = new Array();
25             var row:uint = 0;//处理第几行?
26             var column:uint;
27             while(row < heightInTiles)
28             {
29                 columns = rows[row++].split(",");//用‘,‘划分列的元素
30                 if(columns.length <= 1)
31                 {
32                     heightInTiles = heightInTiles - 1;
33                     continue;//假如发生空行的情况,地图高度减1
34                 }
35                 if(widthInTiles == 0)
36                     widthInTiles = columns.length;
37                 column = 0;
38                 while(column < widthInTiles)
39                     _data.push(uint(columns[column++]));//把整列压进_data
40             }
41
42             //Pre-process the map data if it‘s auto-tiled
43             var i:uint;
44             totalTiles = widthInTiles*heightInTiles;
45             if(auto > OFF)
46             {
47                 _startingIndex = 1;
48                 DrawIndex = 1;
49                 CollideIndex = 1;
50                 i = 0;
51                 while(i < totalTiles)
52                     autoTile(i++);
53             }
54
55             //搞清楚瓷砖的尺寸
56             _tiles = FlxG.addBitmap(TileGraphic);//加载图像
57             _tileWidth = TileWidth;
58             if(_tileWidth == 0)
59                 _tileWidth = _tiles.height;//函数参数起不起作用
60             _tileHeight = TileHeight;
61             if(_tileHeight == 0)
62                 _tileHeight = _tileWidth;//函数参数起不起作用
63
64             //创建一些瓷砖对象,留给以后做重叠检查 (每种一个)
65             i = 0;
66             var l:uint = (_tiles.width/_tileWidth) * (_tiles.height/_tileHeight);
67             if(auto > OFF)
68                 l++;
69             _tileObjects = new Array(l);
70             var ac:uint;
71             while(i < l)
72             {
73                 _tileObjects[i] = new FlxTile(this,i,_tileWidth,_tileHeight,(i >= DrawIndex),(i >= CollideIndex)?allowCollisions:NONE);
74                 i++;
75             }
76
77             //为debug需求创建的对象
78             _debugTileNotSolid = makeDebugTile(FlxG.BLUE);
79             _debugTilePartial = makeDebugTile(FlxG.PINK);
80             _debugTileSolid = makeDebugTile(FlxG.GREEN);
81             _debugRect = new Rectangle(0,0,_tileWidth,_tileHeight);
82
83             //创建地图
84             width = widthInTiles*_tileWidth;
85             height = heightInTiles*_tileHeight;
86             _rects = new Array(totalTiles);
87             i = 0;
88             while(i < totalTiles)
89                 updateTile(i++);//刷新
90
91             return this;
92         }
好了,知道了MapData究竟是怎样的,其实就是用","和"\n"划分的普通的地图数据而已,基本可以用了。还有其他参数也比较清晰。可以说,知道loadMap()就基本可以使用这个类了,不过它还有很多高级功能,下次再看看吧。
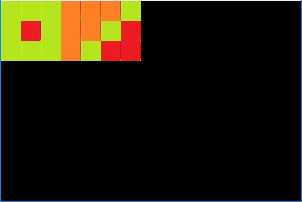
GameState里的代码改成这样,也就可以显示剩余部分了。
1         public function GameState()
2         {
3             var data:Array = [    2, 2, 2, 1, 1, 1, 2,
4                                 2, 0, 2, 1, 1, 2, 0,
5                                 2, 2, 2, 1, 2, 0, 0];
6             map = new FlxTilemap();
7             map.loadMap(FlxTilemap.arrayToCSV(data, 7), ImgTile, 20, 20,FlxTilemap.OFF,0,0,1);
8             add(map);
9         }

代码地址:https://github.com/quanjp/LearningFlixel/tree/master/002loadMap
标签:
原文地址:http://www.cnblogs.com/quanjp/p/5554190.html