标签:监控系统 ganglia 集群监控
前言:Ganglia是UC Berkeley发起的一个开源集群监视项目,设计用于测量数以千计的节点。Ganglia的核心包含gmond、gmetad以及一个Web前端。主要是用来监控系统性能,如:cpu 、mem、硬盘利用率, I/O负载、网络流量情况等,通过曲线很容易见到每个节点的工作状态,对合理调整、分配系统资源,提高系统整体性能起到重要作用。
规划:
使用一台ganglia机器监控两个集群
ganglia-server(gmetad):10.64.8.10 centos6.5
ganglia-agent(gmond):xdhadoop、sjselk
集群xdhadoop:
master1、master2、slave1、slave2、slave3
集群sjselk:
es-master1、es-master2、es-master3、es-master4、es-master5
一:准备工作
(1)修改主机名,并将监控机名写入hosts
10.10.1.10
#hostname ganglia && echo ganglia >/etc/hostname
#cat >> /etc/hosts << EOF
10.10.1.1 master1
10.10.1.2 master2
10.10.1.3 slave1
10.10.1.4 slave2
10.10.1.5 slave3
10.10.0.1 es-master1
10.10.0.2 es-master2
10.10.0.3 es-master3
10.10.0.4 es-master4
10.10.0.5 es-master5
10.10.1.10 ganglia
EOF
(2)关闭selinux和防火墙
#setenforce 0&& service iptables stop &&chkconfig iptables off
二:ganglia-server环境安装
ganglia
(1)web环境
安装apache
#yum install httpd
#vim /etc/httpd/conf/httpd.conf
User nobody
Group nobody
安装php,并编辑测试页面。
#yum install php
#vim /var/www/html/info.php
<?php
phpinfo();
?>
启动httpd
#service httpd restart
打开浏览器访问10.64.8.10/info.php测试,出现下图说明apache与php联动成功。
(2)安装依赖
# yum install -y apr-devel apr-util check-devel cairo-devel pango-devel libxml2-devel rpm-build glib2-devel dbus-devel freetype-devel fontconfig-devel gcc-c++ expat-devel python-devel libXrender-devel
(3)安装libconfuse
#wget http://download.savannah.gnu.org/releases/confuse/confuse-2.7.tar.gz
#tar confuse-2.7.tar.gz
#cd confuse-2.7
# ./configure CFLAGS=-fPIC --disable-nls
# make&&make install
(4)安装pcre
#tar xf pcre-8.12.tar.bz2
#cd pcre-8.12
#./configure && make && make install
#echo "/usr/local/lib" >> /etc/ld.so.conf
# ldconfig
(5)安装rrdTool
1:下载tar包,编译安装rrdTool
#cd /opt
#wget  http://oss.oetiker.ch/rrdtool/pub/rrdtool-1.3.1.tar.gz
#tar xf rrdtool-1.3.1.tar.gz
#cd rrdtool-1.3.1
#./configure --prefix=/usr/local
#make && make install
rrd安装后:lib库文件 /usr/local/lib bin可执行文件 /usr/local/bin/rrdtool
2:将rrdtool 所以拷到/usr/bin下(方便后面ganglia调用),并加入库文件。
#cp /usr/local/bin/rrdtool  /usr/bin/rrdtool
#echo "/usr/local/lib" >> /etc/ld.so.conf
# ldconfig
3:验证rrdtool是否安装成功,利用examples下的示例,渲染一个示例图
#rrdtool -V
#cd /usr/local/share/rrdtool/examples/
#./stripes.pl
#cp stripes.png /var/www/html/
在浏览器访问http://ganglia/stripes.png,,如下图说明rrd安装正常。
三:ganglia-server(gmetad)安装
ganglia
(1)编译安装ganglia
#wget http://120.52.73.45/jaist.dl.sourceforge.net/project/ganglia/ganglia%20monitoring%20core/3.7.2/ganglia-3.7.2.tar.gz
#tar xf  ganglia-3.7.2.tar.gz
#cd  ganglia-3.7.2
# ./configure --prefix=/usr/local/ganglia --with-gmetad --with-librrd=/usr/local/lib --sysconfdir=/etc/ganglia --with-libpcre=no
#make && make install
(2)cpoy启动脚本
# cp gmond/gmond.init /etc/rc.d/init.d/gmond
# cp gmetad/gmetad.init /etc/rc.d/init.d/gmetad
# chkconfig --add gmond && chkconfig gmond on
# chkconfig --add gmetad && chkconfig gmetad on
#vim /etc/init.d/gmetad
改
GMETAD=/usr/sbin/gmetad
为
GMETAD=/usr/local/ganglia/sbin/gmetad
#vim /etc/init.d/gmond
改
GMETAD=/usr/sbin/gmond
为
GMETAD=/usr/local/ganglia/sbin/gmond
复制python_modules
#mkdir /usr/local/ganglia/lib64/ganglia/python_modules
#cp ./gmond/python_modules/*/*.py  /usr/local/ganglia/lib64/ganglia/python_modules
(3)安装ganglia前端
#wget http://120.52.73.47/jaist.dl.sourceforge.net/project/ganglia/ganglia-web/3.7.1/ganglia-web-3.7.1.tar.gz
#tar xf ganglia-web-3.7.1.tar.gz
#cd ganglia-web-3.7.1
#vim Makefile
#改成实际的目录
##########################################################
# User configurables:
##########################################################
# Location where gweb should be installed to (excluding conf, dwoo dirs).
#ganglia的web发布目录
GDESTDIR = /var/www/html/ganglia

# Location where default apache configuration should be installed to.
#ganglia-web的配置文件目录
GCONFDIR = /etc/ganglia-web

# Gweb statedir (where conf dir and Dwoo templates dir are stored)
GWEB_STATEDIR = /var/lib/ganglia-web

# Gmetad rootdir (parent location of rrd folder)
GMETAD_ROOTDIR = /usr/local/ganglia
#httpd的用户
APACHE_USER = nobody

#make install
(4)启动server端gmetad
# service gmetad start
Starting GANGLIA gmetad: [ OK ]
浏览器访问:http://ganglia/ganglia 如下图,gmetad正常,但是还没有加入机器,所以是空白的。
四:ganglia-agent(gmond)安装
xdhadoop所有机器、sjselk所有机器
(1)安装依赖
# yum install -y apr-devel apr-util check-devel cairo-devel pango-devel libxml2-devel rpm-build glib2-devel dbus-devel freetype-devel fontconfig-devel gcc-c++ expat-devel python-devel libXrender-devel
(2)安装libconfuse
#wget http://download.savannah.gnu.org/releases/confuse/confuse-2.7.tar.gz
#tar confuse-2.7.tar.gz
#cd confuse-2.7
# ./configure CFLAGS=-fPIC --disable-nls
# make&&make install
(3)安装pcre
#tar xf pcre-8.12.tar.bz2
#cd pcre-8.12
#./configure && make && make install
#echo "/usr/local/lib" >> /etc/ld.so.conf
# ldconfig
(4)安装
#tar xf  ganglia-3.7.2.tar.gz
#cd  ganglia-3.7.2
# ./configure --prefix=/usr/local/ganglia --sysconfdir=/etc/ganglia
#make && make install
启动脚本
#cp gmond/gmond.init /etc/rc.d/init.d/gmond
#chkconfig --add gmond && chkconfig gmond on
#vim /etc/init.d/gmond
改
GMETAD=/usr/sbin/gmond
为
GMETAD=/usr/local/ganglia/sbin/gmond
复制python_modules
#mkdir /usr/local/ganglia/lib64/ganglia/python_modules
#cp ./gmond/python_modules/*/*.py  /usr/local/ganglia/lib64/ganglia/python_modules
安装完毕,其实agent安装和server安装几乎一样,只是server端我们用的是gmetad(也会安装gmond),agent端,我们只用gmond就行了。
五:配置gmetad和gmond
(1)配置gmond.conf(sjselk集群,组播)
sjselk
#vim  /etc/ganglia/gmond.conf
cluster {
  name = "sjselk"               #集群名
  owner = "nobody"              #运行gmond用户名
  latlong = "unspecified"
  url = "unspecified"
}

host {
  location = "unspecified"
}

udp_send_channel {
  mcast_join = 239.2.11.71      #默认组播地址
  port = 8649                   #gmond端口
  ttl = 1
}

udp_recv_channel {
  mcast_join = 239.2.11.71
  port = 8649
  bind = 239.2.11.71
  retry_bind = true
}

tcp_accept_channel {
  port = 8649
  gzip_output = no
}
添加路由到组播地址
# ip route add 239.2.11.71 dev eth0
(2)配置gmond.conf(xdhadoop集群,单播)
xdhadoop
#vim  /etc/ganglia/gmond.conf
cluster {
  name = "xdhadoop"      #集群名
  owner = "nobody"       #运行gmond的用户
  latlong = "unspecified"
  url = "unspecified"
}

host {
  location = "unspecified"
}

udp_send_channel {
#  mcast_join = 239.2.11.71   #使用单播,注释组播地址
  host = 10.10.1.10           #使用单播,写gmond的IP
  port = 8653                 #设置端口
  ttl = 1
}

udp_recv_channel {
#  mcast_join = 239.2.11.71    #使用单播,注释组播地址
  port = 8653                  #设置端口
#  bind = 239.2.11.71          #使用单播,注释组播地址
bind = 10.10.0.1               #写自己的IP
  retry_bind = true
}

tcp_accept_channel {
  port = 8653
  gzip_output = no
}
(3)配置gmetad.conf
ganglia
#vim /etc/gmetad.conf
 #组播只写一个ip即可,可以写两个,防止一台机器挂了后,收不到数据。单播需要写上所有机器。
data_source "sjselk" es-master1:8649  es-master2:8649
data_source "xdhadoop" master1:8653 master2:8653 slave1:8653  slave2:8653 slave3:8653
添加路由到组播地址
# ip route add 239.2.11.71 dev eth0
五:启动gmetad和gmond
ganglia
[root@ganglia ~]# service gmetad start
Starting GANGLIA gmetad:                                    [  OK  ]
sjselk、xdhadoop
[root@ganglia ~]# service gmond start
Starting GANGLIA gmond:                                     [  OK  ]
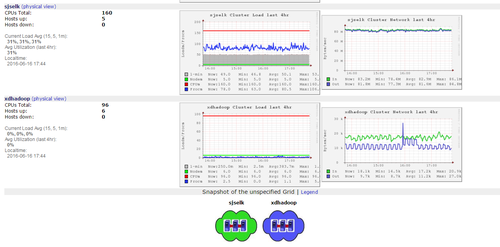
访问http://ganglia/ganglia

本文出自 “8931355” 博客,请务必保留此出处http://8941355.blog.51cto.com/8931355/1790016
标签:监控系统 ganglia 集群监控
原文地址:http://8941355.blog.51cto.com/8931355/1790016