标签:
参考:http://www.mybatis.org/mybatis-3/zh/getting-started.html
从今天开始学习官方文档。
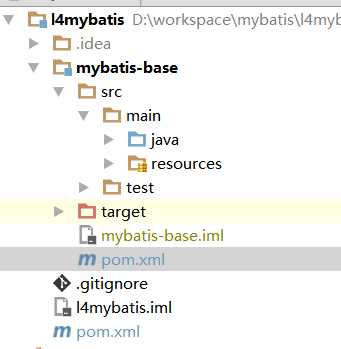
项目结构:

首先,搭建一个maven项目。为了方便以后的测试,这里每次测试都是以子项目的形式。所以,创建一个parent:
在idea中,File->new->project->选择maven->groupt:com.test,artifact:l4mybatis.
创建好parent后,填充pom:

 1 <?xml version="1.0" encoding="UTF-8"?>
 2 <project xmlns="http://maven.apache.org/POM/4.0.0"
 3          xmlns:xsi="http://www.w3.org/2001/XMLSchema-instance"
 4          xsi:schemaLocation="http://maven.apache.org/POM/4.0.0 http://maven.apache.org/xsd/maven-4.0.0.xsd">
 5     <modelVersion>4.0.0</modelVersion>
 6
 7     <groupId>com.test</groupId>
 8     <artifactId>l4mybatis</artifactId>
 9     <packaging>pom</packaging>
10     <version>1.0-SNAPSHOT</version>
11
12
13     <dependencyManagement>
14         <dependencies>
15             <dependency>
16                 <groupId>org.mybatis</groupId>
17                 <artifactId>mybatis</artifactId>
18                 <version>3.4.1</version>
19             </dependency>
20             <dependency>
21                 <groupId>mysql</groupId>
22                 <artifactId>mysql-connector-java</artifactId>
23                 <version>6.0.2</version>
24             </dependency>
25             <dependency>
26                 <groupId>junit</groupId>
27                 <artifactId>junit</artifactId>
28                 <version>4.12</version>
29             </dependency>
30         </dependencies>
31     </dependencyManagement>
32
33
34 </project>
在项目名称l4mybatis上右键,new -> module->选择maven->artifact:mybatis-base.
创建好子项目mybatis-base后,编写pom:

 1 <?xml version="1.0" encoding="UTF-8"?>
 2 <project xmlns="http://maven.apache.org/POM/4.0.0"
 3          xmlns:xsi="http://www.w3.org/2001/XMLSchema-instance"
 4          xsi:schemaLocation="http://maven.apache.org/POM/4.0.0 http://maven.apache.org/xsd/maven-4.0.0.xsd">
 5     <parent>
 6         <artifactId>l4mybatis</artifactId>
 7         <groupId>com.test</groupId>
 8         <version>1.0-SNAPSHOT</version>
 9     </parent>
10     <modelVersion>4.0.0</modelVersion>
11
12     <artifactId>mybatis-base</artifactId>
13
14     <dependencies>
15         <dependency>
16             <groupId>org.mybatis</groupId>
17             <artifactId>mybatis</artifactId>
18         </dependency>
19         <dependency>
20             <groupId>mysql</groupId>
21             <artifactId>mysql-connector-java</artifactId>
22         </dependency>
23         <dependency>
24             <groupId>junit</groupId>
25             <artifactId>junit</artifactId>
26         </dependency>
27     </dependencies>
28
29     <build>
30         <resources>
31             <resource>
32                 <directory>src/main/resources</directory>
33                 <includes>
34                     <include>**/*.properties</include>
35                     <include>**/*.xml</include>
36                 </includes>
37                 <filtering>true</filtering>
38             </resource>
39             <resource>
40                 <directory>src/main/java</directory>
41                 <includes>
42                     <include>**/*.properties</include>
43                     <include>**/*.xml</include>
44                 </includes>
45                 <filtering>true</filtering>
46             </resource>
47         </resources>
48     </build>
49
50
51 </project>
在helloword测试中,我们依赖有:
        <dependencies>
            <dependency>
                <groupId>org.mybatis</groupId>
                <artifactId>mybatis</artifactId>
                <version>3.4.1</version>
            </dependency>
            <dependency>
                <groupId>mysql</groupId>
                <artifactId>mysql-connector-java</artifactId>
                <version>6.0.2</version>
            </dependency>
            <dependency>
                <groupId>junit</groupId>
                <artifactId>junit</artifactId>
                <version>4.12</version>
            </dependency>
        </dependencies>
新建mysql 数据库mybatis,创建一个表blog:

 1 SET FOREIGN_KEY_CHECKS=0;
 2
 3 -- ----------------------------
 4 -- Table structure for blog
 5 -- ----------------------------
 6 DROP TABLE IF EXISTS `blog`;
 7 CREATE TABLE `blog` (
 8   `id` int(11) NOT NULL AUTO_INCREMENT,
 9   `name` varchar(255) DEFAULT NULL,
10   PRIMARY KEY (`id`)
11 ) ENGINE=InnoDB AUTO_INCREMENT=2 DEFAULT CHARSET=utf8;
12
13 -- ----------------------------
14 -- Records of blog
15 -- ----------------------------
16 INSERT INTO `blog` VALUES (‘1‘, ‘test‘);
在src\main\java下:
创建com.test.start.mapper.BlogMapper。这个相当于dao。

 1 package com.test.start.mapper;
 2
 3 import com.test.start.model.Blog;
 4
 5 /**
 6  * Created by miaorf on 2016/6/27.
 7  */
 8 public interface BlogMapper {
 9
10     Blog selectBlog(int id);
11 }
创建com/test/start/mapper/BlogMapper.xml。这个要和mapper一一映射,名字完全相同,命名空间一致。

1 <?xml version="1.0" encoding="UTF-8" ?>
2 <!DOCTYPE mapper
3         PUBLIC "-//mybatis.org//DTD Mapper 3.0//EN"
4         "http://mybatis.org/dtd/mybatis-3-mapper.dtd">
5 <mapper namespace="com.test.start.mapper.BlogMapper">
6     <select id="selectBlog" resultType="Blog">
7         select * from Blog where id = #{id}
8     </select>
9 </mapper>
创建com.test.start.model.Blog。这个是实体,就是查询结果所映射的类。

 1 package com.test.start.model;
 2
 3 /**
 4  * Created by miaorf on 2016/6/27.
 5  */
 6 public class Blog {
 7     int id;
 8     String name;
 9
10     @Override
11     public String toString() {
12         return "Blog{" +
13                 "id=" + id +
14                 ", name=‘" + name + ‘\‘‘ +
15                 ‘}‘;
16     }
17 }
在src\main\resources下:
创建mybatis-config.xml:

 1 <?xml version="1.0" encoding="UTF-8" ?>
 2 <!DOCTYPE configuration
 3         PUBLIC "-//mybatis.org//DTD Config 3.0//EN"
 4         "http://mybatis.org/dtd/mybatis-3-config.dtd">
 5 <configuration>
 6     <properties resource="db.properties"/>
 7
 8     <typeAliases>
 9         <!--简化mapper.xml中实体的的命名,否则mapper.xml中的实体必须为全限定名称-->
10         <package name="com.test.start.model"/>
11     </typeAliases>
12
13     <environments default="development">
14         <environment id="development">
15             <transactionManager type="JDBC"/>
16             <dataSource type="POOLED">
17                 <property name="driver" value="${jdbc.driver}"/>
18                 <property name="url" value="${jdbc.url}"/>
19                 <property name="username" value="${jdbc.username}"/>
20                 <property name="password" value="${jdbc.password}"/>
21             </dataSource>
22         </environment>
23     </environments>
24     <mappers>
25         <mapper resource="com/test/start/mapper/BlogMapper.xml"/>
26     </mappers>
27 </configuration>
创建db.properties:

1 #jdbc.driver=com.mysql.jdbc.Driver
2 jdbc.driver=com.mysql.cj.jdbc.Driver
3 jdbc.url=jdbc:mysql://localhost:3306/mybatis?characterEncoding=utf-8&zeroDateTimeBehavior=convertToNull&serverTimezone=Asia/Shanghai&useSSL=false
4 jdbc.username=root
5 jdbc.password=
在src\main\java下
创建com.test.start.MybatisStarter:

 1 package com.test.start;
 2
 3 import com.test.start.mapper.BlogMapper;
 4 import com.test.start.model.Blog;
 5 import org.apache.ibatis.io.Resources;
 6 import org.apache.ibatis.mapping.Environment;
 7 import org.apache.ibatis.session.Configuration;
 8 import org.apache.ibatis.session.SqlSession;
 9 import org.apache.ibatis.session.SqlSessionFactory;
10 import org.apache.ibatis.session.SqlSessionFactoryBuilder;
11 import org.apache.ibatis.transaction.TransactionFactory;
12 import org.apache.ibatis.transaction.jdbc.JdbcTransactionFactory;
13 import org.junit.Test;
14
15 import javax.sql.DataSource;
16 import java.io.IOException;
17 import java.io.InputStream;
18
19 /**
20  * Created by miaorf on 2016/6/27.
21  */
22 public class MybatisStarter {
23
24     public static void main(String[] args) throws IOException {
25         String resource = "mybatis-config.xml";
26         InputStream inputStream = Resources.getResourceAsStream(resource);
27         SqlSessionFactory sqlSessionFactory = new SqlSessionFactoryBuilder().build(inputStream);
28
29         SqlSession session = sqlSessionFactory.openSession();
30         try {
31             BlogMapper mapper = session.getMapper(BlogMapper.class);
32             Blog blog = mapper.selectBlog(1);
33             System.out.println(blog);
34         } finally {
35             session.close();
36         }
37     }
38
39     @Test
40     public void sqlSessionByJava(){
41 //        DataSource dataSource = BlogDataSourceFactory.getBlogDataSource();
42 //        TransactionFactory transactionFactory = new JdbcTransactionFactory();
43 //        Environment environment = new Environment("development", transactionFactory, dataSource);
44 //        Configuration configuration = new Configuration(environment);
45 //        configuration.addMapper(BlogMapper.class);
46 //        SqlSessionFactory sqlSessionFactory = new SqlSessionFactoryBuilder().build(configuration);
47     }
48 }
Blog{id=1, name=‘test‘}
Process finished with exit code 0
理解我们目前已经讨论过的不同范围和生命周期类是至关重要的,因为错误的使用会导致非常严重的并发问题。
提示 对象生命周期和依赖注入框架
依赖注入框架可以创建线程安全的、基于事务的 SqlSession 和映射器(mapper)并将它们直接注入到你的 bean 中,因此可以直接忽略它们的生命周期。如果对如何通过依赖注入框架来使用 MyBatis 感兴趣可以研究一下 MyBatis-Spring 或 MyBatis-Guice 两个子项目。
这个类可以被实例化、使用和丢弃,一旦创建了 SqlSessionFactory,就不再需要它了。因此 SqlSessionFactoryBuilder 实例的最佳范围是方法范围(也就是局部方法变量)。你可以重用 SqlSessionFactoryBuilder 来创建多个 SqlSessionFactory 实例,但是最好还是不要让其一直存在以保证所有的 XML 解析资源开放给更重要的事情。
SqlSessionFactory 一旦被创建就应该在应用的运行期间一直存在,没有任何理由对它进行清除或重建。使用 SqlSessionFactory 的最佳实践是在应用运行期间不要重复创建多次,多次重建 SqlSessionFactory 被视为一种代码“坏味道(bad smell)”。因此 SqlSessionFactory 的最佳范围是应用范围。有很多方法可以做到,最简单的就是使用单例模式或者静态单例模式。
每个线程都应该有它自己的 SqlSession 实例。SqlSession 的实例不是线程安全的,因此是不能被共享的,所以它的最佳的范围是请求或方法范围。绝对不能将 SqlSession 实例的引用放在一个类的静态域,甚至一个类的实例变量也不行。也绝不能将 SqlSession 实例的引用放在任何类型的管理范围中,比如 Serlvet 架构中的 HttpSession。如果你现在正在使用一种 Web 框架,要考虑 SqlSession 放在一个和 HTTP 请求对象相似的范围中。换句话说,每次收到的 HTTP 请求,就可以打开一个 SqlSession,返回一个响应,就关闭它。这个关闭操作是很重要的,你应该把这个关闭操作放到 finally 块中以确保每次都能执行关闭。下面的示例就是一个确保 SqlSession 关闭的标准模式:
SqlSession session = sqlSessionFactory.openSession();
try {
  // do work
} finally {
  session.close();
}
在你的所有的代码中一致性地使用这种模式来保证所有数据库资源都能被正确地关闭。
映射器是创建用来绑定映射语句的接口。映射器接口的实例是从 SqlSession 中获得的。因此从技术层面讲,映射器实例的最大范围是和 SqlSession 相同的,因为它们都是从 SqlSession 里被请求的。尽管如此,映射器实例的最佳范围是方法范围。也就是说,映射器实例应该在调用它们的方法中被请求,用过之后即可废弃。并不需要显式地关闭映射器实例,尽管在整个请求范围(request scope)保持映射器实例也不会有什么问题,但是很快你会发现,像 SqlSession 一样,在这个范围上管理太多的资源的话会难于控制。所以要保持简单,最好把映射器放在方法范围(method scope)内。下面的示例就展示了这个实践:
SqlSession session = sqlSessionFactory.openSession();
try {
  BlogMapper mapper = session.getMapper(BlogMapper.class);
  // do work
} finally {
  session.close();
}
项目:https://github.com/chenxing12/l4mybatis
标签:
原文地址:http://www.cnblogs.com/woshimrf/p/5621883.html