标签:
最近我们需要对大约2T(6.5亿条)日志做全文检索,Elasticsearch看起来很火爆,又有很多产品使用(Facebook、github、stackoverflow),值得一试。以下是一些基础知识笔记。
Elasticsearch是一个基于Lucene构建的开源、分布式、RESTful的搜索引擎,能够实现近实时(NRT)搜索,稳定、可靠、安装方便。性能不错、水平扩展、文档齐全、社区火爆,这几点很重要。
如果之前已经了解过分布式存储系统、query切词、检索相关性策略,Elasticsearch的使用学习起来会很快。
1 基础概念
Elasticsearch是一个近实时的系统,从你写入数据到数据可以被检索到,一般会有1秒钟的延时。Elasticsearch是基于Lucene的,Lucene的读写是两个分开的句柄,往写句柄写入的数据刷新之后,读句柄重新打开,这才能读到新写入的数据。
名词解释:
Cluster:集群。
Index:索引,Index相当于关系型数据库的DataBase。
Type:类型,这是索引下的逻辑划分,一般把有共性的文档放到一个类型里面,相当于关系型数据库的table。
Document:文档,Json结构,这点跟MongoDB差不多。
Shard、Replica:分片,副本。
分片有两个好处,一个是可以水平扩展,另一个是可以并发提高性能。在网络环境下,可能会有各种导致分片无法正常工作的问题,所以需要有失败预案。ES支持把分片拷贝出一份或者多份,称为副本分片,简称副本。副本有两个好处,一个是实现高可用(HA,High Availability),另一个是利用副本提高并发检索性能。
分片和副本的数量可以在创建index的时候指定,index创建之后,只能修改副本数量,不能修改分片。
健康状态:
安装了head插件之后,可以在web上看到集群健康状态,集群处于绿色表示当前一切正常,集群处于黄色表示当前有些副本不正常,集群处于红色表示部分数据无法正常提供。绿色和黄色状态下,集群都是能提供完整数据的,红色状态下集群提供的数据是有缺失的。
2 搭建ElasticSearch
首先安装java,设置好JAVA_HOME环境变量(export JAVA_HOME=.../java8),然后安装Elasticsearch。
参考官方文档:https://www.elastic.co/guide/en/elasticsearch/reference/current/_installation.html
设置配置的时候,ES可能因为各种原因不能自动找到集群,所以把地址也设置上,如:
discovery.zen.ping.unicast.hosts: ["host_name...:9301", "host_name_xxx:port_yyy"...]
安装head插件:拉取 https://github.com/mobz/elasticsearch-head 代码,将其放到./plugins/head 目录下。
启动之前设置ES使用的内存:export ES_HEAP_SIZE=10g。
elasticsearch -d 以守护进程方式启动,启动之后,就可以在浏览器里使用head插件看到集群信息,如:
http://host_name_xxx:port_yyy/_plugin/head/
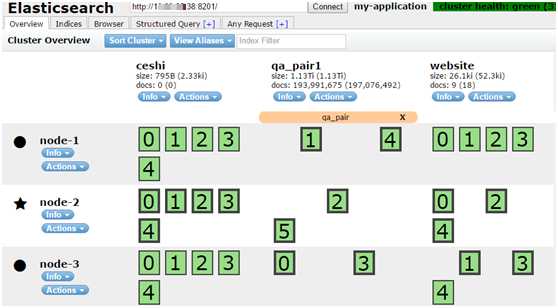
上图:启动了三个Elasticsearch实例,创建了三个Index;ceshi Index有一主shard,两replica shard;qa_pair1 Index只有主shard;website Index有一主shard,一replica shard。
3 测试Elasticsearch使用
Elasticsearch提供RESTful API,我采用Postman(chrome的一个插件)作为辅助客户端向ES发送请求。
先创建一个index:
POST http://10.11.111.11:8301/test_index
查看创建的index:
GET http://10.11.111.11:8301/_cat/indices?v
写入数据:
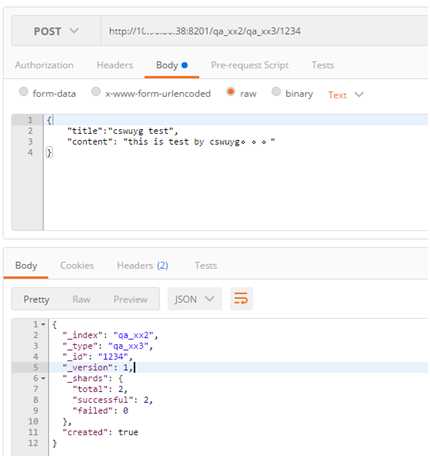
查询数据:
(1)使用id直接查:
GET http://xxxhost:8201/qa_xx2/qa_xx3/1235
(2)DSL查询:
往查询url POST数据即可:
URL格式:http://xxxhost:8201/qa_xx2/qa_xx3/_search
a. 查询title中包含有cswuyg字段的文档。Highlight设置高亮命中的词。POST方法的body:

{
    "query": {
        "match": {
            "title": {
                "query": "cswuyg "
            }
        }
    },
    "highlight": {
        "fields": {
            "title": {

            }
        }
    }
}
b. bool组合查询,命中的文档的title字段必须能命中“餐厅”、“好吃”、“深圳”,可以是完全命中,也可以是名字其中的个别字。“便宜”则是可选命中。
如果要求每一个字都命中,可以把match修改为match_phrase。POST方法的body:
{
    "query": {
        "bool": {
            "must": [{
                "match": {
                    "title": {
                        "query": "餐厅"
                    }
                }
            },
            {
                "match": {
                    "title": {
                        "query": "好吃"
                    }
                }
            },
            {
                "match": {
                    "title": {
                        "query": "深圳"
                    }
                }
            }],
            "should": [{
                "match": {
                    "title": "便宜"
                }
            }]
        }
    },
    "highlight": {
        "fields": {
            "title": {

            }
        }
    }
}
c. 给查询词设置权重(boost)。POST方法的body:
{
    "query": {
        "bool": {
            "must": {
                "match": {
                    "title": {
                        "query": "好吃的餐厅",
                        "boost": 1
                    }
                }
            },
            "must": {
                "match": {
                    "title": {
                        "query": "深圳湾",
                        "boost": 100
                    }
                }
            },
            "should": [{
                "match": {
                    "title": "便宜"
                }
            }]
        }
    },
    "highlight": {
        "fields": {
            "title": {

            }
        }
    }
}
d. filter查询,也就是kv查询,不涉及检索的相关性打分,title必须是完全命中,如果建库时是有对这个字段切词的,则查询时,需要是切词后的某个词去查询,如“今天天气”,建库切词为“今天”和“天气”,那么filter查询的时候需要使用“今天”或者“天气”才能命中。POST方法的body:
{
    "query": {
        "bool": {
            "filter": [{
                "term": {
                    "title": "好吃的"
                }
            }]
        }
    }
}
e. 完全匹配某个短语,这就要求“好厉害”三个字组成的词必须在文档中出现,不能是只出现其中的个别字(match就是这样)。POST方法的body:
{
    "query": {
        "match_phrase": {
            "title": {
                "query": "好厉害"
            }
        }
    }
}
(3)运维
a. 去掉副本,调研的时候希望不要副本,这样子写入会快点
PUT http://10.11.111.11:8202/qa_pair2/_settings
{
   "number_of_replicas" : 0
}
4 使用ik中文切词插件
Elasticsearch默认的中文切词插件是单字切词,这不能满足我们要求,需要安装中文切词插件。
插件github地址:https://github.com/medcl/elasticsearch-analysis-ik
源码安装:编译时需要联网,可以在windows下编译完之后,把elasticsearch-analysis-ik-1.9.3.zip拷贝到linux机器的./plugin/head目录下解压。
配置:在配置文件./config/elasticsearch.yml末尾添加配置: index.analysis.analyzer.ik.type: "ik"
测试ik切词:http://host_name_xx:port_yyy/qa_pair/_analyze?analyzer=ik&pretty=true&text=我是中国人"
5 使用python读写Elasticsearch
驱动安装:使用pip安装elasticsearch
读取文件批量插入数据示例:
#!/home/work/bin/python
#-*-coding:utf8-*-
"""
读取文件,入库到es
使用:python insert_demo.py xxx_file_name

Authors: cswuyg
Date: 2016.06.18
"""

from elasticsearch import Elasticsearch
from elasticsearch.helpers import bulk
from elasticsearch import exceptions
import traceback
import datetime
import sys

reload(sys)
sys.setdefaultencoding(‘utf-8‘)

#设置mappings
def _create_index(es, index_name="cswuyg", doc_type_name="cswuyg"):
    my_settingss = {
            ‘number_of_shards‘: 18,
            ‘number_of_replicas‘: 0
            }
    my_mappings = {
            "cswuyg": {
                ‘_all‘: {
                    ‘enabled‘: ‘false‘
                    },
                "properties": {
                    "title": {
                        ‘type‘: ‘string‘,
                        ‘store‘: ‘no‘,
                        ‘term_vector‘: ‘with_positions_offsets‘,
                        ‘analyzer‘: ‘ik_max_word‘,
                        ‘boost‘: 8
                        },
                    "url": {
                        "type": "string",
                        ‘index‘: ‘not_analyzed‘
                        },
                    ‘content‘: {
                        ‘type‘: ‘string‘,
                        ‘store‘: ‘no‘,
                        ‘term_vector‘: ‘with_positions_offsets‘,
                        ‘analyzer‘: ‘ik_max_word‘,
                        ‘boost‘: 8
                        }
                    }
                }
            }
    settings = {
            ‘settings‘: my_settingss,
            ‘mappings‘: my_mappings
            }

    create_index = es.indices.create(index=index_name, body=settings)

#将文件中的数据存储到es中
def _save_data(es, input_file):
    #读入数据
    all_data = list()
    count = 0
    with open(input_file) as f_r:
        for line in f_r:
        count += 1
            all_data.append({
                ‘_index‘: ‘cswuyg‘,
                ‘_type‘: ‘cswuyg‘,
                ‘_source‘: {
                    ‘title‘: line
                    }
                })
            if len(all_data) == 100:
                success, _ = bulk(es, all_data, index=‘cswuyg‘, raise_on_error=True)
                all_data = list()
                print(‘{1}: finish {0}‘.format(count, input_file))
    if len(all_data) != 0:
        success, _ = bulk(es, all_data, index=‘cswuyg‘, raise_on_error=True)
        all_data = list()
        print(‘{1}: finish {0}‘.format(count, input_file))
    print(‘{0}: finish all‘.format(input_file))

def _insert_data(es, file_name):
    start_time = datetime.datetime.now()
    _save_data(es, file_name)
    cost_time = datetime.datetime.now() - start_time
    print(‘all cost time{0}‘.format(cost_time))

def _main():
    if len(sys.argv) != 2:
        print(‘need file argument‘)
        return
    es = Elasticsearch(hosts=["10.200.100.80:8301"], timeout=500)
    try:
        _create_index(es)
    except exceptions.RequestError:
        print(traceback.format_exc())
    _insert_data(es, sys.argv[1]);

if __name__ == ‘__main__‘:
    _main()
测试文件格式:
我是中国人
我爱中国
检索示例(从文件中获取检索条件:切好词且打好分的Term):
#!/home/work/bin/python
#-*-coding:utf8-*-
"""
检索 es
策略:
从文件中读取已经切好词,且给好权重的term,且选好必选term的一行文本,处理成match_phrase + bool查询
默认策略2

使用方法:python search_demo.py test_file
output:
es_query
query\ttitle\tsall_score

output demo:
{‘query‘: {‘bool‘: {‘should‘: [{‘match‘: {‘title‘: {‘query‘: ‘\xe6\x88\x91‘, ‘boost‘: 0.2}}}], ‘must‘: [{‘match_phrase‘: {‘title‘: {‘query‘: ‘\xe4\xb8\xad\xe5\x9b\xbd‘, ‘boost‘: 0.69}}}, {‘match_phrase‘: {‘title‘: {‘query‘: ‘\xe7\x88\xb1‘, ‘boost‘: 0.11}}}]}}}
我爱中国        我爱中国        {"should": ["我"], "score": {"我": 0.2, "中国": 0.69, "爱": 0.11}, "must": ["中国", "爱"]}
我爱中国        我爱中国        {"should": ["我"], "score": {"我": 0.2, "中国": 0.69, "爱": 0.11}, "must": ["中国", "爱"]}
Authors: cswuyg
Date: 2016.06.18
"""
from elasticsearch import Elasticsearch
from elasticsearch.helpers import bulk
from elasticsearch import exceptions
import sys
import json
from log import logger
import traceback

reload(sys)
sys.setdefaultencoding(‘utf-8‘)

def _release_es_query_by_file_info(file_info):
    #输入格式: raw_query\tmust_term\tshould_term\tall_score
    logger.debug(‘file_info:{0}‘.format(file_info))
    file_info_list = file_info.split(‘\t‘)
    print file_info_list
    raw_query = file_info_list[0]
    must_term = file_info_list[3]
    should_term= file_info_list[4]
    all_score = file_info_list[5]
    json_score = json.loads(all_score, encoding=‘utf-8‘)

    ret_obj = {}
    ret_obj[‘must‘] = must_term.split()
    ret_obj[‘should‘] = should_term.split()
    ret_obj[‘score‘] = json_score

    bool_query = dict()
    must_query = list()
    should_query = list()
    for item in must_term.split(‘ ‘):
        must_query.append({‘match_phrase‘: {‘title‘: {‘query‘: item, ‘boost‘: json_score[unicode(item)]}}})
    bool_query[‘must‘] = must_query

    for item in should_term.split(‘ ‘):
        should_query.append({‘match‘: {‘title‘: {‘query‘: item, ‘boost‘: json_score[unicode(item)]}}})
    bool_query[‘should‘] = should_query

    es_query = {‘query‘: {‘bool‘: bool_query}}
    print es_query
    return raw_query, es_query, json.dumps(ret_obj, ensure_ascii=False)

def _do_query_use_file_info(es, file_info):
    raw_query, query, all_score = _release_es_query_by_file_info(file_info.strip(‘\r\n‘))
    res = es.search(index=‘cswuyg‘, doc_type=‘cswuyg‘, body=query, size=100)
    if (len(res[‘hits‘][‘hits‘]) == 0):
        logger.debug(‘len(res["hits"]["hits"]) == 0‘)
        print("{0}\t{1}\t{2}".format(raw_query, "", all_score))
        return

    for item in res[‘hits‘][‘hits‘]:
        try:
            print("{0}\t{1}\t{2}".format(raw_query, item[‘_source‘][‘title‘].strip(‘\r\n‘), all_score))
        except:
            logger.debug(traceback.format_exc())
            logger.debug(item[‘_source‘][‘title‘])
    print(‘\r\n‘)

def _main():
    if len(sys.argv) != 2:
        print(‘argv error‘)
        return
    else:
        print(‘argv[1] = {0}‘.format(sys.argv[1]))
    es = Elasticsearch(hosts=["10.200.100.80:8301"], timeout=5000)
    with open(sys.argv[1]) as f_r:
        for item in f_r:
            try:
                _do_query_use_file_info(es, item)
            except:
                logger.debug(traceback.format_exc())

if __name__ == ‘__main__‘:
    _main()
测文件数据格式:
我爱中国 中国 爱 我 {"我": 0.20, "中国": 0.69, "爱": 0.11}
6 部分学习资料
官方入门文档:https://www.elastic.co/guide/en/elasticsearch/reference/current/getting-started.html
使用ik中文分词插件:http://blog.csdn.net/liuzhenfeng/article/details/39404435
提升性能:http://zhousheng29.iteye.com/blog/2101905
后续如有继续使用再持续更新。
标签:
原文地址:http://www.cnblogs.com/cswuyg/p/5651620.html
