标签:
从Nexus官网下载开源版本Nexus OSS,选择自带jetty容器的bundle版本nexus-2.13.0-01-bundle.tar.gz:
http://www.sonatype.com/download-oss-sonatype
上述文件放在/opt目录下,并解压(tar -zxvf nexus-2.13.0-01-bundle.tar.gz),得到目录/opt/nexus-2.13.0-01。(以下操作的默认目录)
application-port=8081application-host=0.0.0.0nexus-webapp=${bundleBasedir}/nexusnexus-webapp-context-path=/nexusnexus-work=${bundleBasedir}/../sonatype-work/nexusruntime=${bundleBasedir}/nexus/WEB-INF
RUN_AS_USER=root
使用以下命令运行:
bin/nexus start
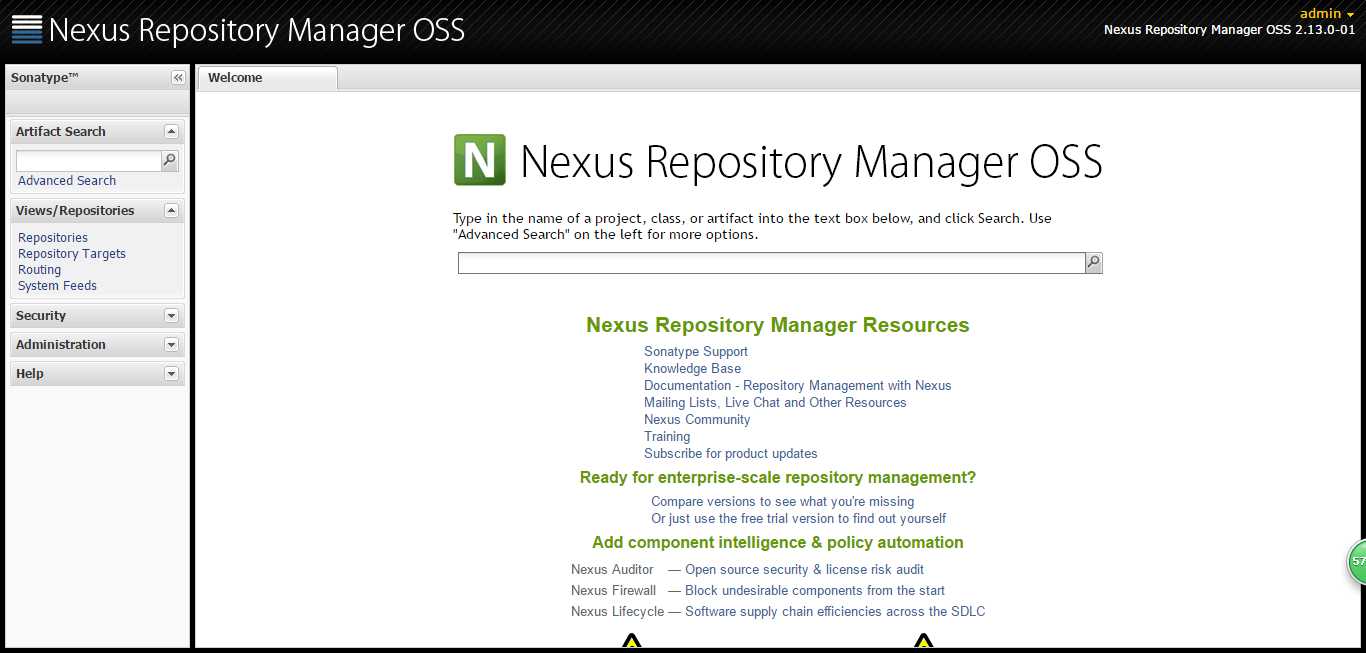
可在浏览器查看是否运行成功,若出现后面的界面则说明运行成功。
点击右上角的登录,使用默认的admin/admin123登录。
http://10.110.13.141:8081/nexus/#welcome


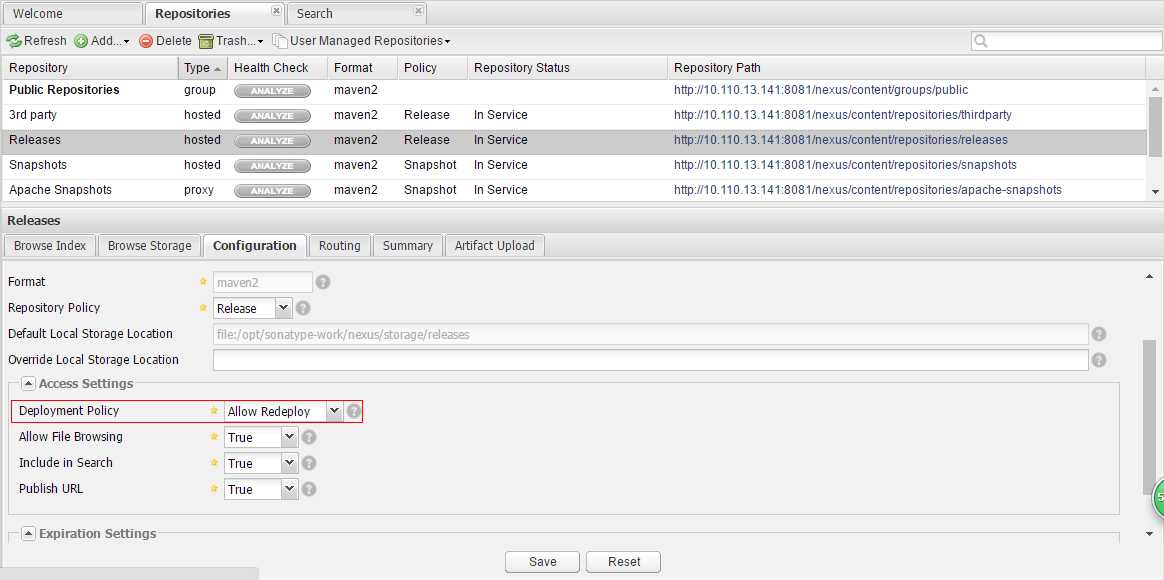
下载远程索引(Download Remote Indexes),选择True:
<?xml version="1.0" encoding="UTF-8"?><settings xmlns="http://maven.apache.org/SETTINGS/1.0.0"xmlns:xsi="http://www.w3.org/2001/XMLSchema-instance"xsi:schemaLocation="http://maven.apache.org/SETTINGS/1.0.0 http://maven.apache.org/xsd/settings-1.0.0.xsd"><servers><server><id>releases</id><username>admin</username><password>admin123</password></server><server><id>snapshots</id><username>admin</username><password>admin123</password></server></servers><mirrors><mirror><id>central</id><mirrorOf>*</mirrorOf><url>http://10.110.13.141:8081/nexus/content/groups/public/</url></mirror></mirrors><profiles><profile><id>nexusProfile</id><!--all requests to nexus via the mirror --><repositories><repository><id>central</id><url>http://central</url><releases><enabled>true</enabled></releases><snapshots><enabled>true</enabled></snapshots></repository></repositories><pluginRepositories><pluginRepository><id>central</id><url>http://central</url><releases><enabled>true</enabled></releases><snapshots><enabled>true</enabled></snapshots></pluginRepository></pluginRepositories></profile></profiles><activeProfiles><activeProfile>nexusProfile</activeProfile></activeProfiles></settings>
这里指本地开发的项目发布到Nexus的maven仓库中,以便小组其他成员依赖发布的jar包。
本地项目使用IntelliJ IDEA开发,需要在pom.xml文件中加入以下配置:
<groupId>com.inspur.sdk</groupId><artifactId>qiandu</artifactId><version>1.0-SNAPSHOT</version><repositories><repository><id>central</id><name>Central</name><url>http://10.110.13.141:8081/nexus/content/groups/public/</url><releases><enabled>true</enabled></releases><snapshots><enabled>true</enabled></snapshots></repository></repositories><pluginRepositories><pluginRepository><id>central</id><name>Central</name><url>http://10.110.13.141:8081/nexus/content/groups/public/</url><releases><enabled>true</enabled></releases></pluginRepository></pluginRepositories><distributionManagement><repository><id>releases</id><name>Nexus Release Repository</name><url>http://10.110.13.141:8081/nexus/content/repositories/releases/</url></repository><snapshotRepository><id>snapshots</id><name>Nexus Snapshots Repository</name><url>http://10.110.13.141:8081/nexus/content/repositories/snapshots/</url></snapshotRepository></distributionManagement>
<plugin><artifactId>maven-deploy-plugin</artifactId><version>2.8.1</version><executions><execution><id>default-deploy</id><phase>deploy</phase><goals><goal>deploy</goal></goals></execution></executions></plugin>
完整的settings.xml和pom.xml文件见附件
mvn clean deploy
若显示以下信息则提示部署成功:
[INFO] ------------------------------------------------------------------------[INFO] BUILD SUCCESS[INFO] ------------------------------------------------------------------------[INFO] Total time: 15.934 s[INFO] Finished at: 2016-07-14T20:22:41+08:00[INFO] Final Memory: 29M/179M[INFO] ------------------------------------------------------------------------
新建maven项目,编写以下依赖,进行Maven测试:
<project xmlns="http://maven.apache.org/POM/4.0.0" xmlns:xsi="http://www.w3.org/2001/XMLSchema-instance"xsi:schemaLocation="http://maven.apache.org/POM/4.0.0 http://maven.apache.org/maven-v4_0_0.xsd"><modelVersion>4.0.0</modelVersion><groupId>com.inspur.test</groupId><artifactId>nexus</artifactId><packaging>war</packaging><version>1.0-SNAPSHOT</version><name>nexus Maven Webapp</name><url>http://maven.apache.org</url><repositories><repository><id>central</id><name>Central</name><url>http://10.110.13.141:8081/nexus/content/groups/public/</url><releases><enabled>true</enabled></releases><snapshots><enabled>true</enabled></snapshots></repository></repositories><pluginRepositories><pluginRepository><id>central</id><name>Central</name><url>http://10.110.13.141:8081/nexus/content/groups/public/</url><releases><enabled>true</enabled></releases></pluginRepository></pluginRepositories><distributionManagement><repository><id>releases</id><name>Nexus Release Repository</name><url>http://10.110.13.141:8081/nexus/content/repositories/releases/</url></repository><snapshotRepository><id>snapshots</id><name>Nexus Snapshots Repository</name><url>http://10.110.13.141:8081/nexus/content/repositories/snapshots/</url></snapshotRepository></distributionManagement><dependencies><dependency><groupId>junit</groupId><artifactId>junit</artifactId><version>3.8.1</version><scope>test</scope></dependency><dependency><groupId>com.inspur.loushang</groupId><artifactId>loushang-framework</artifactId><version>2016</version></dependency><dependency><groupId>com.inspur.qiandu</groupId><artifactId>qiandu-utils</artifactId><version>1.0-SNAPSHOT</version></dependency><dependency><groupId>com.inspur.sdk</groupId><artifactId>qiandu</artifactId><version>1.0-SNAPSHOT</version></dependency></dependencies><build><finalName>nexus</finalName></build></project>
【1】SonaType Nexus OSS installation on Ubuntu 14.04 LTS
https://asadbukhariblog.wordpress.com/2015/08/31/sonatype-nexus-oss-installation-on-ubuntu-14-04-lts/
【2】Maven入门指南⑤:使用Nexus搭建Maven私服
http://www.cnblogs.com/luotaoyeah/p/3791966.html
【3】Maven Deploy to Nexus
http://www.baeldung.com/maven-deploy-nexus
【4】Maven及Nexus私服搭建
http://www.blogjava.net/ldwblog/archive/2013/11/19/406529.html
标签:
原文地址:http://www.cnblogs.com/myitroad/p/5672369.html