标签:
过滤器是web开发中常用的开发方式,比如一些典型的应用场景:
用户身份认证、对用户请求进行记录和审核、对用户发送的数据进行替换和过滤、转换图像格式、对响应内容压缩、加密请求或响应等等。
本篇就了解下监听器的主要使用方法。
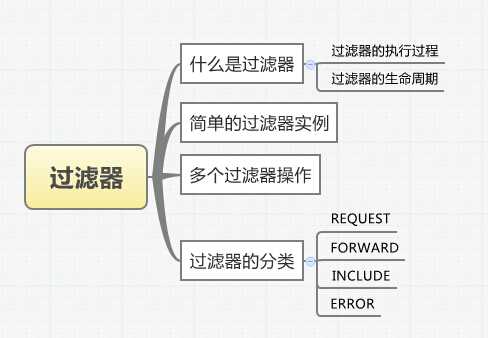
过滤器的生命周期
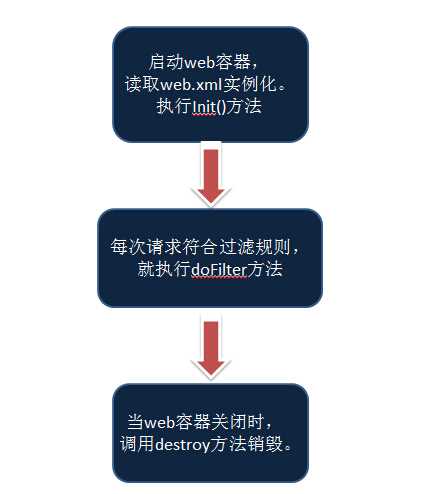
过滤器的生命周期与web容器相同,当web容器启动时,就会读取应用的web.xml配置文件,如果这里配置了过滤器,容器就会执行实例化,并调用过滤器的init方法。
之后用户的每一次请求都会执行过滤器的doFilter方法。
当web容器销毁时,就会执行destroy方法,释放资源。
过滤器的执行过程
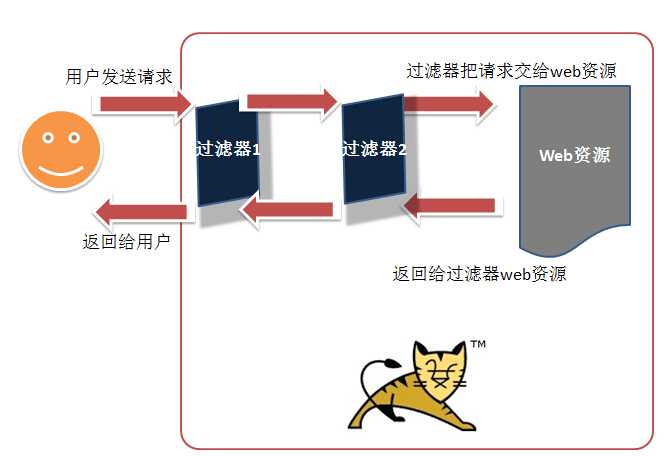
过滤器看名字就能知道大概的用法,它就像一个筛子,可以筛选特定的数据或请求。执行过程如下图所示:
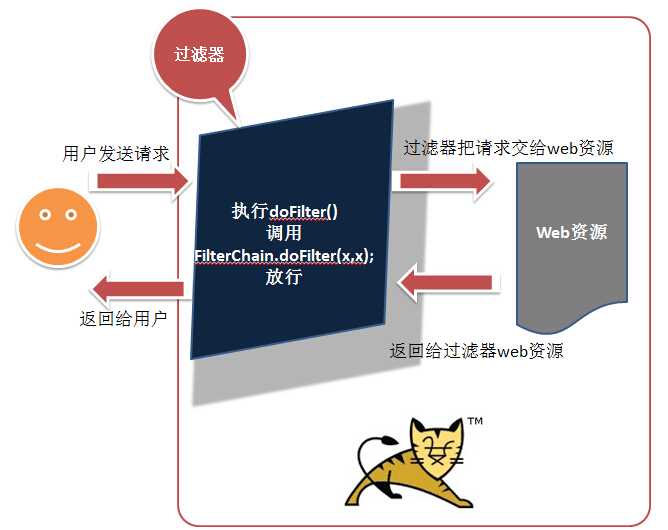
用户在发送请求后,如果该请求满足过滤器的过滤规则,web容器就会执行过滤器中的doFilter方法进行特定的操作;然后通过调用FilterChain.doFilter转交给web容器。web容器执行完成后把资源返回给过滤器,再展现给用户。
下面通过一个简单的代码,看看过滤器的编写。
首先,需要创建一个过滤器,过滤器集成javax.servlet.Filter接口,其中必须实现三个方法:init() doFilter() destroy()
public class MyFilter implements Filter{
    public void destroy() {
        System.out.println("MyFilter destroy");
    }
    public void doFilter(ServletRequest request, ServletResponse response,
            FilterChain chain) throws IOException, ServletException {
        System.out.println("MyFilter start...dofilter");
        chain.doFilter(request, response);//对请求放行
        System.out.println("MyFilter end...dofilter");
    }
    public void init(FilterConfig arg0) throws ServletException {
        System.out.println("MyFilter init");
    }
}
init()方法是在web容器实例化过滤器时调用的。
doFilter()方法是每次有请求,且满足过滤规则时调用。
destroy()方法是web容器关闭时,调用。
然后,在web.xml中配置相应的选项。如果是servlet3.0,那么支持注解的方式配置过滤器。
<filter>
      <filter-name>MyFilter</filter-name>
      <filter-class>com.test.filter.MyFilter</filter-class>
</filter>
<filter-mapping>
      <filter-name>MyFilter</filter-name>
      <url-pattern>/index.jsp</url-pattern>
        <!--<dispatcher></dispatcher>-->
</filter-mapping>
其中几个必备的项:
在<filter>中配置了过滤器,filter-name是过滤器的名字,filter-class是过滤器的类;
在<filter-mapping>中配置了过滤器的映射规则,filter-name是过滤器的名字,url-pattern是过滤的规则,dispatcher是过滤器的分类(主要包括四种,稍后讲解)
这里先说下过滤器的规则,如果想要全部的请求都过滤,那么可以写/*
如果想要过滤index.jsp index.html 可以写/index*
如果只想过滤index.jsp,可以写成/index.jsp
其次,配置好后,创建index.jsp
 View
Code
最后,当启动web容器后,可以在控制台中发现,初始化时,执行了init方法
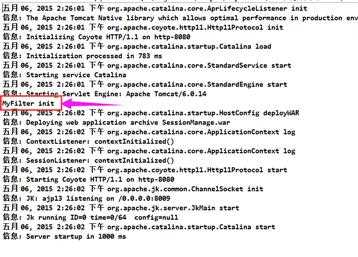
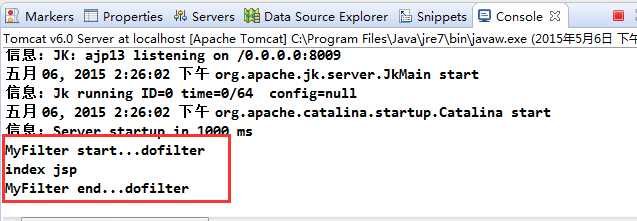
访问对应的web资源,可以看到控制台按照执行的顺序打印消息:
多个过滤器执行与上面差不多。
在上面代码的基础上,再增加一个过滤器:
public class SecondFilter implements Filter{
    public void destroy() {
        System.out.println("SecondFilter destroy()");
    }
    public void doFilter(ServletRequest arg0, ServletResponse arg1,
            FilterChain chain) throws IOException, ServletException {
        System.out.println("SecondFilter doFilter start");
        chain.doFilter(arg0, arg1);
        System.out.println("SecondFilter doFilter end");
    }

    public void init(FilterConfig arg0) throws ServletException {
        System.out.println("SecondFilter init()");
    }
}
在web.xml中增加过滤器配置
  <filter>
      <filter-name>SecondFilter</filter-name>
      <filter-class>com.test.filter.SecondFilter</filter-class>
  </filter>
  <filter-mapping>
      <filter-name>SecondFilter</filter-name>
      <url-pattern>/index.jsp</url-pattern>
  </filter-mapping>
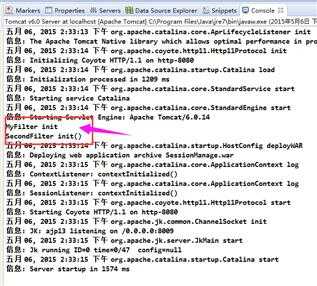
启动web容器,控制台输出init信息
访问页面,可以看到由于在web.xml中映射配置MyFilter在SecondFilter上面,
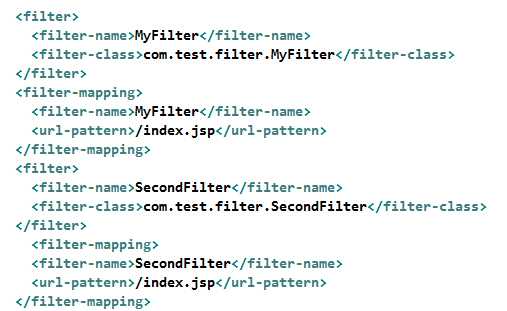
因此输出如下消息:
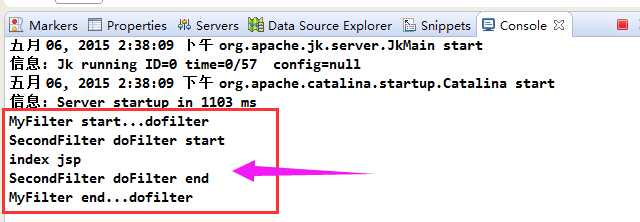
类似的,如果把SecondFilter配置放在上面,就会先执行SecondFilter的doFilter方法。

最后看一下过滤器的分类,过滤器主要包括四种,REQUEST\FORWARD\INCLUDE\ERROR(3.0额外新增了一个异步请求ASYNC)。
上面的过滤器都是采用REQUEST的方式,直接请求。由于没有配置dispathcer,默认就会按照REQUEST的方式进行。
直接看一下FORWARD的使用方法,在doFilter中执行下面的方法:
public void doFilter(ServletRequest request, ServletResponse response,
            FilterChain chain) throws IOException, ServletException {
        System.out.println("MyFilter start...dofilter");
        HttpServletRequest req = (HttpServletRequest)request;
        req.getRequestDispatcher("main.jsp").forward(request, response);
        System.out.println("MyFilter end...dofilter");
}
此时页面请求就会直接跳转到main.jsp,触发FORWARD类型过滤器,过滤器配置选项如下:
  <filter>
      <filter-name>MyFilter</filter-name>
      <filter-class>com.test.filter.MyFilter</filter-class>
  </filter>
  <filter-mapping>
      <filter-name>MyFilter</filter-name>
      <url-pattern>/index.jsp</url-pattern>
  </filter-mapping>
  <filter>
      <filter-name>SecondFilter</filter-name>
      <filter-class>com.test.filter.SecondFilter</filter-class>
  </filter>
<!--     <filter-mapping>
      <filter-name>SecondFilter</filter-name>
      <url-pattern>/index.jsp</url-pattern>
  </filter-mapping> -->
  <filter-mapping>
      <filter-name>SecondFilter</filter-name>
      <url-pattern>/main.jsp</url-pattern>
      <dispatcher>FORWARD</dispatcher>
  </filter-mapping>
启动后发现,原本请求Index.jsp跳转到了main.jsp。

此时,如果第二个过滤器采用的是REQUEST,就不会触发了。
另外,还可以使用JSP页面标签,执行跳转,此时过滤器也可以触发。比如在JSP页面中添加<jsp:forward>标签
<%@ page language="java" contentType="text/html; charset=ISO-8859-1"
    pageEncoding="ISO-8859-1"%>


<jsp:forward page="/main.jsp"></jsp:forward>


<!DOCTYPE html PUBLIC "-//W3C//DTD HTML 4.01 Transitional//EN" "http://www.w3.org/TR/html4/loose.dtd">
<html>
<head>
<meta http-equiv="Content-Type" content="text/html; charset=ISO-8859-1">
<title>Insert title here</title>
</head>
<body>

</body>
</html>
INCLUDE与FORWARD类似,使用方法也相同,只是名字不同而已,就不做过多的介绍了。
然后看一下ERROR过滤器,通常我们会在web.xml中配置错误页面,如下:
<error-page>
      <error-code>404</error-code>
    <location>/error.jsp</location>
  </error-page>
此时,如果访问不存在的页面,http://localhost:8080/xxx.jsp就会跳转到error.jsp
此时如果过滤器通过REQUEST方式,想要触发,url填写的是/error.jsp并不会起作用,此时就需要把dispathcer改成 ERROR,并且放置在error-page标签下面:
  <error-page>
      <error-code>404</error-code>
    <location>/error.jsp</location>
  </error-page>
  <!-- 需要放在errorpage下面 -->
  <filter>
      <filter-name>ErrorFilter</filter-name>
      <filter-class>com.test.filter.ErrorFilter</filter-class>
  </filter>
  <filter-mapping>
      <filter-name>ErrorFilter</filter-name>
      <url-pattern>/error.jsp</url-pattern>
      <dispatcher>ERROR</dispatcher>
  </filter-mapping>
这样就会触发ERROR过滤器了。
【1】过滤器的应用:http://www.ylzx8.cn/web/web/979338.html
【2】过滤器视频教程:http://www.imooc.com/learn/213
标签:
原文地址:http://blog.csdn.net/u010233323/article/details/51941483