标签:
文档对象模型(Document Object Model,DOM)是一种用于HTML和XML文档的编程接口。它给文档提供了一种结构化的表示方法,可以改变文档的内容和呈现方式。我们最为关心的是,DOM把网页和脚本以及其他的编程语言联系了起来。DOM属于浏览器,而不是JavaScript语言规范里的规定的核心内容。
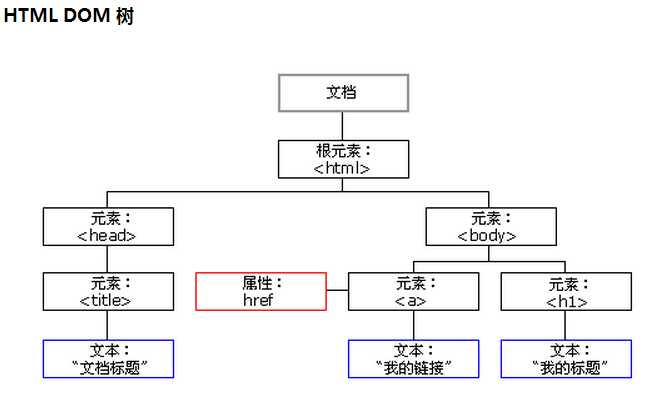
HTML DOM 将 HTML 文档视作树结构。这种结构被称为节点树:
通过 HTML DOM,树中的所有节点均可通过 JavaScript 进行访问。所有 HTML 元素(节点)均可被修改,也可以创建或删除节点。

树中所有的框都是节点,文本也是一个节点
包括:<title>DOM 教程</title>,元素节点 <title>,包含值为 "DOM 教程" 的文本节点。这是一个初学者的易错点。
getElementById() 返回对拥有指定 id 的第一个对象的引用。
getElementsByName() 返回带有指定名称的对象集合。
getElementsByTagName() 返回带有指定标签名的对象集合。
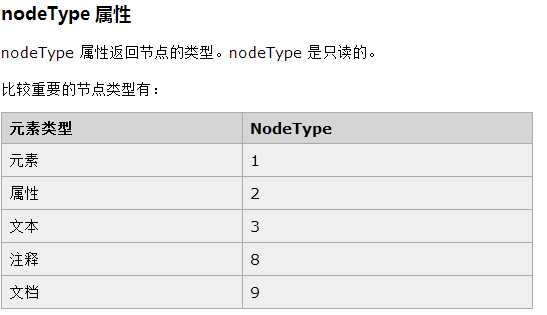
获得节点node,包含所有类型的node节点。
parentNode          // 父节点
childNodes          // 所有子节点
firstChild          // 第一个子节点
lastChild           // 最后一个子节点
nextSibling         // 下一个兄弟节点
previousSibling     // 上一个兄弟节点

获得元素element,仅包含element标签元素的节点。
parentElement           // 父节点标签元素
children                // 所有子标签
firstElementChild       // 第一个子标签元素
lastElementChild        // 最后一个子标签元素
nextElementtSibling     // 下一个兄弟标签元素
previousElementSibling  // 上一个兄弟标签元素
一个例子说明上面两种方法的区别
<div id="t1">
     文本
    <p>123</p>
</div>


1、文本操作
innerText //所有的纯文本内容,包括子标签中的文本
innerHTML //所有子节点(包括元素、注释和文本节点)
outerHTML //返回自身节点与所有子节点
value //表单元素的值

<!DOCTYPE html>
<html lang="en">
<head>
    <meta charset="UTF-8">
    <title>Title</title>
</head>
<body>
    <div>
        <div id="d1"><span>文本操作</span></div>
    </div>
    <input  id ="d2" type="text" value="123">

    <script>
        var e = document.getElementById("d1");
        var i = document.getElementById("d2")
        console.log(e.innerHTML)
        console.log(e.outerHTML)
        console.log(e.innerText)
        console.log(i.value)


    </script>
</body>
</html>

<!DOCTYPE html>
<html lang="en">
<head>
    <meta charset="UTF-8">
    <title>DOM元素取值操作</title>

<!--表单类标签取值使用value-->
</head>
<body>
    <p id="pp">正常标签<span>span</span></p>
<!-- ------------------------------------------------------>
    <fieldset>
        <legend>文本输入样例组</legend>
        <label>文本输入框:</label><input  id=‘i1‘ type="text" value="原始字符" />
        <label>密码框:</label><input id=‘i2‘ type="password" value="123" />
        <label>多行文本输入:</label><textarea  id="i3">value </textarea>
    </fieldset>
        <!-----------------------chexkbox----------------------------->
    <fieldset>
        <legend>选择样例组</legend>
        <ul id="check-box">
            <li><input type="checkbox" value="1" checked="checked"/>篮球</li>
            <li><input type="checkbox" value="2"/>足球</li>
            <li><input type="checkbox" value="3"/>排球</li>
        </ul>
        <ul id="radio-test">
             <!--name一样才能同组互斥-->
            <li><input type="radio" value=‘11‘ name="text" checked="checked"/>男</li>
            <li><input type="radio" value=‘22‘ name="text"/>女</li>
            <li><input type="radio" value=‘33‘ name="text"/>人妖</li>
        </ul>
        <select id="select-test">
            <option value="11">北京</option>
            <option value="22" selected="selected">上海</option>
            <option value="33">广州</option>
            <option value="44">深证</option>
        </select>
    </fieldset>


<!---------------------radios------------------->
    <script>
        pp_text_value = document.getElementById(‘pp‘).innerText //"正常标签span"
        pp_html_value = document.getElementById(‘pp‘).innerHTML//"正常标签<span>span</span>"
//        ----------------------------------------------------------------------------------------
//        text  password    textarea
        i1=document.getElementById(‘i1‘).value//要设置值直接用i1=xxx
        i2=document.getElementById(‘i2‘).value
        i3=document.getElementById(‘i3‘).value
//        -------------------------------------------------------------------------------
//        checkbox
        ul_box=document.getElementById(‘check-box‘)
        var inputs = ul_box.getElementsByTagName(‘input‘)
//        for(var item in inputs){
//            console.log(inputs[item].value)
//        }这种方法有多余的数据出现
         for(var  index=0; index<inputs.length;index++ ){
             console.log(inputs[index].value)   //获取值,1 2   3
             console.log(inputs[index].checked) //获取选中状态, true  ,   false   ,false
         }


//        ------------------radio--------------------------------------
        var radio_test=document.getElementById(‘radio-test‘)
        var radios = radio_test.getElementsByTagName(‘input‘)
        for(var index=0;index<radios.length;index++){
            console.log(radios[index].value)    //获取值,11 22   33
            console.log(radios[index].checked)  //获取选中状态, true  ,   false   ,false
        }
//-----------------------select-------------------------------
        var sel_ele=document.getElementById(‘select-test‘)
        var sel_value=sel_ele.value     //获取当前元素值
        var sel_selindex=sel_ele.selectedIndex  //获取当前选中项索引


    </script>

</body>
</html>
运行结果

2、attrbute属性操作
attributes                // 获取所有标签属性
setAttribute(key,value)   // 设置标签属性
getAttribute(key)         // 获取指定标签属性

/*
var atr = document.createAttribute("class");
atr.nodeValue="democlass";
document.getElementById(‘n1‘).setAttributeNode(atr);
*/
3、class类操作
className                // 获取所有类名
classList         //获取所有类的列表
classList.remove(cls)    // 删除指定类
classList.add(cls)       // 添加类

<!DOCTYPE html>
<html lang="en">
<head>
    <meta charset="UTF-8">
    <title>Title</title>
<style>
    .bg-color{background-color: red}
    .w{width: 100px}
    .col{color:green}

</style>
</head>


<body>
    <div id="d1" class="bg-color w col">cangsong</div>

    <script>
       var d=document.getElementById("d1")
        console.log(d.className)    //bg-color w col
        console.log(d.classList)    //["bg-color", "w", "col", value: "bg-color w col"]
        d.classList.remove("col")
        console.log(d.className)    //bg-color w
        d.classList.add("col")
        console.log(d.className)    //bg-color w col


    </script>
</body>
</html>
4、标签操作
a.创建标签
// 方式一
var tag = document.createElement(‘a‘)
tag.innerText = "wupeiqi"
tag.className = "c1"
tag.href = "http://www.cnblogs.com/wupeiqi"

// 方式二
var tag = "<a class=‘c1‘ href=‘http://www.cnblogs.com/wupeiqi‘>wupeiqi</a>"
b、操作标签
// 方式一
var obj = "<input type=‘text‘ />";
xxx.insertAdjacentHTML("beforeEnd",obj);
xxx.insertAdjacentElement(‘afterBegin‘,document.createElement(‘p‘))

//注意:第一个参数只能是‘beforeBegin‘、 ‘afterBegin‘、 ‘beforeEnd‘、 ‘afterEnd‘

// 方式二
var tag = document.createElement(‘a‘)
xxx.appendChild(tag)
xxx.insertBefore(tag,xxx[1])
5、style样式操作
style.cssText			//可对style中的代码进行读写
style.item()			//返回给定位置的CSS属性的名称
style.length			//style代码块中参数个数
style.getPropertyValue()	//返回给定属性的字符串值
style.getPropertyPriority()	//检测给定属性是否设置了!important,设置了返回"important";否则返回空字符串
style.removeProperty()		//删除指定属性
style.setProperty()		//设置属性,可三个参数:设置属性名,设置属性值,是否设置为"important"

<!DOCTYPE html>
<html lang="en">
<head>
    <meta charset="UTF-8">
    <title>Title</title>
</head>
<body>
    <div id="d1" style="background-color: yellow; width: 100px; height: 100px">style test</div>

    <script>
        var d1 = document.getElementById("d1");
        console.log(d1.style.cssText); //width: 100px; height: 100px; background-color: yellow;
        d1.style.cssText = "background-color: yellow; width: 200px; height: 200px"; //修改属性
        console.log(d1.style.cssText); //width: 200px; height: 200px; background-color: yellow;
        console.log(d1.style.item("0")); //background-color
        console.log(d1.style.length); //3
        console.log(d1.style.getPropertyValue("background-color")); //yed1llow
        console.log(d1.style.getPropertyPriority("background-color")); //空字符串
        console.log(d1.style.removeProperty("width")); //200px
        d1.style.setProperty("width","200px",""); //设置属性,第三个值为important优先值,可不写

    </script>
</body>
</html>
6、提交表单
document.geElementById(‘form‘).submit()
7、位置相关
document.documentElement.offsetHeight      //全文文档总高度
document.documentElement.clientHeight      //浏览器可视区域高度。(随着窗口大小变化)
tag.offsetHeight                            //tag自身高度(height + padding + border)
tag.offsetTop                                //距离上级标签定位高度
tag.clientHeight                            //tag可视区域:height + padding
tag.clientTop                                //tag的border高度
tag.scrollHeight                            //tag全文文档高度(height + padding)
tag.scrollTop                                //tag已滚动高度(随滚动变化)
tag.offsetParent                 //tag相对偏移的父级标签元素

<!DOCTYPE html>
<html>
<head lang="en">
    <meta charset="UTF-8">
    <title></title>
</head>
<body style="margin: 0;">
    <div style="height: 900px;">

    </div>
    <div style="padding: 10px;">
        <div id="i1" style="height:190px;padding: 2px;border: 1px solid red;margin: 8px;overflow: scroll">
                <p>asdf</p>
                <p>asdf</p>
                <p>asdf</p>
                <p>asdf</p>
                <p>asdf</p>
                <p>asdf</p>
                <p>asdf</p>
                <p>asdf</p>
        </div>
    </div>

    <script>
        var i1 = document.getElementById(‘i1‘);
        console.log(document.documentElement.clientHeight)  //窗口可视区域高度
        console.log(document.documentElement.offsetHeight)  //全文文档总高度
        console.log(‘=====‘);
        console.log(i1.clientHeight); // 可见区域:height + padding
        console.log(i1.clientTop);    // border高度
        console.log(‘=====‘);
        console.log(i1.offsetHeight); // 可见区域:height + padding + border
        console.log(i1.offsetTop);    // 上级定位标签的高度
        console.log(‘=====‘);
        console.log(i1.scrollHeight);   //全文高:height + padding
        console.log(i1.scrollTop);      // 已滚动高度


    </script>
</body>
</html>

<!DOCTYPE html>
<html lang="en">
<head>
    <meta charset="UTF-8">
    <style type="text/css">
        .container{
            height:2000px;
            width:100%;
        }
        #top{
            background-color: aqua;
            height: 50px;
            width:50px;
            padding:10px;
            position: fixed;
            bottom:30px;
            right: 30px;
        }
        .hide{
            display: none;
        }
    </style>
    <title>返回顶部</title>
</head>
<body onscroll="scroll()">
<div class="container">
    <div id="top" class="hide" onclick="gotop()">
        <a href="javascript:void(0)"  >返回顶部</a>
    </div>
    <div class="content">
        <h1>本实例知识点:</h1>
            <p>1、 onscroll="gotop()"要要用在监听的元素上。本例为body边标签。</p>
            <p>2、document.body.scrollTop监听离元素滚轮顶部的距离。</p>
            <p>3、 a href="javascript:void(0)",使得点击a标签不刷新页面。</p>
            <p>4、返回顶部设置document.body.scrollTop=0</p>

    </div>
</div>
<script>
    function scroll() {
        var scrolltop=document.body.scrollTop
        if (scrolltop>100){
            document.getElementById("top").classList.remove("hide")
        }else {
             document.getElementById("top").classList.add("hide")
        }
    }
    function gotop() {
        document.body.scrollTop=0

    }
</script>
</body>
</html>

<!DOCTYPE html>
<html>
<head lang="en">
    <meta charset="UTF-8">
    <title></title>
    <style>
        .clearfix:after{
            content: ‘clearfix‘;
            display: block;
            height: 0;
            visibility: hidden;
            clear: both;
        }

        .header{
            height:50px;
            background-color: black;
        }
        .container{
            width: 1100px;
            margin: 0 auto;
        }
        .menu{
            width: 200px;
            float: left;
            background-color: coral;
        }
        .content{
            width: 870px;
            background-color: blanchedalmond;
            margin-left: 20px;
            float: right;
        }
        .fixed{
            position: fixed;
            top:10px;
        }
        .section{
            border: 1px solid red;
            height: 300px;
            width: 865px;
        }
    </style>
</head>
<body onscroll="scrollEvent()">
    <div class="header"></div>
    <div class="container clearfix">
        <div id="menu" class="menu">
            <ul>
                <li>第一章</li>
                <li>第二章</li>
                <li>第三章</li>
            </ul>
        </div>
        <div class="content">
            <div class="section">第一章内容</div>
            <div class="section">第二章内容</div>
            <div class="section">第三章内容</div>
        </div>
    </div>

    <script>
        function scrollEvent() {
            var sh= document.body.scrollTop //  滚轮已滚高度
            var menu=document.getElementById("menu")
            if (sh>50){

                menu.classList.add("fixed")
            }else {
                menu.classList.remove("fixed")
            }
        }

    </script>
</body>
</html>
 (接固定菜单往下做)
<!DOCTYPE html>
<html>
<head lang="en">
    <meta charset="UTF-8">
    <title></title>
    <style>
        .clearfix:after{
            content: ‘clearfix‘;
            display: block;
            height: 0;
            visibility: hidden;
            clear: both;
        }

        .header{
            height:50px;
            background-color: black;
        }
        .container{
            width: 1100px;
            margin: 0 auto;
        }
        .menu{
            width: 200px;
            float: left;
            background-color: coral;
        }
        .content{
            width: 870px;
            background-color: blanchedalmond;
            margin-left: 20px;
            float: right;
        }
        .fixed{
            position: fixed;
            top:10px;
        }
        .section{
            border: 1px solid red;
            height: 300px;
            width: 865px;
        }
        .active{
            background-color: blue;
        }
    </style>
</head>
<body onscroll="scrollEvent()">
    <div class="header"></div>
    <div class="container clearfix">
        <div id="menu" class="menu">
            <ul>
                <li>第一章</li>
                <li>第二章</li>
                <li>第三章</li>
            </ul>
        </div>
        <div class="content">
            <div class="section">第一章内容</div>
            <div class="section">第二章内容</div>
            <div class="section">第三章内容</div>
        </div>
    </div>

    <script>
        function scrollEvent() {
            var sh= document.body.scrollTop //  滚轮已滚高度
            var menu=document.getElementById("menu")
            if (sh>50){

                menu.classList.add("fixed")
            }else {
                menu.classList.remove("fixed")
            }//实现菜单固定显示

            var sections = document.getElementsByClassName("section")
            var menu_section=document.getElementsByTagName("li")
            for (i=0;i<sections.length;i++){

                var secParent=sections[i].offsetParent  // 章节相对偏移的父元素。content
                //sections[i].offsetTop章节元素偏移高度+父元素偏移高度secParent.offsetTop-滑动的高度=章节元素相对于视口顶部的高度。
                //小于0,说明章节元素顶部即将超出视口,可以激活。
                var secOffect= sections[i].offsetTop+secParent.offsetTop-sh
                var secHeight=sections[i].offsetHeight  //章节元素自身高度
                var secBottomOffect=secOffect+secHeight //章节元素底部距离浏览器视口高度。

                //元素顶部偏移超出视口,底部偏移还未超出是,机会该章节。一旦有章节匹配不再往下判断,break
                if(secOffect<0 && secBottomOffect>0){
                    curr_menu_section= menu_section[i]
                    curr_menu_section.classList.add("active");
                    //清除其他章节的active
                    for(j=0;j<menu_section.length;j++){
                        if(curr_menu_section!=menu_section[j]){
                            menu_section[j].classList.remove("active");
                        }else {}
                    }


                    break;
                }
            }

        }

    </script>
</body>
</html>
8、定时器
setInterval         //多次定时器(毫秒计时)
clearInterval      //清除多次定时器
setTimeout         //单次定时器
clearTimeout      //清除单次定时器

<!DOCTYPE html>
<html lang="en">
<head>
    <meta charset="UTF-8">
    <title>Title</title>
</head>
<body>
    <input type="button" value="Interval" onclick="Interval();" />
    <input type="button" value="StopInterval" onclick="StopInterval();" />
    <script>
        function Interval() {
            s1 = setInterval(function () {
                console.log(123);
            }, 1000);
            s2 = setInterval(function () {
                console.log(456);
            }, 2000);
            console.log(1);
        }
        function StopInterval() {
            clearInterval(s1);
            clearInterval(s2);
        }
    </script>
</body>
</html>
9、弹出框
console.log              //输出框
alert                       //弹出框
confirm                    //确认框

<!DOCTYPE html>
<html lang="en">
<head>
    <meta charset="UTF-8">
    <title>Title</title>
</head>
<body>
    <input type="button" value="consolelog" onclick="console_log();" />
    <input type="button" value="alert" onclick="test_alert();" />
    <input type="button" value="confirm" onclick="test_confirm();" />
    <script>
        function console_log() {
            console.log("后台输出数据")//要在后台调试界面console界面看到
        }
        function test_alert() {
            alert("测试alert")
        }
        function test_confirm() {
            confirm("测试confirm")
        }

    </script>
</body>
</html>
location.href = "url"	获取URL重定向
location.assign("http://www.cnblogs.com/suoning")		重定向到URL
location.search = "wd=suoning"		修改查询字符串(百度搜索)
location.hostname		服务主机名,例:www.cnblogs.com
location.pathname		路径,例:suoning
location.port			端口号
location.reload()		重新加载
11、其他BOM相关
navigator        包含有关浏览器的信息
screen            包含有关客户端显示屏幕的信息
history            包含用户(在浏览器窗口中)访问过的 URL
window.print();    显示打印对话框

//后退一页
history.go(-1)
//前进一页
history.go(1);
//前进两页
history.go(2);
//无参数时,刷新当前页面
history.go()

//后退一页
history.back()
//前进一页
history.forward()

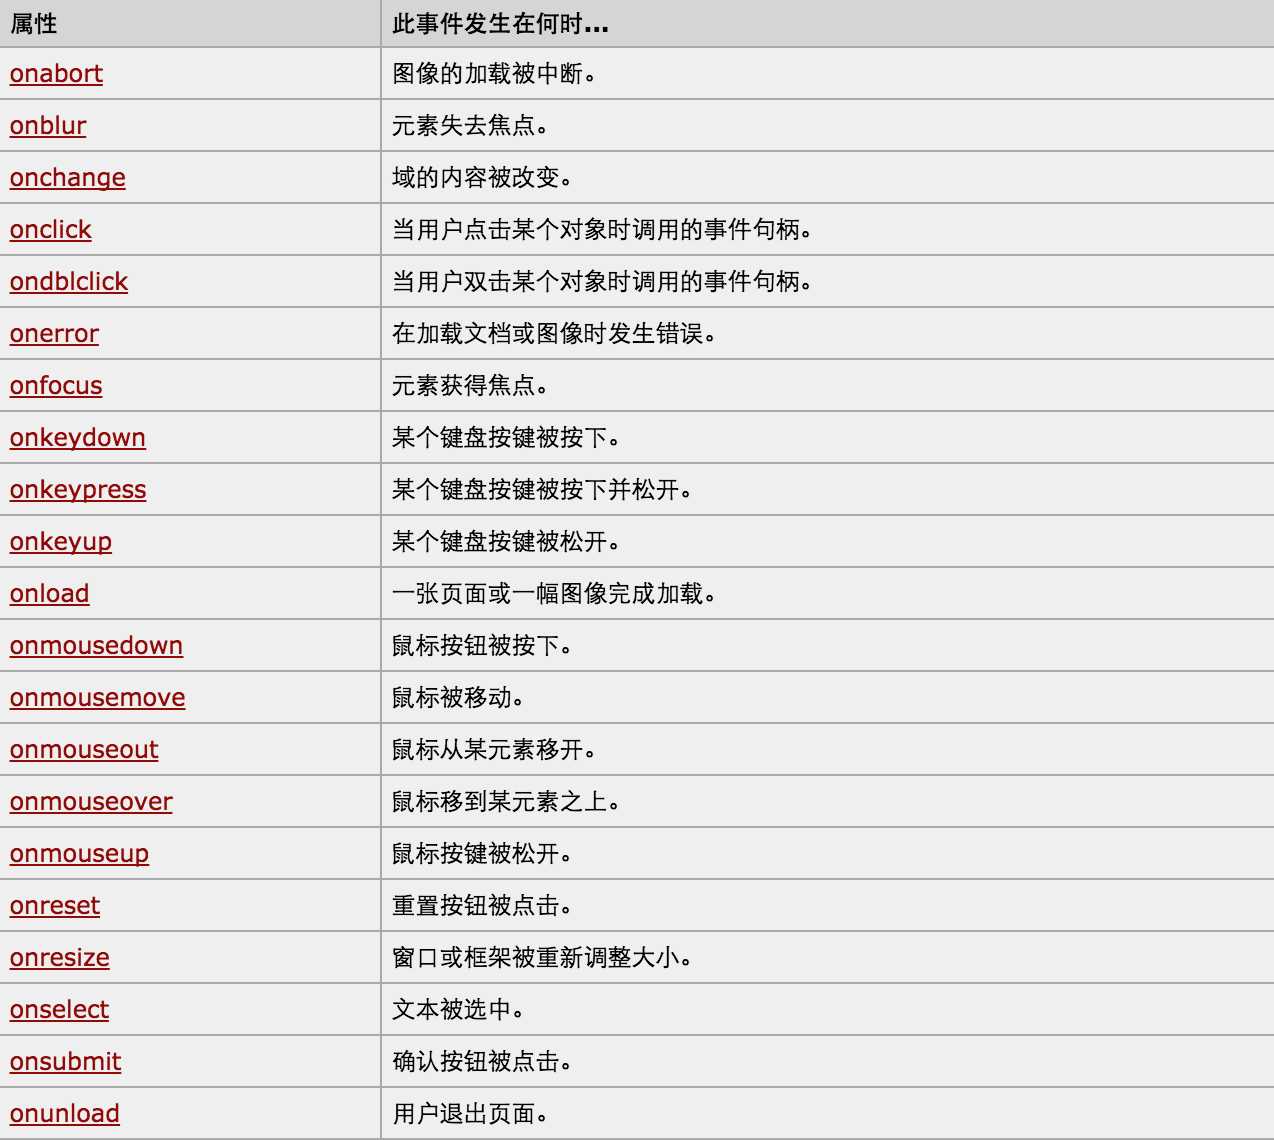
对于事件需要注意的要点:
this标签当前正在操作的标签,event封装了当前事件的内容。
实例:

<!DOCTYPE html>
<html>
    <head>
        <meta charset=‘utf-8‘ />
        <title></title>

        <style>
            .gray{
                color:gray;
            }
            .black{
                color:black;
            }
        </style>
        <script type="text/javascript">
            function Enter(){
               var id= document.getElementById("tip")
               id.className = ‘black‘;
               if(id.value==‘请输入关键字‘||id.value.trim()==‘‘){
                    id.value = ‘‘
               }
            }
            function Leave(){
                var id= document.getElementById("tip")
                var val = id.value;
                if(val.length==0||id.value.trim()==‘‘){
                    id.value = ‘请输入关键字‘
                    id.className = ‘gray‘;
                }else{
                    id.className = ‘black‘;
                }
            }
        </script>
    </head>
    <body>
        <input type=‘text‘ class=‘gray‘ id=‘tip‘ value=‘请输入关键字‘ onfocus=‘Enter();‘  onblur=‘Leave();‘/>
    </body>
</html>

<!DOCTYPE html>
<html lang="en">
<head>
    <meta charset="UTF-8">
    <style type="text/css">
        ul {
            margin:0;
            padding:0;

        }
        ul li{
            line-height: 44px;
            text-align: center;
            list-style: none;
            float: left;
            margin:0;
            padding-left: 10px;
            padding-right: 10px;
        }
        .clearfix:after{
            display: block;
            content:‘.‘;
            height:0;
            visibility: hidden;
            clear: both;
        }
        .hide{
            display:none;
        }
        .active{
            background-color: white;
            border-bottom: none;
        }
        .container{
            width: 100%;
        }
        .title{
            height:44px;
            background-color: bisque;
            border:1px solid black;
            border-bottom: none;
            margin: auto 10% ;
        }
        #content{
            margin: auto 10%;
            background-color: white;
            border: 1px solid black;
            border-top: none;
            max-height:500px;
            min-height:100px;
            overflow: scroll;
        }
    </style>
    <title>Tab菜单实例</title>
</head>
<body>
<div class="container">
    <div class="title"  class="clearfix">
        <ul id="i1">
            <!--this表示元素本身-->
            <li title="1" onclick="show(this)" class="active">title1</li>
            <li title="2" onclick="show(this)">title2</li>
            <li title="3" onclick="show(this)">title3</li>
        </ul>
    </div>
    <div id="content">
        <div content="1" >
            <h1>本例知识点:</h1>
            <p>1/onclick="show(this)" this特质本元素。</p>
            <p>2、classList.remove(‘active‘) 移除class中的active,用于class操作</p>
            <p>3、ths.className获取class名,设置值直接ths.className="active"</p>
            <p>3、tag.getAttribute("content")获取tag标签中:“content"属性的值。标题和内容关联用标签值来关联。</p>
            <h1>4、max-height:500px;最大高度min-height:100px;最小高度</h1>
            <h1>content1</h1>
            <h1>content1</h1>
            <h1>content1</h1>
            <h1>content1</h1>
            <h1>content1</h1>

        </div>
        <div content="2"  class="hide">content2</div>
        <div content="3"  class="hide">content3</div>
    </div>
</div>
 <script>
     function show(ths) {
//         ths表示元素自身,本函数点击自身添加active样式,兄弟节点移除active样式、
         ths.className="active"
         var brothers = ths.parentElement.children
         for(var i=0;i<brothers.length;i++){
             if (ths==brothers[i]){
                 continue
             }else {
                 brothers[i].classList.remove(‘active‘)
             }
         }
         var title_tab=ths.getAttribute("title")
         var father =document.getElementById("content")
         var contents = father.children
//         console.log(contents)
         for(var i=0;i<contents.length;i++){
             if(contents[i].getAttribute("content")==title_tab){
                 contents[i].classList.remove("hide")
             }else {
                 contents[i].classList.add("hide")
             }
         }
     }

 </script>
</body>
</html>
标签:
原文地址:http://www.cnblogs.com/tkqasn/p/5737608.html