标签:
本文中所使用的demo源码地址:https://github.com/mantuliu/javaAdvance 其中的类Lesson1ThreadLocal
本文为java晋级系列的第一讲,后续会陆续推出java相关的高级应用和分析。我个人一直都比较推崇threadlocal的设计原理和实现方式。以下关于threadlocal的描述来源于百度百科:
package com.mantu.advance;

/**
 * blog http://www.cnblogs.com/mantu/
 * github https://github.com/mantuliu/
 * @author mantu
 *
 */
public class Lesson1ThreadLocal {
    public static ThreadLocal<String> local = new ThreadLocal<String>();//声明静态的threadlocal变量
    public static ThreadLocal<String> local2 = new ThreadLocal<String>();//声明静态的threadlocal变量
    public static void main(String [] args){
        for(int i=0;i<5;i++){
            TestThread testThread = new TestThread();//创建5个线程
            new Thread(testThread).start();
        }
    }

}

class TestThread implements Runnable{

    @Override
    public void run() {
        // TODO Auto-generated method stub
        try {
            Thread.sleep(1l);//让线程停顿一下,便于其它线程执行
        } catch (InterruptedException e) {
            // TODO Auto-generated catch block
            e.printStackTrace();
        }
        Lesson1ThreadLocal.local.set(Thread.currentThread().getId()+":"+System.currentTimeMillis());
        Lesson1ThreadLocal.local2.set(Thread.currentThread().getId()+"");
        firstStep();
        try {
            Thread.sleep(1l);//让线程停顿一下,便于其它线程执行
        } catch (InterruptedException e) {
            // TODO Auto-generated catch block
            e.printStackTrace();
        }
        secondStep();
        try {
            Thread.sleep(1l);//让线程停顿一下,便于其它线程执行
        } catch (InterruptedException e) {
            // TODO Auto-generated catch block
            e.printStackTrace();
        }
        thirdStep();
        try {
            Thread.sleep(1l);//让线程停顿一下,便于其它线程执行
        } catch (InterruptedException e) {
            // TODO Auto-generated catch block
            e.printStackTrace();
        }
        fourthStep();
        try {
            Thread.sleep(1l);//让线程停顿一下,便于其它线程执行
        } catch (InterruptedException e) {
            // TODO Auto-generated catch block
            e.printStackTrace();
        }
        fStep();
    }

    public void firstStep(){
        System.out.println(Lesson1ThreadLocal.local.get().toString()+":first step");//获取本线程的threadlocal变量值并打印
    }
    public void secondStep(){
        System.out.println(Lesson1ThreadLocal.local.get().toString()+":second step");
    }
    public void thirdStep(){
        System.out.println(Lesson1ThreadLocal.local.get().toString()+":third step");
    }
    public void fourthStep(){
        System.out.println(Lesson1ThreadLocal.local.get().toString()+":fourth step");
    }
    public void fStep(){
        System.out.println(Lesson1ThreadLocal.local.get().toString()+":fifth step");
    }
}
代码的主要思路是5个线程,使用了同一个静态的threadlocal变量,每个线程在启动时,存储本线程相关的变量,在后面的5个步骤中都会使用到,展示每个线程的所使用的变量都是独立的,执行结果如下,大家可以自行执行并观察执行结果:
9:1470882533007:first step
11:1470882533023:first step
10:1470882533024:first step
13:1470882533024:first step
9:1470882533007:second step
12:1470882533024:first step
9:1470882533007:third step
12:1470882533024:second step
13:1470882533024:second step
11:1470882533023:second step
10:1470882533024:second step
11:1470882533023:third step
10:1470882533024:third step
12:1470882533024:third step
9:1470882533007:fourth step
13:1470882533024:third step
11:1470882533023:fourth step
10:1470882533024:fourth step
12:1470882533024:fourth step
13:1470882533024:fourth step
9:1470882533007:fifth step
12:1470882533024:fifth step
10:1470882533024:fifth step
13:1470882533024:fifth step
11:1470882533023:fifth step
从执行结果标注红色的部分可以看出,线程id为9的线程在step1到step5的操作过程中,从threadlocal变量中所取到变量值是同一个:9:1470882533007,由此便巧妙的利用了threadlocal变量来实现了在同一个线程内部的变量共享功能,对于同一个变量的操作与其它线程隔离。
下面我们开始分析一下threadlocal的源码,首先从set()方法看起:
    public void set(T value) {
        Thread t = Thread.currentThread();//获取到当前的线程
        ThreadLocalMap map = getMap(t);//通过当前的线程来获取到本线程对应的存储map
        if (map != null)
            map.set(this, value);//如果map不为空,则在map中存储值value,对应的key为当前的threadlocal对象
        else
            createMap(t, value);//如果map为空,则创建map,并在map中存储此变量
    }
接下来,我们再分析一下createMap()相关的代码
    void createMap(Thread t, T firstValue) {
        t.threadLocals = new ThreadLocalMap(this, firstValue);//创建ThreadLocalMap,参数为threadlocal变量和之前传递的变量值
    }

        ThreadLocalMap(ThreadLocal firstKey, Object firstValue) {
            table = new Entry[INITIAL_CAPACITY];//存储变量的数组
            int i = firstKey.threadLocalHashCode & (INITIAL_CAPACITY - 1);
            table[i] = new Entry(firstKey, firstValue);//将变量存储到数组里
            size = 1;
            setThreshold(INITIAL_CAPACITY);
        }
我们再来看看get()的源码
    public T get() {
        Thread t = Thread.currentThread();//一样的获取当前的线程
        ThreadLocalMap map = getMap(t);//因为每个线程都有一个独立的map空间,通过线程获取到这个map
        if (map != null) {
            ThreadLocalMap.Entry e = map.getEntry(this);//通过key值,也就是我们的local变量来获取到实际的变量值
            if (e != null)
                return (T)e.value;
        }
        return setInitialValue();
    }
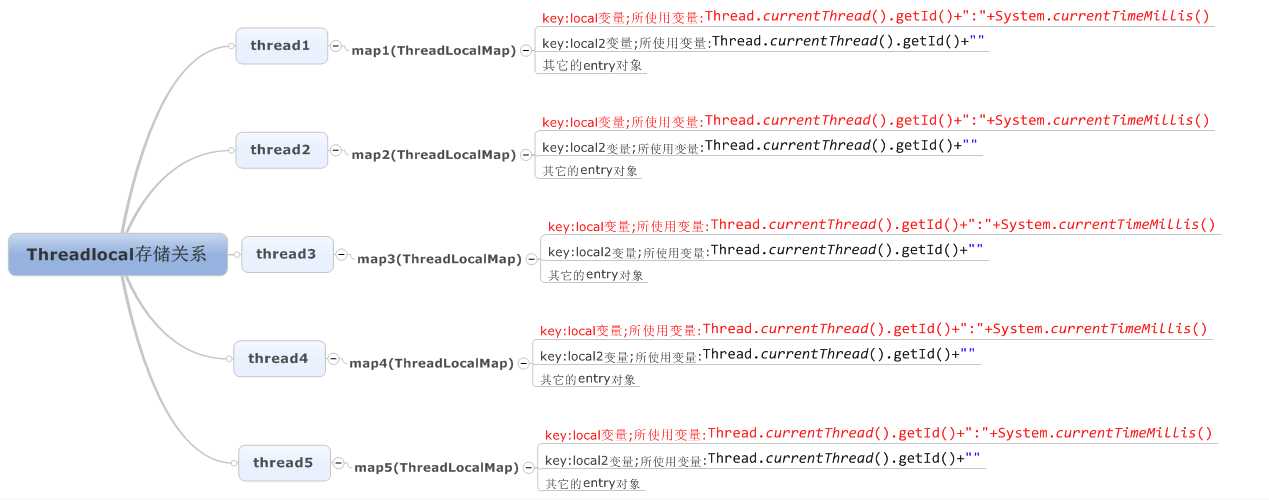
从源码中,我们可以发现,每个线程都有一个独立的存储空间,此空间是一个map,map的key值是我们所使用的threadlocal变量,例如文中的ThreadLocal<String> local 变量,此key对应的值为我们存储的变量Thread.currentThread().getId()+":"+System.currentTimeMillis()。通过下面的图可以更好的帮助大家来理解threadlocal变量中线程、存储空间map、threadlocal变量、存储的变量四者间的关系:一个thread有且只有一个存储空间(map),map会对应多个键值对,其中键为threadlocal变量,值为业务使用的实际变量。

lesson1:threadlocal的使用demo及源码分析
标签:
原文地址:http://www.cnblogs.com/mantu/p/5760087.html