标签:
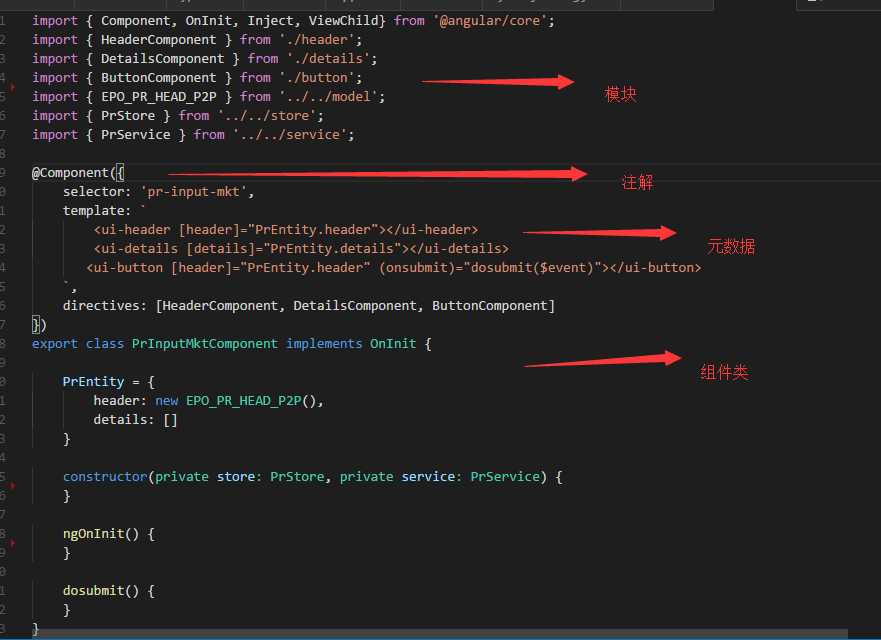
Angular2 组件是构成Angular2应用程序的核心部分,Angualr2应用程序本质上来说就是一个组件树,Angular2组件一般由模块,注解,元数据以及组件类组成,实现组件类逻辑和视图模板的相互交互。来看下面的这个简单的组件的例子:

模块是一个内聚的代码块,用来实现某种单一的功能,可以进行导入来使用模块内的变量,类或者函数等,如下所示,组件需要导入一些该组件使用到的函数,其他组件,服务等模块,例如,从 @angular/core中导入Component函数,导入其他依赖组件HeaderComponent等。
|
import { Component, OnInit, Inject, ViewChild} from ‘@angular/core‘; import { HeaderComponent } from ‘./header‘; import { DetailsComponent } from ‘./details‘; import { ButtonComponent } from ‘./button‘; import { EPO_PR_HEAD_P2P } from ‘../../model‘; import { PrStore } from ‘../../store‘; import { PrService } from ‘../../service‘; |
从@angular/core中导入Component函数后,可以使用@Component()来标示组件类为一个Component,@标示注解的一种标识,用来对组件类福建对应的元数据信息。
@Component将元数据的信息附加到组件类上,我们来详细了解一下常用的组件元数据信息都有哪些:
|
@Component({ moduleId: "pr-input-mkt", selector: ‘pr-input-mkt‘, //inline template template: ` <ui-header [header]="PrEntity.header"></ui-header> <ui-details [details]="PrEntity.details"></ui-details> <ui-button [header]="PrEntity.header" (onsubmit)="dosubmit($event)"></ui-button> `, //out template templateUrl: `./template.html`, directives: [HeaderComponent, DetailsComponent, ButtonComponent], pipes: [DatePipe], providers: [PrService] }) |
moduleId:组件标识ID,用来区分各个组件,主要作用于相对路径使用组件,可以准确定位到组件。
selector:选择器名称,在组件使用过程中,充当模板中的标识,类似a标签中的a。这个属性信息是必须的,必须精确的指定在模板中所使用的标签定义,可以为属性,标签或者样式类等,例子中使用是采用标签的形式使用的。
template/templateUrl:组件对应的模板,template是组件内部的用法,引入外部模板文件使用templateUrl。
directives:在组件模板中使用的其他组件或者指令,引入以后可以在模板中进行使用。
pipes:管道集合,组件模板中使用到的管道,引入后可以在模板中进行使用。
providers:服务提供者集合,依赖注入系统的部分,配置了那些新的服务会引入到组件类中进行使用。
组件类作为组件的核心代码区域,包含了组件的逻辑以及视图的显示数据信息。组件类的用户主要是体现在输入和输出两个部分。
输入使用@Input()注解来表示,将父组件的数据绑定到对应的子组件的属性中。例如 HeaderComponent 组件中,使用@Input() 来附加输入属性到header上。
|
import { Component, OnInit, Input, } from ‘@angular/core‘;
import { EPO_PR_HEAD_P2P} from ‘../../model‘; import { PrService } from ‘../../service‘;
@Component({ selector: ‘ui-header‘, template: ` <form class="form-horizontal" role="form" (change)="change($event)"> <div class="form-group"> <legend>Form title</legend> </div>
<div class="input-group"> <div class="input-group-addon">ID</div> <input type="text" class="form-control" name="ID" [ngModel]="header.ID" placeholder="Amount"> </div>
</form> ` }) export class HeaderComponent implements OnInit { _init: boolean = false;
@Input() header: EPO_PR_HEAD_P2P; } |
那么如何在父组件中如何调用呢,其实非常简单,实际上就是模板语法中属性的绑定方式,将父组件中的数据传递到子组件中。
|
<ui-header [header]="PrEntity.header"></ui-header> |
输入使用@ Output ()注解来表示,将子组件触发的事件提交到父组件中。例如 ButtonComponent组件中,使用@ Output () 来创建一个事件触发器onsave,当点击save按钮的时候触发onsave事件,并传递对应的数据’save’。
|
import { Component, OnInit, Output, EventEmitter } from ‘@angular/core‘;
@Component({ selector: ‘ui-button‘, template: ` <div class="btn-group"> <button type="button" class="btn btn-default" (click)="save($event)">save</button> </div> ` }) export class ButtonComponent implements OnInit { @Output() onsave = new EventEmitter();
constructor() { }
ngOnInit() { }
save($event) { this.onsave.emit(‘save‘); } } |
那么如何在父组件中如何调用呢,和组件输入相似,不过本次采用的是模板语法中事件的绑定方式,$event表示传递的参数信息,当点击子组件save按钮的时候的时候,父组件中的dosave方法便会执行。
|
<ui-button (onsave)="dosave($event)"></ui-button> |
标签:
原文地址:http://www.cnblogs.com/SLchuck/p/5761708.html