标签:
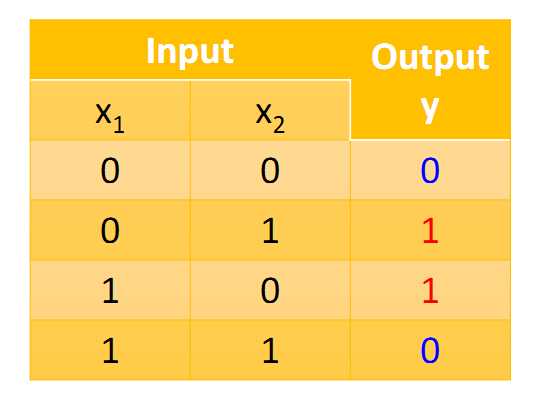
与非门的图片如下

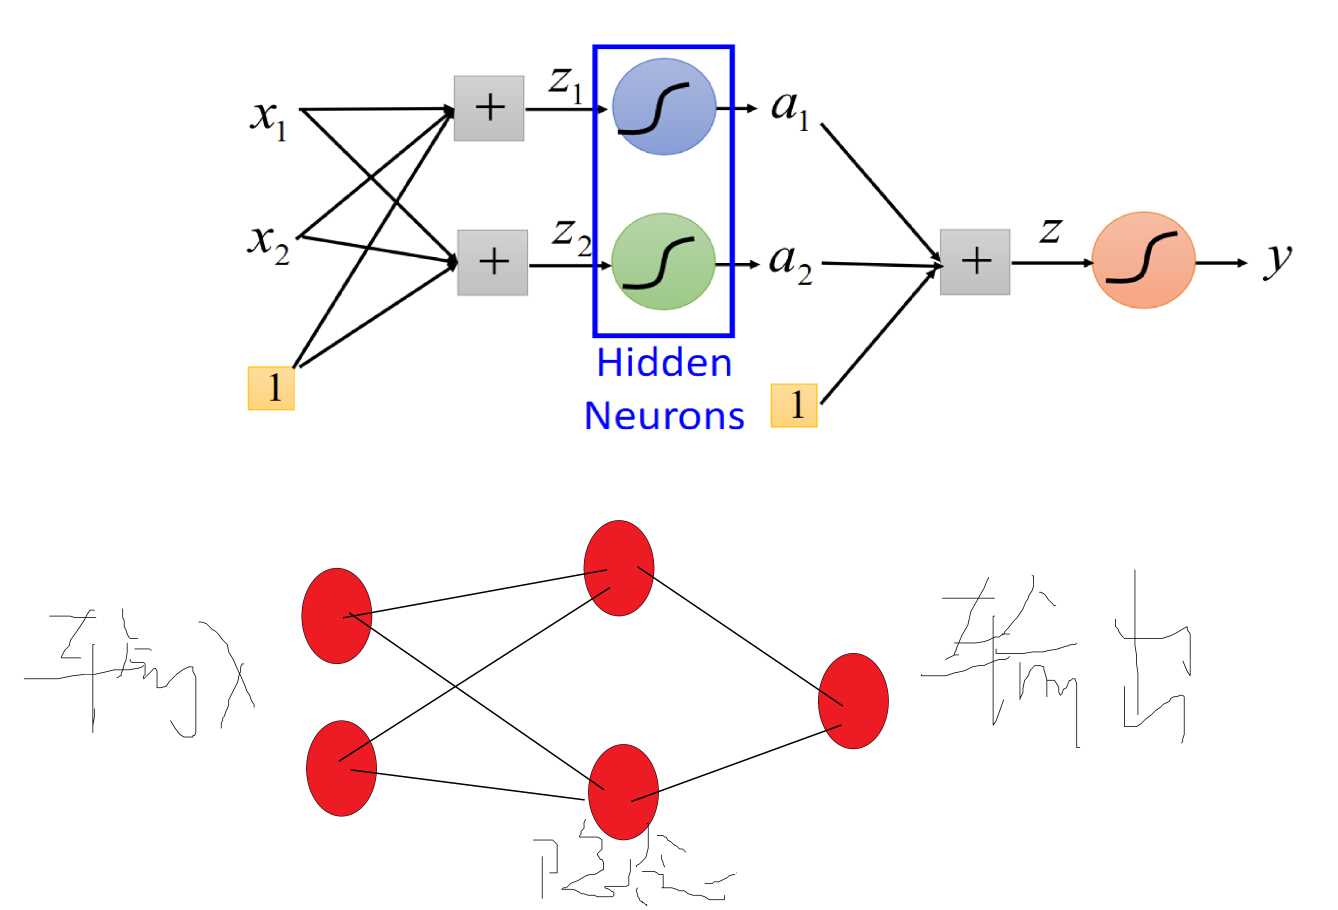
示意图

详细解释:
1 定义变量的代码,包括了输入、权值、输出等。其中激活函数采用的是sigmod函数
 1 # -*- coding: utf-8 -*-
 2 __author__ = ‘Administrator‘
 3
 4 import theano
 5 import  theano.tensor as T
 6 import  random
 7 import  numpy as np
 8 from itertools import izip
 9
10
11 #定义网络结构
12 #定义输入
13 x=T.vector()
14 #定义权值W1
15 w1=theano.shared(np.random.randn(2)) #生成一个1行2列的随机数
16 w2=theano.shared(np.random.randn(2))
17 b1=theano.shared(np.random.randn(1))
18 b2=theano.shared(np.random.randn(1))
19 z1=T.dot(w1,x)+b1
20 a1=1/(1+T.exp(-z1))
21 z2=T.dot(w2,x)+b2
22 a2=1/(1+T.exp(-z2))
23
24 w=theano.shared(np.random.randn(2))
25 b=theano.shared(np.random.randn(1))
26 z=T.dot(w,[a1,a2])+b
27 y=1/(1+T.exp(-z))
2 定义目标输出和损失函数计算方式,我们采用的平方损失
1 y_hat = T.scalar()#正确输出
2 cost = T.sum((y-y_hat)**2) #采用的是平方损失函数
另外也可以采用交叉熵损失函数
cost = - (y_hat*T.log(y)+(1-y_hat)*T.log(1-y)).sum() #采用交叉熵损失函数
3 误差反向传播求导,直接调用theano函数求解,方便快捷
1 #误差反向传播求导
2 dw,db,dw1,dw2,db1,db2= T.grad(cost,[w,b,w1,w2,b1,b2])
4 权值更新
 1 #手动定义一个权值更新函数
 2 def MyUpdate(paramters,gradients):
 3     mu=0.1 #步长
 4     paramters_updates=  5     [(p, p-mu*g) for p,g in izip(paramters,gradients)]
 6     return paramters_updates
 7
 8 #绑定输入、输出与权值更新函数
 9 g = theano.function(
10     inputs=[x,y_hat],
11     outputs=[y,cost],
12     updates=MyUpdate([w,b,w1,w2,b1,b2],[dw,db,dw1,dw2,db1,db2])
13 )
5 开始训练
1 for i in range(50000):
2     y1,c1=g([0,0],0)
3     y2,c2=g([0,1],1)
4     y3,c3=g([1,0],1)
5     y4,c4=g([1,1],0)
6     print  c1+c2+c3+c4
7     print y1,y2,y3,y4
6 结果输出:
0.000541548001074
[ 0.01069522] [ 0.98782012] [ 0.98784247] [ 0.01144574]
0.000541536246431
[ 0.01069511] [ 0.98782025] [ 0.9878426] [ 0.01144562]
可以看到,每一项都接近[0 1 1 0],网络已经成功训练了。
交叉熵的结果输出
0.00187006124627
[ 0.00044582] [ 0.99958399] [ 0.99938235] [ 0.00039013]
相同参数下,很明显交叉熵的结果更好!
标签:
原文地址:http://www.cnblogs.com/love6tao/p/5770364.html