标签:

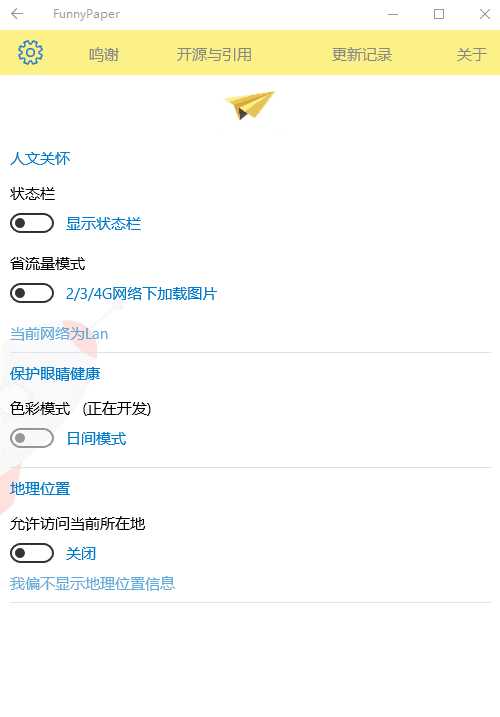
要实现如上图所示的效果分为三步:
1.重写Pivot样式,去掉Pivot的Header或者是直接使用默认的Pivot的样式然后不写Header
2.使用一个ListView或者是横向的StackPanel或者是横向的Grid加上一个Button代替Header的效果(我使用的是Grid,建议使用ListView)
3.在Pivot的SelelctionChanged事件中以及当做Header的Button的Click事件做一个同步
首先Pivot的Item你想放什么就放什么
然后就是代替Header的问题:我用的Grid套了5个Button
 1 <Grid Grid.Row="0" x:Name="TopBar" Background="#FDF187">
 2             <Grid.ColumnDefinitions>
 3                 <ColumnDefinition Width="*"/>
 4                 <ColumnDefinition Width="*"/>
 5                 <ColumnDefinition Width="2*"/>
 6                 <ColumnDefinition Width="2*"/>
 7                 <ColumnDefinition Width="*"/>
 8             </Grid.ColumnDefinitions>
 9             <Button x:Name="Header0" Style="{StaticResource GrayLightButton}"
10                     Background="Transparent" Grid.Column="0" Content="设置" FontFamily="Segoe MDL2 Assets,Segoe UI"
11                     FontSize="15" HorizontalAlignment="Center" VerticalAlignment="Center" Click="Header0_Click"/>
12             <Button x:Name="Header1" Style="{StaticResource GrayLightButton}"
13                     Background="Transparent" Grid.Column="1" Content="鸣谢" FontFamily="Segoe MDL2 Assets,Segoe UI"
14                     FontSize="15" HorizontalAlignment="Center" VerticalAlignment="Center" Click="Header1_Click"/>
15             <Button x:Name="Header2" Style="{StaticResource GrayLightButton}"
16                     Background="Transparent" Grid.Column="2" Content="开源与引用" FontFamily="Segoe MDL2 Assets,Segoe UI"
17                     FontSize="15" HorizontalAlignment="Center" VerticalAlignment="Center" Click="Header2_Click"/>
18             <Button x:Name="Header3" Style="{StaticResource GrayLightButton}"
19                     Background="Transparent" Grid.Column="3" Content="更新记录" FontFamily="Segoe MDL2 Assets,Segoe UI"
20                     FontSize="15" HorizontalAlignment="Center" VerticalAlignment="Center" Click="Header3_Click"/>
21             <Button x:Name="Header4" Style="{StaticResource GrayLightButton}"
22                     Background="Transparent" Grid.Column="4" Content="关于" FontFamily="Segoe MDL2 Assets,Segoe UI"
23                     FontSize="15" HorizontalAlignment="Center" VerticalAlignment="Center" Click="Header4_Click"/>
24         </Grid>
最后就是在后台代码中实现PivotItem与Grid的同步:
Pivot的SelelctionChanged事件实现Button的文字和颜色切换
1 private void Pivot_SelectionChanged(object sender, SelectionChangedEventArgs e) 2 { 3 Header0.Content = "设置"; 4 Header0.FontSize = 15; 5 Header0.Foreground = new SolidColorBrush(Color.FromArgb(225, 128, 128, 128)); 6 Header1.Content = "鸣谢"; 7 Header1.FontSize = 15; 8 Header1.Foreground = new SolidColorBrush(Color.FromArgb(225, 128, 128, 128)); 9 Header2.Content = "开源与引用"; 10 Header2.FontSize = 15; 11 Header2.Foreground = new SolidColorBrush(Color.FromArgb(225, 128, 128, 128)); 12 Header3.Content = "更新记录"; 13 Header3.FontSize = 15; 14 Header3.Foreground = new SolidColorBrush(Color.FromArgb(225, 128, 128, 128)); 15 Header4.Content = "关于"; 16 Header4.FontSize = 15; 17 Header4.Foreground = new SolidColorBrush(Color.FromArgb(225, 128, 128, 128)); 18 switch (pivot.SelectedIndex) 19 { 20 case 0: 21 Header0.Content = "";//Segoe MDL2 Assets图标 22 Header0.FontSize = 25; 23 Header0.Foreground = new SolidColorBrush(Color.FromArgb(225, 0, 122, 204)); 24 break; 25 case 1: 26 Header1.Content = "";//Segoe MDL2 Assets图标 27 Header1.FontSize = 25; 28 Header1.Foreground = new SolidColorBrush(Color.FromArgb(225, 0, 122, 204)); 29 break; 30 case 2: 31 Header2.Content = "";//Segoe MDL2 Assets图标 32 Header2.FontSize = 25; 33 Header2.Foreground = new SolidColorBrush(Color.FromArgb(225, 0, 122, 204)); 34 break; 35 case 3: 36 Header3.Content = "";//Segoe MDL2 Assets图标 37 Header3.FontSize = 25; 38 Header3.Foreground = new SolidColorBrush(Color.FromArgb(225, 0, 122, 204)); 39 break; 40 case 4: 41 Header4.Content = "?";//Segoe MDL2 Assets图标 42 Header4.FontSize = 25; 43 Header4.Foreground = new SolidColorBrush(Color.FromArgb(225, 0, 122, 204)); 44 break; 45 } 46 }
然后就是点击Button实现PivotItem的切换
以第一个Button举个栗子,以此类推
1         private void Header0_Click(object sender, RoutedEventArgs e)
2         {
3             pivot.SelectedIndex = 0;
4             pivot.SelectedItem = pivot.Items[0];
5         }
就这样就可以实现如上效果了。
还可以做一个扩展:在Grid中Button下面加一扁扁的矩形,然后后台代码处理矩形的隐藏和出现,可以实现更加好看的效果。
抛砖引玉,如有更炫酷的方法请联系我~
标签:
原文地址:http://www.cnblogs.com/qzr19970105/p/5774443.html