标签:
---------------------------------------------------------------------------------------------------------原文链接:http://www.cnblogs.com/alex-bn-lee/archive/2012/04/08/2437358.html
A1 ………… 实现:鼠标滑过显示要素 tip
A2 ………… 实现:通过鼠标选择要素并高亮显示(ISelectionEnvironment)
A3 ………… 实现:只显示筛选的要素(IFeatureLayerDefinition)
A4 ………… 实现:高亮显示筛选的要素(IFeatureSelection)
A5 ………… 实现:类似 ArcMap 中 Identify 工具的效果(IIdentify、IArray、IIdentifyObj)
A6 ………… 实现:在 MapControl 上绘制几何图形
实现:在 MapControl 上绘制几何图形(IGraphicsContainer,几何:圆)
A7 ………… 实现:在 MapControl 自由旋转地图(IScreenDisplay [RotateMoveTo])
实现:在 MapControl 中鼠标与地图反向移动(IScreenDisplay [PanMoveTo])
A8 ………… 实现:弹出颜色选择器(IColorPalette、IColorSelector、IColorBrowser)
实现:获取控件的屏幕位置(两种方法)
A9 ………… 实现:Symbol 对象(ISimpleMarkerSymbol、Arrow、Character、Picture)
G1 ………… 实现:Symbol 对象
G2 ………… 实现:显示图层的属性窗口
G3 ………… 实现:PageLayoutControl 的样式设置(IBorder、IBackground、IShadow、IMapGrid)
G4 ………… 实现:删除shapefile文件中的重复数据
G5 ………… 实现:MapControl 与 PageLayoutControl 的交互
G6 ………… 实现:制作可以浮动的工具栏
G7 ………… 实现:ArcGIS Engine 实现鹰眼 & 分析(IGraphicsContainer、IFillShapeElement)
G8 ………… 实现:独立窗口的鹰眼显示(IHookHelper)
G9 ………… 实现:自定义工具窗口(ICustomizeDialog、ICustomizeDialogEvents)
U1 ………… 实现:Map 与 PageLayout 切换后工具不变
U2 ………… 实现:在窗体中显示渐变颜色 & 根据名称获取控件(IAlgorithmicColorRamp、IEnumColor)
U3 ………… 实现:获取地图是否处于编辑状态(IDataset、IWorkspaceEdit)
U4 ………… 实现:为某一要素添加字段内容(IFeature)
U5 ………… 实现:获取地图是否处于编辑状态
U6 ………… 实现:获取地图是否处于编辑状态
---------------------------------------------------------------------------------------------------------
╔════════╗
╠════╣ 第A1个 ╠══════════════════════════════════════════════════╣
╚════════╝
对于这个有两个方法:
第一种:通过将 axmapcontrol 自带的 ShowMapTips 属性设置为 true 来实现。
第二种:通过 .NET 自带的控件 ToolTip 来实现!
第一种代码:
private void axMapControl1_OnMouseMove(object sender, IMapControlEvents2_OnMouseMoveEvent e)
{
    axMapControl1.ShowMapTips = true;
    IFeatureLayer pFeatureLayer = axMapControl1.Map.get_Layer(0) as IFeatureLayer;
    pFeatureLayer.DisplayField = "Name";
    pFeatureLayer.ShowTips = true;
}
第二种代码:
private void axMapControl1_OnMouseMove(object sender, IMapControlEvents2_OnMouseMoveEvent e)
{
 IFeatureLayer pFeatureLayer = axMapControl1.Map.get_Layer(0) as IFeatureLayer;
    pFeatureLayer.DisplayField = "Name";
    pFeatureLayer.ShowTips = true;
    string pTip;
    pTip = pFeatureLayer.get_TipText(e.mapX, e.mapY, axMapControl1.ActiveView.FullExtent.Width / 10000);
    if (pTip != null)
    {
        toolTip1.SetToolTip(axMapControl1, "名称:" + pTip);
    }
    else           //当 ToolTip 空间显示的内容为 null 的时候,就不会显示了!相当于隐藏了!
    {
        toolTip1.SetToolTip(axMapControl1, "");
    }
}
以上两种方法都可以实现显示标注,但是第二种效果更好一点~!
---------------------------------------------------------------------------------------------------------
╔════════╗
╠════╣ 第A2个 ╠══════════════════════════════════════════════════╣
╚════════╝
---------------------------------------------------------------------------------------------------------
---------------------------------------------------------------------------------------------------------
通过 IMap 接口的 SelectByShape 方法来实现!同时可以修改高亮显示的颜色!
        private void axMapControl1_OnMouseDown(object sender, IMapControlEvents2_OnMouseDownEvent e)
        {
            axMapControl1.MousePointer = esriControlsMousePointer.esriPointerDefault;
            IMap pMap = axMapControl1.Map;
            IGeometry pGeometry = axMapControl1.TrackRectangle();       //获取框选几何
            ISelectionEnvironment pSelectionEnv = new SelectionEnvironment(); //新建选择环境
            IRgbColor pColor = new RgbColor();
            pColor.Red = 255;
            pSelectionEnv.DefaultColor = pColor;         //设置高亮显示的颜色!

            pMap.SelectByShape(pGeometry, pSelectionEnv, false); //选择图形!
            axMapControl1.Refresh(esriViewDrawPhase.esriViewGeoSelection, null, null);
        }
---------------------------------------------------------------------------------------------------------
╔════════╗
╠════╣ 第A3个 ╠══════════════════════════════════════════════════╣
╚════════╝
---------------------------------------------------------------------------------------------------------
---------------------------------------------------------------------------------------------------------
1. 通过 IFeatureLayerDefinition 接口的 DefinitionExpression 属性可以实现!
IFeatureLayer pFeatureLayer = axMapControl1.Map.get_Layer(0) as IFeatureLayer;
IFeatureLayerDefinition pFeatLyrDef = pFeatureLayer as IFeatureLayerDefinition; //新建 IFeatureLayerDefinition 接口实例
pFeatLyrDef.DefinitionExpression = "Area > 20";  //定义筛选条件
axMapControl1.ActiveView.Refresh();  //刷新
这样便只显示符合要求的部分了!即面积大于20的要素!
2. 通过 IFeatureLayerDefinition 接口的 CreatSelectionLayer 方法可以通过筛选建立新图层!
IFeatureLayer pFeatureLayer = axMapControl1.Map.get_Layer(0) as IFeatureLayer;
IFeatureLayerDefinition pFeatLyrDef = pFeatureLayer as IFeatureLayerDefinition;
pFeatLyrDef.DefinitionExpression = "Area > 20";
axMapControl1.ActiveView.Refresh();         //重新定义的图层

IQueryFilter pQueryFilter = new QueryFilter();
pQueryFilter.WhereClause = "POP > 10";

IFeatureSelection pFeatSel = pFeatureLayer as IFeatureSelection;
pFeatSel.SelectFeatures(pQueryFilter, esriSelectionResultEnum.esriSelectionResultNew, false);
axMapControl1.Refresh(esriViewDrawPhase.esriViewGeoSelection, null, null);  //在新定义图层的基础上进行的查询

IFeatureLayer pNewFeat = pFeatLyrDef.CreateSelectionLayer("New Layer", true, null, null);  //新建的图层包括上面两者的交集部分!
pFeatSel.Clear();
axMapControl1.Map.AddLayer(pNewFeat);
MessageBox.Show(axMapControl1.Map.LayerCount.ToString());
首先是建立一个虚拟的新图层,然后在此新图层的基础上进行筛选,然后从而生成新的图层!
参考:http://blog.csdn.net/qinyilang/article/details/6575539
---------------------------------------------------------------------------------------------------------
╔════════╗
╠════╣ 第A4个 ╠══════════════════════════════════════════════════╣
╚════════╝
---------------------------------------------------------------------------------------------------------
---------------------------------------------------------------------------------------------------------
通过 IFeatureSelection 接口的 SelectFeatures 方法可以实现!
IFeatureLayer pFeatureLayer = axMapControl1.Map.get_Layer(0) as IFeatureLayer;
IQueryFilter pQueryFilter = new QueryFilter();  //建立查询
pQueryFilter.WhereClause = "POP > 10";
IFeatureSelection pFeatSel = pFeatureLayer as IFeatureSelection;  //新建 IFeatureSelection 接口实例
pFeatSel.SelectFeatures(pQueryFilter, esriSelectionResultEnum.esriSelectionResultNew, false);  //实现方法,选择筛选的部分!
axMapControl1.Refresh(esriViewDrawPhase.esriViewGeoSelection, null, null);
---------------------------------------------------------------------------------------------------------
╔════════╗
╠════╣ 第A5个 ╠══════════════════════════════════════════════════╣
╚════════╝
---------------------------------------------------------------------------------------------------------
---------------------------------------------------------------------------------------------------------
---------------------------------------------------------------------------------------------------------
---------------------------------------------------------------------------------------------------------
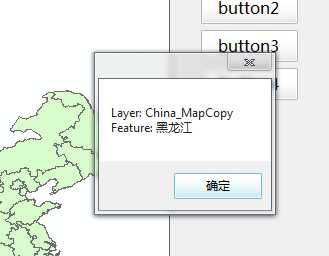
主要实现点击查询并闪烁显示,并把查询要素的信息通过DataGridView显示出来,主要用到的接口:IIdentity、IArray、IIdentifyObj
IIdentify pIdentify = axMapControl1.Map.get_Layer(0) as IIdentify; //通过图层获取 IIdentify 实例
IPoint pPoint = new ESRI.ArcGIS.Geometry.Point(); //新建点来选择
IArray pIDArray;
IIdentifyObj pIdObj;

pPoint.PutCoords(e.mapX, e.mapY);      //定义点
pIDArray = pIdentify.Identify(pPoint);       //通过点获取数组,用点一般只能选择一个元素
if (pIDArray != null)
{
    pIdObj = pIDArray.get_Element(0) as IIdentifyObj; //取得要素
    pIdObj.Flash(axMapControl1.ActiveView.ScreenDisplay);       //闪烁效果
    MessageBox.Show("Layer: " + pIdObj.Layer.Name + "\n" + "Feature: " + pIdObj.Name); //输出信息
}
else
{
    MessageBox.Show("Nothing!");
}
效果:
框选实现如下所示:
IIdentify pIdentify = axMapControl1.Map.get_Layer(0) as IIdentify;
IGeometry pGeo = axMapControl1.TrackRectangle() as IGeometry;
IArray pIDArray;
IIdentifyObj pIdObj;

pIDArray = pIdentify.Identify(pGeo);
if (pIDArray != null)
{
    string str = "\n";
    string lyrName = "";
    for (int i = 0; i < pIDArray.Count;i++ )
    {
        pIdObj = pIDArray.get_Element(i) as IIdentifyObj;
        pIdObj.Flash(axMapControl1.ActiveView.ScreenDisplay);
        str += pIdObj.Name + "\n";
        lyrName = pIdObj.Layer.Name;
    }
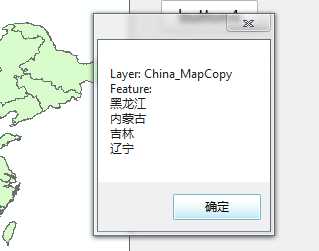
    MessageBox.Show("Layer: " + lyrName + "\n" + "Feature: " + str);
}
else
{
    MessageBox.Show("Nothing!");
}
效果如下:
参考:http://blog.csdn.net/mjhwy/article/details/7337426
---------------------------------------------------------------------------------------------------------
╔════════╗
╠════╣ 第A6个 ╠══════════════════════════════════════════════════╣
╚════════╝
可以直接使用 axMapControl1.DrawShape 方法来实现~!
ISimpleLineSymbol pLineSym = new SimpleLineSymbol();
IRgbColor pColor = new RgbColor();
pColor.Red = 11;
pColor.Green = 120;
pColor.Blue = 233;
pLineSym.Color = pColor;
pLineSym.Style = esriSimpleLineStyle.esriSLSSolid;
pLineSym.Width = 2;

IPolyline pLine = axMapControl1.TrackLine() as IPolyline;

object symbol = pLineSym as object;
axMapControl1.DrawShape(pLine, ref symbol);
也可以通过 IScreenDisplay 接口的方法来实现!~
ISimpleLineSymbol pLineSym = new SimpleLineSymbol();
IRgbColor pColor = new RgbColor();
pColor.Red = 11;
pColor.Green = 120;
pColor.Blue = 233;
pLineSym.Color = pColor;
pLineSym.Style = esriSimpleLineStyle.esriSLSSolid;
pLineSym.Width = 2;

IPolyline pLine = axMapControl1.TrackLine() as IPolyline;

IScreenDisplay pScreenDisplay = axMapControl1.ActiveView.ScreenDisplay;
pScreenDisplay.StartDrawing(pScreenDisplay.hDC, 1);
pScreenDisplay.SetSymbol(pLineSym as ISymbol);
pScreenDisplay.DrawPolyline(pLine);
pScreenDisplay.FinishDrawing();
通过比较,只是后面实现的部分不同,前面都是相同的!
---------------------------------------------------------------------------------------------------------
╔════════╗
╠════╣ 第A6A个 ╠══════════════════════════════════════════════════╣
╚════════╝
普通的图形,可以直接向下面一样实现!
m_ActiveView = m_hookHelper.ActiveView;
m_Map = m_hookHelper.FocusMap;
IScreenDisplay pScreenDisplay = m_ActiveView.ScreenDisplay;
IRubberBand pRubberPolygon = new RubberPolygonClass();
ISimpleFillSymbol pFillSymbol = new SimpleFillSymbolClass();
pFillSymbol.Color = getRGB(255, 255, 0);
IPolygon pPolygon = pRubberPolygon.TrackNew(pScreenDisplay, (ISymbol)pFillSymbol) as IPolygon;
pFillSymbol.Style = esriSimpleFillStyle.esriSFSDiagonalCross;
pFillSymbol.Color = getRGB(0, 255, 255);
IFillShapeElement pPolygonEle = new PolygonElementClass();
pPolygonEle.Symbol = pFillSymbol;
IElement pEle = pPolygonEle as IElement;
pEle.Geometry = pPolygon;
IGraphicsContainer pGraphicsContainer = m_Map as IGraphicsContainer;
pGraphicsContainer.AddElement(pEle, 0);
m_ActiveView.PartialRefresh(esriViewDrawPhase.esriViewGraphics, null, null);
画圆比较特殊,因为没有圆这个现成的几何体,因此要转换,如下所示:
m_ActiveView = m_hookHelper.ActiveView;
m_Map = m_hookHelper.FocusMap;
IScreenDisplay pScreenDisplay = m_ActiveView.ScreenDisplay;
IRubberBand pRubberCircle = new RubberCircleClass();
ISimpleFillSymbol pFillSymbol = new SimpleFillSymbolClass();
pFillSymbol.Color = getRGB(255, 255, 0);
IGeometry pCircle = pRubberCircle.TrackNew(pScreenDisplay, (ISymbol)pFillSymbol) as IGeometry;

IPolygon pPolygon = new PolygonClass();    //空的多边形
ISegmentCollection pSegmentCollection = pPolygon as ISegmentCollection;  //段集合
ISegment pSegment = pCircle as ISegment;  //将圆赋值给段
object missing = Type.Missing;  //显示默认值
pSegmentCollection.AddSegment(pSegment, ref missing, ref missing);  //给空多边形加入圆
pFillSymbol.Style = esriSimpleFillStyle.esriSFSDiagonalCross;
pFillSymbol.Color = getRGB(0, 255, 255);
IFillShapeElement pPolygonEle = new PolygonElementClass();
pPolygonEle.Symbol = pFillSymbol;
IElement pEle = pPolygonEle as IElement;
pEle.Geometry = pPolygon;
IGraphicsContainer pGraphicsContainer = m_Map as IGraphicsContainer;
pGraphicsContainer.AddElement(pEle, 0);
m_ActiveView.PartialRefresh(esriViewDrawPhase.esriViewGraphics, null, null);
---------------------------------------------------------------------------------------------------------
╔════════╗
╠════╣ 第A7个 ╠══════════════════════════════════════════════════╣
╚════════╝
---------------------------------------------------------------------------------------------------------
---------------------------------------------------------------------------------------------------------
通过 IScreenDisplay 接口来实现!
//鼠标按下!
private void axMapControl1_OnMouseDown(object sender, IMapControlEvents2_OnMouseDownEvent e)
{
    IPoint pPoint = new PointClass();
    pPoint.PutCoords(e.mapX, e.mapY);
    IPoint pCentrePoint = new PointClass();
    pCentrePoint.PutCoords(axMapControl1.Extent.XMin + axMapControl1.ActiveView.Extent.Width / 2,
        axMapControl1.Extent.YMax - axMapControl1.ActiveView.Extent.Height / 2); //获取图像的中心位置
 axMapControl1.ActiveView.ScreenDisplay.RotateStart(pPoint, pCentrePoint); //开始旋转
}
//鼠标移动!
private void axMapControl1_OnMouseMove(object sender, IMapControlEvents2_OnMouseMoveEvent e)
{
    IPoint pPoint = new PointClass();
    pPoint.PutCoords(e.mapX, e.mapY);
    axMapControl1.ActiveView.ScreenDisplay.RotateMoveTo(pPoint);    //旋转到鼠标的位置
 axMapControl1.ActiveView.ScreenDisplay.RotateTimer(); //可以忽略
}
//鼠标抬起!
private void axMapControl1_OnMouseUp(object sender, IMapControlEvents2_OnMouseUpEvent e)
{
    double dRotationAngle = axMapControl1.ActiveView.ScreenDisplay.RotateStop(); //获取旋转的角度
 axMapControl1.Rotation = dRotationAngle; //赋值给 axMapControl1.Rotation,这下真的旋转了!
 axMapControl1.ActiveView.PartialRefresh(esriViewDrawPhase.esriViewGeography, null, null); //刷新!
}
---------------------------------------------------------------------------------------------------------
╔════════╗
╠════╣ 第A7A个 ╠══════════════════════════════════════════════════╣
╚════════╝
double startMapX = 0;
double startMapY = 0;
IScreenDisplay pScreenDisplay;

private void Form1_Load(object sender, EventArgs e)  //窗体加载信息
{
    pScreenDisplay = axMapControl1.ActiveView.ScreenDisplay;
}

private void axMapControl1_OnMouseDown(object sender, IMapControlEvents2_OnMouseDownEvent e)  //鼠标按下的时候触发
{
    IPoint pPoint = new PointClass();
    pPoint.PutCoords(e.mapX, e.mapY);
    pScreenDisplay.PanStart(pPoint);

    startMapY = e.mapY;
    startMapX = e.mapX;
}

private void axMapControl1_OnMouseMove(object sender, IMapControlEvents2_OnMouseMoveEvent e)  //鼠标移动的时候触发
{
    IPoint pPoint = new PointClass();
    pPoint.PutCoords(startMapX * 2 - e.mapX, startMapY * 2 - e.mapY);   //获取当前点关于起始点的对称点

    pScreenDisplay.PanMoveTo(pPoint);
}

private void axMapControl1_OnMouseUp(object sender, IMapControlEvents2_OnMouseUpEvent e)    //鼠标松开的时候触发
{
    pScreenDisplay.PanStop();
}
---------------------------------------------------------------------------------------------------------
╔════════╗
╠════╣ 第A8个 ╠══════════════════════════════════════════════════╣
╚════════╝
---------------------------------------------------------------------------------------------------------
---------------------------------------------------------------------------------------------------------
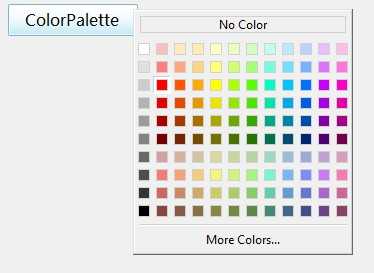
1. ColorPalette:
private void button1_Click(object sender, EventArgs e)
{
    IColor pColor = new RgbColor();
    pColor.RGB = 255;
    tagRECT pTag = new tagRECT();
    pTag.left = this.Left + button1.Left + button1.Width;
    pTag.bottom = this.Top + button1.Top + button1.Height;
    IColorPalette pColorPalette = new ColorPalette();
    pColorPalette.TrackPopupMenu(ref pTag, pColor, false, 0);
    pColor = pColorPalette.Color;
}
效果:
---------------------------------------------------------------------------------------------------------
╔════════╗
╠════╣ 第A8A个 ╠══════════════════════════════════════════════════╣
╚════════╝
第一种:将控件坐标转换为屏幕坐标!
pTag.left = button1.PointToScreen(System.Drawing.Point.Empty).X;
pTag.bottom = button1.PointToScreen(System.Drawing.Point.Empty).Y + button1.Height;
第二种:通过空间之间属性的间接计算!注:button1 在 groupBox2 中!
pTag.left = SystemInformation.FrameBorderSize.Width + this.Left + groupBox2.Left + button1.Left;
pTag.bottom = (this.Height - this.ClientRectangle.Height - SystemInformation.FrameBorderSize.Height) + this.Top + groupBox2.Top + button1.Top + button1.Height;
---------------------------------------------------------------------------------------------------------
---------------------------------------------------------------------------------------------------------
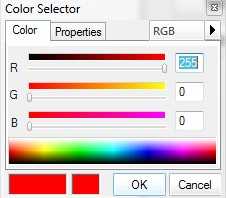
2. ColorSelector:
IColor pColor = new RgbColor();
pColor.RGB = 255;
IColorSelector pSelector = new ColorSelectorClass();
pSelector.Color = pColor;
if (pSelector.DoModal(0))
{
    pColor = pSelector.Color;
}
效果:
---------------------------------------------------------------------------------------------------------
---------------------------------------------------------------------------------------------------------
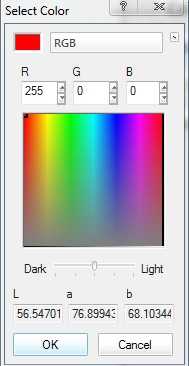
3. ColorBrowser:
IColor pColor = new RgbColor();
pColor.RGB = 255;
IColorBrowser pColorBrowser = new ColorBrowser();
pColorBrowser.Color = pColor;
if (pColorBrowser.DoModal(0))
{
    pColor = pColorBrowser.Color;
}
效果:
---------------------------------------------------------------------------------------------------------
╔════════╗
╠════╣ 第A9个 ╠══════════════════════════════════════════════════╣
╚════════╝
---------------------------------------------------------------------------------------------------------
---------------------------------------------------------------------------------------------------------
1. AlgorithmicColorRamp:
定义函数:
private IEnumColors CreateColorRamp(IColor fromColor,IColor toColor,int count)
{
    IAlgorithmicColorRamp pRampColor = new AlgorithmicColorRamp();
    pRampColor.FromColor = fromColor;
    pRampColor.ToColor = toColor;
    pRampColor.Size = count;
    bool ok = false;
    pRampColor.CreateRamp(out ok);
    if (ok)
    {
        return pRampColor.Colors;
    }
    else
    {
        return null;
    }
}
调用函数:颜色在 red 和 violet 之间变化!
private void timer1_Tick(object sender, EventArgs e)
{
    IRgbColor fromColor = new RgbColor();
    fromColor.Red = 255;
    IRgbColor toColor = new RgbColor();
    toColor.Red = 128;
    toColor.Blue = 255;
    IEnumColors pEnumColors = CreateColorRamp(fromColor, toColor, 50);
    IColor pColor = null;
    for (int i = 0; i < count;i++ )
    {
        pColor = pEnumColors.Next();
    }
    if (count == 50)
    {
        count = 0;
        timer1.Enabled = false;
        timer2.Enabled = true;
    }
    count++;
    axPageLayoutControl1.PageLayout.Page.BackgroundColor = pColor;
}

private void timer2_Tick(object sender, EventArgs e)
{
    IRgbColor fromColor = new RgbColor();
    fromColor.Red = 128;
    fromColor.Blue = 255;
    IRgbColor toColor = new RgbColor();
    toColor.Red = 255;
    IEnumColors pEnumColors = CreateColorRamp(fromColor, toColor, 20);
    IColor pColor = null;
    for (int i = 0; i < count; i++)
    {
        pColor = pEnumColors.Next();
    }
    if (count == 20)
    {
        count = 0;
        timer2.Enabled = false;
        timer1.Enabled = true;
    }
    count++;
    axPageLayoutControl1.PageLayout.Page.BackgroundColor = pColor;
}
---------------------------------------------------------------------------------------------------------
---------------------------------------------------------------------------------------------------------
2. RandomColorRamp:
定义函数:
private IColor CreateRandomColorRamp()
{
    IRandomColorRamp pRandomColor = new RandomColorRamp();
    pRandomColor.StartHue = 140;
    pRandomColor.EndHue = 220;
    pRandomColor.MinValue = 35;
    pRandomColor.MaxValue = 100;
    pRandomColor.MinSaturation = 32;
    pRandomColor.MaxSaturation = 100;

    pRandomColor.Size = 12;
    pRandomColor.Seed = 7;
    bool ok = true;
    pRandomColor.CreateRamp(out ok);
    IEnumColors pEnumColors = pRandomColor.Colors;
    IColor pColor = pEnumColors.Next();
    return pColor;
}
调用函数
private void button5_Click(object sender, EventArgs e)
{
    IColor pColor = CreateRandomColorRamp();
    axPageLayoutControl2.PageLayout.Page.BackgroundColor = pColor;
}
---------------------------------------------------------------------------------------------------------
╔════════╗
╠════╣ 第G1个 ╠══════════════════════════════════════════════════╣
╚════════╝
---------------------------------------------------------------------------------------------------------
---------------------------------------------------------------------------------------------------------
1. SimpleMarkerSymbol:
新建工具!
using System;
using System.Drawing;
using System.Runtime.InteropServices;
using ESRI.ArcGIS.ADF.BaseClasses;
using ESRI.ArcGIS.ADF.CATIDs;
using ESRI.ArcGIS.Controls;
using System.Windows.Forms;
using ESRI.ArcGIS.Display;
using ESRI.ArcGIS.Geometry;

namespace Symbol
{
    /// <summary>
    /// Summary description for Tool1.
    /// </summary>
    [Guid("63835a8e-ae77-4817-b4e4-3b120b5232f9")]
    [ClassInterface(ClassInterfaceType.None)]
    [ProgId("Symbol.Tool1")]
    public sealed class Tool1 : BaseTool
    {
        #region COM Registration Function(s)
        [ComRegisterFunction()]
        [ComVisible(false)]
        static void RegisterFunction(Type registerType)
        {
            // Required for ArcGIS Component Category Registrar support
            ArcGISCategoryRegistration(registerType);

            //
            // TODO: Add any COM registration code here
            //
        }

        [ComUnregisterFunction()]
        [ComVisible(false)]
        static void UnregisterFunction(Type registerType)
        {
            // Required for ArcGIS Component Category Registrar support
            ArcGISCategoryUnregistration(registerType);

            //
            // TODO: Add any COM unregistration code here
            //
        }

        #region ArcGIS Component Category Registrar generated code
        /// <summary>
        /// Required method for ArcGIS Component Category registration -
        /// Do not modify the contents of this method with the code editor.
        /// </summary>
        private static void ArcGISCategoryRegistration(Type registerType)
        {
            string regKey = string.Format("HKEY_CLASSES_ROOT\\CLSID\\{{{0}}}", registerType.GUID);
            ControlsCommands.Register(regKey);

        }
        /// <summary>
        /// Required method for ArcGIS Component Category unregistration -
        /// Do not modify the contents of this method with the code editor.
        /// </summary>
        private static void ArcGISCategoryUnregistration(Type registerType)
        {
            string regKey = string.Format("HKEY_CLASSES_ROOT\\CLSID\\{{{0}}}", registerType.GUID);
            ControlsCommands.Unregister(regKey);

        }

        #endregion
        #endregion

//---------------------------------------------------------------------------------------------------------
        private IHookHelper m_hookHelper = null;
        private IMapControl4 pMapControl;
//---------------------------------------------------------------------------------------------------------

        public Tool1()
        {
            //
            // TODO: Define values for the public properties
            //
            base.m_category = "Marker"; //localizable text
            base.m_caption = "Marker";  //localizable text
            base.m_message = "Marker";  //localizable text
            base.m_toolTip = "Marker";  //localizable text
            base.m_name = "Marker";   //unique id, non-localizable (e.g. "MyCategory_MyTool")
            try
            {
                //
                // TODO: change resource name if necessary
                //
                string bitmapResourceName = GetType().Name + ".bmp";
                base.m_bitmap = new Bitmap(GetType(), bitmapResourceName);
                base.m_cursor = new System.Windows.Forms.Cursor(GetType(), GetType().Name + ".cur");
            }
            catch (Exception ex)
            {
                System.Diagnostics.Trace.WriteLine(ex.Message, "Invalid Bitmap");
            }
        }

        #region Overriden Class Methods

        /// <summary>
        /// Occurs when this tool is created
        /// </summary>
        /// <param name="hook">Instance of the application</param>
        public override void OnCreate(object hook)
        {
            if (m_hookHelper == null)
                m_hookHelper = new HookHelperClass();

            m_hookHelper.Hook = hook;

//---------------------------------------------------------------------------------------------------------
            if (hook is IMapControl4)
            {
                pMapControl = hook as IMapControl4;
            }
//---------------------------------------------------------------------------------------------------------

            // TODO:  Add Tool1.OnCreate implementation
        }

        /// <summary>
        /// Occurs when this tool is clicked
        /// </summary>
        public override void OnClick()
        {
            // TODO: Add Tool1.OnClick implementation
        }

        public override void OnMouseDown(int Button, int Shift, int X, int Y)
        {
            // TODO:  Add Tool1.OnMouseDown implementation

//---------------------------------------------------------------------------------------------------------
            ISimpleMarkerSymbol pMarkerSymbol = new SimpleMarkerSymbol();
            pMarkerSymbol.Style = esriSimpleMarkerStyle.esriSMSCross;
            pMarkerSymbol.Color = GetColor(255, 0, 0);
            pMarkerSymbol.Size = 16;
            pMarkerSymbol.Outline = true;
            pMarkerSymbol.OutlineSize = 4;
            pMarkerSymbol.OutlineColor = GetColor(0, 255, 0);
            IPoint pPoint = pMapControl.ActiveView.ScreenDisplay.DisplayTransformation.ToMapPoint(X, Y);
            object oMarkerSymbol = pMarkerSymbol;
            pMapControl.DrawShape(pPoint, ref oMarkerSymbol);
//---------------------------------------------------------------------------------------------------------

        }

//---------------------------------------------------------------------------------------------------------
        private IRgbColor GetColor(int r,int g,int b)
        {
            IRgbColor pColor = new RgbColor();
            pColor.Red = r;
            pColor.Green = g;
            pColor.Blue = b;
            return pColor;
        }
//---------------------------------------------------------------------------------------------------------

        public override void OnMouseMove(int Button, int Shift, int X, int Y)
        {
            // TODO:  Add Tool1.OnMouseMove implementation
        }

        public override void OnMouseUp(int Button, int Shift, int X, int Y)
        {
            // TODO:  Add Tool1.OnMouseUp implementation
        }
        #endregion
    }
}
调用:
        private void button1_Click(object sender, EventArgs e)
        {
            ICommand command = new Symbol.Tool1();
            command.OnCreate(axMapControl1.Object);
            axMapControl1.CurrentTool = command as ESRI.ArcGIS.SystemUI.ITool;
        }
---------------------------------------------------------------------------------------------------------
---------------------------------------------------------------------------------------------------------
2. ArrowMarkerSymbol:
public override void OnMouseDown(int Button, int Shift, int X, int Y)
{
    // TODO:  Add AddArrow.OnMouseDown implementation
    IArrowMarkerSymbol pArrowMarkerSymbol = new ArrowMarkerSymbol();
    pArrowMarkerSymbol.Style = esriArrowMarkerStyle.esriAMSPlain;
    pArrowMarkerSymbol.Color = GetColor(55, 111, 255);
    pArrowMarkerSymbol.Length = 20;
    pArrowMarkerSymbol.Angle = 90;
    pArrowMarkerSymbol.Width = 10;
    IPoint pPoint = pMapControl.ActiveView.ScreenDisplay.DisplayTransformation.ToMapPoint(X, Y);
    object symbol = pArrowMarkerSymbol;
    pMapControl.DrawShape(pPoint, ref symbol);
}
---------------------------------------------------------------------------------------------------------
---------------------------------------------------------------------------------------------------------
---------------------------------------------------------------------------------------------------------
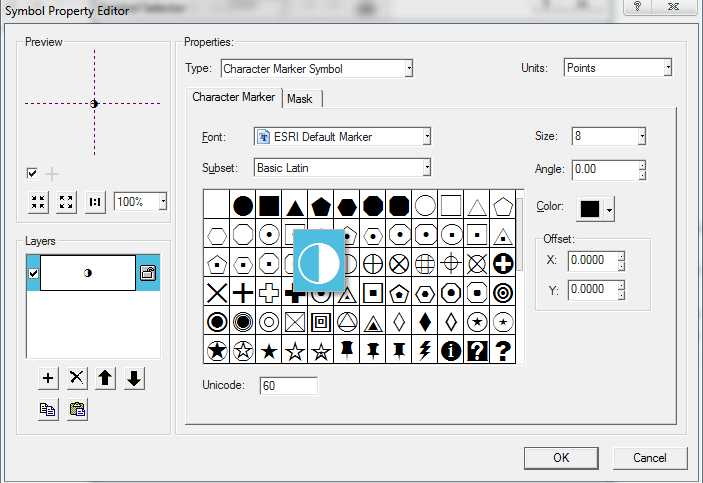
3. CharacterMarkerSymbol:
public override void OnMouseDown(int Button, int Shift, int X, int Y)
{
    // TODO:  Add Character.OnMouseDown implementation
    stdole.StdFont pFont = new stdole.StdFont();       //新建字体!
    pFont.Name = "ESRI Default Marker";
    pFont.Size = 37;
    pFont.Italic = true;

    ICharacterMarkerSymbol pCharacterSymbol = new CharacterMarkerSymbol();
    pCharacterSymbol.CharacterIndex = 60;
    pCharacterSymbol.Color = GetColor(0, 0, 255);
    pCharacterSymbol.Size = 25;
    IPoint pPoint = pMapControl.ActiveView.ScreenDisplay.DisplayTransformation.ToMapPoint(X, Y);
    object oCharMarkerSymbol = pCharacterSymbol;
    pMapControl.DrawShape(pPoint, ref oCharMarkerSymbol);
}
---------------------------------------------------------------------------------------------------------
---------------------------------------------------------------------------------------------------------
4. PictureMarkerSymbol:
public override void OnMouseDown(int Button, int Shift, int X, int Y)
{
       // TODO:  Add Character.OnMouseDown implementation
       IPictureMarkerSymbol pPictureSymbol = new PictureMarkerSymbol();
            pPictureSymbol.CreateMarkerSymbolFromFile(esriIPictureType.esriIPictureBitmap, @"F:\Desktop\1.bmp");
            pPictureSymbol.Size = 80;
            pPictureSymbol.BitmapTransparencyColor = GetColor(255, 255, 255);

            IPoint pPoint = pMapControl1.ActiveView.ScreenDisplay.DisplayTransformation.ToMapPoint(e.x, e.y);
            object oMarkerSymbol = pPictureSymbol;
            pMapControl1.DrawShape(pPoint, ref oMarkerSymbol);
}
---------------------------------------------------------------------------------------------------------
╔════════╗
╠════╣ 第G2个 ╠══════════════════════════════════════════════════╣
╚════════╝
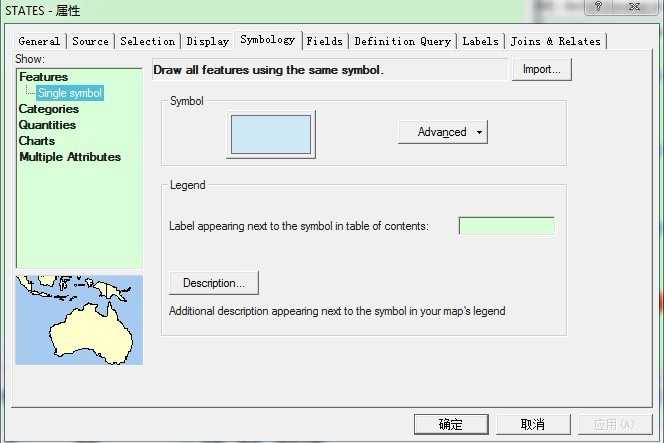
首先新建 Command,下面是实现代码的重要部分!
private bool SetupFeaturePropertySheet(ILayer layer)
{
    if (layer == null) return false;
    ESRI.ArcGIS.Framework.IComPropertySheet pComPropSheet;
    pComPropSheet = new ESRI.ArcGIS.Framework.ComPropertySheet();
    pComPropSheet.Title = layer.Name + " - 属性";

    ESRI.ArcGIS.esriSystem.UID pPPUID = new ESRI.ArcGIS.esriSystem.UIDClass();
    pComPropSheet.AddCategoryID(pPPUID);

    // General....
    ESRI.ArcGIS.Framework.IPropertyPage pGenPage = new ESRI.ArcGIS.CartoUI.GeneralLayerPropPageClass();
    pComPropSheet.AddPage(pGenPage);

    // Source
    ESRI.ArcGIS.Framework.IPropertyPage pSrcPage = new ESRI.ArcGIS.CartoUI.FeatureLayerSourcePropertyPageClass();
    pComPropSheet.AddPage(pSrcPage);

    // Selection...
    ESRI.ArcGIS.Framework.IPropertyPage pSelectPage = new ESRI.ArcGIS.CartoUI.FeatureLayerSelectionPropertyPageClass();
    pComPropSheet.AddPage(pSelectPage);

    // Display....
    ESRI.ArcGIS.Framework.IPropertyPage pDispPage = new ESRI.ArcGIS.CartoUI.FeatureLayerDisplayPropertyPageClass();
    pComPropSheet.AddPage(pDispPage);

    // Symbology....
    ESRI.ArcGIS.Framework.IPropertyPage pDrawPage = new ESRI.ArcGIS.CartoUI.LayerDrawingPropertyPageClass();
    pComPropSheet.AddPage(pDrawPage);

    // Fields...
    ESRI.ArcGIS.Framework.IPropertyPage pFieldsPage = new ESRI.ArcGIS.CartoUI.LayerFieldsPropertyPageClass();
    pComPropSheet.AddPage(pFieldsPage);

    // Definition Query...
    ESRI.ArcGIS.Framework.IPropertyPage pQueryPage = new ESRI.ArcGIS.CartoUI.LayerDefinitionQueryPropertyPageClass();
    pComPropSheet.AddPage(pQueryPage);

    // Labels....
    ESRI.ArcGIS.Framework.IPropertyPage pSelPage = new ESRI.ArcGIS.CartoUI.LayerLabelsPropertyPageClass();
    pComPropSheet.AddPage(pSelPage);

    // Joins & Relates....
    ESRI.ArcGIS.Framework.IPropertyPage pJoinPage = new ESRI.ArcGIS.ArcMapUI.JoinRelatePageClass();
    pComPropSheet.AddPage(pJoinPage);

    // Setup layer link
    ESRI.ArcGIS.esriSystem.ISet pMySet = new ESRI.ArcGIS.esriSystem.SetClass();
    pMySet.Add(layer);
    pMySet.Reset();

    // make the symbology tab active
    pComPropSheet.ActivePage = 4;

    // show the property sheet
    bool bOK = pComPropSheet.EditProperties(pMySet, 0);

    m_activeView.PartialRefresh(esriViewDrawPhase.esriViewGeography, null, m_activeView.Extent);
    return (bOK);
}
完整实现的 Command 代码如下:
 View Code
效果如下所示:
---------------------------------------------------------------------------------------------------------
╔════════╗
╠════╣ 第G3个 ╠══════════════════════════════════════════════════╣
╚════════╝
Border:
IActiveView pActiveView = axPageLayoutControl1.PageLayout as IActiveView;
IMap pMap = pActiveView.FocusMap;
IGraphicsContainer pGraphicsContainer = pActiveView as IGraphicsContainer;
IMapFrame pMapFrame = pGraphicsContainer.FindFrame(pMap) as IMapFrame;
IStyleSelector pStyleSelector = new BorderSelector();
if (pStyleSelector.DoModal(axPageLayoutControl1.hWnd))
{
    IBorder PBorder = pStyleSelector.GetStyle(0) as IBorder;
    pMapFrame.Border = PBorder;
}
axPageLayoutControl1.Refresh(esriViewDrawPhase.esriViewBackground, null, null);
Background:
IActiveView pActiveView = axPageLayoutControl1.PageLayout as IActiveView;
IMap pMap = pActiveView.FocusMap;
IGraphicsContainer pGraphicsContainer = pActiveView as IGraphicsContainer;
IMapFrame pMapFrame = pGraphicsContainer.FindFrame(pMap) as IMapFrame;
IStyleSelector pStyleSelector = new BackgroundSelector();
if (pStyleSelector.DoModal(axPageLayoutControl1.hWnd))
{
    IBackground pBackground = pStyleSelector.GetStyle(0) as IBackground;
    pMapFrame.Background = pBackground;
}
pActiveView.Refresh();
Shadow:
IActiveView pActiveView = axPageLayoutControl1.PageLayout as IActiveView;
IMap pMap = pActiveView.FocusMap;
IGraphicsContainer pGraphicsContainer = pActiveView as IGraphicsContainer;
IMapFrame pMapFrame = pGraphicsContainer.FindFrame(pMap) as IMapFrame;
IStyleSelector pStyleSelector = new ShadowSelector();
if (pStyleSelector.DoModal(axPageLayoutControl1.hWnd))
{
    IShadow pShadow = pStyleSelector.GetStyle(0) as IShadow;
    IFrameProperties pFrameProperties = pMapFrame as IFrameProperties;
    pFrameProperties.Shadow = pShadow;
}
pActiveView.Refresh();
MapGrid:
IActiveView pActiveView = axPageLayoutControl1.PageLayout as IActiveView;
IMap pMap = pActiveView.FocusMap;
IGraphicsContainer pGraphicsContainer = pActiveView as IGraphicsContainer;
IMapFrame pMapFrame = pGraphicsContainer.FindFrame(pMap) as IMapFrame;
IStyleSelector pStyleSelector = new MapGridSelector();
if (pStyleSelector.DoModal(axPageLayoutControl1.hWnd))
{
    IMapGrid pMapGrid = pStyleSelector.GetStyle(0) as IMapGrid;
    IMapGrids pMapGrids = pMapFrame as IMapGrids;
    if (pMapGrid == null)
    {
        return;
    }
    pMapGrids.AddMapGrid(pMapGrid);
}
pActiveView.Refresh();
---------------------------------------------------------------------------------------------------------
╔════════╗
╠════╣ 第G4个 ╠══════════════════════════════════════════════════╣
╚════════╝
第一种情况,只是出现重复数据,那么可以通过判断某一个字段值是否一样来进行删除重复的部分,实现如下:
IFeatureLayer pFeatureLayer = axMapControl1.get_Layer(0) as IFeatureLayer;
IFeatureClass pFeatureClass = pFeatureLayer.FeatureClass;
IFeatureCursor pFeatureCursor = pFeatureClass.Search(null, false);
IFeature pFeature = pFeatureCursor.NextFeature();
int count = 1;
while (pFeature != null)
{
    string name = pFeature.get_Value(pFeatureClass.FindField("Name")).ToString();    //首先获取Name字段的名称属性
    while (pFeature != null)    //外层遍历
    {
        pFeature = pFeatureCursor.NextFeature();    //开始检查下一个要素与目标要素的关系
        if (pFeature == null)   //若已经没有了,则终止
            break; //跳出
        string findName = pFeature.get_Value(pFeatureClass.FindField("Name")).ToString();
        if (findName == name)   //若名称相同,则删除此要素
            pFeature.Delete();
    }
    pFeatureCursor = pFeatureClass.Search(null, false); //重新从头开始
    for (int i = 0; i <= count;i++ )    //为了获取比上一个目标要素下一个的目标,通过count来遍历
        pFeature = pFeatureCursor.NextFeature();
    count++;    //每执行一次操作,增加一次count
}
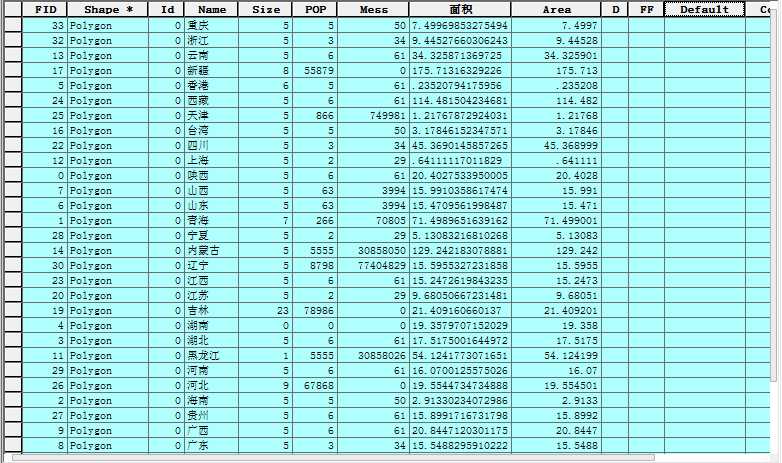
第二种情况,不仅出现某些属性,例如Name相同,但是几何体不是相同的,其中的一部分是残缺的,这个时候就要动用Area了,因为只有最大的那个Area才是完整的,因此要删除掉其他小的部分,可以按照如下实现:
IFeatureLayer pFeatureLayer = axMapControl1.get_Layer(0) as IFeatureLayer;
IFeatureClass pFeatureClass = pFeatureLayer.FeatureClass;
IFeatureCursor pFeatureCursor = pFeatureClass.Search(null, false);
IFeature pFeature = pFeatureCursor.NextFeature();
int count = 1;
while (pFeature != null)
{
    string name = pFeature.get_Value(pFeatureClass.FindField("Name")).ToString();    //首先获取Name字段的名称属性
    double area = Convert.ToDouble(pFeature.get_Value(pFeatureClass.FindField("Area")));   //获取Area的大小
    while (pFeature != null)    //外层遍历
    {
        pFeature = pFeatureCursor.NextFeature();    //开始检查下一个要素与目标要素的关系
        if (pFeature == null)   //若已经没有了,则在从头开始
        {
            pFeatureCursor = pFeatureClass.Search(null, false); //重新从头开始
            pFeature = pFeatureCursor.NextFeature();
        }
        string findName = pFeature.get_Value(pFeatureClass.FindField("Name")).ToString();
        double findArea = Convert.ToDouble(pFeature.get_Value(pFeatureClass.FindField("Area")));
        if (findName == name && findArea < area)   //若名称相同,且面积小的时候才删除,大的话就pass
            pFeature.Delete();
        else if (findName == name && findArea == area)  //要是相同,则说明又碰到自己了,证明已经一圈过去了
            break;
    }
    pFeatureCursor = pFeatureClass.Search(null, false); //重新从头开始
    for (int i = 0; i <= count;i++ )    //为了获取比上一个目标要素下一个的目标,通过count来遍历
        pFeature = pFeatureCursor.NextFeature();
    count++;    //每执行一次操作,增加一次count
}
实现的代码可能不是最好的,是自己写的,要是数据很乱,就连最大的也是重复的,那就比较乱了,可以先试着下面的,将小的尽量删光,然后在用上面的将重复的删光!
---------------------------------------------------------------------------------------------------------
╔════════╗
╠════╣ 第G5个 ╠══════════════════════════════════════════════════╣
╚════════╝
在 MapControl 和 PageLayoutControl 中进行关联!
首先要认清一点,虽然 MapControl 和 PageLayoutControl 中都有 ActiveView 属性,但是同样的属性在两者中表示的含义不同,在 MapControl 中,ActiveView 与 FocusMap 基本是同样的含义,是针对当前地图的;而 PageLayoutControl 中,ActiveView 指的是当前的布局图,并非 FocusMap,所以对于 MapControl 与 PageLayoutControl 之间的关联要用到 PageLayoutControl 中的 FocusMap,而非 ActiveView,对于 MapControl 则无所谓。它们之间的不同,可以通过显示其 Width 属性来实现,如下所示:
private void button2_Click(object sender, EventArgs e)
{
    label1.Text = axPageLayoutControl1.ActiveView.Extent.Width.ToString();
    IActiveView pActiveView = axPageLayoutControl1.ActiveView.FocusMap as IActiveView;
    label2.Text = pActiveView.Extent.Width.ToString();
}

private void button3_Click(object sender, EventArgs e)
{
    label3.Text = axMapControl1.ActiveView.Extent.Width.ToString();
    label4.Text = (axMapControl1.ActiveView.FocusMap as IActiveView).Extent.Width.ToString();
}
显示如下:
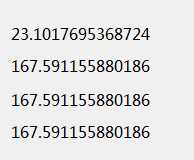
由此可见,PageLayoutControl 的 ActiveView 是独树一帜的!
//当地图替换的时候触发

        private void axMapControl1_OnMapReplaced(object sender, IMapControlEvents2_OnMapReplacedEvent e)
        {
            IObjectCopy pObjectCopy = new ObjectCopy();
            object copyMap = axMapControl1.Map;
            object overWriteMap = axPageLayoutControl1.ActiveView.FocusMap;
            pObjectCopy.Overwrite(copyMap, ref overWriteMap);
        }

//当布局的地图发生变化的时候触发,将 axPageLayoutControl 中地图的范围传递给 axMapControl

        private void axPageLayoutControl1_OnAfterScreenDraw(object sender, IPageLayoutControlEvents_OnAfterScreenDrawEvent e)
        {
            IActiveView activeView = axPageLayoutControl1.ActiveView.FocusMap as IActiveView;
            IDisplayTransformation displayTransformation = activeView.ScreenDisplay.DisplayTransformation;
            axMapControl1.Extent = displayTransformation.VisibleBounds;
            axMapControl1.ActiveView.Refresh();
        }

//当地图控件的范围发生变化时,将 axMapControl 中地图的范围传递给axPageLayoutControl

        private void axMapControl1_OnAfterDraw(object sender, IMapControlEvents2_OnAfterDrawEvent e)
        {
            IActiveView activeView = axPageLayoutControl1.ActiveView.FocusMap as IActiveView;
            IDisplayTransformation displayTransformation = activeView.ScreenDisplay.DisplayTransformation;
            displayTransformation.VisibleBounds = axMapControl1.Extent;
            axPageLayoutControl1.ActiveView.Refresh();
        }
另外,在 PageLayoutControl 中要想操作地图,还是要用到地图中的放大、缩小等工具,而要操作 PageLayoutControl 的框架时,则要用 PageLayout 的放大、缩小等工具!
---------------------------------------------------------------------------------------------------------
╔════════╗
╠════╣ 第G6个 ╠══════════════════════════════════════════════════╣
╚════════╝
第一步:导入一个类文件包,如下所示:
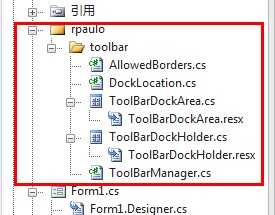
文件包下载>>>点击下载<<<
第二步:可以写代码了:
using rpaulo.toolbar;            //添加引用

ToolBarManager _toolBarManager;
_toolBarManager = new ToolBarManager(this, this);         //新建工具管理

// The control Text property is used to draw the bar name while floating
// and on view/hide menu.
_toolBar1.Text = "Bar #1";
_toolBar2.Text = "Bar #2";
_toolBar3.Text = "Bar #3";
_toolBar4.Text = "Bar #4";

// Add toolbar (default position)
_toolBarManager.AddControl(_toolBar1);
// Add toolbar (floating)
_toolBarManager.AddControl(_toolBar2, DockStyle.None);
// Add toolbar (left)
_toolBarManager.AddControl(_toolBar3, DockStyle.Left);
// Add toolbar (left, on the left of _toolBar3)
_toolBarManager.AddControl(_toolBar4, DockStyle.Left, _toolBar3, DockStyle.Left);
// Add control
ToolBarDockHolder holder = _toolBarManager.AddControl(_dateTimePicker, DockStyle.Bottom);
// Added by mav
holder.ToolbarTitle = "Appointment";
holder.AllowedBorders = AllowedBorders.Top|AllowedBorders.Bottom;
_toolBarManager.AddControl(toolBar1, DockStyle.Right);
效果图:
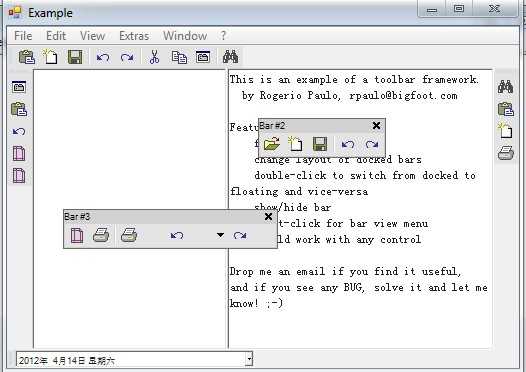
最重要的是那些代码了,调用其实很容易的!
---------------------------------------------------------------------------------------------------------
╔════════╗
╠════╣ 第G7个 ╠══════════════════════════════════════════════════╣
╚════════╝
主要用到两个 MapControl 的事件:
1> OnExtentUpdated:实现地图范围变化时触发。
2> OnMouseDown:鼠标单击的时候触发。
第一步:实现 TrackRectangle 方法,通过拖拽矩形来放大地图。
        private void axMapControl1_OnMouseDown(object sender, IMapControlEvents2_OnMouseDownEvent e)
        {
            IEnvelope pEnv = axMapControl1.TrackRectangle();
            axMapControl1.Extent = pEnv;
        }
第二步:实现信息从 MapControl1 传递到 MapControl2 中。
        private void axMapControl1_OnExtentUpdated(object sender, IMapControlEvents2_OnExtentUpdatedEvent e)
        {
    //实现鹰眼的方框的 symbol 部分
            ILineSymbol outLineSymbol = new SimpleLineSymbol();  //设置鹰眼图中的红线!
            outLineSymbol.Width = 2;
            outLineSymbol.Color = GetColor(255, 0, 0, 255);

            IFillSymbol fillSymbol = new SimpleFillSymbol();  //设置填充符号的属性!
            fillSymbol.Color = GetColor(255, 0, 0, 0);    //设置完全透明色
            fillSymbol.Outline = outLineSymbol;

    //实现信息传递
            IEnvelope envlope2 = e.newEnvelope as IEnvelope;  //定义新的信封范围,赋值为拖拽的矩形,或是extent
            IElement element2 = new RectangleElement();  //定义一个要素,用在后面放在容器中显示应眼框
            element2.Geometry = envlope2;  //给矩形要素赋值上面的信封范围

            IFillShapeElement fillShapeElement2 = element2 as IFillShapeElement;  //具有 symbol 属性!
            fillShapeElement2.Symbol = fillSymbol;  //赋值上面定义的 symbol

            IGraphicsContainer graphicsContainer2 = axMapControl2.Map as IGraphicsContainer;  //定义存储图形的容器
            graphicsContainer2.DeleteAllElements();            //首先删除当前的全部图形,也就是上一次的鹰眼框
            pElement = fillShapeElement2 as IElement;  //将 fillShapeElement2 在转为 IElement,以为后面方法只能用这个类型!
            graphicsContainer2.AddElement(pElement, 0);  //增加新的鹰眼框
            axMapControl2.Refresh(esriViewDrawPhase.esriViewGeography, null, null);  //刷新 MapControl2
        }

        private IRgbColor GetColor(int r, int g, int b, int t)  //定义获取颜色的函数
        {
            IRgbColor rgbColor = new RgbColor();
            rgbColor.Red = r;
            rgbColor.Green = g;
            rgbColor.Blue = b;
            rgbColor.Transparency = (byte)t;  //透明度
            return rgbColor;
        }
第三步:实现点击 MapControl2 响应鹰眼框的移动。
        private void axMapControl2_OnMouseDown(object sender, IMapControlEvents2_OnMouseDownEvent e)
        {
            IPoint point = new ESRI.ArcGIS.Geometry.Point();  //定义地理点
            point.PutCoords(e.mapX, e.mapY);    //获取点击的地理点
            axMapControl1.CenterAt(point);
        }
效果显示:
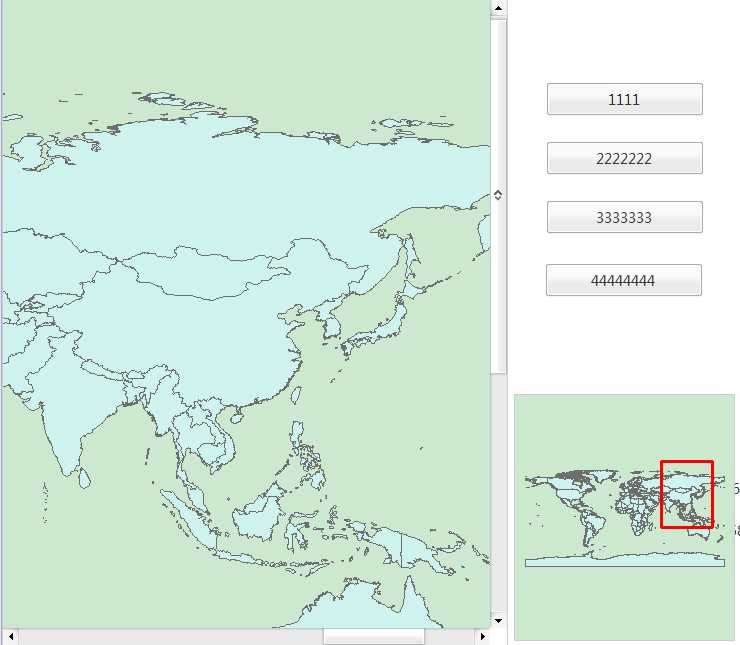
-------------------------------------------------------------------------------------------------------
╔════════╗
╠════╣ 第G8个 ╠══════════════════════════════════════════════════╣
╚════════╝
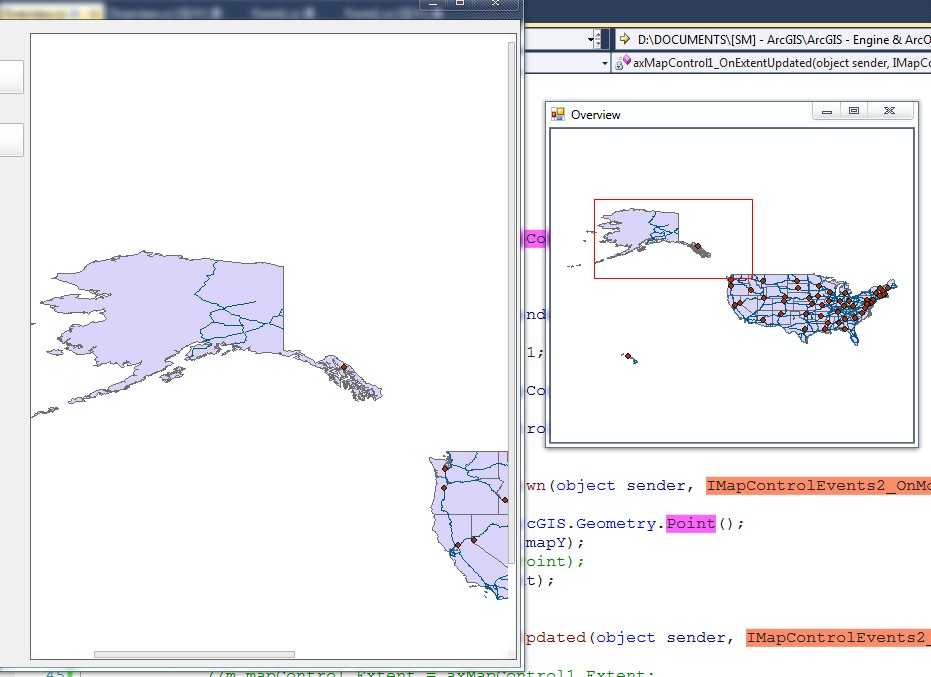
1:建立独立显示的窗体 Overview,在窗体中加入一个 MapControl 控件!
注意:将 axMapControl1 的 modifier 设置为 public,这样在主窗体中才可以调用!
public partial class Overview : Form
{
    IMapControl4 m_mapControl;  //建立用于显示主窗体 MapControl 的实例!
    IMap m_map;
    public Overview(IHookHelper hook)  //添加参数,用于与主窗体中 MapControl 相关联!
    {
        InitializeComponent();
        m_mapControl = hook.Hook as IMapControl4;  //从 hook 中获取主窗体的 MapControl!
        m_map = m_mapControl.Map;
    }

    private void Overview_Load(object sender, EventArgs e)
    {
        for (int i = m_map.LayerCount - 1; i >= 0;i-- )
        {
            axMapControl1.AddLayer(m_mapControl.get_Layer(i));
        }
        axMapControl1.Extent = m_mapControl.FullExtent;
    }

    private void axMapControl1_OnMouseDown(object sender, IMapControlEvents2_OnMouseDownEvent e)
    {
        IPoint centerPoint = new ESRI.ArcGIS.Geometry.Point();
        centerPoint.PutCoords(e.mapX, e.mapY);
        m_mapControl.CenterAt(centerPoint);
    }
}
:在主窗体中写入交互内容!
private Overview pOverview2;  //实例化一个鹰眼窗口

private void button2_Click(object sender, EventArgs e)
{
    HookHelper hookHelper = new HookHelper();  //新建 HookHelper 的实例!
    hookHelper.Hook = axMapControl2.Object;  //将主窗体的 axMapControl1 赋值给其属性 Hook,实现关联!
    pOverview2 = new Overview(hookHelper);  //实例化一个鹰眼窗体,并将 hookHelper 传递过去!
    pOverview2.Show();  //窗体显示!
}

private void axMapControl2_OnExtentUpdated(object sender, IMapControlEvents2_OnExtentUpdatedEvent e)
{
    IEnvelope pEnv = e.newEnvelope as IEnvelope;  //获取矩形
    IGraphicsContainer pGraphicsContainer = pOverview2.axMapControl1.Map as IGraphicsContainer;  //在鹰眼窗体上建立容器
    IActiveView pActiveView = pGraphicsContainer as IActiveView;  //用于刷新的
    pGraphicsContainer.DeleteAllElements();  //删除所有图形

    ISimpleLineSymbol pSimpleLineSymbol = new SimpleLineSymbol();  //新建线状样式
    IRgbColor pColor = new RgbColor();
    pColor.Red = 255;
    pSimpleLineSymbol.Width = 1;
    pSimpleLineSymbol.Color = pColor;

    ISimpleFillSymbol pSimpleFillSymbol = new SimpleFillSymbol();  //新建填充样式
    IRgbColor pColor2 = new RgbColor();
    pColor2.Transparency = 0;
    pSimpleFillSymbol.Color = pColor2;
    pSimpleFillSymbol.Outline = pSimpleLineSymbol;

    IElement pElement = new RectangleElement();  //新建元素,用于后面添加到地图上面的
    pElement.Geometry = pEnv;  //给元素赋予几何(矩形)属性,因为不具有 Symbol 属性,所以还要 QI 一下

    IFillShapeElement pFillShapeElement = pElement as IFillShapeElement;  //用于赋予 symbol 的内容
    pFillShapeElement.Symbol = pSimpleFillSymbol;

    pElement = pFillShapeElement as IElement;  //后面方法中只能用 IElement,所以在转回来!

    pGraphicsContainer.AddElement(pElement,0);  //添加元素,实现鹰眼效果

    pActiveView.PartialRefresh(esriViewDrawPhase.esriViewGraphics, null, null);  //刷新,这是刷新的鹰眼窗体!
}
效果如下图所示:
-------------------------------------------------------------------------------------------------------
╔════════╗
╠════╣ 第9个 ╠══════════════════════════════════════════════════╣
╚════════╝
---------------------------------------------------------------------------------------------------------
| Description | ||
|---|---|---|
 |
CloseDialog | Closes the customize dialog. |
 |
CommandsCategory | The GUID of the component category used for commands. |
 |
DialogTitle | The title of the customize dialog. |
 |
DoubleClickDestination | The ToolbarControl commands are added to when double clicked. |
 |
IsDialogActive | Indicates if the customize dialog is active on the screen. |
 |
MenusCategory | The GUID of the component category used for menu definitions. |
 |
SetDoubleClickDestination | Sets the ToolbarControl commands are added to when double clicked. |
 |
ShowAddFromFile | Indicates if the ‘Add From File‘ button is available on the customize dialog. |
 |
StartDialog | Starts the modeless customize dialog. |
 |
ToolbarsCategory | The GUID of the component category used for toolbar definitions. |
---------------------------------------------------------------------------------------------------------
| Description | ||
|---|---|---|
 |
OnCloseDialog | Fires when customize dialog is closed or exited. |
 |
OnStartDialog | Fires when customize dialog is displayed on screen. |
---------------------------------------------------------------------------------------------------------
首先:定义窗口实例和委托实例!对于 ArcObjects 来说属性方法放在一个接口中,事件放在另外一个接口中!
ICustomizeDialog m_CustomizeDialog = new CustomizeDialogClass();     //自定义对话框实例
ICustomizeDialogEvents_OnStartDialogEventHandler startDialogE;           //开始对话框委托,通过事件可以找到需要事件的委托类型!
ICustomizeDialogEvents_OnCloseDialogEventHandler closeDialogE;    //关闭对话框委托
其次:定义函数!
private void OnStartDialogHandler()
{
    basicToolbarControl.Customize = true;       //工具条控件允许自定义工具
}
private void OnCloseDialogHandler()
{
    basicToolbarControl.Customize = false;   //工具条控件不允许自定义工具
    chkCustomize.Checked = false;      //将复选框的√去掉
}
最后:实现事件!在 Form_Load 中写的!
// Set the customize dialog box events.
ICustomizeDialogEvents_Event pCustomizeDialogEvent = m_CustomizeDialog as ICustomizeDialogEvents_Event;  //ICustomizeDialog 不具有事件,所以要查询到有事件的接口
startDialogE = new ICustomizeDialogEvents_OnStartDialogEventHandler(OnStartDialogHandler);  //实例化开始委托
pCustomizeDialogEvent.OnStartDialog += startDialogE;  //用开始委托实现开始事件
closeDialogE = new ICustomizeDialogEvents_OnCloseDialogEventHandler(OnCloseDialogHandler);  //实例化关闭委托
pCustomizeDialogEvent.OnCloseDialog += closeDialogE;  //用关闭委托实现关闭事件
// Set the title.
m_CustomizeDialog.DialogTitle = "定制工具条";  //标题!
// Set the ToolbarControl that new items will be added to.
m_CustomizeDialog.SetDoubleClickDestination(basicToolbarControl);  //双击工具加到工具条控件中!
另外是与复选框的交互!
private void chkCustomize_CheckedChanged(object sender, EventArgs e)
{
    if (chkCustomize.Checked == false)
    {
        m_CustomizeDialog.CloseDialog();  //关闭自定义对话框
    }
    else
    {
        m_CustomizeDialog.StartDialog(basicToolbarControl.hWnd);  //弹出自定义对话框
    }
}
-------------------------------------------------------------------------------------------------------
╔════════╗
╠════╣ 第1个 ╠══════════════════════════════════════════════════╣
╚════════╝
实现在切换前后,对于Map的工具恢复到之前的工具,而PageLayoutControl也是一样的!
ITool pMapTool = null;  //定义存储map的工具
ITool pPageLayoutTool = null;  //定义存储pagelayout的工具
private void tabControl1_SelectedIndexChanged(object sender, EventArgs e)
{
    if (tabControl1.SelectedIndex == 0)
    {
        if (axPageLayoutControl1.CurrentTool != null)  //如果有工具则赋值,在没有转换buddy之前
            pPageLayoutTool = axPageLayoutControl1.CurrentTool;

        axToolbarControl1.SetBuddyControl(axMapControl1);

        if (axMapControl1.CurrentTool == null)  //理论上讲默认都是null,然后给其赋值刚才的工具!
            axMapControl1.CurrentTool = pMapTool;
    }
    else
    {
        if (axMapControl1.CurrentTool != null)
            pMapTool = axMapControl1.CurrentTool;

        axToolbarControl1.SetBuddyControl(axPageLayoutControl1);

        if (axPageLayoutControl1.CurrentTool == null)
            axPageLayoutControl1.CurrentTool = pPageLayoutTool;
    }
}
-------------------------------------------------------------------------------------------------------
╔════════╗
╠════╣ 第2个 ╠══════════════════════════════════════════════════╣
╚════════╝
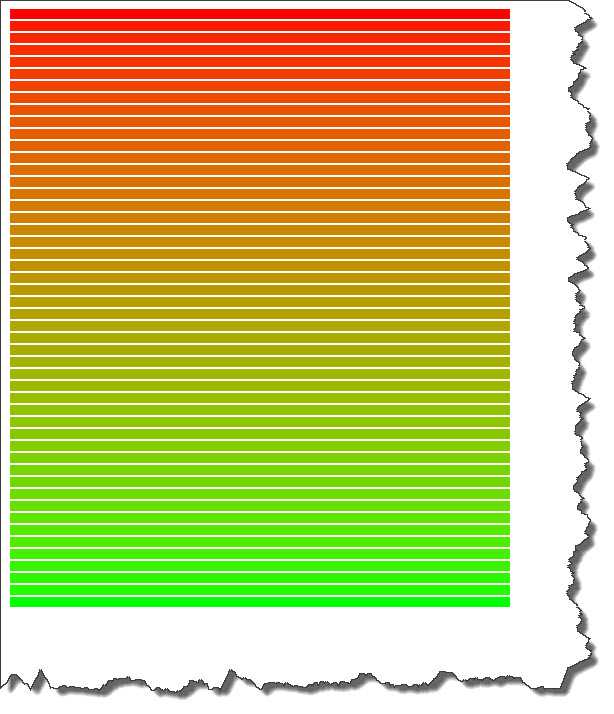
实现效果:
实现代码如下:
private void button1_Click(object sender, EventArgs e)
{
    IAlgorithmicColorRamp algColorRamp = new AlgorithmicColorRampClass();
    IRgbColor startColor = new RgbColor();
    startColor.Red = 255;
    IRgbColor endColor = new RgbColor();
    endColor.Green = 255;

    algColorRamp.FromColor = startColor;
    algColorRamp.ToColor = endColor;
    algColorRamp.Algorithm = esriColorRampAlgorithm.esriCIELabAlgorithm;
    algColorRamp.Size = 32;

    bool bture = true;
    algColorRamp.CreateRamp(out bture);

    IEnumColors pEnumColors = algColorRamp.Colors;

    for (int i = 1; i <= 32;i++ )
    {
        object o;
        PictureBox pb;
        o=this.GetType().GetField("pictureBox" + i.ToString(),
            BindingFlags.Instance | BindingFlags.NonPublic).GetValue(this);  //通过控件名称来找控件的方法
if (o != null)
        {
            pb = (PictureBox)o;
            pb.BackColor = ColorTranslator.FromOle(pEnumColors.Next().RGB);
        }
    }
}
自己定义 pictureBox,实现如下:
for (int i = 1; i <= 50;i++ )
{
    PictureBox pb = new PictureBox();
    pb.Height = 10;
    pb.Width = 500;
    pb.Location = new System.Drawing.Point(10, i * 12);
    panel1.Controls.Add(pb);
    pb.BackColor = ColorTranslator.FromOle(pEnumColors.Next().RGB);
}
-------------------------------------------------------------------------------------------------------
╔════════╗
╠════╣ 第3个 ╠══════════════════════════════════════════════════╣
╚════════╝
引言:在操作地图的时候,可能某人设置了,左键可以实现拉框放大,中键和右键怎可以实现漫游,但是若是这样设置,当图层处于编辑状态的时候就糟糕了!因为操作会重叠,这个时候就需要判断图层是否处于编辑状态,只有处于非编辑状态的时候才要执行上面的方法!
IFeatureLayer pFeatureLayer = axMapControl1.Map.get_Layer(0) as IFeatureLayer;  //获取 IFeatureLayer
IDataset pDataset =(IDataset) pFeatureLayer.FeatureClass;          //获取 IDataset
IWorkspaceEdit pWorkspaceEdit = (IWorkspaceEdit) pDataset.Workspace;  //获取 IWorkspaceEdit
if (pWorkspaceEdit.IsBeingEdited())
{
  //可以编辑状态
}
-------------------------------------------------------------------------------------------------------
╔════════╗
╠════╣ 第4个 ╠══════════════════════════════════════════════════╣
╚════════╝
为要素添加字段内容,主要是用到了 set_Value 方法!然后记得用下 Store 方法!
string str001 = ((sender as Button).FindForm() as CheckForm).comboBox1.Text;
//Type字段内容
int int001 = Convert.ToInt32(((sender as Button).FindForm() as CheckForm).tb_Water_Quality.Text);
//Water_Quality字段内容
pDrawFeature.set_Value(pDrawFeature.Fields.FindField("Type"), str001);
pDrawFeature.set_Value(pDrawFeature.Fields.FindField("Water"), int001);
pDrawFeature.Store();       //存储字段内容
-------------------------------------------------------------------------------------------------------
╔════════╗
╠════╣ 第5个 ╠══════════════════════════════════════════════════╣
╚════════╝
引言:在操作地图的时候,可能某人设置了,左键可以实现拉框
-------------------------------------------------------------------------------------------------------
╔════════╗
╠════╣ 第6个 ╠══════════════════════════════════════════════════╣
╚════════╝
引言:在操作地图的时候,可能某人设置了,左键可以实现拉框
标签:
原文地址:http://www.cnblogs.com/khfang/p/5778602.html