标签:
Mvvm提倡View和ViewModel的分离,View只负责数据的显示,业务逻辑都尽可能放到ViewModel中,
保持View.xaml.cs中的简洁(没有任何代码,除了构造函数),但是某些场景下也不必一定要保持
View.xaml.cs中的简洁,例如动画。我们想要让界面酷炫一点,就需要故事版,故事版中必然有与
控件相关的,动画和界面耦合很紧,并且也没有办法分离(或许有呢),我们大可直接将动画的逻辑
就放置到View的后台代码中,动画的触发条件由ViewModel发出,这里我们就要借助Messenger来完成
消息的传递。不仅View和ViewModel可以通过消息传递,ViewModel和ViewModel也需要通过消息传递
来完成一些交互。
Messenger的使用首先要注册消息,消息的标志是什么,消息接受的参数是什么,收到消息后执行什么
操作,然后是发送消息,向哪个消息发送信息,参数是什么。使用上和事件的订阅,事件的触发是一样的。
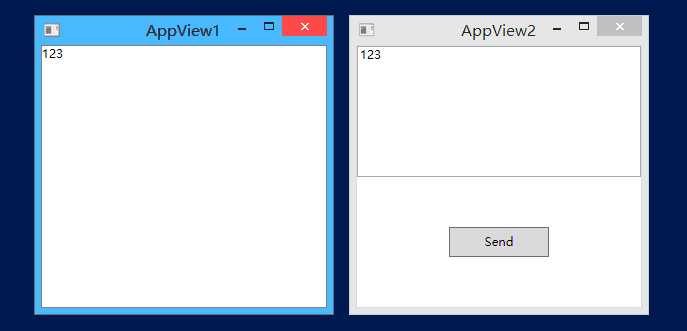
这个例子中,我们打开两个窗口(注意是同一个程序中,当初接触的时候不了解其原理,以为是Windows通信
机制中的消息通信,还傻傻的打开两个Application,让他们通信),窗口2向窗口1发送消息,窗口1显示接受到的消息。

我们先来看窗口1是怎么注册消息的
AppView1.xaml
<Window x:Class="MessengerDemo.Views.AppView1"
    xmlns="http://schemas.microsoft.com/winfx/2006/xaml/presentation"
    xmlns:x="http://schemas.microsoft.com/winfx/2006/xaml"
    xmlns:d="http://schemas.microsoft.com/expression/blend/2008"
    xmlns:mc="http://schemas.openxmlformats.org/markup-compatibility/2006"
    xmlns:local="clr-namespace:MessengerDemo.Views" DataContext="{Binding Source={StaticResource Locator},Path=View1}"
    mc:Ignorable="d"
    Title="AppView1" Height="300" Width="300">
<Grid>
    <TextBlock Text="{Binding Msg}"></TextBlock>
</Grid>
</Window>
AppView1Model.cs
public class AppView1Model : ViewModelBase
{
    private string _msg;

    public string Msg
    {
        get
        {
            return _msg;
        }
        set
        {
            _msg = value;
            RaisePropertyChanged(() => Msg);
        }
    }

    public AppView1Model()
    {
        Messenger.Default.Register<string>(this, MessageToken.SendMessageToken, (msg) =>
        {
            Msg = msg;
        });
    }
}
注意:这里使用了一个静态类MessageToken,它的作用是定义消息标志,也是通过它区分不同的消息
MessageToken.cs
public static class MessageToken
{
    /// <summary>
    /// 动画信息标志
    /// </summary>
    public static readonly string AnimateMessageToken;

    /// <summary>
    /// 发送消息标志
    /// </summary>
    public static readonly string SendMessageToken;

    static MessageToken()
    {
        AnimateMessageToken = nameof(AnimateMessageToken);

        SendMessageToken = nameof(SendMessageToken);
    }
}
这里定义了2个消息类型,一个用于动画演示,一个用于发送消息。
我们再来看窗口2是怎么发送消息的
AppView2.xaml
<Window x:Class="MessengerDemo.Views.AppView2"
    xmlns="http://schemas.microsoft.com/winfx/2006/xaml/presentation"
    xmlns:x="http://schemas.microsoft.com/winfx/2006/xaml"
    xmlns:d="http://schemas.microsoft.com/expression/blend/2008"
    xmlns:mc="http://schemas.openxmlformats.org/markup-compatibility/2006"
    xmlns:local="clr-namespace:MessengerDemo.Views" DataContext="{Binding Source={StaticResource Locator},Path=View2}"
    mc:Ignorable="d"
    Title="AppView2" Height="300" Width="300">
<Grid>
    <Grid.RowDefinitions>
        <RowDefinition/>
        <RowDefinition/>
    </Grid.RowDefinitions>
    <TextBox Text="{Binding Msg}"></TextBox>

    <Button Width="100" Height="30" Grid.Row="1" Content="Send" Command="{Binding SendCommand}"></Button>
</Grid>
</Window>
AppView2Model.cs
public class AppView2Model : ViewModelBase
{
    private string _msg;


    public string Msg
    {
        get
        {
            return _msg;
        }
        set
        {
            _msg = value;
            RaisePropertyChanged(() => Msg);
        }
    }

    public RelayCommand SendCommand
    {
        get; set;
    }

    public AppView2Model()
    {
        SendCommand = new RelayCommand(() =>
          {
              Messenger.Default.Send<string>(Msg, MessageToken.SendMessageToken);
          });
    }
}
这里使用的是同一个MessageToken,这样调试的时候也方便查找。这里我们发送消息时,传递的参数是字符串,
这里可以传递任何类型。
在来看一个动画的,动画的逻辑都写到了View的后台代码中,ViewModel发送触发动画的消息
AppView1.xaml
<Grid>
    <Grid.RowDefinitions>
        <RowDefinition/>
        <RowDefinition/>
    </Grid.RowDefinitions>

    <TextBlock Text="{Binding Msg}"></TextBlock>

    <Button Width="100" Height="30" Grid.Row="1" Content="执行动画" x:Name="btn" Command="{Binding AnimateCommand}">
        <Button.RenderTransform>
            <TransformGroup>
                <ScaleTransform/>
                <SkewTransform/>
                <RotateTransform/>
                <TranslateTransform/>
            </TransformGroup>
        </Button.RenderTransform>
    </Button>
</Grid>
AppView1.xaml.cs
public partial class AppView1 : Window
{
    private Storyboard _storyboard;

    public AppView1()
    {
        InitializeComponent();

        _storyboard = new Storyboard();

        DoubleAnimation doubleAnimation = new DoubleAnimation(0, 180, new Duration(new TimeSpan(0, 0, 2)));
        Storyboard.SetTarget(doubleAnimation, btn);
        Storyboard.SetTargetProperty(doubleAnimation, new PropertyPath("(UIElement.RenderTransform).(TransformGroup.Children)[2].(RotateTransform.Angle)"));

        _storyboard.Children.Add(doubleAnimation);

        Messenger.Default.Register<string>(this, MessageToken.AnimateMessageToken, (msg) =>
         {
             _storyboard.Begin();
         });
    }
}
AppView1Model.cs
public class AppView1Model : ViewModelBase
{
    public RelayCommand AnimateCommand
    {
        get; set;
    }

    public AppView1Model()
    {
        AnimateCommand = new RelayCommand(() =>
          {
              Messenger.Default.Send<string>("", MessageToken.AnimateMessageToken);
          });
    }
}
当然,动画还是使用Blend编写要舒服一些。有了Messenger,使得ViewModel和ViewModel之间一定的
解耦,可以处理更复杂的情况。
标签:
原文地址:http://www.cnblogs.com/maanshancss/p/5794840.html