标签:
本章内容包含:创建第一个控制器,用于展示新闻条目列表和详情;学习控制器和视图之间的交互;自定义视图的布局。
本章结构如下:
为了处理一个请求,第一件要做的事就是创建一个新的控制器。
在创建一个控制器文件时,需要注意如下一些事项:
use引用会使用的类yii\web\Controller类action开头,并且每一个单词的首字母大写在文件夹basic\controllers中创建文件NewsController.php。
然后创建一个和文件名一样的类,并继承yii\web\Controller类,创建一个actionIndex函数,这个函数对应的请求就是news/index:
<?php
// 1. specify namespace at the top (in basic application usually app\controllers);
namespace app\controllers;
// 2. specify ‘use‘ path for used class;
use Yii;
use yii\web\Controller;
// 3. controller class must extend yii\web\Controller class;
// This line is equivalent to
// class NewsController extends yii\web\Controller
class NewsController extends Controller
{ // 4. actions are handled from controller functions whose name starts with ‘action‘ and the first letter of each word is uppercase;
    public function actionIndex()
    {
        echo "this is my first controller";
    }
}使用浏览器访问http://hostname/basic/web/index.php?r=news/index,我们将会看到一个空白页面,并提示我们this is my first controller.
现在让我们看看,如果我们忽略了先前提到的需要注意的四件事中的某些时,将会发生什么错误。
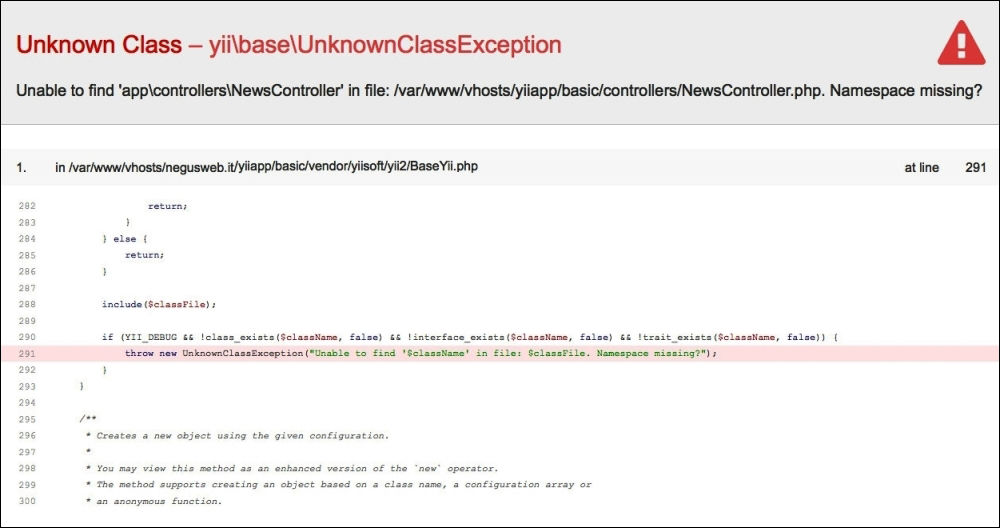
命名空间定义了应用中使用到的名称的等级结构。如果我们忘记使用命名空间,并且web/index.php中的YII_DEBUG设置为true,我们将会看到如下错误信息:

控制器命名空间缺失
Yii2能非常棒的展示错误信息,提示我们检查是否丢失了命名空间。
use用于指明某个类在应用中的详细路径。类都有一个类似这样的完整路径path/to/class/ClassName。如果们在命名空间之后定义添加use path/to/class/ClassName,那么我们在使用时只需要引用ClassName。
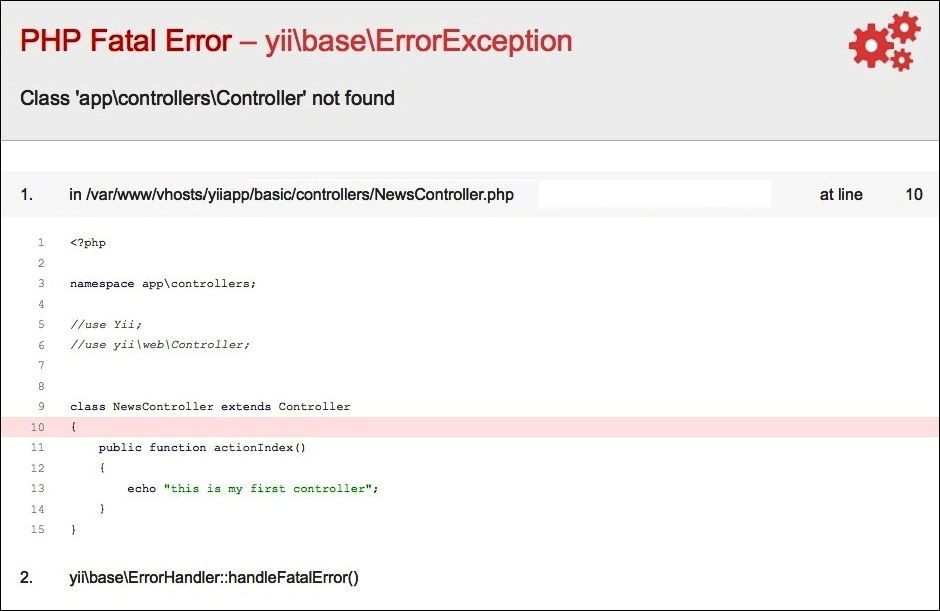
但是,如果我们在只是使用ClassName,但没有添加use path/to/class/ClassName,将会出现如下错误:

对于初学者来说,这个错误非常容易解释,但是很难发现。
在这个例子中,从截图中可以看出,在第9行extends之后使用了Controller类。但是因为这不是一个完整的Controller类名,Yii2会尝试从app\controllers下去寻找这个Controller类,但是并没有找到。
为了解决这个问题,我们必须将第9行的Controller修改为yii\web\Controller,或者在文件顶部使用use path/to/class/ClassName。
控制器通常是yii\web\Controller的子类。
现在我们在一个名叫itemsList的视图中创建一个简单的新闻列表。然后从NewsController中指向这个视图,我们需要做下面一些事情:
basic\views中创建一个名叫news的文件夹,控制器NewsController默认在这个文件夹中寻找需要渲染的视图。basci\views\news中创建文件itemsList.php打开文件basci\views\news\itemsList.php,创建一个数据数组和一个展示数据的表格:
<?php
$newsList = [
    [ ‘title‘ => ‘First World War‘, ‘date‘ => ‘1914-07-28‘ ],
    [ ‘title‘ => ‘Second World War‘, ‘date‘ => ‘1939-09-01‘ ],
    [ ‘title‘ => ‘First man on the moon‘, ‘date‘ => ‘1969-07-20‘ ]
];
?>

<table>
    <tr>
        <th>Title</th>
        <th>Date</th>
    </tr>
    <?php foreach($newsList as $item) { ?>
        <tr>
            <td><?php echo $item[‘title‘] ?></td>
            <td><?php echo $item[‘date‘] ?></td>
        </tr>
    <?php } ?>
</table>然后我们需要在控制器中创建一个actionItemsList的动作函数,可以通过http://hostname/basic/web/index.php?r=news/items-list访问到它。
建议
下载示例代码
你可以在http://www.packtpub.com上下载你购买的书的示例代码。如果你在别的地方买了这本书,你可以去http://www.packtpub.com/support这里寻求帮助。
注意
注意路径、控制器和动作的名字:
news/items-list(小写,单词之间用短横线连接);NewsController(单词首字母大写,最后跟着Controller);NewsController中的动作函数是actionItemsList(其中action是一个固定前缀,没有路径中的短横线,且每个单词的首字母大写);NewsController中的函数如下所示:
public function actionItemsList()
{
    return $this->render(‘itemsList‘);
}其中render()方法属于\yii\web\Controller,用于展示第一个参数所代表的视图,框架查找这个视图的时候,会给参数添加上.php的后缀,并在basic\views\news文件夹中寻找。
现在我们可以访问http://hostname/basic/web/index.php?r=news/items-list看到效果啦!
我们已经看到了如何展示视图内容。但是,视图的作用只是展示数据,而不是操纵数据。因此,所有的数据都应该在控制器动作中准备好,然后才传入到视图中。
控制器动作中的render()方法还有第二个参数,它是一个向量,该向量的一系列key是变量的名称,value是这些变量的值,这些变量可以在视图中使用。
现在我们修改之前的代码,将itemsList需要的数据在控制器中准备。
下边是控制器中actionItemsList()的内容:
public function actionItemsList()
{
    $newsList = [
        [ ‘title‘ => ‘First World War‘, ‘date‘ => ‘1914-07-28‘ ],
        [ ‘title‘ => ‘Second World War‘, ‘date‘ => ‘1939-09-01‘ ],
        [ ‘title‘ => ‘First man on the moon‘, ‘date‘ => ‘1969-07-20‘ ]
    ];

    return $this->render(‘itemsList‘, [‘newsList‘ => $newsList]);
}文件views/news/itemsList.php中的代码是:
<?php // $newsList is from actionItemsList ?>
<table>
    <tr>
        <th>Title</th>
        <th>Date</th>
    </tr>
    <?php foreach($newsList as $item) { ?>
        <tr>
            <th><?php echo $item[‘title‘] ?></th>
            <th><?php echo $item[‘date‘] ?></th>
        </tr>
    <?php } ?>
</table>
这样我们就将控制器和视图分开了。
接下来的目标是在另外一个页面中完成新闻新闻阅读器的单条新闻的详情展示部分。
因为列表和详情使用的是同一套数据,我们将$newsList数据从控制器动作中拿出来,进而可以用在别的动作中。
在NewsController中,添加如下的代码:
public function dataItems()
{
    $newsList = [
        [ ‘title‘ => ‘First World War‘, ‘date‘ => ‘1914-07-28‘ ],
        [ ‘title‘ => ‘Second World War‘, ‘date‘ => ‘1939-09-01‘ ],
        [ ‘title‘ => ‘First man on the moon‘, ‘date‘ => ‘1969-07-20‘ ]
    ];

    return $newsList;
}

public function actionItemsList()
{
    $newsList = $this->dataItems();

    return $this->render(‘itemsList‘, [‘newsList‘ => $newsList]);
}然后在NewsController中创建一个新的动作actionItemDetail,用于处理新闻条目详情的请求。这个函数有一个参数,指明需要展示$newsList哪条新闻,例如通过标题。
public function actionItemDetail($title)
{
    $newsList = $this->dataItems();

    $item = null;
    foreach($newsList as $n)
    {
        if($title == $n[‘title‘]) $item = $n;
    }

    return $this->render(‘itemDetail‘, [‘item‘ => $item]);
}接下来在views\news中创建一个新的视图文件itemDetail.php:
<?php // $item is from actionItemDetail ?>

<h2>News Item Detail</h2>
<br />
Title: <b><?php echo $item[‘title‘] ?></b>
<br />
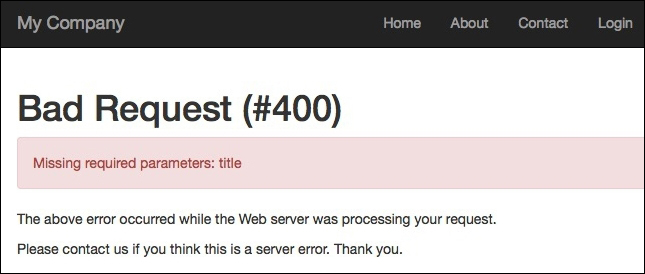
Date: <b><?php echo $item[‘date‘] ?></b>如果访问http://hostname/basic/web/index.php?r=news/item-detail,没有指出标题参数,那么将会返回如下错误:

页面展示了一个错误信息,提示我们缺少标题参数。
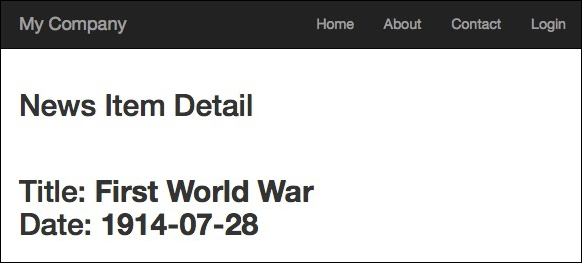
修正URL,访问http://hostname/basic/web/index.php?r=news/item-detail&title=First%20World%20War,将会输出如下结果:

这就是我们期望的!
最后,将itemsList和itemDetail联系起来,在views\news\itemsList.php中,我们做如下修改:
<?php // $newsList is from actionItemsList ?>
<table>
    <tr>
        <th>Title</th>
        <th>Date</th>
    </tr>
    <?php foreach($newsList as $item) { ?>
        <tr>
            <th><a href="<?php echo Yii::$app->urlManager->createUrl([‘news/item-detail‘ , ‘title‘ => $item[‘title‘]]) ?>"><?php echo $item[‘title‘] ?></a></th>
            <th><?php echo $item[‘date‘] ?></th>
        </tr>
    <?php } ?>
</table>使用组件urlManager可以创建一个链接,具体是使用createUrl()方法。createUrl()的参数是一个向量,其中包含了路径和需要通过URL传递的参数。关于这个方法更多的介绍,可以去这里查看http://www.yiiframework.com/doc-2.0/yii-web-urlmanager.html#createUrl%28%29-detail。
在这里例子中,请求的路径是news\item-detail,并且传递了参数title。
注意
可以用于内置格式化组件格式化日期。例如,为了以d/m/Y的格式展示日期,echo \Yii::$app->formatter->asDatetime(‘2010-01-23‘, "php:d/m/Y");将会输出23/01/2010。
建议为每条新闻指定一个唯一的编号,这里我们为数据添加一个id项。
下面是NewsController的内容:
public function dataItems()
{
    $newsList = [
        [ ‘id‘ => 1, ‘title‘ => ‘First World War‘, ‘date‘ => ‘1914-07-28‘ ],
        [ ‘id‘ => 2, ‘title‘ => ‘Second World War‘, ‘date‘ => ‘1939-09-01‘ ],
        [ ‘id‘ => 3, ‘title‘ => ‘First man on the moon‘, ‘date‘ => ‘1969-07-20‘ ]
    ];
    return $newsList;
}

public function actionItemsList()
{
    $newsList = $this->dataItems();
    return $this->render(‘itemsList‘, [‘newsList‘ => $newsList]);
}
public function actionItemDetail($id)
{
    $newsList = $this->dataItems();

    $item = null;
    foreach($newsList as $n)
    {
        if($id == $n[‘id‘]) $item = $n;
    }

    return $this->render(‘itemDetail‘, [‘item‘ => $item]);
}然后将views\news\itemsList.php中createUrl的参数修改为:
<table>
    <tr>
        <th>Title</th>
        <th>Date</th>
    </tr>
    <?php foreach($newsList as $item) { ?>
        <tr>
            <th><a href="<?php echo Yii::$app->urlManager->createUrl([‘news/item-detail‘ , ‘id‘ => $item[‘id‘]]) ?>"><?php echo $item[‘title‘] ?></a></th>
            <th><?php echo Yii::$app->formatter->asDatetime($item[‘date‘], "php:d/m/Y"); ?></th>
        </tr>
    <?php } ?>
</table>有些时候,若干视图会有部分相同的内容。例如,itemsList和itemDetail都需要展示版权信息。
为了减少工作量,我们需要将这些共有的部分抽取出来,并使用控制器的renderPartial()方法调用(http://www.yiiframework.com/doc-2.0/yii-base-controller.html#renderPartial%28%29-detail)。这个函数和render()有相同的参数;两者的区别主要是render()会将视图内容放在布局中,而renderPartial()只是输出视图内容。
在这个例子中,我们为itemsList和itemDetail创建版权信息。
在views\news中创建文件_copyright.php。
注意
在Yii2的应用中,可复用视图文件通常以下划线开始。
将如下内容写入文件views\news\_copyright.php文件中:
<div>
    This is text about copyright data for news items
</div>然后分别在itemsList和itemDetail视图中展示版权信息。
修改views\news\itemsList.php的内容为:
<?php echo $this->context->renderPartial(‘_copyright‘); ?>
<table>
    <tr>
        <th>Title</th>
        <th>Date</th>
    </tr>
    <?php foreach($newsList as $item) { ?>
        <tr>
            <th><a href="<?php echo Yii::$app->urlManager->createUrl([‘news/item-detail‘ , ‘id‘ => $item[‘id‘]]) ?>"> <?php echo $item[‘title‘] ?> </a></th>
            <th><?php echo Yii::$app->formatter->asDatetime($item[‘date‘], ‘php:d/m/Y‘); ?></th>
        </tr>
    <?php } ?>
</table>修改views\news\itemsDetail.php的内容为:
<?php // $item is from actionItemDetail ?>
<?php echo $this->context->renderPartial(‘_copyright‘); ?>
<h2>News Item Detail</h2>
<br />
Title: <b><?php echo $item[‘title‘] ?></b>
<br />
Date: <b><?php echo $item[‘date‘] ?></b>
在这两个文件中我们都添加了下面的内容:
<?php echo $this->context->renderPartial(‘_copyright‘); ?>注意
注意!因为renderPartial()是Controller的方法,$this代指视图文件中的View类,所以为了使用renderPartial()必须使用上下文成员context,它是View对象中的Controller对象。
所有的网站都包含静态网页,他们的内容是静态的。
为了以更常见的方式创建,我们需要做如下工作:
Controller中创建一个函数(action)将如下内容放在Controller中:
public function actionInfo()
{
    return $this->render(‘info‘);
}然后创建一个视图文件views/controller/action-name.php。这个过程比较长,并且比较冗余。
Yii2提供了另外一种更为便捷的方式,添加如下内容到Controller的action()中:
public function actions()
{
    return [
        ‘pages‘ => [
            ‘class‘ => ‘yii\web\ViewAction‘,
        ],
    ];
}然后我们就可以将静态内容网页放在views/controllerName/pages中了。
最后,可以通过访问http://hostname/basic/web/index.php?r=controllerName/pages&view=name_of_view来查看相关的静态网页。
在了解了如何创建静态网页以后,我们来创建一个联系人页。
在views/site/pages/contact.php中添加如下内容:
To contact us, please write to info@example.com然后,在Controller的action()方法中添加一个page属性,这里我们在SiteController中做如下修改:
原来的内容:
public function actions()
{
    return [
        ‘error‘ => [
            ‘class‘ => ‘yii\web\ErrorAction‘,
        ],
        ‘captcha‘ => [
            ‘class‘ => ‘yii\captcha\CaptchaAction‘,
            ‘fixedVerifyCode‘ => YII_ENV_TEST ? ‘testme‘ : null,
        ],
    ];
}
修改后:
public function actions()
{
    return [
        ‘error‘ => [
            ‘class‘ => ‘yii\web\ErrorAction‘,
        ],
        ‘captcha‘ => [
            ‘class‘ => ‘yii\captcha\CaptchaAction‘,
            ‘fixedVerifyCode‘ => YII_ENV_TEST ? ‘testme‘ : null,
        ],
        ‘pages‘ => [
            ‘class‘ => ‘yii\web\ViewAction‘,
        ],
    ];
}设置好以后,所有对site/pages的请求都会使用ViewAction类,具体就是方法相对应的静态视图。
访问网址http://hostname/basic/web/index.php?r=site/pages&view=contact可以看到如下内容:

我们可以对上述路径做如下自定义修改:
Controller中actions()的属性名称ViewAction的viewPrefix属性,来声明我们想使用的URLviews/controllerName的子文件夹名称例如,我们希望在SiteController中使用static来访问静态网页。
通过访问http://hostname/basic/web/index.php?r=site/static&view=contact查看联系人页面。
那么可以在SiteController中actions()添加如下内容:
‘static‘ => [
    ‘class‘ => ‘yii\web\ViewAction‘,
    ‘viewPrefix‘ => ‘static‘
],同时我们需要添加文件夹view/site/static,这样我们就可以访问http://hostname/basic/web/index.php?r=site/static&view=contact页面了。
在视图与布局之间共享数据,Yii2提供了一种标准的方法,即通过视图控件的params属性。
注意
这是一个标准的方法,因为params存在于所有的视图中。
params属性是一个数组,没有任何使用限制。
例如我们希望保存面包屑的数据,用于展示在导航路径中。
打开主视图views/layouts/main.php;找到有关面包屑的代码:
<div class="container">
    <?= Breadcrumbs::widget([
        ‘links‘ => isset($this->params[‘breadcrumbs‘]) ? $this->params[‘breadcrumbs‘] : [],
    ]) ?>
</div>在文件views/site/index.php中添加如下代码:
$this->params[‘breadcrumbs‘][] = ‘My website‘;注意
因为这是在视图文件中,$this代表视图控件。
访问http://hostname/basic/web/index.php?r=site/index可以看到如下图所示的面包屑导航:

视图和布局之间进行通信的另外一个例子是,基于URL参数改变布局背景。
通过向路径为site/index的URL传递参数bckg来修改背景。
因此,我们必须在代码views/site/index.php中添加如下内容:
<?php
$backgroundColor = isset($_REQUEST[‘bckg‘])?$_REQUEST[‘bckg‘]:‘#FFFFFF‘;
$this->params[‘background_color‘] = $backgroundColor;如果没有传递参数bckg,这行代码会将$backgroundColor设置为#FFFFFF(白色);否则会被设置为指定的值。
打开views/layout/main.php,在body标签中,根据params[‘background_color‘]修改它的style。
<?php
$backgroundColor = isset($this->params[‘background_color‘])?$this->params[‘background_color‘]:‘#FFFFFF‘; ?>
<body style="background-color:<?php echo $backgroundColor ?>">访问http://hostname/basic/web/index.php?r=site/index&bckg=yellow可以看到背景是黄色的,访问http://hostname/basic/web/index.php?r=site/index&bckg=#FF0000可以看到背景是红色的。
注意
在这个例子中,我们只在views/site/index.php中给params添加了background_color参数。如果我们不在布局文件中检查background_color属性是否被设置了,那么有可能会收到一个错误。
params参数用于视图和布局之前的通信,这一般只适用于简单的情况,如果遇到比较复杂的情况时,我们需要传递HTML块。
例如,布局中的广告区(使用模板中的左列或者右列),它可以根据需要展示的视图来改变。
在这个条件下,我们需要将HTML整块从视图传递到布局中。
为了这个目的,框架提供了Block,我们可以在这里定义需要从视图传递到布局的数据。
使用Blocks意味着定义在一个视图中定义它,并在另一个视图中进行展示,通常是在布局中。
我们可以按如下方式定义Block:
<?php $this->beginBlock(‘block1‘); ?>
...content of block1...
$this->endBlock(); ?>这里beginBlock和endBlock定义了block1的开始和结束。其中的内容被保存到的视图控件中的block1的属性中。
我们可以使用$view>blocks[$blockID]在任意一个视图中获取这个块,包含布局。
为了在布局视图中使用这个块,可以使用如下代码:
<?php if(isset($this->blocks[‘block1‘]) { ?>
    <?php echo $this->blocks[‘block1‘] ?>
<?php } else { ?>
    … default content if missing block1 attribute
<?php } ?>在这个例子中,我们会展示一个广告信息块,且数据是从视图传递过来的。
首先添加一个展示数据的块。
打开views/layouts/main.php并修改做如下修改:
<div class="container">
<?= Breadcrumbs::widget([
    ‘links‘ => isset($this->params[‘breadcrumbs‘]) ? $this->params[‘breadcrumbs‘] : [],
]) ?>

    <div class="well">
        This is content for blockADV from view
        <br />
        <?php if(isset($this->blocks[‘blockADV‘])) { ?>
            <?php echo $this->blocks[‘blockADV‘]; ?>
        <?php } else { ?>
            <i>No content available</i>
        <?php } ?>
    </div>

    <?= $content ?>
</div>然后在NewsController中创建一个新的动作,advTest。
创建文件views/news/advTest.php:
<span>
This is a test where we display an adv box in layout view
</span>
<?php $this->beginBlock(‘blockADV‘); ?>

<b>Buy this fantastic book!</b>

<?php $this->endBlock(); ?>
我们可以在这个block中创建任何内容。这里我们添加了一些文本。
注意
在视图中创建block的位置是不重要的。
然后,打开NewsController添加如下内容:
public function actionAdvTest()
{
    return $this->render(‘advTest‘);
}访问http://hostname/basic/web/index.php?r=news/adv-test将会看到如下结果:

在其它页面上将会看到no content available。
在创建一个网站或者一个网站应用时,通常需要在不同的布局中渲染不同的视图。例如,本章中制作的新闻列表和详情。
布局是由Controller的$layout属性管理的;main是这个属性的缺省值。
修改这个属性的值,就可以改变布局。
关于$layout属性有如下一些规则:
@app/views/layouts/main)。/main),以一个斜线开始。布局文件将会在应用布局路径中寻找,这个路径的缺省值是@app/views/layouts。main),将会在当前模块的布局路径中寻找,该路径的缺省值是当前模块的views/layouts。注意
如果布局值不含有文件扩展名,它将会使用缺省值.php。
在这个例子中,我们会在NewsController中创建一个新的动作,它根据URL传递的参数修改布局。
public function actionResponsiveContentTest()
{
    $responsive =  Yii::$app->request->get(‘responsive‘, 0);

    if($responsive)
    {
        $this->layout = ‘responsive‘;
    }
    else
    {
        $this->layout = ‘main‘;
    }

    return $this->render(‘responsiveContentTest‘, [‘responsive‘ => $responsive]);
}在这个动作中,我们根据URL中的参数responsive设置变量$responsive,缺省值是0。
然后根据$responsive动态修改Controller的$layout,并将这个变量传递给视图。
创建一个新的视图views/news/responsiveContentTest.php:
<?php if($responsive) { ?>
    This layout contains responsive content
<?php } else { ?>
    This layout does not contain responsive content
<?php } ?>根据$responsive展示不同的文本块。
最后,将view/layouts/main.php复制为views/layouts/responsive.php,并在新文件中作如下修改:
<div class="container"> in <div class="container-fluid" style="padding-top:60px">这个改变将div容器修改为响应式的。
如果访问http://hostname/basic/web/index.php?r=news/responsive-content-test,我们将会看到一个固定的布局。如果我们将responsive的参数设置为1,http://hostname/basic/web/index.php?r=news/responsive-content-test&responsive=1,我们将会看到一个宽屏布局。
在本章中,在了解了Yii2应用的结构以后,我们创建我们的第一个控制器和相关的视图。我已经看到的动态和静态视图,我们已经学习了如何在布局中渲染视图,并从控制器中传递数据到视图中,以及如何复用视图。
最后,我们操作了布局,并根据条件修改它。
在下一章中,我们将会用更好的方式展示URL,这对搜索引擎优化(SEO)非常重要。然后,我们将会学习如何创建一个自定义URL句柄来管理任何需要的URL自定义。
《Yii2 By Example》第2章:创建一个简单的新闻阅读器
标签:
原文地址:http://blog.csdn.net/zhyoulun/article/details/52303298