标签:
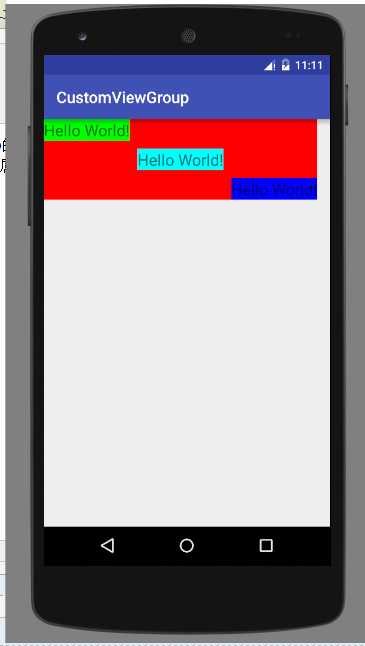
自定义View包括很多种,上一次随笔中的那一种是完全继承自View,这次写的这个小Demo是继承自ViewGroup的,主要是将自定义View继承自ViewGroup的这个流程来梳理一下,这次的Demo中自定义了一个布局的效果,并且这个自定义布局中包含布局自己的属性,布局中的控件也包含只属于这个布局才具有的自定义属性(类似于layout_weight只存在于LinearLayout中,只有LinearLayout中的控件可以使用一样)。话不多说,先看效果图:

其中红色的部分是自定义的ViewGroup,这里使用了wrap_content,所以包裹内容。
我的思路是这样的:
先自定义一个类,继承自ViewGroup,继承自ViewGroup的自定义类,一定要重写onLayout()方法,因为这是一个抽象方法,主要作用就是用来绘制子View视图,确定ViewGroup中的每个子控件的位置。然后再重写其两个构造函数,一个是一个参数的,一个是两个参数的。继承自ViewGroup与继承自View有些不同的地方,我们在重写onMeasure()的时候,不仅仅要测量自定义的父布局(本自定义View)的尺寸,还要在其中计算其子View的尺寸信息,这是比较麻烦的地方,计算完尺寸还要再onLayout()方法中根据计算出来的控件的摆放位置,调用 子View.layout(int left,int top,int right,int bottom)方法将控件绘制在ViewGroup上,其中的四个参数为子View控件的左上角的点的坐标和右下角的点的坐标信息。这里我们为子View定义了两个自定义属性,实现类似margin的效果,而只要定义了子控件的这类属性,就要自定义一个内部类,继承自MarginLayoutParams类,在这里获取我们在xml中设置的属性信息。也就是主要的方法和与继承自View的自定义View中不同的就是onMeasure()方法,自定义类继承自MarginLayoutParams,onLayout()方法,generateLayoutParams()方法。还不是有点懵?来看看代码,如果是在不懂,可以把代码拷贝到工程中自己改改属性试一下,就会明白不少!
attr.xml:
 1 <?xml version="1.0" encoding="utf-8"?>
 2 <resources>
 3     <!--声明自定义属性 自定义ViewGroup的属性 -->
 4     <declare-styleable name="CascadeViewGroup">
 5         <attr name="verticalSpacing" format="dimension|reference"></attr>
 6         <attr name="horizontalSpacing" format="dimension|reference"></attr>
 7     </declare-styleable>
 8     <!--以下自定义属性针对自定义CascadeViewGroup布局中的子控件设置的属性-->
 9     <declare-styleable name="CascadeViewGroup_LayoutParams">
10         <attr name="layout_paddingLeft" format="dimension|reference"></attr>
11         <attr name="layout_paddingTop" format="dimension|reference"></attr>
12     </declare-styleable>
13 </resources>
自定义View类:
  1 package com.example.customviewgroup;
  2
  3 import android.content.Context;
  4 import android.content.res.TypedArray;
  5 import android.util.AttributeSet;
  6 import android.util.Log;
  7 import android.view.View;
  8 import android.view.ViewGroup;
  9
 10 /**
 11  */
 12 public class CascadeViewGroup extends ViewGroup{
 13     //声明自定义布局中的子控件距离父布局的间距的宽度和高度
 14     private int mHoriztonalSpacing;
 15     private int mVerticalSpacing;
 16
 17     public CascadeViewGroup(Context context) {
 18         super(context);
 19     }
 20
 21     public CascadeViewGroup(Context context, AttributeSet attrs) {
 22         super(context, attrs);
 23         TypedArray array=context.obtainStyledAttributes(attrs,R.styleable.CascadeViewGroup);
 24         mHoriztonalSpacing=array.getDimensionPixelSize(
 25                 R.styleable.CascadeViewGroup_horizontalSpacing,R.dimen.default_horizontal_spacing);
 26         mVerticalSpacing=array.getDimensionPixelSize(
 27                 R.styleable.CascadeViewGroup_verticalSpacing,R.dimen.default_vertical_spacing);
 28         array.recycle();
 29     }
 30
 31     /**
 32      * onMeasure 测量自身大小  测量子view的大小
 33      * 并且将子view信息保存到LayoutParams中
 34      */
 35     @Override
 36     protected void onMeasure(int widthMeasureSpec, int heightMeasureSpec) {
 37         //获取viewgroup中子view 的个数
 38         int count=this.getChildCount();
 39         //获取当前光标的坐标位置 横坐标 纵坐标
 40         int width=getPaddingLeft();
 41 //        Log.d("Tag", "base-width: "+width);
 42         int height=this.getPaddingTop();
 43 //        Log.d("Tag", "base-height: "+height);
 44         for(int i=0;i<count;i++){
 45             View currentView=getChildAt(i);
 46             //测量每个子view的宽度和高度
 47             measureChild(currentView,widthMeasureSpec,heightMeasureSpec);
 48             LayoutParams lp= (LayoutParams) currentView.getLayoutParams();
 49             //判断子view是否设置自定义属性padding
 50             if(lp.mSettingPaddingLeft!=0){
 51                 width+=lp.mSettingPaddingLeft;
 52             }
 53             if(lp.mSettingPaddingTop!=0){
 54                 height+=lp.mSettingPaddingTop;
 55             }
 56             //获取子view的起始点坐标
 57             lp.x=width;
 58             lp.y=height;
 59             width+=mHoriztonalSpacing+currentView.getMeasuredWidth();
 60             height+=mVerticalSpacing+currentView.getMeasuredHeight();
 61         }
 62         //因为最后一次循环多加上了一个mHoriztonalSpacing和mVerticalSpacing,
 63         // 所以父布局的wrap_content情况的话需要减掉一个mHoriztonalSpacing和mVerticalSpacing
 64         width+=getPaddingRight()-mHoriztonalSpacing;
 65         height+=getPaddingBottom()-mVerticalSpacing;
 66         //设置自定义ViewGroup的宽度和高度
 67         //resolveSize()主要就是根据指定的尺寸大小和模式  返回需要的大小值
 68         // 自动判断是哪一种模式,并返回需要的尺寸大小(match_parent或者是指定大小或者是wrap_content)
 69         setMeasuredDimension(resolveSize(width,widthMeasureSpec),
 70                 resolveSize(height,heightMeasureSpec));
 71     }
 72
 73     /**
 74      * 如果想在自定义ViewGroup中使用margin设置间距,则要在自定义类中重写generateLayoutParams系列方法才行
 75      * @return
 76      */
 77     @Override
 78     protected ViewGroup.LayoutParams generateDefaultLayoutParams() {
 79         return new LayoutParams(LayoutParams.MATCH_PARENT,LayoutParams.MATCH_PARENT);
 80     }
 81
 82     @Override
 83     public ViewGroup.LayoutParams generateLayoutParams(AttributeSet attrs) {
 84         return new LayoutParams(this.getContext(),attrs);
 85     }
 86
 87     @Override
 88     protected ViewGroup.LayoutParams generateLayoutParams(ViewGroup.LayoutParams p) {
 89         return new LayoutParams(p);
 90     }
 91
 92     /**
 93      * 以内部类的形式自定义LayoutParams 方便测量子view时保存子控件使用的属性值
 94      * 当ViewGroup中的子控件中有自己独特的属性的时候才重写自定义一个类LayoutParams继承自MarginLayoutParams
 95      */
 96     public static class LayoutParams extends MarginLayoutParams{
 97         //记录子view的起始点
 98         int x;
 99         int y;
100         //子控件的自定义属性,这里的效果相当于margin的效果
101         int mSettingPaddingLeft;
102         int mSettingPaddingTop;
103
104         public LayoutParams(Context c, AttributeSet attrs) {
105             super(c, attrs);
106             TypedArray array=c.obtainStyledAttributes(attrs,R.styleable.
107                         CascadeViewGroup_LayoutParams);
108             mSettingPaddingLeft=array.getDimensionPixelSize(R.styleable.
109                     CascadeViewGroup_LayoutParams_layout_paddingLeft,0);
110             mSettingPaddingTop=array.getDimensionPixelSize(
111                     R.styleable.CascadeViewGroup_LayoutParams_layout_paddingTop,0);
112             array.recycle();
113         }
114
115         public LayoutParams(int width, int height) {
116             super(width, height);
117         }
118
119         public LayoutParams(MarginLayoutParams source) {
120             super(source);
121         }
122
123         public LayoutParams(ViewGroup.LayoutParams source) {
124             super(source);
125         }
126     }
127
128     /**
129      * 确定布局子view的位置
130      */
131     @Override
132     protected void onLayout(boolean changed, int l, int t, int r, int b) {
133         int count=getChildCount();
134         for(int i=0;i<count;i++){
135             View currentView=getChildAt(i);
136             LayoutParams lp= (LayoutParams) currentView.getLayoutParams();
137             currentView.layout(lp.x,lp.y,lp.x+currentView.getMeasuredWidth(),
138                     lp.y+currentView.getMeasuredHeight());
139         }
140     }
141 }
布局文件:
 1 <?xml version="1.0" encoding="utf-8"?>
 2 <com.example.customviewgroup.CascadeViewGroup
 3     xmlns:android="http://schemas.android.com/apk/res/android"
 4     xmlns:app="http://schemas.android.com/apk/res-auto"
 5     android:layout_width="wrap_content"
 6     android:layout_height="wrap_content"
 7     android:background="#ff0000"
 8     app:horizontalSpacing="10dp"
 9     app:verticalSpacing="10dp"
10     >
11
12     <!--<TextView-->
13         <!--android:layout_width="100dp"-->
14         <!--android:layout_height="wrap_content"-->
15         <!--android:background="#ff0000"-->
16         <!--android:textSize="20sp"-->
17         <!--android:text="打发打发斯蒂芬" />-->
18
19     <TextView
20         android:layout_width="wrap_content"
21         android:layout_height="wrap_content"
22         android:background="#00ff00"
23         android:textSize="20sp"
24         android:text="Hello World!" />
25
26     <TextView
27         android:layout_width="wrap_content"
28         android:layout_height="wrap_content"
29         android:background="#00ffff"
30         android:textSize="20sp"
31         android:text="Hello World!" />
32
33     <TextView
34         android:layout_width="wrap_content"
35         android:layout_height="wrap_content"
36         android:background="#0000ff"
37         android:textSize="20sp"
38         android:text="Hello World!" />
39 </com.example.customviewgroup.CascadeViewGroup>
基本上就这么多,但是会有一个小Bug,目前还不太清楚是怎么回事,就是在布局文件的根布局下如果不指定我们自定义的app:horizontalSpacing="10dp"和app:verticalSpacing="10dp"这两个属性,在自定义View的第40行和第42行getPaddingLeft()和getPaddingTop()的时候会得到一个非常大的值,即使我们指定了padding的值也是这样,也就是说必须设定这两个自定义属性,我们设置的默认padding没有起作用。不想有间距的话可以设成0dp,这个坑我找到解决办法之后再来填。
标签:
原文地址:http://www.cnblogs.com/RabbitLx/p/5843433.html