标签:
Coherence在extend模式下,proxy的负载均衡机制官方解释是
Extend client connections are load balanced across proxy service members. By default, a proxy-based strategy is used that distributes client connections to proxy service members that are being utilized the least. Custom proxy-based strategies can be created or the default strategy can be modified as required. As an alternative, a client-based load balance strategy can be implemented by creating a client-side address provider or by relying on randomized client connections to proxy service members. The random approach provides minimal balancing as compared to proxy-based load balancing.
Proxy-based load balancing is the default strategy that is used to balance client connections between two or more members of the same proxy service. The strategy is weighted by a proxy‘s existing connection count, then by its daemon pool utilization, and lastly by its message backlog.
The proxy-based load balancing strategy is configured within a <proxy-scheme> definition using a <load-balancer> element that is set to proxy. For clarity, the following example explicitly specifies the strategy. However, the strategy is used by default if no strategy is specified and is not required in a proxy scheme definition.
说的比较模糊,在weblogic作为前端来连入后台coherence cluster的情况下,我们模拟实际的生产环境,看一看实际的运作
针对proxy节点的proxy-override.xml
|
<?xml version="1.0"?>
<!DOCTYPE cache-config SYSTEM "cache-config.dtd">
<cache-config>
<caching-scheme-mapping>
<cache-mapping>
<cache-name>*</cache-name>
<scheme-name>distributed-scheme</scheme-name>
</cache-mapping>
</caching-scheme-mapping>
<caching-schemes>
<!-- Distributed caching scheme. -->
<distributed-scheme>
<scheme-name>distributed-scheme</scheme-name>
<service-name>DistributedCache</service-name>
<thread-count>50</thread-count>
<backup-count>1</backup-count>
<backing-map-scheme>
<local-scheme>
<scheme-name>LocalSizeLimited</scheme-name>
</local-scheme>
</backing-map-scheme>
<autostart>true</autostart>
<local-storage>false</local-storage>
</distributed-scheme>
<local-scheme>
<scheme-name>LocalSizeLimited</scheme-name>
<eviction-policy>LRU</eviction-policy>
<high-units>500</high-units>
<unit-calculator>BINARY</unit-calculator>
<unit-factor>1048576</unit-factor>
<expiry-delay>48h</expiry-delay>
</local-scheme>
<proxy-scheme>
<service-name>ExtendTcpProxyService</service-name>
<thread-count>10</thread-count>
<acceptor-config>
<tcp-acceptor>
<local-address>
<address>192.168.0.101</address>
<port>9099</port>
</local-address>
</tcp-acceptor>
</acceptor-config>
<load-balancer>proxy</load-balancer>
<autostart>true</autostart>
</proxy-scheme>
</caching-schemes>
</cache-config>
|
针对storage节点的storage-override.xml
|
<?xml version="1.0"?>
<cache-config>
<caching-scheme-mapping>
<!--
Caches with names that start with ‘DBBacked‘ will be created
as distributed-db-backed.
-->
<cache-mapping>
<cache-name>POFSample</cache-name>
<scheme-name>distributed-pof</scheme-name>
</cache-mapping>
</caching-scheme-mapping>
<caching-schemes>
<!--
DB Backed Distributed caching scheme.
-->
<distributed-scheme>
<scheme-name>distributed-pof</scheme-name>
<service-name>DistributedCache</service-name>
<thread-count>50</thread-count>
<backing-map-scheme> <local-scheme/> </backing-map-scheme>
<listener/>
<autostart>true</autostart>
<local-storage>true</local-storage>
</distributed-scheme>
</caching-schemes>
</cache-config>
|
针对客户端的client.xml
|
<?xml version="1.0"?>
<!DOCTYPE cache-config SYSTEM "cache-config.dtd">
<cache-config>
<caching-scheme-mapping>
<cache-mapping>
<cache-name>*</cache-name>
<scheme-name>extend-dist</scheme-name>
</cache-mapping>
</caching-scheme-mapping>
<caching-schemes>
<remote-cache-scheme>
<scheme-name>extend-dist</scheme-name>
<service-name>ExtendTcpCacheService</service-name>
<initiator-config>
<tcp-initiator>
<remote-addresses>
<socket-address>
<address>192.168.0.101</address>
<port>9100</port>
</socket-address>
<socket-address>
<address>192.168.0.101</address>
<port>9099</port>
</socket-address>
</remote-addresses>
<connect-timeout>10s</connect-timeout>
</tcp-initiator>
<outgoing-message-handler>
<request-timeout>5s</request-timeout>
</outgoing-message-handler>
</initiator-config>
</remote-cache-scheme>
</caching-schemes>
</cache-config>
|
另外一个客户端的配置文件client-2.xml
|
<?xml version="1.0"?>
<!DOCTYPE cache-config SYSTEM "cache-config.dtd">
<cache-config>
<caching-scheme-mapping>
<cache-mapping>
<cache-name>*</cache-name>
<scheme-name>extend-dist</scheme-name>
</cache-mapping>
</caching-scheme-mapping>
<caching-schemes>
<remote-cache-scheme>
<scheme-name>extend-dist</scheme-name>
<service-name>ExtendTcpCacheService2</service-name>
<initiator-config>
<tcp-initiator>
<remote-addresses>
<socket-address>
<address>192.168.0.101</address>
<port>9099</port>
</socket-address>
<socket-address>
<address>192.168.0.101</address>
<port>9100</port>
</socket-address>
</remote-addresses>
<connect-timeout>10s</connect-timeout>
</tcp-initiator>
<outgoing-message-handler>
<request-timeout>5s</request-timeout>
</outgoing-message-handler>
</initiator-config>
</remote-cache-scheme>
</caching-schemes>
</cache-config>
|
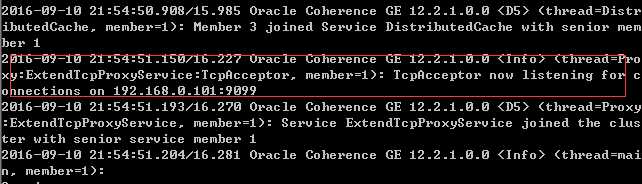
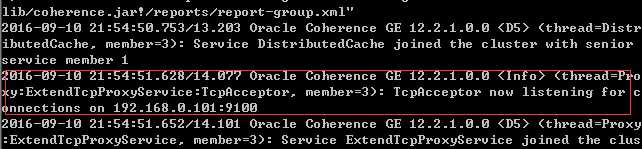
通过proxy-server.cmd启动两个proxy节点,会监听在9099和9100端口
|
"%java_exec%" -server -showversion -Dtangosol.coherence.mode=prod -Dtangosol.coherence.management.remote=true -Dtangosol.coherence.cacheconfig=E:\wls12c\coherence\bin\proxy-override.xml %java_opts% -cp "%coherence_home%\lib\coherence.jar" com.tangosol.net.DefaultCacheServer %*
|
通过storage-cmd启动一个storage节点
|
"%java_exec%" -server -showversion -Dtangosol.coherence.mode=prod -Dtangosol.coherence.management.remote=true -Dtangosol.coherence.management=all %java_opts% -Dtangosol.coherence.cacheconfig=E:\wls12c\coherence\bin\storage-override.xml -cp "%coherence_home%\lib\coherence.jar" com.tangosol.net.DefaultCacheServer %*
|
在weblogic的setDomainEnv.cmd文件中加入
|
set JAVA_OPTIONS=%JAVA_OPTIONS% -Dtangosol.coherence.cacheconfig="E:\wls12c\coherence\bin\client.xml" -Dtangosol.coherence.tcmp.enabled=false
set CLASSPATH=E:\wls1212\coherence\lib\coherence.jar;%CLASSPATH%
|
然后部署一个web应用,核心是一个jsp文件coput.jsp,批量放入10000个对象
|
<!DOCTYPE HTML PUBLIC "-//W3C//DTD HTML 4.01 Transitional//EN"
"http://www.w3.org/TR/html4/loose.dtd">
<%@page import="java.util.*"%>
<%@page import="com.tangosol.net.*"%>
<%@ page contentType="text/html;charset=windows-1252"%>
<html>
<head>
<meta http-equiv="Content-Type" content="text/html; charset=windows-1252"/>
<title>setName</title>
</head>
<html>
<body>
<h3>
<%
String mysession;
//private final ClassLoader loader = null;
NamedCache cache12;
cache12 = CacheFactory.getCache("POFSample");
for (int i=0;i<10000;i++) {
//String key = "hello";
cache12.put (i, "CacheValue=eric"+i);
}
%>
put 10000 records success.........
</h3>
</body>
</html>
|
启动weblogic访问,主要连到了9099的proxy server

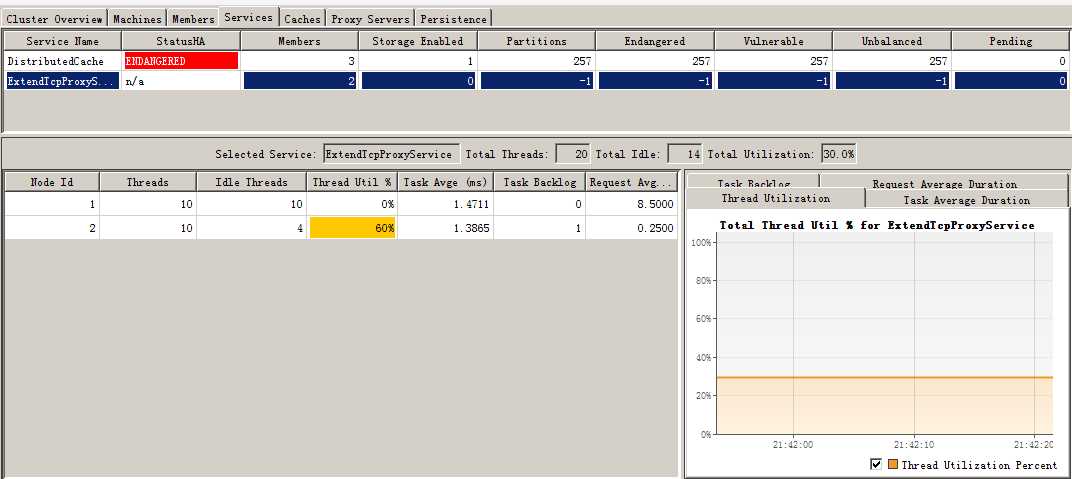
没有压力的时候,通过jvisualvm监控的proxy的线程如下,可以看到有每个都有10个空闲线程:
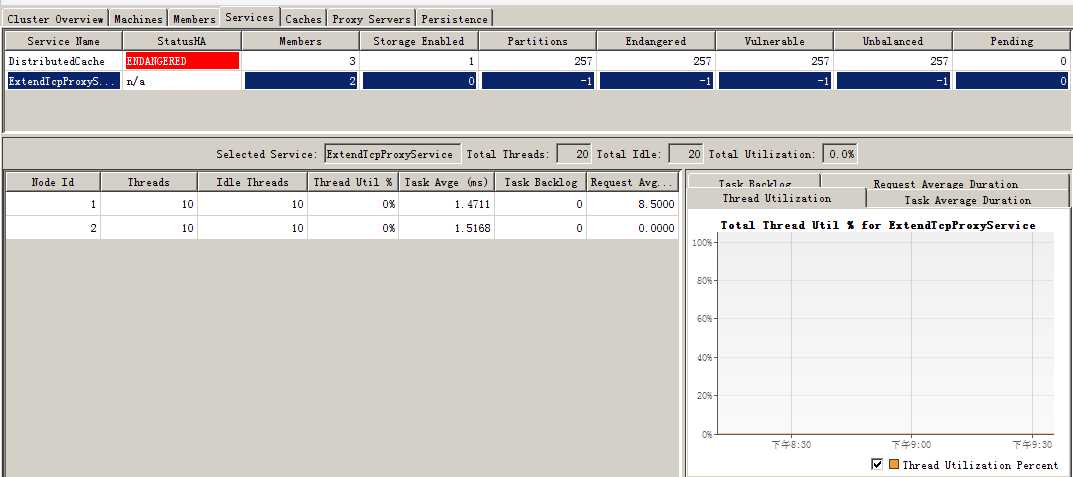
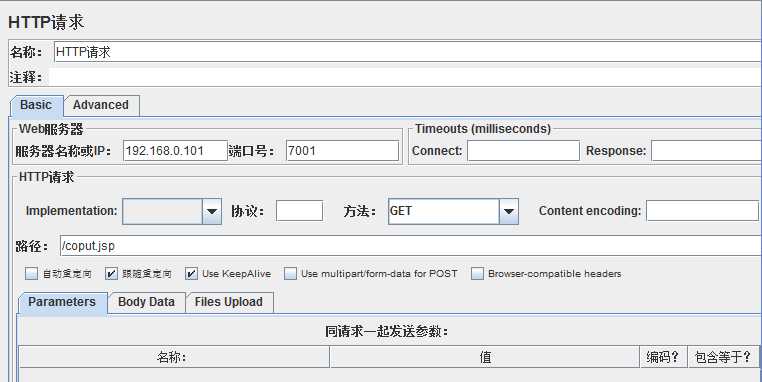
通过jmeter运行20个线程的压力,压力主要压在weblogic server
压力上来时候线程如下
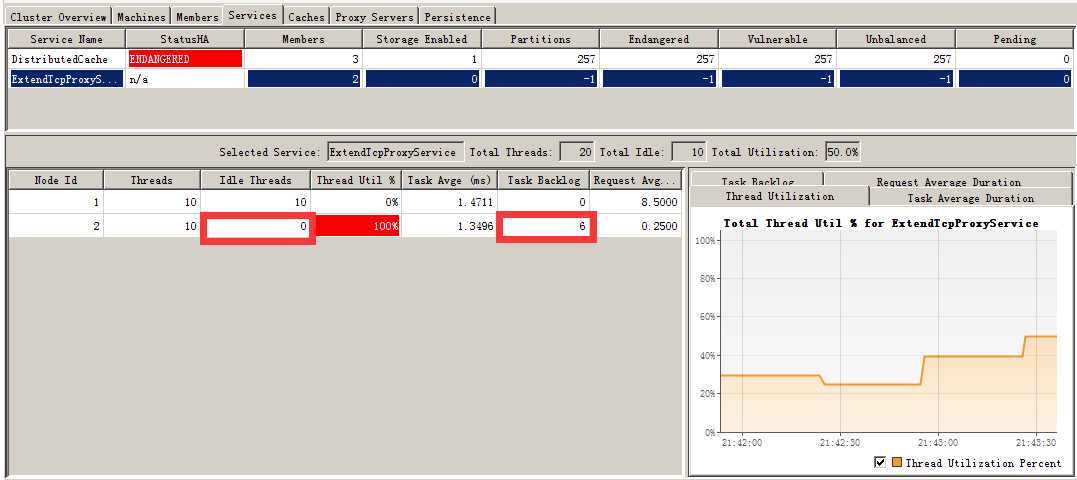
可以看到当空闲线程为0,并且有6个在backlog等待时,都没有分到另外一个proxy.
结论如下:
- Coherence将weblogic server的一个实例当成是一个客户端,并不是基于这个客户端内部的thread进行负载均衡(这不是bug,而是产品设计如此)
- WebLogic Server和Coherence建立的是长连接,除非在超时时间外没有线程访问会断开,在压力比较大的时候,weblogic server会一直用这个连接,并不管这个连接是否已经用完。
- Proxy设置的线程数是有限的,最大512条,proxy占用的资源也是有限的,在压力大的时候可能这个proxy会缓慢甚至挂掉,所以最好的办法还是要把压力分散到不同的proxy上面去。
- 但当多个weblogic实例上来时会进行负载均衡。严格来说,coherence集群是按照client端的NIC和port进行负载均衡的。
修改coput.jsp如下:
也就是会根据不同的thread id,选择加载不同的xml,实现均分。
|
<!DOCTYPE HTML PUBLIC "-//W3C//DTD HTML 4.01 Transitional//EN"
"http://www.w3.org/TR/html4/loose.dtd">
<%@page import="java.util.*"%>
<%@page import="com.tangosol.net.*"%>
<%@ page contentType="text/html;charset=windows-1252"%>
<html>
<head>
<meta http-equiv="Content-Type" content="text/html; charset=windows-1252"/>
<title>setName</title>
</head>
<html>
<body>
<h3>
<%
String mysession;
//private final ClassLoader loader = null;
NamedCache cache12;
ConfigurableCacheFactory factory1 = null;
int threadid = (int)Thread.currentThread().getId();
System.out.println("Thread id="+ threadid);
if ((threadid % 2) == 0) {
factory1 = new DefaultConfigurableCacheFactory("E:\\wls12c\\coherence\\bin\\client-2.xml", Thread.currentThread().getClass().getClassLoader());
} else {
factory1 = new DefaultConfigurableCacheFactory("E:\\wls12c\\coherence\\bin\\client.xml", Thread.currentThread().getClass().getClassLoader());
}
cache12 = factory1.ensureCache("POFSample", Thread.currentThread().getClass().getClassLoader());
for (int i=0;i<10000;i++) {
//String key = "hello";
cache12.put (i, "CacheValue=eric"+i);
}
%>
put 10000 records success.........
</h3>
</body>
</html>
|
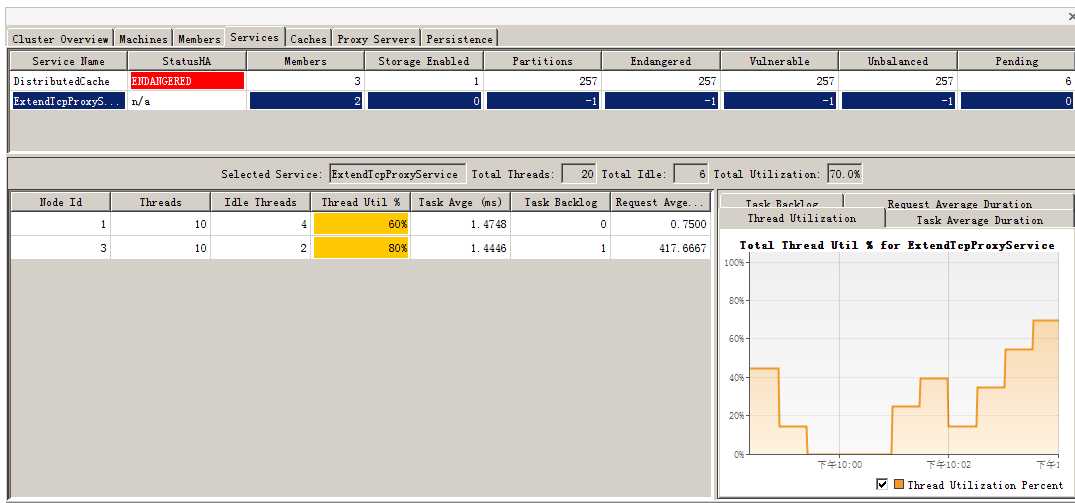
再次进行压力测试,如下:
可以看到压力以及分在两个proxy上.
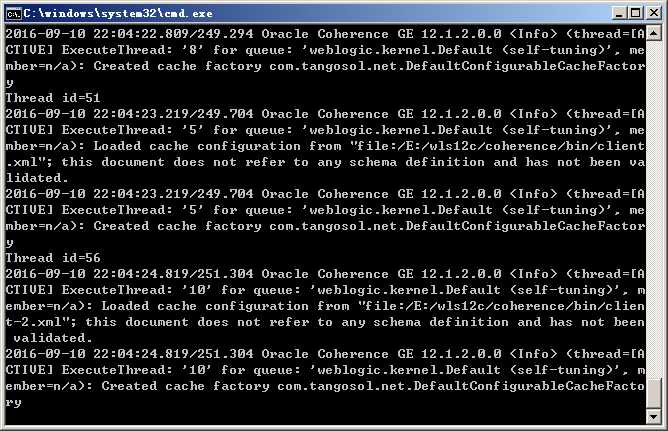
后台weblogic日志,在根据threadid调用.
Coherence代理的负载均衡
标签:
原文地址:http://www.cnblogs.com/ericnie/p/5860447.html