标签:
以下文本及代码基本基于《OpenCV 2.4.13.0 documentation》的How to scan images, lookup tables and time measurement with OpenCV一节,英文好的同学可以直接看原文。
颜色压缩(Color Reduction)最简单的理解就是减少表示图像的颜色数目,我们都知道,8位位深的3通道RGB真彩图像包括了1600多万(16777216)的颜色数目,其实在某些应用中用不到这么多数量(例如图像传输(transmission)、分割(segmentation)、压缩(compression))的颜色。这也是一个研究的小方向,想了解更多,可以阅读文章Adaptive Color Reduction,Color reduction and estimation of the number of dominant colors by using a self-growing and self-organized neural gas 。
在这里,我们实现一个很简单的方法:

I_old 为输入的像素值,I_new为输出的像素值,divideWidth代表要减少的度,我们可以理解为当divideWidth为128的时候,对于灰度图像就做的是一个阈值为128的二值化。
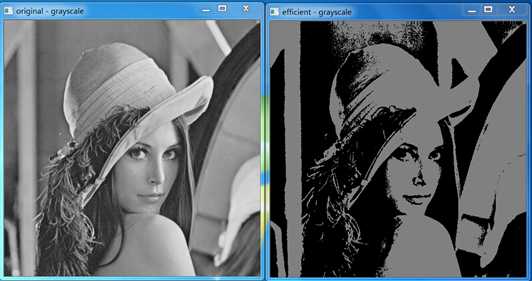
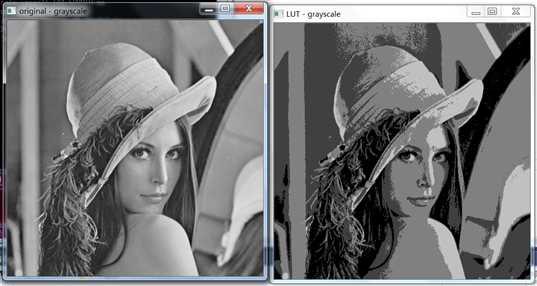
上点图更直观一点,左边为灰度原始图像,右边为输出图像:
当divideWidth为128时:

当divideWidth为64时:

根据以上描述,实际上这个公式我们可以建立一个映射表来避免重复计算,对于0-255的有限的输入值,建立输出值的映射表:
// color space divide width
const int divideWidth = 128;
// converting table for reducing color space
uchar table[256];
// first, we should build the converting table
for (int i = 0; i < 256; i++)
{
table[i] = (uchar)(divideWidth * (i / divideWidth));
}
我们的测试程序做的就是:
1. 读入一幅灰度图像和一幅RGB彩色图像;
2. 按照下文描述的四种访问像素的方式来实现这个算法;
3. 多次分别跑算法,取平均,对四种访问像素的方式进行对比。
首先大致说明下图像数据如何在内存中存储。Mat是OpenCV2.x版本以上基本的图像类型,Mat可以视为一个矩阵,矩阵的大小依赖于该Mat是什么颜色空间(Color Space),比如最基本的灰度(Gray scale)或者RGB,CMYK,YCbCr等,因为这决定了该Mat具有多少个通道,一般来讲,灰度图像只有一个通道,而RGB图像具有三个通道。
对于灰度图像来讲,图像数据在内存中的存储如图所示:

对于多通道图像来讲,有几个通道,每一列就包含多少个子列。对于经常使用的基于RGB颜色空间,其图像数据存储如下:

需要注意的是通道的顺序是BGR而非RGB。
一般而言,图像数据的每一行在内存中都是连续存储的,因为这样对于遍历图像数据更高效。Mat提供了isContinuous()函数来获取是否是连续存储的数据。
OpenCV提供了两个简单的函数,getTickCount()和getTickFrequency()。getTickCount返回从操作系统启动到当前所经的计时周期数,类型为int64。getTickFrequency返回每秒的计时周期数,类型为double。因此就可以用如下的代码计算以秒为单位的两个操作所耗费的时间:
double dtime = (double) getTickCount();
// do something
dtime = ((double)getTickCount() - dtime)/getTickFrequency();
这种方式基于.ptr和C的[]操作,这种方式也是比较推荐的遍历图像的方式。
/** @Method 1: the efficient method
 accept grayscale image and RGB image */
int ScanImageEfficiet(Mat & image)
{
	// channels of the image
	int iChannels = image.channels();
	// rows(height) of the image
	int iRows = image.rows;
	// cols(width) of the image
	int iCols = image.cols * iChannels;

	// check if the image data is stored continuous
	if (image.isContinuous())
	{
		iCols *= iRows;
		iRows = 1;
	}

	uchar* p;
	for (int i = 0; i < iRows; i++)
	{
		// get the pointer to the ith row
		p = image.ptr<uchar>(i);
		// operates on each pixel
		for (int j = 0; j < iCols; j++)
		{
			// assigns new value
			p[j] = table[p[j]];
		}
	}

	return 0;
}
这里获取一个指向每一行的指针,然后遍历这一行所有的数据。当图像数据是连续存储的时候,只需要取一次指针,然后就可以遍历整个图像数据。
相较于高效的方式需要自己来计算需要遍历的数据量,以及当图像的行与行之间数据不连续的时候需要跳过一些间隙。迭代器(iterator)方式提供了一个更安全的访问图像像素的方式。你只需要做的就是声明两个MatIterator_变量,一个指向图像开始,一个指向图像结束,然后迭代。
/** @Method 2: the iterator(safe) method
 accept grayscale image and RGB image */
int ScanImageIterator(Mat & image)
{
	// channels of the image
	int iChannels = image.channels();

	switch (iChannels)
	{
	case 1:
	{
		MatIterator_<uchar> it, end;
		for (it = image.begin<uchar>(), end = image.end<uchar>(); it != end; it++)
		{
			*it = table[*it];
		}
		break;
	}
	case 3:
	{
		MatIterator_<Vec3b> it, end;
		for (it = image.begin<Vec3b>(), end = image.end<Vec3b>(); it != end; it++)
		{
			(*it)[0] = table[(*it)[0]];
			(*it)[1] = table[(*it)[1]];
			(*it)[2] = table[(*it)[2]];
		}
		break;
	}
	}

	return 0;
}
彩色图像的话,由于是三个通道的向量,OpenCV提供了Vec3b的数据类型来存储。
这种方式不推荐用来遍历图像,一般用在要随机访问很少量的图像数据的时候。基本用法就是指定行列号,返回该位置的像素值。不过需要你事先知道返回的数据类型是uchar还是Vec3b或者其他的。
/** @Method 3: random access method
 accept grayscale image and RGB image */
int ScanImageRandomAccess(Mat & image)
{
	// channels of the image
	int iChannels = image.channels();
	// rows(height) of the image
	int iRows = image.rows;
	// cols(width) of the image
	int iCols = image.cols;

	switch (iChannels)
	{
	// grayscale
	case 1:
	{
		for (int i = 0; i < iRows; i++)
		{
			for (int j = 0; j < iCols; j++)
			{
				image.at<uchar>(i, j) = table[image.at<uchar>(i, j)];
			}
		}
		break;
	}
	// RGB
	case 3:
	{
		Mat_<Vec3b> _image = image;
		for (int i = 0; i < iRows; i++)
		{
			for (int j = 0; j < iCols; j++)
			{
				_image(i, j)[0] = table[_image(i, j)[0]];
				_image(i, j)[1] = table[_image(i, j)[1]];
				_image(i, j)[2] = table[_image(i, j)[2]];
			}
		}
		image = _image;
		break;
	}
	}

	return 0;
}
OpenCV大概也考虑到了有很多这种需要改变单个像素值的场合(比如基于单个像素值的亮度变换,gamma矫正等),因此在core模块提供了一个更加高效很一颗赛艇的LUT()函数来进行这种操作而且不需要遍历整个图像。
首先建个映射查找表:
// build a Mat type of the lookup table
Mat lookupTable(1, 256, CV_8U);
uchar* p = lookupTable.data;
for (int i = 0; i < 256; i++)
{
	p[i] = table[i];
}
然后调用LUT()函数:
// call the function
LUT(image, lookupTable, matout);
image是输入图像,matout是输出图像。
测试环境:OpenCV版本3.1.0,Windows 7 64位系统。
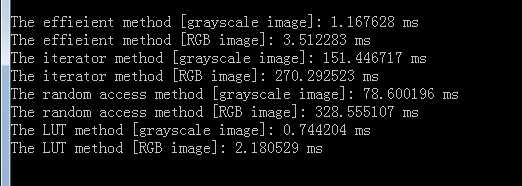
测试图像是512*512的Lena灰度图和512*512的Lena彩色图。分别跑100次不同的方法,然后得到的平均时间如下:

可以看到LUT算法稍优于高效的方法,但都很高效,而迭代器方式与随机访问方式就很慢了。
标签:
原文地址:http://www.cnblogs.com/qdsclove/p/5866867.html