标签:
一.案例描述
1.案例:开发一个打印机程序,模拟打印程序。
2.需求:可以灵活的配置使用彩色墨盒或灰色墨盒。
可以灵活的配置打印页面的大小。
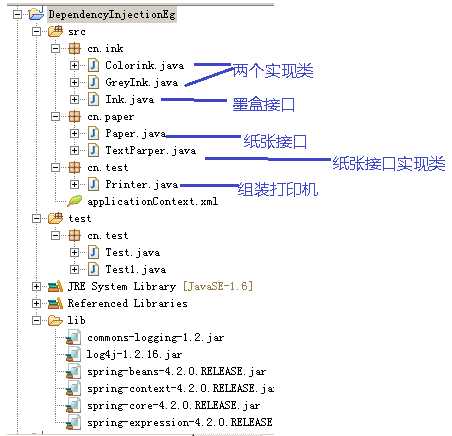
程序中包括打印机(Printer),墨盒(Ink)和纸张(Paper)3类组件。
3.开发步骤:
01.定义Ink和Paper接口。
02.使用Ink接口和Paper接口开发Printer程序,在开发是并不依赖Ink和Paper的实现类。
03.开发Ink接口和Paper接口的实现类:ColorInk,GreyInk和TextPaper。
04.组装打印机,运行调试。
二.开发案例
1.整体架构

2.搭建接口
墨盒接口:Ink
package cn.ink;

/**
 * 墨盒接口
 * @author hyj
 *
 */
public interface Ink {
    /**
     * 定义打印要采用的颜色
     * @param a
     * @param b
     * @param c
     * @return
     */
    public String getColor(int a,int b,int c);
}
纸张接口:Paper
package cn.paper;
/**
 * 纸张接口
 * @author hyj
 *
 */
public interface Paper {
     //用来换行
     public static final String newLine="\r\n";
      /**
       * 输出一个字符到纸张
       * @param c
       */
      public void putInChar(char c);
      /**
       * 得到输出到纸张的内容
       * @return
       */
      public String getContent();
}
3.搭建接口实现类
彩色墨盒Colorink:
package cn.ink;

import java.awt.Color;
/**
 * 彩色墨盒
 * @author hyj
 *
 */
public class Colorink implements Ink{
    @Override
    public String getColor(int a, int b, int c) {
    Color color=new Color(a,b,c);
    return "#"+Integer.toHexString(color.getRGB()).substring(2);
    }
}
灰色墨盒GreyInk:
package cn.ink;

import java.awt.Color;

/**
 * 灰色墨盒
 * @author hyj
 *
 */
public class GreyInk implements Ink{

    @Override
    public String getColor(int a, int b, int c) {
        int d=(a+b+c)/3;
        Color color=new Color(d,d,d);
        return "#"+Integer.toHexString(color.getRGB()).substring(2);
    }

}
纸张接口实现类:TextParper
package cn.paper;

public class TextParper implements Paper {
    //每行字符数
    private int charPerLine=16;
    //每页行数
    private int linePerPage=5;
    //纸张中的内容
    private String content="";
    //当前横向位置,从0到charPerLine-1
    private int posX=0;
    //当前行数,从0到linePerpage-1
    private int posY=0;
    //当前页数
    private int posP=1;


    @Override
    public void putInChar(char c) {
        content+=c;
        ++posX;
        //判断是否换行
        if(posX==charPerLine){
            content+=Paper.newLine;
            posX=0;
            ++posY;
        }
        //判断是否翻页
        if(posY==linePerPage){
            content+="==第"+posP+"页==";
            content+=Paper.newLine+Paper.newLine;
            posY=0;
            ++posP;

        }


    }

    @Override
    public String getContent() {
        String ret=this.content;
        if(!(posX==0&&posY==0)){
            int count=linePerPage-posY;
            for (int i = 0; i <count; i++) {
                ret+=Paper.newLine;
            }
            ret+="==第"+posP+"页==";
        }
        return ret;
    }

    public int getCharPerLine() {
        return charPerLine;
    }

    public void setCharPerLine(int charPerLine) {
        this.charPerLine = charPerLine;
    }

    public int getLinePerPage() {
        return linePerPage;
    }

    public void setLinePerPage(int linePerPage) {
        this.linePerPage = linePerPage;
    }

    public int getPosX() {
        return posX;
    }

    public void setPosX(int posX) {
        this.posX = posX;
    }

    public int getPosY() {
        return posY;
    }

    public void setPosY(int posY) {
        this.posY = posY;
    }

    public int getPosP() {
        return posP;
    }

    public void setPosP(int posP) {
        this.posP = posP;
    }

    public void setContent(String content) {
        this.content = content;
    }

}
4.组装打印机Printer
package cn.test;

import cn.ink.Ink;
import cn.paper.Paper;

/**
 * 打印机
 * @author hyj
 *
 */
public class Printer {
   //墨盒接口
    private Ink ink=null;
     //纸张接口
    private Paper paper=null;
    /**
     * 打印机打印的方法
     * @param str
     */
    public void print(String str){
        System.out.println("使用"+ink.getColor(255, 200, 0)+"颜色打印\n");
        for (int i = 0; i < str.length(); i++) {
            paper.putInChar(str.charAt(i));
        }
        System.out.print(paper.getContent());
    }

    public Ink getInk() {
        return ink;
    }
    public void setInk(Ink ink) {
        this.ink = ink;
    }
    public Paper getPaper() {
        return paper;
    }
    public void setPaper(Paper paper) {
        this.paper = paper;
    }

}
5.书写Spring配置文件:applicationContext.xml
<?xml version="1.0" encoding="UTF-8"?>
<beans xmlns="http://www.springframework.org/schema/beans"
    xmlns:xsi="http://www.w3.org/2001/XMLSchema-instance"
    xsi:schemaLocation="
        http://www.springframework.org/schema/beans http://www.springframework.org/schema/beans/spring-beans.xsd">
     <!-- 定义彩色墨盒bean,id是colorInk -->
    <bean id="colorInk" class="cn.ink.Colorink"></bean>
    <!-- 定义灰色墨盒bean,id是greyInk -->
   <bean id="greyInk" class="cn.ink.GreyInk"></bean>
   <!-- 定义A4纸张bean,id是A4Paper -->
   <!-- 通过setcharperLine()方法为charPerLine属性注入每行字符数 -->
   <!-- 通过setLinePerpage()方法为linePerpage属性注入每页行数 -->
    <bean id="a4Paper" class="cn.paper.TextParper">
        <property name="charPerLine" value="10"></property>
        <property name="linePerPage" value="8"></property>
    </bean>

   <!-- 定义A5纸张bean,id是A5Paper -->
   <!-- 通过setcharperLine()方法为charPerLine属性注入每行字符数 -->
   <!-- 通过setLinePerpage()方法为linePerpage属性注入每页行数 -->
    <bean id="a5Paper" class="cn.paper.TextParper">
        <property name="charPerLine" value="8"></property>
        <property name="linePerPage" value="5"></property>
    </bean>

    <!-- 组装打印机,定义打印机的bean,该bean的id是printer -->
    <bean id="printer" class="cn.test.Printer">
       <!-- 通过ref属性注入已经定义好的bean -->
        <!-- 注入彩色墨盒 -->
          <property name="ink" ref="colorInk"></property>
        <!-- 注入a5打印纸 -->
        <property name="paper" ref="a5Paper"></property>
    </bean>

</beans>
6.测试类
package cn.test;

import org.springframework.context.ApplicationContext;
import org.springframework.context.support.ClassPathXmlApplicationContext;

/**
 * 测试类
 * @author hyj
 *
 */
public class Test {
  public static void main(String[] args) {
      ApplicationContext context=new ClassPathXmlApplicationContext("applicationContext.xml");
      //通过Printer bean的id来获取Printer实例
      Printer printer = (Printer)context.getBean("printer");
      String content="就是一个傻帽,在问另一群傻帽最好笑的笑话是傻帽,然后一个不傻帽的人来回答说:就是一个傻帽,在问另一群傻帽最好笑的笑话是傻帽!!!";
      printer.print(content);
  }
}
标签:
原文地址:http://www.cnblogs.com/heyongjun1997/p/5881047.html