标签:
研究接入facebook也有不短的时间, 上线过几款产品,这里把接入所有的点 都记录一下。
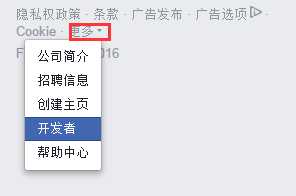
1.首先进入facebook的开发者页面,直接入口在右下角更多里面

然后注册开发者账号, 创建APP 选择Facebook Canvas
然后得到app编号 和密钥。
2.配置Canvas

这里添加的地址必须是 https的,而且不能是静态页面。

  <script>
        window.fbAsyncInit = function () {
            FB.init({
                appId: ‘830298307005763‘,
                xfbml: true,
                version: ‘v2.3‘
            });
            FB.login(function (response) {
                if (response.authResponse) {
                    // user sucessfully logged in
                    var accessToken = response.authResponse.accessToken;
                    if (accessToken)
                        window.location.href = "CallBack.aspx?accessToken=" + accessToken + "&userID=" + response.authResponse.userID + "&expiresIn=" + response.authResponse.expiresIn;
                }
            }, { scope: ‘email‘ });
            function onLogin(response) {
                if (response.status == ‘connected‘) {
                    FB.api(‘/me?fields=first_name‘, function (data) {
                        var welcomeBlock = document.getElementById(‘fb-welcome‘);
                        welcomeBlock.innerHTML = ‘Hello, ‘ + data.first_name + ‘!‘;
                    });
                }
            }

            FB.getLoginStatus(function (response) {
                // Check login status on load, and if the user is
                // already logged in, go directly to the welcome message.
                if (response.status == ‘connected‘) {
                    onLogin(response);
                } else {
                    // Otherwise, show Login dialog first.
                    FB.login(function (response) {
                        onLogin(response);
                    }, { scope: ‘user_friends, email‘ });
                }
            });
            // ADD ADDITIONAL FACEBOOK CODE HERE
        };

        (function (d, s, id) {
            var js, fjs = d.getElementsByTagName(s)[0];
            if (d.getElementById(id)) { return; }
            js = d.createElement(s); js.id = id;
            js.src = "//connect.facebook.net/en_US/sdk.js";
            fjs.parentNode.insertBefore(js, fjs);
        } (document, ‘script‘, ‘facebook-jssdk‘));


</script>
在Callback页面 引用fb的 jsSDK,然后使用页面跳转的方式 将accessToken传到服务端。这一步很重要, 因为有了accessToken才可以调用FB接口换取长效证书。
  var url = "https://graph.facebook.com/oauth/access_token?grant_type=fb_exchange_token&client_id=" + app的编号 +
                  "&client_secret=" + app的密钥 +
                  "&fb_exchange_token=" + accessToken;
 string responseFromServer = wc.DownloadString(url);
string access_token = "";
String[] tokens = responseFromServer.Split(new char[] { ‘&‘ });
//expires:The number of seconds until this access token expires.
foreach (string t in tokens)
{
if (t.IndexOf("access_token") != -1)
{
access_token = t.Split(new char[] { ‘=‘ })[1];
}
}
使用fb的接口就能换取长效证书,并取出来。
用在下面的代码中,获取用户基本信息
   ////获取facebook用户基本信息
                    var url_basic = "https://graph.facebook.com/me?access_token=" + access_token;
                    string responseFromServer_basic = wc.DownloadString(url_basic);
                    string jsonStr_basic = reg.Replace(responseFromServer_basic, delegate(Match m) { return ((char)Convert.ToInt32(m.Groups[1].Value, 16)).ToString(); });

                    ////获取facebook用户好友信息
                    var url_friends = "https://graph.facebook.com/me/friends?access_token=" + access_token;
                    string responseFromServer_friends = wc.DownloadString(url_friends);
到这里 ,接入部分的工作基本结束了。
3.支付
可以先看fb提供的 文档 https://developers.facebook.com/docs/games_payments
首先需要有一个产品信息页, (我这里只做静态定价,不做动态定价因为没有具体需要的业务场景)
这里的内容其实还是动态的, 需要根据支付时所选择的商品来显示。
<!DOCTYPE html><html>
 <head prefix=
    "og: http://ogp.me/ns#
     fb: http://ogp.me/ns/fb#
     product: http://ogp.me/ns/product#">
    <meta property="og:type"                   content="og:product" />
    <meta property="og:title"                  content="Friend Smash Coin" />
    <meta property="og:image"                  content="http://www.friendsmash.com/images/coin_600.png" />
    <meta property="og:description"            content="Friend Smash Coins to purchase upgrades and items!" />
    <meta property="og:url"                    content="http://www.friendsmash.com/og/coins.html" />
    <meta property="product:plural_title"      content="Friend Smash Coins" />
    <meta property="product:price:amount"      content="0.30"/>
    <meta property="product:price:currency"    content="USD"/>
    <meta property="product:price:amount"      content="0.20"/>
    <meta property="product:price:currency"    content="GBP"/>
  </head>
</html>
这个页面其实就是给fb提供用户购买的商品信息。
然后在游戏页面的 商城里用户选择购买商品以后 调用 fb jsSDK的接口
function FacebookCreditsOrder(order_info) { var obj = { method: ‘pay‘, action: ‘purchaseitem‘, product: order_info.url,//产品信息页面的地址 request_id: order_info.pid//产品的id //quantity: 1 }; FB.ui(obj, function (data) { if (data) { var parameter = { "amount": data.amount, "currency": data.currency, "payment_id": data.payment_id, "quantity": data.quantity, "signed_request": data.signed_request, "status": data.status }; if (data.status == ‘completed‘) {// 这里 只处理了支付状态为成功的请求,其实还需要处理“等待中”的状态 var url = "https://**********/FaceBookReceiveOrder.ashx?amount=" + data.amount + "¤cy=" + data.currency + "&payment_id=" + data.payment_id + "&quantity=" + data.quantity + "&signed_request=" + data.signed_request + "&status=" + data.status; new Request(url, { method: "GET", maxTime: 8000 }) .on(‘complete‘, function (e) { var return_obj = JSON.parse(e.text); if (return_obj.State == 1) { closeMall(); } else if (orderinfo_obj.State != 1) { } }).send(); } else { } } }); }
支付页面处理:
需要使用Nuget 获取一个 Facebook的 第三方插件。在处理加密时需要

为了安全,url里所包含的订单信息全不使用, 而使用fb传过来的signed_request 加密参数。这个参数里包含了订单所需的全部信息,需要解密。
FacebookClient client = new FacebookClient();
client.AppId = "*******";//app编号
client.AppSecret = "*********";//app密钥
string signed = context.Request.QueryString["signed_request"];
                object obj = new object();
                client.TryParseSignedRequest(signed, out obj);
 if (obj != null)
                {
                    if (((Facebook.JsonObject)(obj)).TryGetValue("algorithm", out objtoken))
                        payInfo.algorithm = Convert.ToString(objtoken);
                    if (((Facebook.JsonObject)(obj)).TryGetValue("amount", out objtoken))
                        payInfo.amount = Convert.ToString(objtoken);
                    if (((Facebook.JsonObject)(obj)).TryGetValue("currency", out objtoken))
                        payInfo.currency = Convert.ToString(objtoken);
                    if (((Facebook.JsonObject)(obj)).TryGetValue("issued_at", out objtoken))
                        payInfo.issued_at = Convert.ToDecimal(objtoken);
                    if (((Facebook.JsonObject)(obj)).TryGetValue("payment_id", out objtoken))
                        payInfo.payment_id = Convert.ToDecimal(objtoken);
                    if (((Facebook.JsonObject)(obj)).TryGetValue("quantity", out objtoken))
                        payInfo.quantity = Convert.ToString(objtoken);
                    if (((Facebook.JsonObject)(obj)).TryGetValue("status", out objtoken))
                        payInfo.status = Convert.ToString(objtoken);
                    if (((Facebook.JsonObject)(obj)).TryGetValue("request_id", out objtoken))
                        payInfo.request_id = Convert.ToString(objtoken);
}
再根据订单信息 处理添加商品等信息了。
这里可以根据订单id获取 订单的支付情况
具体说明参考文档
https://developers.facebook.com/docs/games_payments/fulfillment
到这里fb的接入基本就完成了。
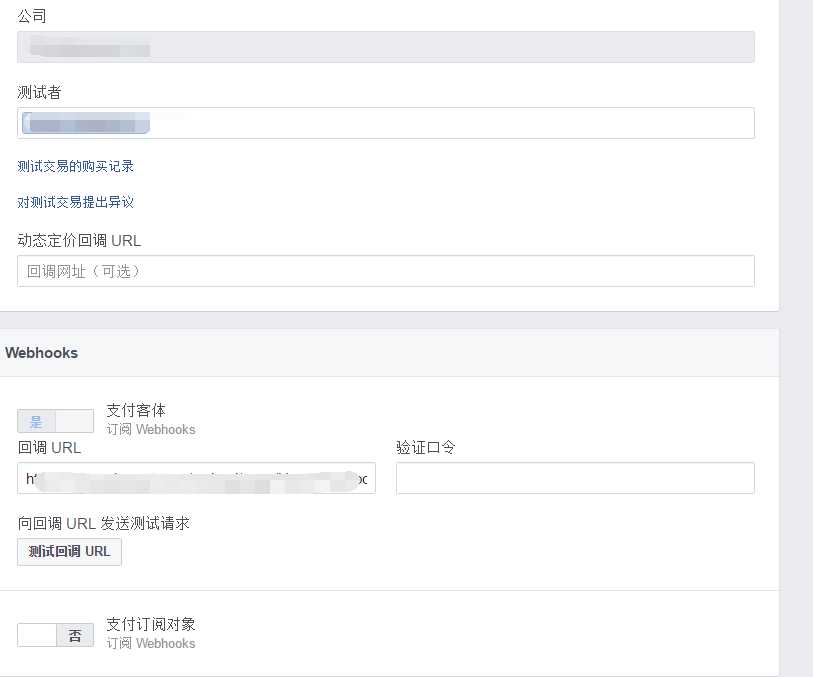
新版的app设置页面中默认是没有支付的,需要开发自己添加。

添加的时候 需要填写公司信息,和 回调url,也就是产品信息页的地址。
可以在测试者里添加开发测试的 数字id。这样就可以不用付款就能测试到支付接口了。

标签:
原文地址:http://www.cnblogs.com/Gavin-wang/p/5885361.html