标签:
python的web框架有Django、Tornado、Flask等多种,Django相较于其他web框架其优势大而全,而框架本身集成了ORM、模型绑定、模板引擎、缓存、session等诸多功能。
其他常用命令
python manage.py runserver 0.0.0.0:port
python manage.py startapp appname
python manage.py syncdb
python manage.py makemigrations
python manage.py migrate
python manage.py createsuperuser
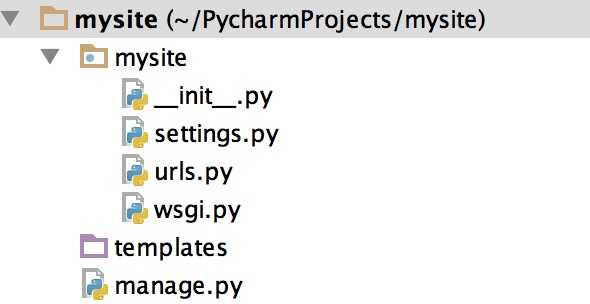
settings.py 配置文件 urls.py 路由映射系统 manage.py Django的启动管理程序
python manage.py startapp app01
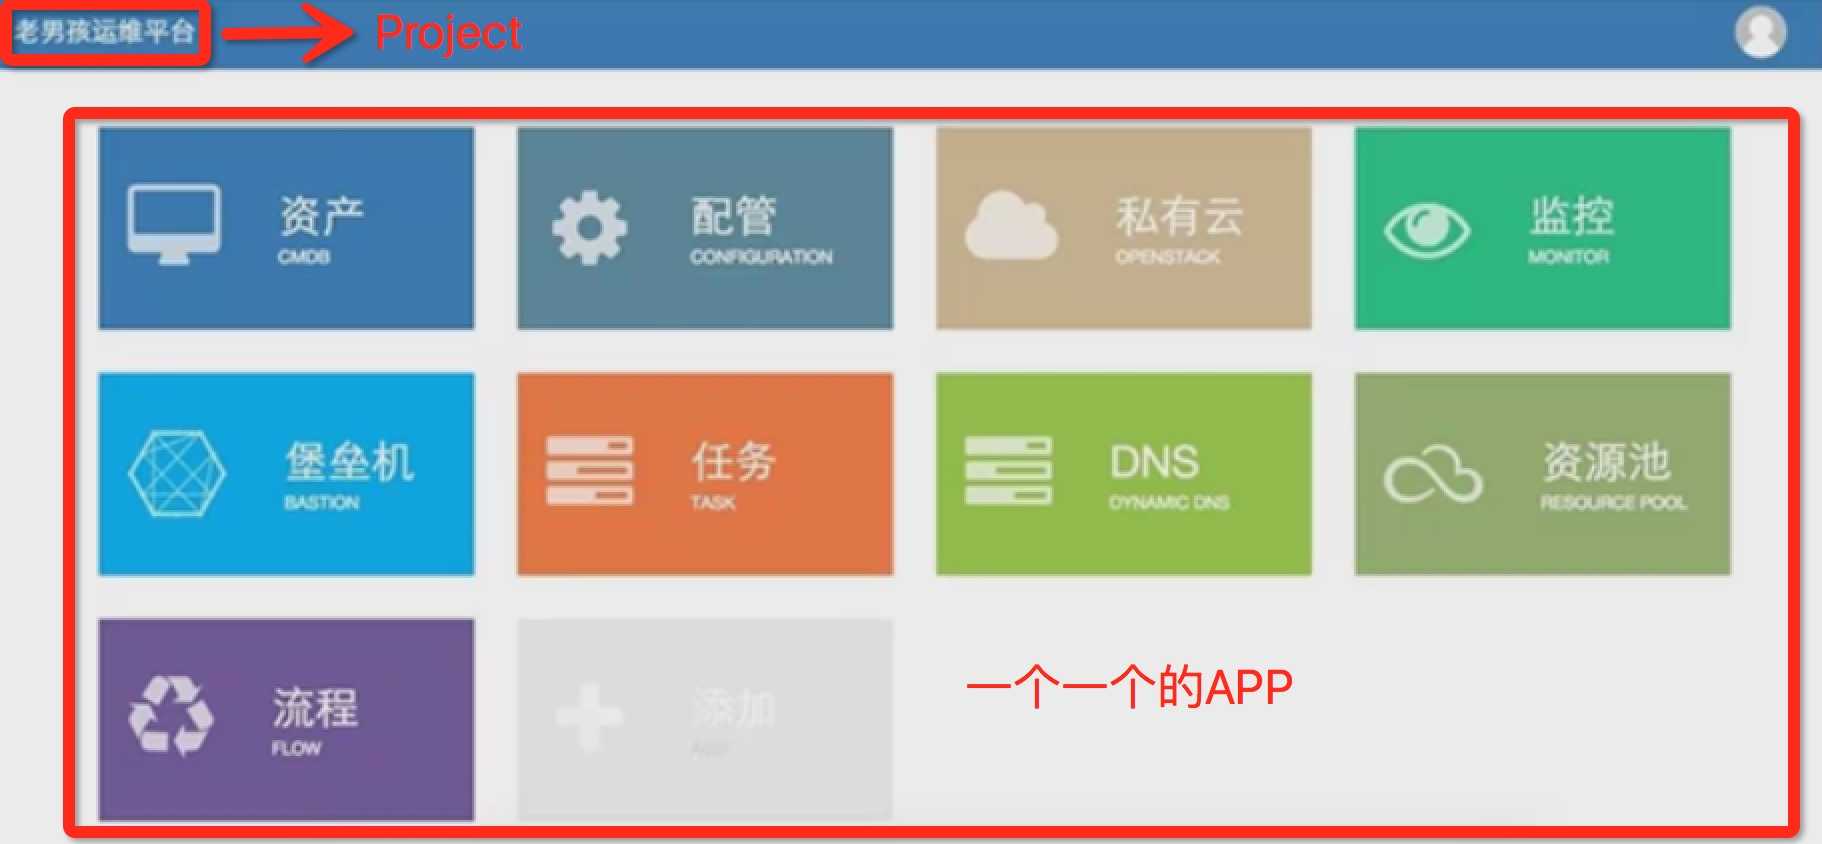
如果在创建一个app,我们可以理解app是手机里的app程序他们之间是完全独立的,好处是降低他们之间的耦合性,不到万不得已不要他们之间建立关系!
app里面的admin是提供了后台管理的平台,test是用来测试的!
同步数据库
python manage.py syncdb

#注意:django1.7.1及以上版本需要用以下命令
python manage.py makemigrations
python manage.py migrate
创建超级用户
python manage.py createsuperuser
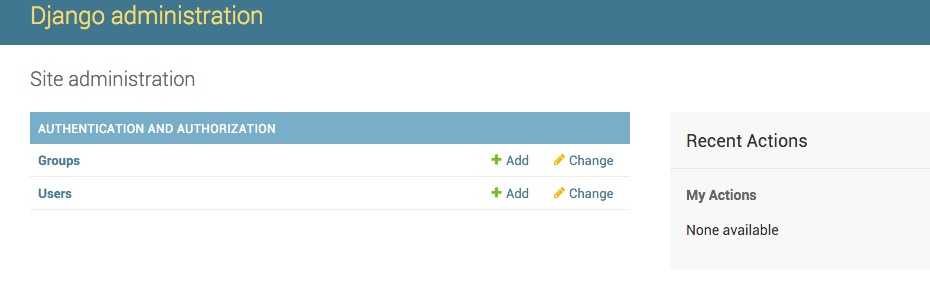
输入你要设置的用户名和密码,然后启动Django,然后输入:http://127.0.0.1:8000/admin/
DATABASES = {
    ‘default‘: {
    ‘ENGINE‘: ‘django.db.backends.mysql‘,
    ‘NAME‘:‘dbname‘,
    ‘USER‘: ‘root‘,
    ‘PASSWORD‘: ‘xxx‘,
    ‘HOST‘: ‘‘,
    ‘PORT‘: ‘‘,
    }
}


# 由于Django内部连接MySQL时使用的是MySQLdb模块,而python3中还无此模块,所以需要使用pymysql来代替
# 如下设置放置的与project同名的配置的 __init__.py文件中

import pymysql
pymysql.install_as_MySQLdb()
TEMPLATE_DIRS = (
        os.path.join(BASE_DIR,‘templates‘),
    )


STATICFILES_DIRS = ( os.path.join(BASE_DIR,‘static‘), )
 # 特有的静态文件夹放在app里面, # 模板里面使用静态文件 <script src="/static/jquery-1.12.4.js"></script>
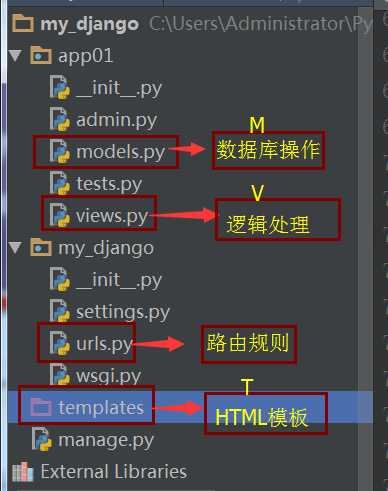
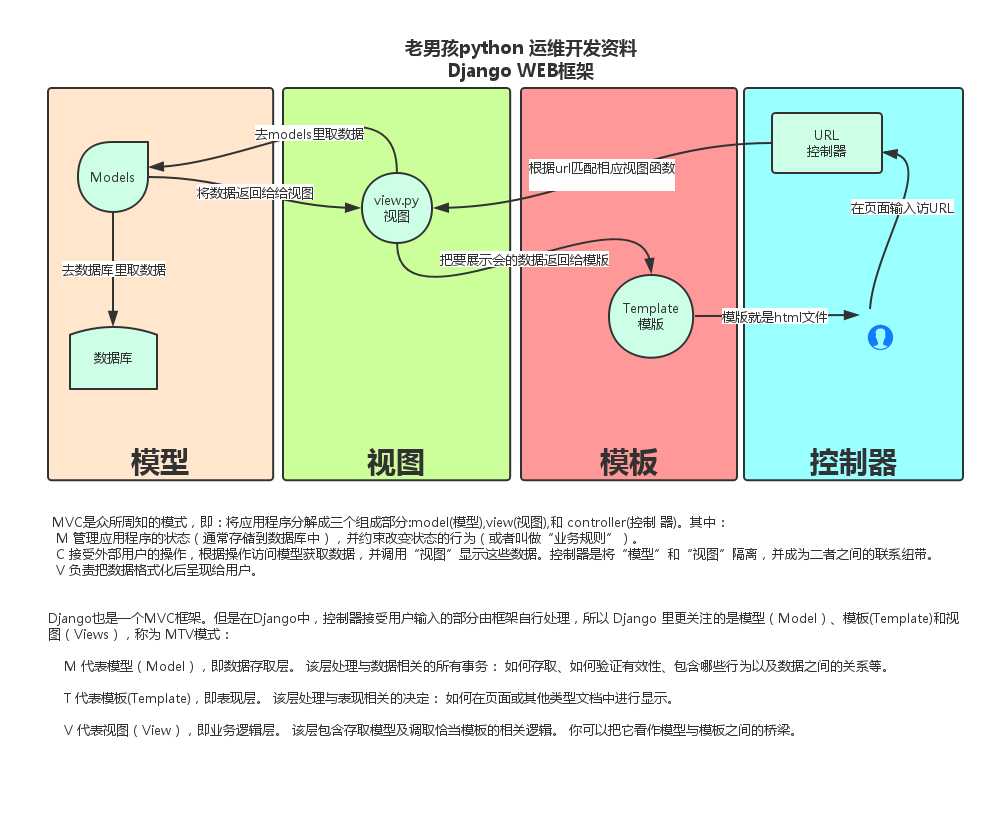
MVC模式:所谓MVC就是把web应用分为模型(M),控制器(C),视图(V)三层,他们之间以一种插件似的,松耦合的方式连接在一起,模型负责业务对象与数据库对象(ORM),视图负责与用户的交互(页面),控制器(C)接受用户的输入调用模型和视图完成用户的请求。 
Django的MTV模式本质与MVC模式没有什么差别,也是各组件之间为了保持松耦合关系,只是定义上有些不同,Django的MTV分别代表:
此外,Django还有一个url分发器,它的作用是将一个个url的页面请求分发给不同的视图函数(View)处理,View再调用相应的Model和Template
参数说明
from django.conf.urls import url

from . import views


urlpatterns = [

    # 一般
    url(r‘^articles/2003/$‘, views.special_case_2003),
    url(r‘^articles/([0-9]{4})/$‘, views.year_archive),
    url(r‘^articles/(?P<year>[0-9]{4})/(?P<month>[0-9]{2})/$‘, views.month_archive),

     # 路由分发(在MyDjango的urls使用include实现路由分发,并在app01下新建urls.py实现url映射)
    url(r‘^contact/‘, include(‘app01.urls‘)),

    # 传给视图的默认参数,对应的视图函数也必须加上同名的参数
    url(r‘^blog/(?P<year>[0-9]{4})/$‘, views.year_archive, {‘foo‘: ‘bar‘}),

    #name参数
    url(r‘^index‘,views.index,name=‘bieming‘),
]
在urls.py里添加对应url关系
from django.conf.urls import patterns, include, url
#首先要从app01里导入views
from app01 import views
from django.contrib import admin
admin.autodiscover()

urlpatterns = patterns(‘‘,
    # Examples:
    # url(r‘^$‘, ‘my_django.views.home‘, name=‘home‘),
    # url(r‘^blog/‘, include(‘blog.urls‘)),

    url(r‘^admin/‘, include(admin.site.urls)),
    url(r‘^index/‘, views.index),
)
并在app里views.py里添加函数
from django.shortcuts import render
#django在返回的时候需要一层封装,需要导入HttpResponse
from django.shortcuts import HttpResponse

# Create your views here.

def index(req):
    return HttpResponse(‘<h1>hello index</h1>‘)
django中的路由系统和其他语言的框架有所不同,在django中每一个请求的url都要有一条路由映射,这样才能将请求交给对一个view中的函数去处理,其他大部分的web框架则是对一类的url请求做一条路由映射,从而使得路由系统变得简洁。
启动:IDE启动和命令行启动(python manage.py runserver 127.0.0.1:6666)
返回html
from django.shortcuts import render
#django在返回的时候需要一层封装,需要导入HttpResponse
from django.shortcuts import HttpResponse

# Create your views here.

# def index(req):
#     return HttpResponse(‘<h1>hello index</h1>‘)

def home(req):
    #找到home.html
    #读取并返回给客户端
    return render(req,‘home.html‘)
最后要记得在settings里面注册app
实例写法:
urlpatterns = patterns(‘‘,
    # Examples:
    # url(r‘^$‘, ‘my_django.views.home‘, name=‘home‘),
    # url(r‘^blog/‘, include(‘blog.urls‘)),

    url(r‘^admin/‘, include(admin.site.urls)),
    #给index这url别名,前端可通过别名来进行提交
    url(r‘^index/‘, views.index,name=‘eric‘,),
    # 在视图函数里添加一个默认参数name,值为alex
    url(r‘^car/‘, views.car, {‘name‘: ‘alex‘}),
    # url(r‘^home/‘, views.home),
)


def index(req):
    if req.method == ‘POST‘:
        username = req.POST.get(‘username‘)
        print(username)
        if username == ‘alex‘:
            return HttpResponse(‘you are de right‘)
        else:
            return HttpResponse(‘error‘)
    return render(req,‘index.html‘)


def car(req,name):
    return HttpResponse(‘car‘+name)


<body>
    <form action="{% url ‘eric‘ %}" method="post">
        {% csrf_token %}
        <input type="text" name="username"/>
        <input type="submit" value="提交"/>
    </form>
</body>
主要围绕HttpRequest对象和Httpresponse对象
# path:       请求页面的全路径,不包括域名
#
# method:     请求中使用的HTTP方法的字符串表示。全大写表示。例如
#
#                    if  req.method=="GET":
#
#                              do_something()
#
#                    elseif req.method=="POST":
#
#                              do_something_else()
#
# GET:         包含所有HTTP GET参数的类字典对象
#
# POST:       包含所有HTTP POST参数的类字典对象
#
#              服务器收到空的POST请求的情况也是可能发生的,也就是说,表单form通过
#              HTTP POST方法提交请求,但是表单中可能没有数据,因此不能使用
#              if req.POST来判断是否使用了HTTP POST 方法;应该使用  if req.method=="POST"
#
#
#
# COOKIES:     包含所有cookies的标准Python字典对象;keys和values都是字符串。
#
# FILES:      包含所有上传文件的类字典对象;FILES中的每一个Key都是<input type="file" name="" />标签中                     name属性的值,FILES中的每一个value同时也是一个标准的python字典对象,包含下面三个Keys:
#
#             filename:      上传文件名,用字符串表示
#             content_type:   上传文件的Content Type
#             content:       上传文件的原始内容
#
#
# user:       是一个django.contrib.auth.models.User对象,代表当前登陆的用户。如果访问用户当前
#              没有登陆,user将被初始化为django.contrib.auth.models.AnonymousUser的实例。你
#              可以通过user的is_authenticated()方法来辨别用户是否登陆:
#              if req.user.is_authenticated();只有激活Django中的AuthenticationMiddleware
#              时该属性才可用
#
# session:    唯一可读写的属性,代表当前会话的字典对象;自己有激活Django中的session支持时该属性才可用。
HttpRequest对象的方法.:get_full_path(),获取相对路径(比如:http://127.0.0.1:8000/index33/?name=123 ,req.get_full_path()得到的结果就是/index33/?name=123)
对于HttpRequest对象来说,是由django自动创建的,但是,HttpResponse对象就必须由我们自己创建,每个视图函数处理请求最后必须返回一个HttpResponse对象(render本质找到html文件,读取文件内容通过HttpResponse对象返回),HttpResponse类必须自行导入
在HttpResponse对象扩展的常用方法:
<body>
    <h1>hello wupeiqi</h1>
    <h1>{{ name }}</h1>
</body>


def index1(req):
    name = ‘alex‘
    # return render(req,‘index.html‘,{‘name‘:‘alex‘})  #渲染,字典传值
    # return redirect(‘http://www.baidu.com‘)  #跳转
    return render_to_response(‘index.html‘,locals())  #locals传值
from django.db import models

# Create your models here.


class UserType(models.Model):
    nid = models.AutoField(primary_key=True)
    caption = models.CharField(max_length=32)


class UserInfo(models.Model):
    user = models.CharField(max_length=16)
    pwd = models.CharField(max_length=16)
    email = models.EmailField()
    userType = models.ForeignKey(UserType)


class Group(models.Model):
    name = models.CharField(max_length=16)
    h2g = models.ManyToManyField(‘Host‘)


class Host(models.Model):
    hostname = models.CharField(max_length=16)
    ip = models.CharField(max_length=16)
from django.contrib import admin
from app01 import models

# Register your models here.
admin.site.register(models.UserInfo)
admin.site.register(models.UserType)
admin.site.register(models.Group)
admin.site.register(models.Host)
#  第一种方式创建
    # usertype = models.UserType(caption=‘管理员‘)
    # usertype.save()

    # 第二种方式创建
    # models.UserType.objects.create(caption=‘普通用户‘)

    # 第三种
    # userTypeDict = {‘caption‘: ‘协管员‘}
    # models.UserType.objects.create(**userTypeDict)

    # 带外键添加数据库 推荐使用
    # userInfoDict = {
    #     ‘user‘: ‘jason‘,
    #     ‘email‘: ‘jason123@qq.com‘,
    #     ‘pwd‘: ‘123‘,
    #     ‘userType_id‘: 2,
    # }

    # userInfoDict = {
    #     ‘user‘: ‘jason2‘,
    #     ‘email‘: ‘jason26663@qq.com‘,
    #     ‘pwd‘: ‘123‘,
    #     ‘userType‘: models.UserType.objects.filter(nid=2).first(),
    # }

    # models.UserInfo.objects.create(**userInfoDict)
    # 删除
    # models.UserType.objects.filter(nid=3).delete()
    # 修改
    # models.UserType.objects.filter(nid=1).update(caption=‘超级管理员‘)
    # 查询 查询结果是QuerySet
    # ret = models.UserType.objects.all()    # select会获取所有的映射
    # print(type(ret), ret, ret.query)       # ret 里面保存的是对象

    # ret = models.UserType.objects.all().values(‘nid‘)  # 获取指定映射
    # print(type(ret), ret, ret.query)        # ret 里面保存的是字典

    # ret = models.UserType.objects.all().values_list(‘nid‘)  # 获取指定映射
    # print(type(ret), ret, ret.query)  # ret 里面保存的是元祖
一对多查找操作
# 连表 双下划线使用,注意什么情况下使用 表名_set 什么情况下使用 表名__字段
    # (表名_set 获取QuerySet对象) (表名__字段,查找过滤映射的时候用)

    # 正向查找,再多的一方查找一的一方
    # ret = models.UserInfo.objects.all().values(‘user‘, ‘userType__caption‘)
    # print(ret)

    # ret = models.UserInfo.objects.filter(userType__caption="普通用户").values(‘user‘, ‘userType__caption‘)
    # print(ret)

    # 反向查找 在一的一方查找多的一方
    # 在获取了一对多中一那一方的对象之后,要获取多的那一方对象使用反向表名_set
    # ret = models.UserType.objects.filter(caption=‘普通用户‘).first()
    # print(ret.nid, ret.userinfo_set, ret.userinfo_set.all(), ret.userinfo_set.all()[0].user)

    # 直接在一对多一那一方使用查找或者过滤映射的时候使用反向表名__字段
    # ret = models.UserType.objects.all().values(‘caption‘, ‘userinfo__user‘)
    # print(ret)
建立一对一(外键,唯一)
user_type = models.Foreignkey("UserType",unique=True)

user_type = models.OneToOneField("UserType")
多对多操作
‘‘‘
        创建表:
        直接使用m2m
        自已定义第三张表
        自已定义第三张表 + m2m(through) 可以通过through参数来指明存在的表

        直接使用m2m
            --- 获取值
            add添加
            remove删除(关系表),filter.delete()(关系表+..)
            set设置(添加、删除)
            get_or_create
            update_or_create

        自已定义第三张表 + m2m + through
            --关系表只能获取值 filter,all...
            通过第三张表进行操作


    ‘‘‘
    ‘‘‘
        # 直接使用
        class Host(models.Model):
            hid = models.AutoField(primary_key=True)
            hostname = models.CharField(max_length=32)
            ip =  models.CharField(max_length=32)
            # h2g = models.ManyToManyField(‘Group‘)
        class Group(models.Model):
            gid = models.AutoField(primary_key=True)
            name = models.CharField(max_length=16)

            h2g = models.ManyToManyField(‘Host‘)


        # 自定义第三张表
        # class Host(models.Model):
        #     hid = models.AutoField(primary_key=True)
        #     hostname = models.CharField(max_length=32)
        #     ip =  models.CharField(max_length=32)
        #     # h2g = models.ManyToManyField(‘Group‘, through=‘HostToGroup‘)
        # class Group(models.Model):
        #     gid = models.AutoField(primary_key=True)
        #     name = models.CharField(max_length=16)
        #
        #     h2g = models.ManyToManyField(‘Host‘)
        #
        # class HostToGroup(models.Model):
        #     hgid = models.AutoField(primary_key=True)
        #     host_id = models.ForeignKey(‘Host‘)
        #     group_id = models.ForeignKey(‘Group‘)
        #     status = models.IntegerField()
        #     class Meta:
        #         # index_together = ("host_id",‘goup_id‘) 组合索引
        #         unique_together = [
        #             (‘host_id‘, ‘group_id‘),             组合唯一索引
        #         ]

    ‘‘‘
多对多方法
反向,不存在多对多字段一方获取对象---对象.对方表名_set.set() 数据修改(之前有,现有--保留;之前有,现无--删除;之前无,现有--添加,四个字--去旧照新),clear=True,全删了,然后再添加
# 将多台机器分给一组 正向
    # obj = models.Group.objects.get(id=1)

    # hosts = models.Host.objects.filter(id__gt=2)
    # obj.h2g.add(*hosts)

    # host = models.Host.objects.get(id=2)
    # obj.h2g.add(host)

    # 给多个组分一台机器 反向
    # h = models.Host.objects.get(id=1)
    # h.group_set.add(*models.Group.objects.filter(id__gt=2))
    # h.group_set.add(2)   # 可以直接添加id或对象


    # h.group_set.remove(*models.Group.objects.filter(id__gt=3))  # 只删除关系表
    # h.group_set.filter(id__gt=2).delete()  # group_id>2 的关系表删除了,相应的group表数据也被删除了

    # h.group_set.set(models.Group.objects.filter(id__gt=1), clear=True) #大于1的全部清除在添加

    # h.group_set.set(models.Group.objects.filter(id__gt=2))  # 大于2 以前存在的不清除,不存在的添加

    # h.group_set.set(models.Group.objects.filter(id__gt=4))  # 小于5的被清除

    # r = h.group_set.update_or_create(name=‘人事部‘)  # 两张表都不存在,先在group表创建在添加到关系表中去
    # print(r)

    # r = h.group_set.update_or_create(name=‘pm‘)         # 和上面的效果一样,为什么

    # h.group_set.get_or_create(name=‘te‘)    # 和上面的效果一样
一次性插多条数据
author_list = []
   for i in range(7):
       name = ‘alex‘ + str(i)
       age = i
       author = models.Author(name=name, age=age)
       author_list.append(author)
   models.Author.objects.bulk_create(author_list)

1、models.AutoField  自增列 = int(11)
  如果没有的话,默认会生成一个名称为 id 的列,如果要显示的自定义一个自增列,必须将给列设置为主键 primary_key=True。
2、models.CharField  字符串字段
  必须 max_length 参数
3、models.BooleanField  布尔类型=tinyint(1)
  不能为空,Blank=True
4、models.ComaSeparatedIntegerField  用逗号分割的数字=varchar
  继承CharField,所以必须 max_lenght 参数
5、models.DateField  日期类型 date
  对于参数,auto_now = True 则每次更新都会更新这个时间;auto_now_add 则只是第一次创建添加,之后的更新不再改变。
6、models.DateTimeField  日期类型 datetime
  同DateField的参数
7、models.Decimal  十进制小数类型 = decimal
  必须指定整数位max_digits和小数位decimal_places
8、models.EmailField  字符串类型(正则表达式邮箱) =varchar
  对字符串进行正则表达式
9、models.FloatField  浮点类型 = double
10、models.IntegerField  整形
11、models.BigIntegerField  长整形
  integer_field_ranges = {
    ‘SmallIntegerField‘: (-32768, 32767),
    ‘IntegerField‘: (-2147483648, 2147483647),
    ‘BigIntegerField‘: (-9223372036854775808, 9223372036854775807),
    ‘PositiveSmallIntegerField‘: (0, 32767),
    ‘PositiveIntegerField‘: (0, 2147483647),
  }
12、models.IPAddressField  字符串类型(ip4正则表达式)
13、models.GenericIPAddressField  字符串类型(ip4和ip6是可选的)
  参数protocol可以是:both、ipv4、ipv6
  验证时,会根据设置报错
14、models.NullBooleanField  允许为空的布尔类型
15、models.PositiveIntegerFiel  正Integer
16、models.PositiveSmallIntegerField  正smallInteger
17、models.SlugField  减号、下划线、字母、数字
18、models.SmallIntegerField  数字
  数据库中的字段有:tinyint、smallint、int、bigint
19、models.TextField  字符串=longtext
20、models.TimeField  时间 HH:MM[:ss[.uuuuuu]]
21、models.URLField  字符串,地址正则表达式
22、models.BinaryField  二进制
23、models.ImageField   图片
24、models.FilePathField 文件
1、null=True
  数据库中字段是否可以为空
2、blank=True
  django的 Admin 中添加数据时是否可允许空值
3、primary_key = False
  主键,对AutoField设置主键后,就会代替原来的自增 id 列
4、auto_now 和 auto_now_add
  auto_now   自动创建---无论添加或修改,都是当前操作的时间
  auto_now_add  自动创建---永远是创建时的时间
5、choices
GENDER_CHOICE = (
        (u‘M‘, u‘Male‘),
        (u‘F‘, u‘Female‘),
    )
gender = models.CharField(max_length=2,choices = GENDER_CHOICE)
6、max_length
7、default  默认值
8、verbose_name  Admin中字段的显示名称
9、name|db_column  数据库中的字段名称
10、unique=True  不允许重复
11、db_index = True  数据库索引
12、editable=True  在Admin里是否可编辑
13、error_messages=None  错误提示
14、auto_created=False  自动创建
15、help_text  在Admin中提示帮助信息
16、validators=[]
17、upload-to
# 获取个数
    #
    # models.Tb1.objects.filter(name=‘seven‘).count()

    # 大于,小于
    #
    # models.Tb1.objects.filter(id__gt=1)              # 获取id大于1的值
    # models.Tb1.objects.filter(id__lt=10)             # 获取id小于10的值
    # models.Tb1.objects.filter(id__lt=10, id__gt=1)   # 获取id大于1 且 小于10的值

    # in
    #
    # models.Tb1.objects.filter(id__in=[11, 22, 33])   # 获取id等于11、22、33的数据
    # models.Tb1.objects.exclude(id__in=[11, 22, 33])  # not in

    # contains
    #
    # models.Tb1.objects.filter(name__contains="ven")
    # models.Tb1.objects.filter(name__icontains="ven") # icontains大小写不敏感
    # models.Tb1.objects.exclude(name__icontains="ven")

    # range
    #
    # models.Tb1.objects.filter(id__range=[1, 2])   # 范围bettwen and

    # 其他类似
    #
    # startswith,istartswith, endswith, iendswith,

    # order by
    #
    # models.Tb1.objects.filter(name=‘seven‘).order_by(‘id‘)    # asc
    # models.Tb1.objects.filter(name=‘seven‘).order_by(‘-id‘)   # desc

    # limit 、offset
    #
    # models.Tb1.objects.all()[10:20]

    # group by
    from django.db.models import Count, Min, Max, Sum
    # models.Tb1.objects.filter(c1=1).values(‘id‘).annotate(c=Count(‘num‘))
    # SELECT "app01_tb1"."id", COUNT("app01_tb1"."num") AS "c" FROM "app01_tb1" WHERE "app01_tb1"."c1" = 1 GROUP BY "app01_tb1"."id"
# F 使用查询条件的值
    #
    # from django.db.models import F
    # models.Tb1.objects.update(num=F(‘num‘)+1)

    # Q 构建搜索条件
    from django.db.models import Q
    # con = Q()
    #
    # q1 = Q()
    # q1.connector = ‘OR‘
    # q1.children.append((‘id‘, 1))
    # q1.children.append((‘id‘, 10))
    # q1.children.append((‘id‘, 9))
    #
    # q2 = Q()
    # q2.connector = ‘OR‘
    # q2.children.append((‘c1‘, 1))
    # q2.children.append((‘c1‘, 10))
    # q2.children.append((‘c1‘, 9))
    #
    # con.add(q1, ‘AND‘)
    # con.add(q2, ‘AND‘)
    #
    # models.Tb1.objects.filter(con)

    #
    # from django.db import connection
    # cursor = connection.cursor()
    # cursor.execute("""SELECT * from tb where name = %s""", [‘Lennon‘])
    # row = cursor.fetchone()
<!DOCTYPE html>
<html lang="en">
<head>
    <meta charset="UTF-8">
    <title>Title</title>
    <style>
        .left{
            float: left;
        }
        .clearfix:after{
            content: ‘.‘;
            clear: both;
            display: block;
            visibility: hidden;
            height: 0;
        }
    </style>
</head>
<body>
    <div class="condition">
        <div class="item clearfix">
            <div class="icon left" onclick="AddCondition(this);">+</div>
            <div class="left">
                <select onchange="ChangeName(this);">
                    <option value="name">书名</option>
                    <option value="book_type__caption">图书类型</option>
                    <option value="price">价格</option>
                    <option value="pages">页数</option>
                </select>
            </div>
            <div class="left"><input type="text" name="name" /></div>
        </div>
    </div>
    <div>
        <input type="button" onclick="Search();" value="搜索" />
    </div>

    <div class="container">

    </div>


    <script src="/static/jquery-1.12.4.js"></script>
    <script>
        function  AddCondition(ths) {
            var new_tag = $(ths).parent().clone();
            new_tag.find(‘.icon‘).text(‘-‘);
            new_tag.find(‘.icon‘).attr(‘onclick‘, ‘RemoveCondition(this);‘);

            $(ths).parent().parent().append(new_tag);
        }
        function  RemoveCondition(ths) {
            $(ths).parent().remove();
        }
        function ChangeName(ths) {
            var v = $(ths).val();
            $(ths).parent().next().find(‘input‘).attr(‘name‘,v);
        }
        function Search() {
            var post_data_dict = {};

            // 获取所有input的内容,提交数据
            $(‘.condition input‘).each(function () {
                // console.log($(this)[0])
                var n = $(this).attr(‘name‘);
                var v = $(this).val();
                var v_list = v.split(‘,‘);
                post_data_dict[n] = v_list;
            });
            console.log(post_data_dict);
            var post_data_str = JSON.stringify(post_data_dict);
            $.ajax({
                url: ‘/index/‘,
                type: ‘POST‘,
                data: { ‘post_data‘: post_data_str},
                dataType: ‘json‘,
                success: function (arg) {
                    // 字符串 "<table>" +
                    if(arg.status){
                        var table = document.createElement(‘table‘);
                        table.setAttribute(‘border‘,1);
                        // [{,name,pubdate,price,caption},]
                        $.each(arg.data, function(k,v){
                            var tr = document.createElement(‘tr‘);

                            var td1 = document.createElement(‘td‘);
                            td1.innerText = v[‘name‘];
                            var td2 = document.createElement(‘td‘);
                            td2.innerText = v[‘price‘];
                            var td3 = document.createElement(‘td‘);
                            td3.innerText = v[‘book_type__caption‘];
                            var td4 = document.createElement(‘td‘);
                            td4.innerText = v[‘pubdate‘];
                            tr.appendChild(td1);
                            tr.appendChild(td2);
                            tr.appendChild(td3);
                            tr.appendChild(td4);

                            table.appendChild(tr);
                        });

                        $(‘.container‘).empty();
                        $(‘.container‘).append(table);
                    }else{
                        alert(arg.message);
                    }

                }

            })
        }
    </script>
</body>
</html>
from django.db import models

# Create your models here.


class Author(models.Model):
    name = models.CharField(max_length=32)
    age = models.IntegerField()


class BookType(models.Model):
    caption = models.CharField(max_length=32)


class Book(models.Model):
    name = models.CharField(max_length=64)
    price = models.DecimalField(max_digits=10, decimal_places=2)
    pubdate = models.DateField()

    authors = models.ManyToManyField(Author)
    book_type = models.ForeignKey(BookType)
from django.shortcuts import render,HttpResponse
from app01 import models
# Create your views here.
import json
def test(request):
    # models.BookType.objects.create(caption=‘技术‘)
    # models.BookType.objects.create(caption=‘文学‘)
    # models.BookType.objects.create(caption=‘动漫‘)
    # models.BookType.objects.create(caption=‘男人装‘)

    # models.Book.objects.create(name=‘文艺复兴‘,pages=‘100‘,price=‘40‘,pubdate=‘1992-11-2‘,book_type_id=‘1‘)
    # models.Book.objects.create(name=‘解密‘,pages=‘80‘,price=‘10‘, pubdate=‘2016-6-10‘,book_type_id=‘2‘)
    # models.Book.objects.create(name=‘刀锋‘,pages=‘50‘,price=‘3‘, pubdate=‘2014-02-16‘,book_type_id=‘2‘)
    # models.Book.objects.create(name=‘查令十字路84号‘,pages=‘260‘,price=‘40‘,pubdate=‘1999-10-12‘,book_type_id=‘3‘)
    # models.Book.objects.create(name=‘红楼‘,pages=‘1000‘,price=‘500‘, pubdate=‘1760-1-1‘,book_type_id=‘3‘)
    # models.Book.objects.create(name=‘将夜‘,pages=‘2000‘,price=‘300‘, pubdate=‘2010-3-3‘,book_type_id=‘1‘)
    # models.Book.objects.create(name=‘mysql从删库到跑路‘,pages=‘20‘,price=‘10‘,pubdate=‘1998-9-2‘,book_type_id=‘4‘)
    # models.Book.objects.create(name=‘马克思主义‘,pages=‘50‘,price=‘100‘,pubdate=‘1937-3-3‘,book_type_id=‘2‘)

    return HttpResponse(‘ok‘)

import json
from datetime import date
from datetime import datetime
from decimal import Decimal
class JsonCustomEncoder(json.JSONEncoder):

    def default(self, field):

        if isinstance(field, datetime):
            return field.strftime(‘%Y-%m-%d %H:%M:%S‘)
        elif isinstance(field, date):
            return field.strftime(‘%Y-%m-%d‘)
        elif isinstance(field, Decimal):
            return str(field)
        else:
            return json.JSONEncoder.default(self, field)

def index(request):
    if request.method == ‘POST‘:
        ret = {‘status‘: False, ‘message‘: ‘‘, ‘data‘:None}
        try:
            post_data = request.POST.get(‘post_data‘,None)
            post_data_dict = json.loads(post_data)
            print(post_data_dict)
            # {‘name‘: [‘11‘, ‘sdf‘],‘price‘: [‘11‘, ‘sdf‘]}
            # 构造搜索条件
            from django.db.models import Q
            con = Q()
            for k,v in post_data_dict.items():
                q = Q()
                q.connector = ‘OR‘
                for item in v:
                    q.children.append((k, item))
                con.add(q, ‘AND‘)
            """
            ret = models.Book.objects.filter(con)
            print(ret) # queryset,[对象]

            from django.core import serializers
            data = serializers.serialize("json", ret)   # 这种方法获取到的图书类型是id不是book_type__caption
            print(type(data),data)
            # 字符串
            """
            """
            #ret = models.Book.objects.filter(con).values(‘name‘,‘book_type__caption‘)
            ret = models.Book.objects.filter(con).values_list(‘name‘, ‘book_type__caption‘)
            print(ret,type(ret))
            li = list(ret)
            data = json.dumps(li)
            print(data,type(data))
            """
            result = models.Book.objects.filter(con).values(‘name‘,‘price‘,‘pubdate‘,‘book_type__caption‘)
            # ret = models.Book.objects.filter(con).values_list(‘name‘, ‘book_type__caption‘)
            li = list(result)
            ret[‘status‘] = True
            ret[‘data‘] = li
        except Exception as e:
            ret[‘message‘] = str(e)
        ret_str = json.dumps(ret, cls=JsonCustomEncoder)
        return HttpResponse(ret_str)
    return render(request, ‘index.html‘)
上面已经可以正常的返回html,我们要给他使用模板语言进行渲染怎么渲染?和jinja2是一样的
from django.shortcuts import render
#django在返回的时候需要一层封装,需要导入HttpResponse
from django.shortcuts import HttpResponse

# Create your views here.

# def index(req):
#     return HttpResponse(‘<h1>hello index</h1>‘)

def home(req):
    #找到home.html
    #读取并返回给客户端

    #定义一个字典然后传给render
    dic = {‘name‘:‘alex‘,‘age‘:‘50‘,‘user_list‘:[‘shuai‘,‘ge‘,‘hen‘,‘shuai‘],}
    return render(req,‘home.html‘,dic)
html
<!DOCTYPE html>
<html lang="en">
<head>
    <meta charset="UTF-8">
    <title>Title</title>
</head>
<body>
    <div style="background:blue">
        {{ name }}
        {{ age }}
    </div>
    <div style="background:red">
        <ul>
            {% for item in user_list %}
                <li>{{ item }}</li>
            {% endfor %}
        </ul>
    </div>
</body>
</html>
2、自定义模板语言方法
光有上面模板方法肯定是不能满足我们的需求,所以有了自定义方法
{% load xx %}
xx.py(自定义simple_tag)
from django import template
from django.utils.safestring import mark_safe
from django.template.base import resolve_variable,Node,TemplateSyntaxError


register = template.Library()

@register.simple_tag
def my_simple_time(v1,v2,v3):
    return v1+v2+v3

@register.simple_tag
def my_input(id,arg):
    result = "<input type=‘text‘ id=‘%s‘ class=‘%s‘/>"%(id,arg,)
    return mark_safe(result)
html:
{% load xx %}
<!DOCTYPE html>
<html lang="en">
<head>
    <meta charset="UTF-8">
    <title>Title</title>
    <style>
        .hide{
            display:none;
        }
    </style>
</head>
<body>
    <h1>simple_tag</h1>
    {% my_input 123 ‘hide‘ %}
    <input type="button" onclick="show();"/>
    {% my_simple_time 1 2 3 %}
<script>
    function show(){
        var inp = document.getElementById(‘123‘);
        inp.classList.remove(‘hide‘);
    }
</script>
</body>
</html>
xx.py(filter)
from django import template
from django.utils.safestring import mark_safe
from django.template.base import resolve_variable,Node,TemplateSyntaxError


register = template.Library()

@register.filter
def detail(value,arg):
    allcount,remainder = arg.split(‘,‘)
    allcount = int(allcount)
    remainder = int(remainder)
    if value % allcount == remainder:
        return True
    return False

@register.filter
def func(val1,val2):
    if val1 + val2 == 2:
        return True
    return False
html:
{% load xx %}
<!DOCTYPE html>
<html lang="en">
<head>
    <meta charset="UTF-8">
    <title>Title</title>
</head>
<body>
    <h1>filter</h1>
    <div>
{#        {% if 1|func:1 %}#}
{#            <h1>bingo</h1>#}
{#        {% endif %}#}

        {% for item in detail_list %}
            {% if forloop.counter|detail:"4,0" %}
                <div>
                    <p>{{ item.name }}</p>
                </div>
            {% endif %}
        {% endfor %}
    </div>
<script>

</script>
</body>
</html>
views.py
from django.shortcuts import render

def test(request):
    detail = [{‘name‘:‘alex‘},{‘name‘:‘eric‘},{‘name‘:‘seven‘},{‘name‘:‘nick‘},{‘name‘:‘caijing‘}]
    return render(request,‘test.html‘,{‘detail_list‘:detail})
两种自定义方式对比
标签:
原文地址:http://www.cnblogs.com/xinsiwei18/p/5905646.html
