龙果运维平台开源项目地址:
https://github.com/roncoo/roncoo-cmdb
龙果运维平台安装使用视频教程:
http://www.roncoo.com/course/view/a2d58fe08172447696412fb7af1de620
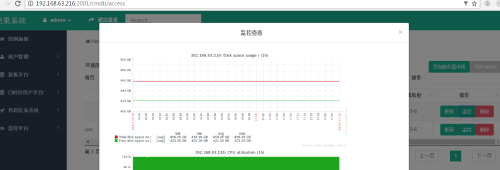
今天把运维平台加上图形功能,就是把zabbix的图片整合到CMDB平台;当然要是想要非常美观的显示图形的话也是不要建议这样做;参考了好几篇博客之后,自己也写篇总结文档:
主要思路是:
1、找到zabbix图片对应的url。
2、读取URL的所有内容生成jpg文件。
3、遍历图片目录把图片文件返回前端js整合。
1、打开zabbix,找到图片的路径:
http://192.168.63.216/zabbix/chart2.php?graphid=567&period=60&stime=20160907160153&updateProfile=1&profileIdx=web.screens&profileIdx2=567&width=1224&sid=0afbe713bbeb0519&screenid=&curtime=1473237848932
*我们所要获取的关键参数是
*graphid:图形IP。
*stime:开始时间;默认我们出当前时间。
*period:时间长度:以秒为单位。
2、我们需要获取的就是graphid而已,所以通过zabbix_client模块把id给获取出来,风格跟我之前写的api管理zabbix一致,大家可以自行查看:
def get_graphid(self,hostid):
data = {
"selectGraphs": ["graphid","name"],
"filter":{"hostid": hostid}
}
ret = self.zb.host.get(**data)
return ret[0][‘graphs‘]
3、通过传入的graphid生成jpg图片文件,脚本:
#!/usr/bin/env python
# -*- coding: utf-8 -*-
from . import app , jsonrpc
import util
import json, traceback
import datetime
import cookielib, urllib2,urllib
class Zabbix_api():
def__init__(self,url="http://192.168.63.216/zabbix/index.php",name="Admin",password="zabbix"):
self.url=url
self.name=name
self.passwd=password
#初始化的时候生成cookies
cookiejar = cookielib.CookieJar()
urlOpener =urllib2.build_opener(urllib2.HTTPCookieProcessor(cookiejar))
values ={"name":self.name,‘password‘:self.passwd,‘autologin‘:1,"enter":‘Signin‘}
data = urllib.urlencode(values)
request = urllib2.Request(url, data)
try:
urlOpener.open(request,timeout=10)
self.urlOpener=urlOpener
except urllib2.HTTPError, e:
print e
defGetGraph(self,url="http://192.168.63.216/zabbix/chart2.php",values={‘width‘:800, ‘height‘: 200, ‘graphid‘: ‘564‘, ‘stime‘: ‘20160907090409‘, ‘period‘:3600},image_dir="/tmp"):
data=urllib.urlencode(values)
request = urllib2.Request(url,data)
url = self.urlOpener.open(request)
image = url.read()
imagename="%s/%s_%s.jpg" %(image_dir, values["graphid"], values["stime"])
f=open(imagename,‘wb‘)
f.write(image)
return ‘1‘
if __name__ == "__main__":
graph = Zabbix_api()
values = {‘width‘: 800, ‘height‘: 200, ‘graphid‘:‘564‘, ‘stime‘: ‘20160907090409‘, ‘period‘: 3600}
graph.GetGraph("http://192.168.63.216/zabbix/chart2.php",values,"/tmp")
4、后端程序处理,返回结果之后和前端结合吧图形加载到html即可:
js处理请求:
/*点击监控按钮,获取监控数据*/
$("tbody").on(‘click‘,‘.monitor-btn‘,function(){
var id = $(this).attr(‘data-id‘)
var url ="/getapi?method="+"graph"+"&id="+id
$.getJSON(url,function(data){
data = JSON.parse(data[‘result‘])
console.log(data)
if (data[‘code‘]==0){
var str = ‘‘
$.each(data.result,function(n,value){
str+=‘<img src=\‘#\‘" /><br >‘
})
console.log(str)
$("#graph").html(str)
$(‘#monitor‘).modal(‘show‘)
}else{
swal("Error",data[‘errmsg‘], "error")
}
})
})
5、html页面:
<!--监控查看 -->
<div id="monitor" class="modal fadetext-center">
<divstyle="display: inline-block; width: 60%;">
<div class="modal-content">
<div>
<button type="button"class="close" data-dismiss="modal"aria-label="Close"><spanaria-hidden="true">×</span></button>
<h4class="modal-title">监控查看</h4>
</div><!--modal-header end-->
<div>
<p hidden id="errorMsg"class="text-danger" style="color:red">监控查看</p> <!-- foe error msg-->
<formclass="form-horizontal" id="ChangePasswdForm">
<input id="passwdid"type="hidden" name="passwdid"> <!--updateneed id-->
<divclass="form-group">
<div id="graph">
</div>
</div>
<divclass="form-group">
<divclass="modal-footer">
<button data-dismiss="modal">退出</button>
</div>
</div><!--button end-->
</form>
</div><!-- /.modal-body-->
</div><!-- /.modal-content -->
</div><!-- /.modal-dialog -->
</div><!-- /.modal -->
6、生成效果,在CMDB点击监控时候跳出相关监控图形方便查看:
或者也有运维工程师习惯把生成的图片用html的方式发送发送到邮箱也是可以数显的,主要是图片已经生成后续的操作也非常简单了。
本文出自 “11132517” 博客,请务必保留此出处http://11142517.blog.51cto.com/11132517/1863027
原文地址:http://11142517.blog.51cto.com/11132517/1863027