标签:des style blog http color java 使用 os
该文主要记录下maven下载安装以及简单使用。
全文目录为:
1、maven下载
2、maven安装
3、maven简单概念
3.1、maven本地仓库
3.2、maven局域网内私服仓库nexus
3.3、maven第三方仓库
3.4、maven中央仓库
4、maven常用命令
5、maven+nexus私服简单演示例子
正文内容为:
1、maven下载
从maven官方网站下载tar.gz包解压到本机即可。
Maven官方下载地址为:http://maven.apache.org/
从maven官方网站下载完成后,将maven放到本地硬盘目录下,设置maven环境变量。
下载地址为:http://maven.apache.org/download.cgi
比如,下载3.1.1版本放到本地目录为:D:\apache-maven-3.1.1
2、maven安装
maven不存在什么安装不安装,从官方下载到的tar.gz包解压到本机,然后设定好环境变量即可。
maven环境变量设置为:
M2_HOME:D:\\apache-maven-3.1.1
Path追加:;D:\\apache-maven-3.1.1\\bin
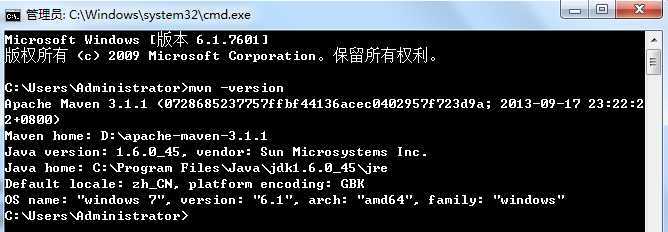
打开windows下cmd窗口,输入:mvn -version查看安装是否成功即可。
截图为:

3、maven简单概念
maven仓库概念简单理解为仓库里边放jar包的地方。任何需要用到的开源jar包,都可以在maven的中央仓库上搜索到。
官方提供的地址为:http://search.maven.org/ 或者 http://mvnrepository.com/
maven依赖找jar包的大致顺序为:
maven本地仓库-->maven私服nexus仓库-->maven中央仓库
即为:若发现本地仓库存在,则不再到maven私服nexus仓库中寻找jar包;
当从maven中央仓库找到jar后,maven会依次下载放到私服nexus仓库,本地仓库。
3.1、maven本地仓库
maven解压到本地D:\\apache-maven-3.1.1目录下,打开D:\\apache-maven-3.1.1\\conf\\settings.xml配置文件
找到本地仓库设置位置,比如,将本地仓库改到D:\\maven_repository目录下
<settings>
...
<localRepository>D:\\maven_repository</localRepository>
...
<settings>
maven默认本地仓库的地址为:
Default: ${user.home}/.m2/repository
3.2、maven局域网内私服仓库nexus
在公司团队开发过程中,经常会使用到一些公共的jar包,但是这些jar又是公司内部私有的,不对外公开的。
这些jar包可以通过团队成员之间拷贝或者ftp或者内部公共服务器存放。这些方式并不完美,maven可以完美解决这个问题。
maven提出了内部的私服仓库,名称为nexus,在内部搭建一个nexus私服比较容易。
官方地址为:http://www.sonatype.org/nexus/go
下载完毕zip包后,解压到本地,找到对应操作系统的版本,然后启动私服nexus即可。
Linux环境通过uname -a查询,windows系统容易得出操作系统版本。
比如,本机是win7 x86_64位系统,解压放到d盘目录下。
D:\\nexus-2.8.1-01 找到win7 对应x86_64启动脚本,启动nexus私服即可。
nexus私服安装遇到的问题为:
http://blog.csdn.net/pk490525/article/details/14228423
本机安装的jdk版本为1.6,nexus2.8.x版本对jdk1.6不支持功能,解决办法为:
重新下载nexus私服,用1.9.x版本,跑在jdk1.6上即可;或者升级jdk版本到1.7。
nexus私服关联java环境
将nexus2.8.x放在d盘目录下,地址为:D:\nexus-2.8.1-01
D:\nexus-2.8.1-01\bin\jsw\conf\wrapper.conf配置文件
设置关联上jdk1.7
wrapper.java.command=C:\Program Files\Java\jdk1.7.0_51\bin\java.exe
nexus私服关联端口号:
默认的jetty端口为8081,要变更要到conf\nexus.properties文件,修改application-port=8081,变更端口号,如下:
application-port=8081
application-host=0.0.0.0
更多nexus私服介绍,后续文章梳理。
3.3、maven第三方仓库
一般Apache之类的第三方开源组织都会提供maven第三方仓库。
3.4、maven中央仓库
maven中央仓库,即为maven repository中央仓库。
更多见:http://search.maven.org/
4、maven常用命令
mvn -verison 查看maven版本信息
mvn eclipse:eclipse 将maven工程处理成Eclipse工程
mvn clean 清理掉target
mvn install maven依赖安装
mvn test 跑单元测试
mvn tomcat:run 跑tomcat
mvn package 打包
mvn deploy 部署
5、maven+nexus私服简单演示例子
此处举例两个例子,maven-hello和maven-world例子。
将maven结合nexus私服做演示处理的,maven-hello jar上传到nexus私服,然后maven-world从nexus去拉jar包。
创建hello maven工程
编写配置文件pom.xml,创建hello maven工程项目,打包hello-1.0.0.jar包,提交到本地maven仓库以及本地搭建的nexus私服上,然后另外创建一个world maven工程依赖私服上的这个hello-1.0.0.jar包。
a.创建maven工程
新建maven工程,先创建pom.xml配置文件,在pom.xml配置文件中修改工程相关参数。
pom.xml配置文件为:
  1 <project xmlns="http://maven.apache.org/POM/4.0.0" xmlns:xsi="http://www.w3.org/2001/XMLSchema-instance"
  2     xsi:schemaLocation="http://maven.apache.org/POM/4.0.0 http://maven.apache.org/xsd/maven-4.0.0.xsd">
  3     <modelVersion>4.0.0</modelVersion>
  4
  5     <groupId>com.nexus.demo</groupId>
  6     <artifactId>nexus-hello</artifactId>
  7     <version>1.0.0</version>
  8     <packaging>jar</packaging>
  9     <name>nexus-hello</name>
 10     <url>http://maven.apache.org</url>
 11
 12     <properties>
 13         <project.build.sourceEncoding>UTF-8</project.build.sourceEncoding>
 14         <slf4j.version>1.7.5</slf4j.version>
 15         <commons-lang.version>2.5</commons-lang.version>
 16         <commons-lang3.version>3.1</commons-lang3.version>
 17         <deploy.dir>/fddDev/fddCodes/</deploy.dir>
 18     </properties>
 19
 20     <dependencies>
 21         <dependency>
 22             <groupId>org.slf4j</groupId>
 23             <artifactId>slf4j-api</artifactId>
 24             <version>${slf4j.version}</version>
 25         </dependency>
 26         <dependency>
 27             <groupId>commons-lang</groupId>
 28             <artifactId>commons-lang</artifactId>
 29             <version>${commons-lang.version}</version>
 30         </dependency>
 31         <dependency>
 32             <groupId>org.apache.commons</groupId>
 33             <artifactId>commons-lang3</artifactId>
 34             <version>${commons-lang3.version}</version>
 35         </dependency>
 36         <dependency>
 37             <groupId>org.apache.maven</groupId>
 38             <artifactId>maven-ant-tasks</artifactId>
 39             <version>2.1.2</version>
 40         </dependency>
 41         <dependency>
 42             <groupId>junit</groupId>
 43             <artifactId>junit</artifactId>
 44             <version>4.8.2</version>
 45             <scope>test</scope>
 46         </dependency>
 47     </dependencies>
 48
 49     <build>
 50         <plugins>
 51             <!-- 编译jdk版本相关插件 -->
 52             <plugin>
 53                 <groupId>org.apache.maven.plugins</groupId>
 54                 <artifactId>maven-compiler-plugin</artifactId>
 55                 <version>2.3.2</version>
 56                 <configuration>
 57                     <source>1.6</source>
 58                     <target>1.6</target>
 59                 </configuration>
 60             </plugin>
 61             <!-- maven静态资源文件插件 -->
 62             <plugin>
 63                 <groupId>org.apache.maven.plugins</groupId>
 64                 <artifactId>maven-resources-plugin</artifactId>
 65                 <version>2.5</version>
 66                 <executions>
 67                     <execution>
 68                         <id>copy-resources</id>
 69                         <phase>package</phase>
 70                         <goals>
 71                             <goal>copy-resources</goal>
 72                         </goals>
 73                         <configuration>
 74                             <encoding>UTF-8</encoding>
 75                             <outputDirectory>${deploy.dir}/conf
 76                             </outputDirectory><!-- 这是目标地址目录, 将编译完后的资源文件拷贝到该目录下-->
 77                             <resources>
 78                                 <resource>
 79                                     <directory>conf/</directory><!-- 待拷贝的资源文件源地址 -->
 80                                     <includes><!-- 可以设定拷贝规则,哪些需要操作,哪些不操作 -->
 81                                         <include>*.xml</include>
 82                                         <include>*.properties</include>
 83                                     </includes>
 84                                 </resource>
 85                             </resources>
 86                         </configuration>
 87                     </execution>
 88                     <execution>
 89                         <id>copy-sh</id>
 90                         <phase>package</phase>
 91                         <goals>
 92                             <goal>copy-resources</goal>
 93                         </goals>
 94                         <configuration>
 95                             <encoding>UTF-8</encoding>
 96                             <outputDirectory>${deploy.dir}/bin
 97                             </outputDirectory><!-- 拷贝启动等相关脚本文件 -->
 98                             <resources>
 99                                 <resource>
100                                     <directory>bin/</directory>
101                                     <includes>
102                                         <include>*.sh</include>
103                                         <include>*.pl</include>
104                                         <include>*.bat</include>
105                                     </includes>
106                                 </resource>
107                             </resources>
108                         </configuration>
109                     </execution>
110                 </executions>
111             </plugin>
112             <!-- maven打jar包插件,打包后不包含pom.xml文件 -->
113             <plugin>
114                 <groupId>org.apache.maven.plugins</groupId>
115                 <artifactId>maven-jar-plugin</artifactId>
116                 <version>2.3.2</version>
117                 <configuration>
118                     <archive>
119                         <addMavenDescriptor>false</addMavenDescriptor>
120                         <!-- Maven在生成jar时,并不知道这个jar是lib还是app,所以使用以下这个插件告之MAVEN这个jar为app,指定main类 -->
121                         <manifest>
122                             <mainClass>com.nexus.hello.ServerMain</mainClass>
123                         </manifest>
124                     </archive>
125                 </configuration>
126                 <executions>
127                     <execution>
128                         <id>jarexclude</id>
129                         <phase>package</phase>
130                         <goals>
131                             <goal>jar</goal>
132                         </goals>
133                         <configuration>
134                             <outputDirectory>${deploy.dir}/lib</outputDirectory>
135                             <excludes>
136                                 <exclude>*.xml</exclude>
137                                 <exclude>*.pl</exclude>
138                                 <exclude>*.sql</exclude>
139                                 <exclude>*.properties</exclude>
140                                 <exclude>*.bat</exclude>
141                                 <exclude>*.conf</exclude>
142                                 <exclude>*.sh</exclude>
143                                 <exclude>*.doc</exclude>
144                             </excludes>
145                         </configuration>
146                     </execution>
147                 </executions>
148             </plugin>
149             <!-- 将项目所有包放到一个指定目录 -->
150             <plugin>
151                 <groupId>org.apache.maven.plugins</groupId>
152                 <artifactId>maven-dependency-plugin</artifactId>
153                 <version>2.3</version>
154                 <executions>
155                     <execution>
156                         <id>copy-dependencies</id>
157                         <phase>package</phase>
158                         <goals>
159                             <goal>copy-dependencies</goal>
160                         </goals>
161                         <configuration>
162                             <outputDirectory>${deploy.dir}/lib</outputDirectory>
163                             <overWriteReleases>false</overWriteReleases>
164                             <overWriteSnapshots>false</overWriteSnapshots>
165                             <overWriteIfNewer>true</overWriteIfNewer>
166                         </configuration>
167                     </execution>
168                 </executions>
169             </plugin>
170         </plugins>
171     </build>
172 </project>
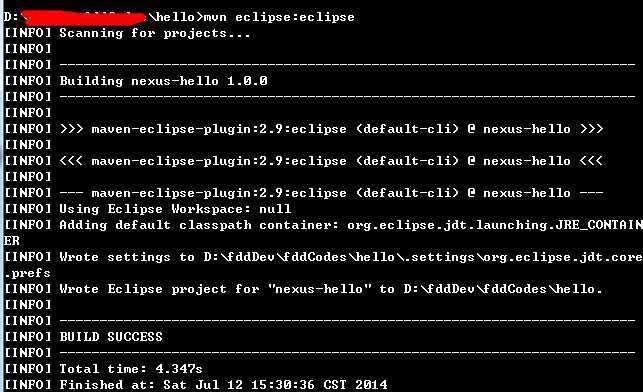
将maven工程创建成Eclipse工程,命令为mvn eclipse:eclipse
然后执行mvn install本地安装会将依赖的jar下载到本地仓库上。
相关截图为:

mvn eclipse:eclipse命令执行,截图为:

mvn install 命令执行
从一个pom.xml文件到生成如图上文件列表
.classpath/.project是mvn eclipse:eclipse命令生成的文件
target文件夹是mvn install命令生成的文件夹,里边放的是安装后生成的文件
b.设置maven配置文件settings.xml
Hello项目并没有特殊要设置的settings.xml配置文件,在上边已经提到了settings.xml的设置处理,包括servers/mirrors设置,hello工程需要将hello.1.0.0.jar演示上传到本地搭建的nexus私服上,因此设置pom.xml配置文件即可。
c.设置maven工程pom.xml文件
将hello-1.0.0.jar上传到私服nexus上,设置pom.xml配置文件,关联到thirdparty仓库中,配置截图为:

id名称为thirdparty要和在settings.xml配置文件中的server id名称保持一致,这样才能通过机器权限的验证逻辑过程。
d.打包部署到私服
通过命令:mvn eclipse:eclipse-->开发-->mvn install-->jar包-->mvn deploy部署到私服nexus上
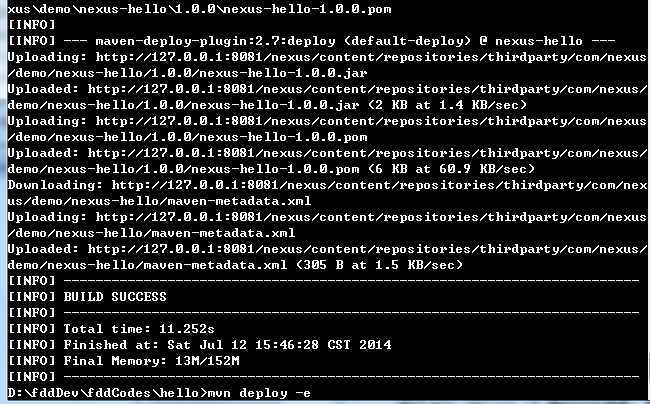
执行mvn deploy -e 输出日志信息,截图为:
提示build成功,到nexus web站点查看jar包看到截图为:

地址为:
http://127.0.0.1:8081/nexus/content/repositories/thirdparty/com/nexus/demo/nexus-hello/
私服nexus上传jar包文件成功,最后查看下本地maven仓库
D:\maven_repository\com\nexus\demo\nexus-hello
也看到了生成的nexus-hello-1.0.0.jar包,说明也是创建成功的。
创建world maven工程
1)创建maven工程
同理创建hello工程,直接修改配置文件即可,world演示工程不需要上传jar到私服,只是需要从私服nexus依赖到之前上传的hello jar包即可。
2)设置maven工程pom.xml文件
将hello工程名称修改为world工程,然后mvn eclipse:eclipse搞成Eclipse工程,干掉pom.xml中的上传私服配置即可。
3)无需打包部署到私服
本地打成jar包,执行mvn install或者mvn package打包命令。
编辑后的pom.xml配置为:
<project xmlns="http://maven.apache.org/POM/4.0.0" xmlns:xsi="http://www.w3.org/2001/XMLSchema-instance"
    xsi:schemaLocation="http://maven.apache.org/POM/4.0.0 http://maven.apache.org/xsd/maven-4.0.0.xsd">
    <modelVersion>4.0.0</modelVersion>

    <groupId>com.nexus.demo</groupId>
    <artifactId>nexus-world</artifactId>
    <version>1.0.0</version>
    <packaging>jar</packaging>
    <name>nexus-world</name>
    <url>http://maven.apache.org</url>

    <properties>
        <project.build.sourceEncoding>UTF-8</project.build.sourceEncoding>
        <slf4j.version>1.7.5</slf4j.version>
        <commons-lang.version>2.5</commons-lang.version>
        <commons-lang3.version>3.1</commons-lang3.version>
        <deploy.dir>/fddDev/fddCodes/nexus-world/</deploy.dir>
    </properties>

    <dependencies>
        <dependency>
            <groupId>com.nexus.demo</groupId>
            <artifactId>nexus-world</artifactId>
            <version>1.0.0</version>
        </dependency>
        <dependency>
            <groupId>org.slf4j</groupId>
            <artifactId>slf4j-api</artifactId>
            <version>${slf4j.version}</version>
        </dependency>
        <dependency>
            <groupId>commons-lang</groupId>
            <artifactId>commons-lang</artifactId>
            <version>${commons-lang.version}</version>
        </dependency>
        <dependency>
            <groupId>org.apache.commons</groupId>
            <artifactId>commons-lang3</artifactId>
            <version>${commons-lang3.version}</version>
        </dependency>
        <dependency>
            <groupId>org.apache.maven</groupId>
            <artifactId>maven-ant-tasks</artifactId>
            <version>2.1.2</version>
        </dependency>
        <dependency>
            <groupId>junit</groupId>
            <artifactId>junit</artifactId>
            <version>4.8.2</version>
            <scope>test</scope>
        </dependency>
    </dependencies>

    <build>
        <plugins>
            <!-- 编译jdk版本相关插件 -->
            <plugin>
                <groupId>org.apache.maven.plugins</groupId>
                <artifactId>maven-compiler-plugin</artifactId>
                <version>2.3.2</version>
                <configuration>
                    <source>1.6</source>
                    <target>1.6</target>
                </configuration>
            </plugin>
            <!-- maven静态资源文件插件 -->
            <plugin>
                <groupId>org.apache.maven.plugins</groupId>
                <artifactId>maven-resources-plugin</artifactId>
                <version>2.5</version>
                <executions>
                    <execution>
                        <id>copy-resources</id>
                        <phase>package</phase>
                        <goals>
                            <goal>copy-resources</goal>
                        </goals>
                        <configuration>
                            <encoding>UTF-8</encoding>
                            <outputDirectory>${deploy.dir}/conf
                            </outputDirectory><!-- 这是目标地址目录, 将编译完后的资源文件拷贝到该目录下-->
                            <resources>
                                <resource>
                                    <directory>conf/</directory><!-- 待拷贝的资源文件源地址 -->
                                    <includes><!-- 可以设定拷贝规则,哪些需要操作,哪些不操作 -->
                                        <include>*.xml</include>
                                        <include>*.properties</include>
                                    </includes>
                                </resource>
                            </resources>
                        </configuration>
                    </execution>
                    <execution>
                        <id>copy-sh</id>
                        <phase>package</phase>
                        <goals>
                            <goal>copy-resources</goal>
                        </goals>
                        <configuration>
                            <encoding>UTF-8</encoding>
                            <outputDirectory>${deploy.dir}/bin
                            </outputDirectory><!-- 拷贝启动等相关脚本文件 -->
                            <resources>
                                <resource>
                                    <directory>bin/</directory>
                                    <includes>
                                        <include>*.sh</include>
                                        <include>*.pl</include>
                                        <include>*.bat</include>
                                    </includes>
                                </resource>
                            </resources>
                        </configuration>
                    </execution>
                </executions>
            </plugin>
            <!-- maven打jar包插件,打包后不包含pom.xml文件 -->
            <plugin>
                <groupId>org.apache.maven.plugins</groupId>
                <artifactId>maven-jar-plugin</artifactId>
                <version>2.3.2</version>
                <configuration>
                    <archive>
                        <addMavenDescriptor>false</addMavenDescriptor>
                        <!-- Maven在生成jar时,并不知道这个jar是lib还是app,所以使用以下这个插件告之MAVEN这个jar为app,指定main类 -->
                        <manifest>
                            <mainClass>com.nexus.hello.ServerMain</mainClass>
                        </manifest>
                    </archive>
                </configuration>
                <executions>
                    <execution>
                        <id>jarexclude</id>
                        <phase>package</phase>
                        <goals>
                            <goal>jar</goal>
                        </goals>
                        <configuration>
                            <outputDirectory>${deploy.dir}/lib</outputDirectory>
                            <excludes>
                                <exclude>*.xml</exclude>
                                <exclude>*.pl</exclude>
                                <exclude>*.sql</exclude>
                                <exclude>*.properties</exclude>
                                <exclude>*.bat</exclude>
                                <exclude>*.conf</exclude>
                                <exclude>*.sh</exclude>
                                <exclude>*.doc</exclude>
                            </excludes>
                        </configuration>
                    </execution>
                </executions>
            </plugin>
            <!-- 将项目所有包放到一个指定目录 -->
            <plugin>
                <groupId>org.apache.maven.plugins</groupId>
                <artifactId>maven-dependency-plugin</artifactId>
                <version>2.3</version>
                <executions>
                    <execution>
                        <id>copy-dependencies</id>
                        <phase>package</phase>
                        <goals>
                            <goal>copy-dependencies</goal>
                        </goals>
                        <configuration>
                            <outputDirectory>${deploy.dir}/lib</outputDirectory>
                            <overWriteReleases>false</overWriteReleases>
                            <overWriteSnapshots>false</overWriteSnapshots>
                            <overWriteIfNewer>true</overWriteIfNewer>
                        </configuration>
                    </execution>
                </executions>
            </plugin>
        </plugins>
    </build>
</project>
先从本地仓库获取,若有则返回,无则到本地私服nexus处获取,若有则返回,无则到外部nexus处获取。为了演示,手动从本地仓库中先移除掉nexus-hello jar包
调试成功,生成了nexus-world-1.0.0.jar文件,maven先从本地仓库发现没有hello jar包,于是到了私服nexus上找到了hello jar下载到本地仓库中。
标签:des style blog http color java 使用 os
原文地址:http://www.cnblogs.com/pinefantasy/p/3911288.html