标签:qpi 自己 对象 操作 加载 res nec inf 界面
在博文http://www.cnblogs.com/hancq/p/5817108.html中介绍了使用空的Qt项目创建带有菜单栏、工具栏的界面。
这里,使用一个简单的图片查看器项目,来熟悉一下Qt的图片显示和基本操作。
该项目分为两部分:
(1)实现图片的打开、关闭、居中显示、上一张/下一张切换
(2)实现图片的放大、缩小、左旋、右旋、另存为等操作
需要用的Qt类:
QFileDialog QImage QPixmap QFileInfo
使用空的Qt项目创建带有菜单栏和工具栏的界面的操作参考博文http://www.cnblogs.com/hancq/p/5817108.html
根据自己的实际需求添加菜单栏和工具栏,参考如下图:
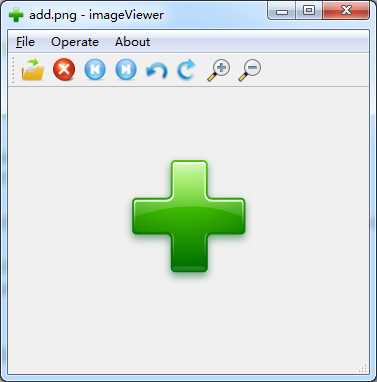
工具栏图标依次是:打开图片、关闭图片、上一张、下一张、左旋、右旋、放大、缩小
此项目算是一个小demo,主要是熟悉图片处理的相关的操作,基础类和操作熟悉之后可以加入复杂的功能。
文件打开和显示的步骤:
(1)使用QFileDislog函数选择一个图片文件,获取到文件的路径名;
(2)使用QImage类加载文件,生成image对象;
(3)使用QLabel类的setPixmap函数将图片显示在界面上。
参考代码如下:
 1 void ImageViewer::openActionTriggered(void)
 2 {
 3     filename = QFileDialog::getOpenFileName(this, tr("Select image:"),
 4         "D:\\Documents\\Pictures", tr("Images (*.png *.bmp *.jpg *.gif)"));
 5     if (filename.isEmpty()) {
 6         return ;
 7     }
 8
 9     QImage image;
10     if (!image.load(filename)) {
11         QMessageBox::information(this, tr("Error"), tr("Open file error"));
12         return ;
13     }
14
15     QPixmap pixmap = QPixmap::fromImage(image);
16     imageSize = pixmap.size();
17
18     imageLabel->setPixmap(pixmap);
19     imageLabel->resize(imageSize);
20     //qDebug() << "filname: " << filename;
21
22     setWindowTitle(QFileInfo(filename).fileName() + tr(" - imageViewer"));
23 }
图片关闭时,只需将label清空即可:
1 void ImageViewer::closeActionTriggered(void)
2 {
3     imageLabel->clear();
4     imageLabel->resize(QSize(200, 100));
5     setWindowTitle(tr("imageViewer"));
6 }
图片打开、关闭的函数,作为QAction的槽函数触发即可:
1     connect(openAction, SIGNAL(triggered(bool)), this, SLOT(openActionTriggered()));
2     connect(closeAction, SIGNAL(triggered(bool)), this, SLOT(closeActionTriggered()));
提示:在图片打开时可以将界面名改为文件名+标题,关闭时去掉文件名,方便用户使用。
通过上述操作,已经可以创建一个label,并将图片显示在label中。
但是会出现各种问题,例如:label在resize时部分尺寸超出页面的大小显示不全、图片不能居中显示等。
需要做以下操作来解决上述问题:
(1)使用QLabel类的setPixmap函数将图片显示在界面上;
(2)创建一个QScrollArea部件,将label加载到scrollarea中;
(3)设置scrollarea部件为中心对齐,无边框;
(4)设置页面布局方式为格点布局,并将scrollarea部件增加到0,0点上。
参考代码:
 1 void ImageShow::setImageShowWidget(void)
 2 {
 3     /* label show image */
 4     imageLabel = new QLabel();
 5
 6     QScrollArea *imageScrollArea = new QScrollArea();
 7     imageScrollArea->setAlignment(Qt::AlignCenter);
 8     imageScrollArea->setFrameShape(QFrame::NoFrame);
 9     imageScrollArea->setWidget(imageLabel);
10
11     QGridLayout *mainLayout = new QGridLayout();
12     mainLayout->addWidget(imageScrollArea, 0, 0);
13     centralWidget->setLayout(mainLayout);
14 }
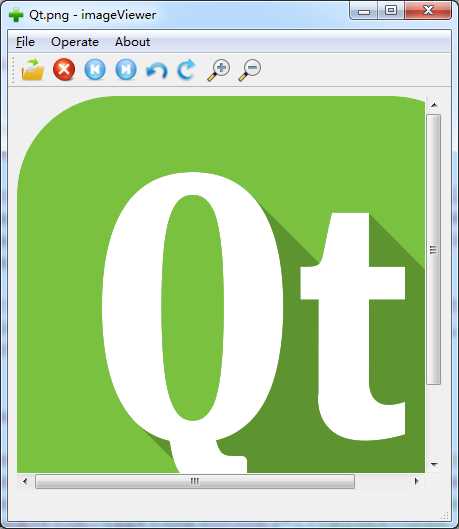
当打开一张图片时,自动居中对齐;当图片大小超过中心窗口尺寸时,scrollarea部件出现滑动条,显示配合放大、缩小功能,显示效果更好。
效果如下图所示:
在打开文件同时,获取到当前目录的文件列表,保存到文件信息链表中。
当需要对打开的文件上、下切换时,只需对当前链表的下表进行轮询并获取图片显示即可。
 1 void ImageViewer::getImgInfoList(QFileInfoList &imgInfoList)
 2 {
 3     imgInfoList.clear();
 4
 5     QDir dir = QFileInfo(filename).absolutePath();
 6     QFileInfoList infoList = dir.entryInfoList(QDir::Files);
 7     //qDebug() << "GET:" << infoList.count() << dir;
 8
 9     QFileInfo info;
10     for (int i = 0; i < infoList.count(); i++) {
11         info = infoList.at(i);
12         //qDebug() << i << info.absolutePath();
13         QString suffix = info.suffix();
14
15         if (suffix == "jpg" || suffix == "bmp" || suffix == "png") {
16             imgInfoList.append(info);
17             //qDebug() << "getImgInfoList:" << i << info.absolutePath() << info.suffix();
18         }
19     }
20
21     QFileInfo curImageInfo = QFileInfo(filename);
22     for (int j = 0; j < imgInfoList.count(); j++) {
23         info = imgInfoList.at(j);
24         if (info.fileName() == curImageInfo.fileName()) {
25             index = j;
26             //qDebug() << "curImage index:" << index;
27         }
28     }
29 }
在菜单栏和工具栏增加上一张/下一张按钮,实现QAction行为触发。
实现步骤:
(1)使用QFileInfoList链表保存下已经打开的文件所在路径下所有的图片文件的信息;
(2)记录下当前文件的下表,上一张/下一张时间触发时,对下标进行增减;
(3)获取到文件路径和文件名;
(4)重新构造image对象,加载图片文件并显示。
参考代码:
 1 void ImageViewer::lastActionTriggered(void)
 2 {
 3     //getImgInfoList(imgInfoList);
 4
 5     index = index - 1;
 6     int count = imgInfoList.count();
 7     //qDebug() << "left count: " << count << "index: " << index;
 8     if (index < 0) {
 9         index = count - 1;
10     }
11
12     filename.clear();
13     filename.append(path);
14     filename += "/";
15     filename += imgInfoList.at(index).fileName();
16     //qDebug() << "filname: " << filename;
17
18     QImage image;
19     if (!image.load(filename)) {
20         QMessageBox::information(this, tr("Error"), tr("Open file error"));
21         return ;
22     }
23
24     QPixmap pixmap = QPixmap::fromImage(image);
25     imageSize = pixmap.size();
26
27     imageLabel->setPixmap(pixmap);
28     imageLabel->resize(imageSize);
29
30     setWindowTitle(QFileInfo(filename).fileName() + tr(" - imageViewer"));
31 }
32
33 void ImageViewer::nextActionTriggered(void)
34 {
35     //getImgInfoList(imgInfoList);
36
37     index = index + 1;
38     int count = imgInfoList.count();
39     //qDebug() << "right count: " << count << "index: " << index;
40     if (index == count) {
41         index = 0;
42     }
43
44     filename.clear();
45     filename.append(path);
46     filename += "/";
47     filename += imgInfoList.at(index).fileName();
48     //qDebug() << "filname: " << filename;
49
50     QImage image;
51     if (!image.load(filename)) {
52         QMessageBox::information(this, tr("Error"), tr("Open file error"));
53         return ;
54     }
55
56     QPixmap pixmap = QPixmap::fromImage(image);
57     imageSize = pixmap.size();
58
59     imageLabel->setPixmap(pixmap);
60     imageLabel->resize(imageSize);
61
62     setWindowTitle(QFileInfo(filename).fileName() + tr(" - imageViewer"));
63 }
需要注意的地方:
(1)图片关闭、上一张、下一张操作是在图片打开成功之后才能操作,所以误点按钮导致程序崩溃,需要加使能操作。
(2)此处图片对象的创建没有使用new操作,理由是需要手动delete比较麻烦;直接使用局部变量,编译器会自动释放资源。
(3)此处使用空的Qt模板创建,不使用系统的ui文件,需要手动初始化菜单栏、工具栏和中心窗口等。
本文为原创博文,转载请注明作者及出处,更新链接:http://www.cnblogs.com/hancq/p/6016400.html
标签:qpi 自己 对象 操作 加载 res nec inf 界面
原文地址:http://www.cnblogs.com/hancq/p/6016400.html