标签:custom nbsp 提交 cti height 看不见 npos point tail
Bootstrap-dialog实现表格内容的增,删,改。
插件引入:必须先引入jquery和bootstrap和artTemplate。
<link rel="stylesheet" href="${ctx}/assets/plugins/bootstrap-dialog/css/bootstrap-dialog.min.css">
<script src="${ctx}/assets/plugins/bootstrap-dialog/js/bootstrap-dialog.min.js"></script>
<script src="${ctx}/assets/js/app-jquery-dialog.js"></script>  //自写的插件,结合ajax。
增:
点击新增订单:弹出如图所示的弹框。
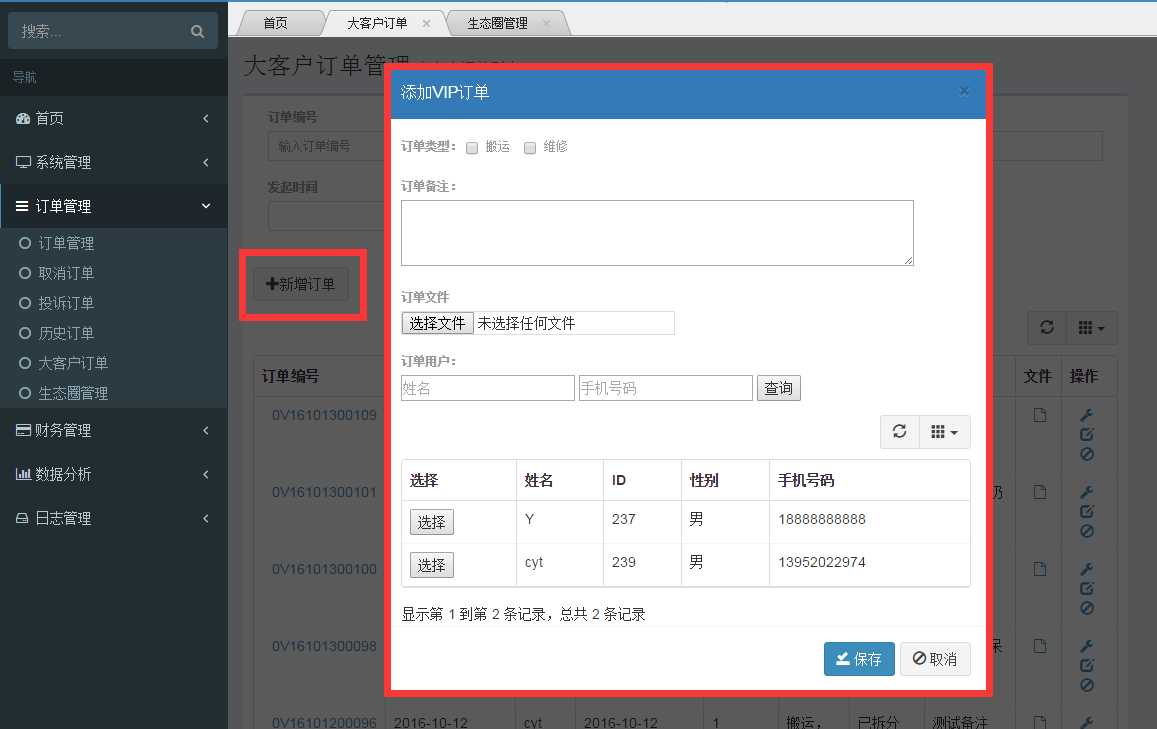
$("#addBtn").on("click", function() {
     $.FORM.showFormDialog({  //显示需要提交的表单。
          title: "添加VIP订单", //标题
          postUrl: "${aapi}/orderVip/create", //数据提交的接口
          templateUrl: ‘${aapi}/page/custom/vipForm‘,  //form表单所在的jsp页面,在mysql中手动添加。
          formId: "#vipForm",  // 需要提交的form表单的id
          postType: "multipart",  // 提交数据类型,与后台@requestBody保持一致。
          data: {  //自定义上传的参数
                  pid: 0,
                  pname: "--",
                  level: 0
                },
          onPostSuccess: function() {
               $("#table").bootstrapTable("refresh");  //请求成功刷新表格,加载数据
          }
      });
});
templateUrl里的jsp页面表单部分。
注意:后台会给出接口文档,name与表单提交的字段名保持一致,否则无法上传。
<form id="vipForm" method="post" action="">
    <input type="hidden" name="id">
    <input type="hidden" name="pid" value="{{pid}}">
    <input type="hidden" name="level" value="{{level}}">
    <input type="hidden" name="cusId" id="id" value="" placeholder="id" />
    <input type="hidden" name="cusName" id="cusName" value="" placeholder="选择大客户姓名" />
    <div class="form-group ">
        <label for="fixMove">订单类型:</label>
        <label class="checkbox-inline">
            <input type="checkbox" name="type" value="1" />搬运
        </label>
        <label class="checkbox-inline">
            <input type="checkbox" name="type" value="0" />维修
        </label>
    </div>
    <div class="form-group ">
        <label>订单备注:</label>
        <div>
            <textarea name="remark" rows="3" cols="70"></textarea>
        </div>
    </div>
    <div class="form-group ">
        <label for="file">订单文件</label>
        <div>
            <input type="file" id="file" name="orderFile" accept="application/vnd.openxmlformats-officedocument.spreadsheetml.sheet,
            application/vnd.ms-excel,application/msword,application/vnd.openxmlformats-officedocument.wordprocessingml.document" />
        </div>
    </div>
    <div class="form-group" id="searchForm">
        <label for="isHot">订单用户:</label>
        <span id="cusname"></span>
        <div>
            <input type="text" class="searEle" name="nickname" value="" placeholder="姓名" />
            <input type="text" class="searEle" name="phone" value="" placeholder="手机号码" />
            <input id="searchcus" type="button" value="查询" />
        </div>
        <div>
            <table id="cusTable"></table>
        </div>
    </div>
</form>
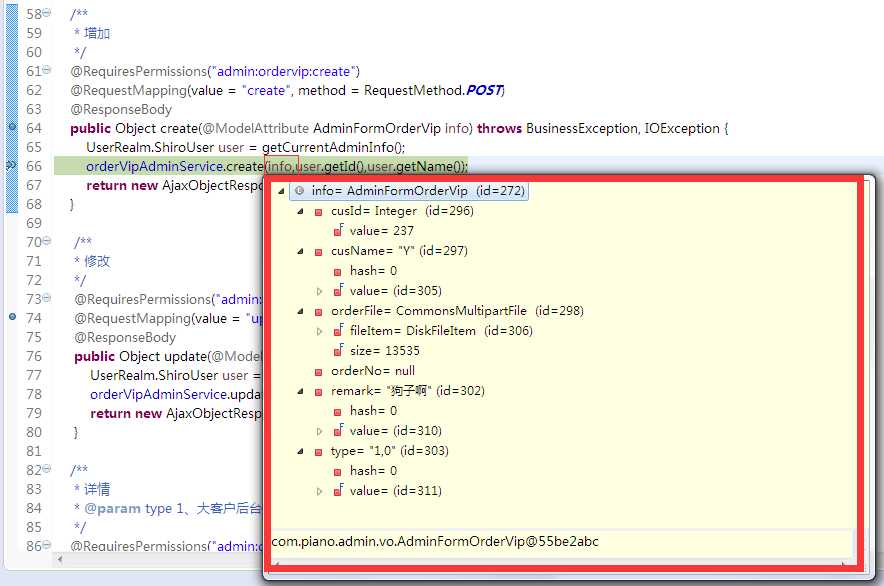
添加内容并且上传,在后台接口中打一个断点,就能监听到前端传入后台的数据(info)。如下图所示。
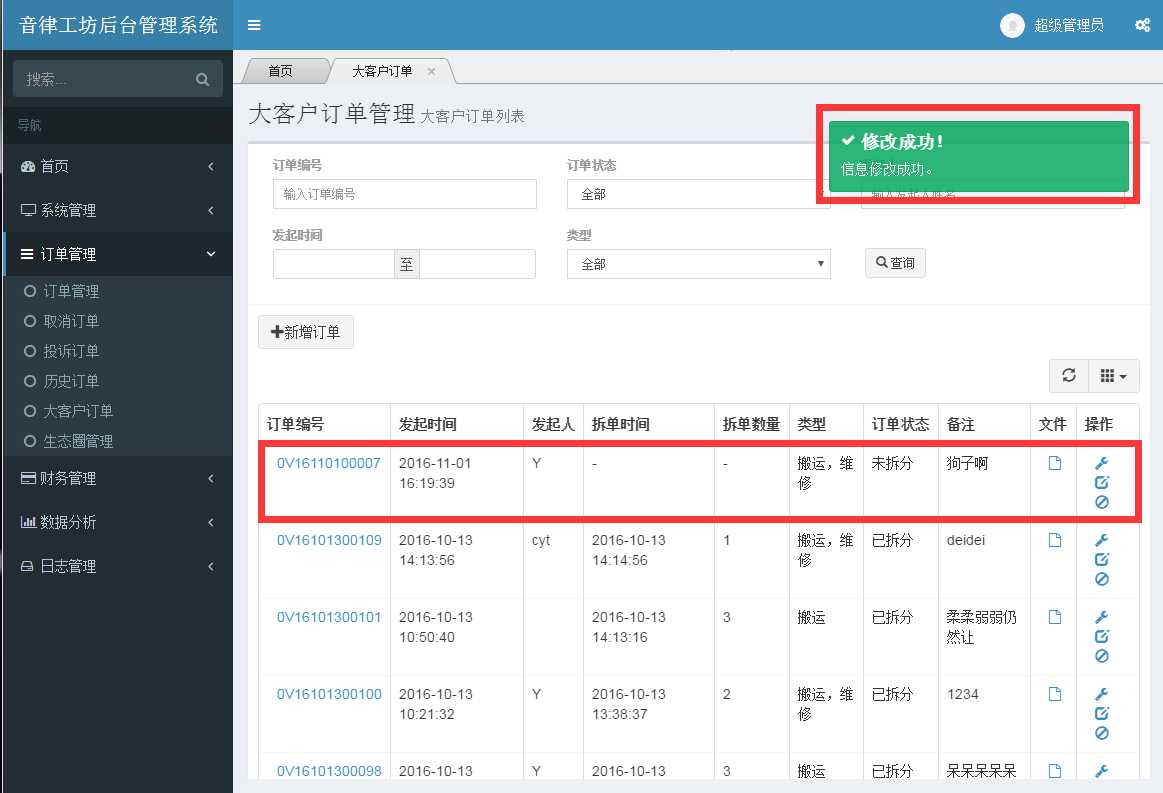
成功后信息提示,表格刷新显示刚才增加的订单。信息提示本文暂不做阐述,在Pnotify插件使用中详细阐述。
改:
点击修改按钮,弹出表单框。
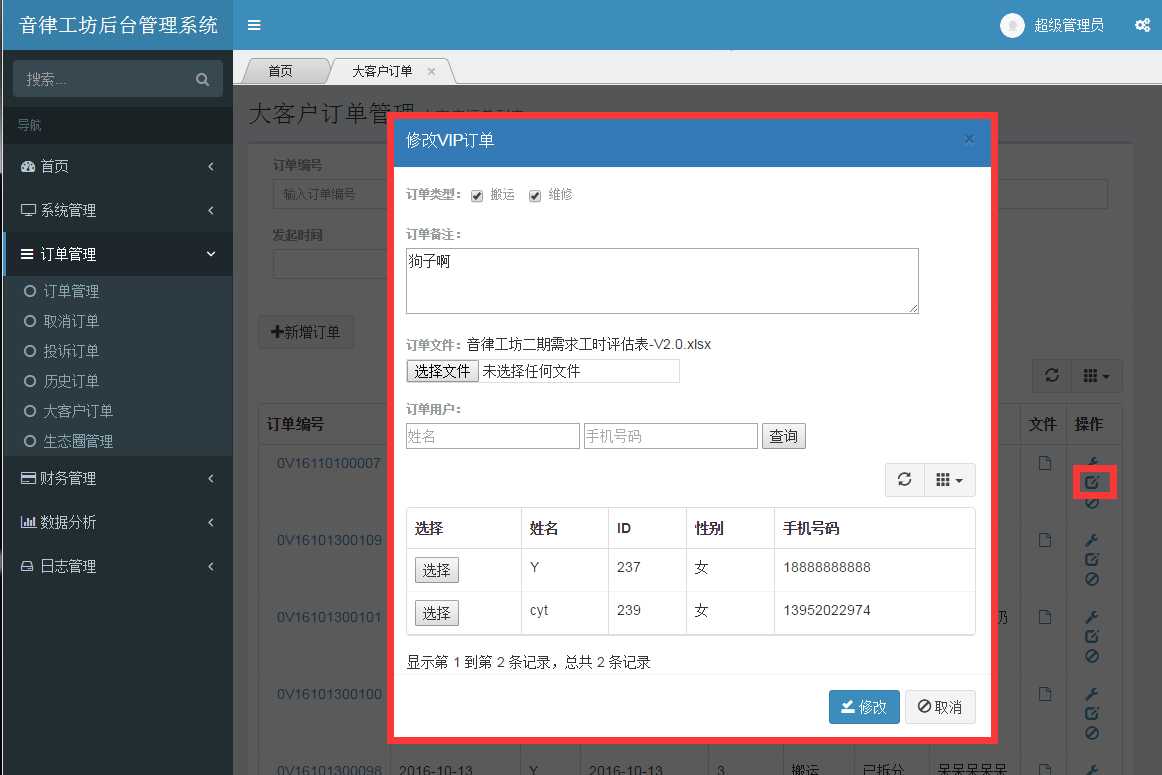
js代码:除了新增了dataSource和isReadOnly,与上述无异。
$.FORM.showFormDialog({
     title: "修改VIP订单",
     postUrl: "${aapi}/orderVip/update", //更新内容的接口
     dataSource: "${aapi}/orderVip/detail/2/" + row.orderNo,//新增了dataSource结合artTemplate用于渲染数据表单数据,实现在此基础上的修改。
     isReadOnly: false, //设置为非只读模式,进入修改模式,提交按钮变成修改。
     templateUrl: ‘${aapi}/page/custom/vipModifyForm‘, //修改的jsp页面,与新增的页面不一致,使用artTemplate将datasource的数据渲染到表单中。
     formId: "#vipForm", //修改为“vipModifyForm.jsp”页面的formid
     postType: "multipart",
     data: {
            pid: 0,
            pname: "--",
            level: 0
           },
     onPostSuccess: function() {
         $("#table").bootstrapTable("refresh");
     }
});
templateUrl:
<script>
    if("{{type}}"=="1,0"){
        $("#movetype").attr("checked","checked");
        $("#fixtype").attr("checked","checked");
    }else if("{{type}}"=="0"){
         $("#fixtype").attr("checked","checked");
    }else if("{{type}}"=="1"){
        $("#movetype").attr("checked","checked");
    }
    function clickCk(){
        var movetype = $("#movetype").prop("checked");
        var fixtype = $("#fixtype").prop("checked");
        var typeStr = "1,0";
        if(movetype&&!fixtype){
            typeStr = "1";
        }else if(!movetype&&fixtype){
            typeStr = "0";
        }
        $("#typeStr").val(typeStr);
    }
</script>
<form id="vipForm" method="post" action="">
    <input type="hidden" name="id"> //type:hiden,看不见这个form控件,但是值能随着表单一起提交。
    <input type="hidden" name="pid" value="{{pid}}">
    <input type="hidden" name="level" value="{{level}}">
    <input type="hidden" name="orderNo" value="{{orderNo}}" /> //由于是修改这一条订单的内容,所以必须上传该条订单的某个参数用以区分,后台要求传orderNo。
    <input type="hidden" name="cusId" id="id" value="" placeholder="id" />
    <input type="hidden" name="cusName" id="cusName" value="" placeholder="选择大客户姓名" />

    <div class="form-group ">
        <label for="fixMove">订单类型:</label>
        <label class="checkbox-inline">
            <input type="checkbox" value="1" id="movetype" onclick="clickCk()"/>搬运
        </label>
        <label class="checkbox-inline">
            <input type="checkbox" value="0" id="fixtype" onclick="clickCk()"/>维修
        </label>
            <input type="hidden" name="type" readonly id="typeStr"/>
    </div>

    <div class="form-group ">
        <label>订单备注:</label>
        <div>
            <textarea name="remark" rows="3" cols="70"></textarea>
        </div>
    </div>
    <div class="form-group ">
        <label>订单文件:</label><span>{{fileRealName}}</span>
        <input name="orderFile" id="input-1" type="file" class="file" accept="application/vnd.openxmlformats-officedocument.spreadsheetml.sheet,
        application/vnd.ms-excel,application/msword,application/vnd.openxmlformats-officedocument.wordprocessingml.document">
    </div>
    <div class="form-group" id="searchForm">
        <label for="isHot">订单用户:</label>
        <span id="cusname"></span>
        <div>
            <input type="text" class="searEle" name="nickname" value="" placeholder="姓名" />
            <input type="text" class="searEle" name="phone" value="" placeholder="手机号码" />
            <input id="searchcus" type="button" value="查询" />
        </div>
        <div>
            <table id="cusTable"></table>
        </div>
    </div>
</form>
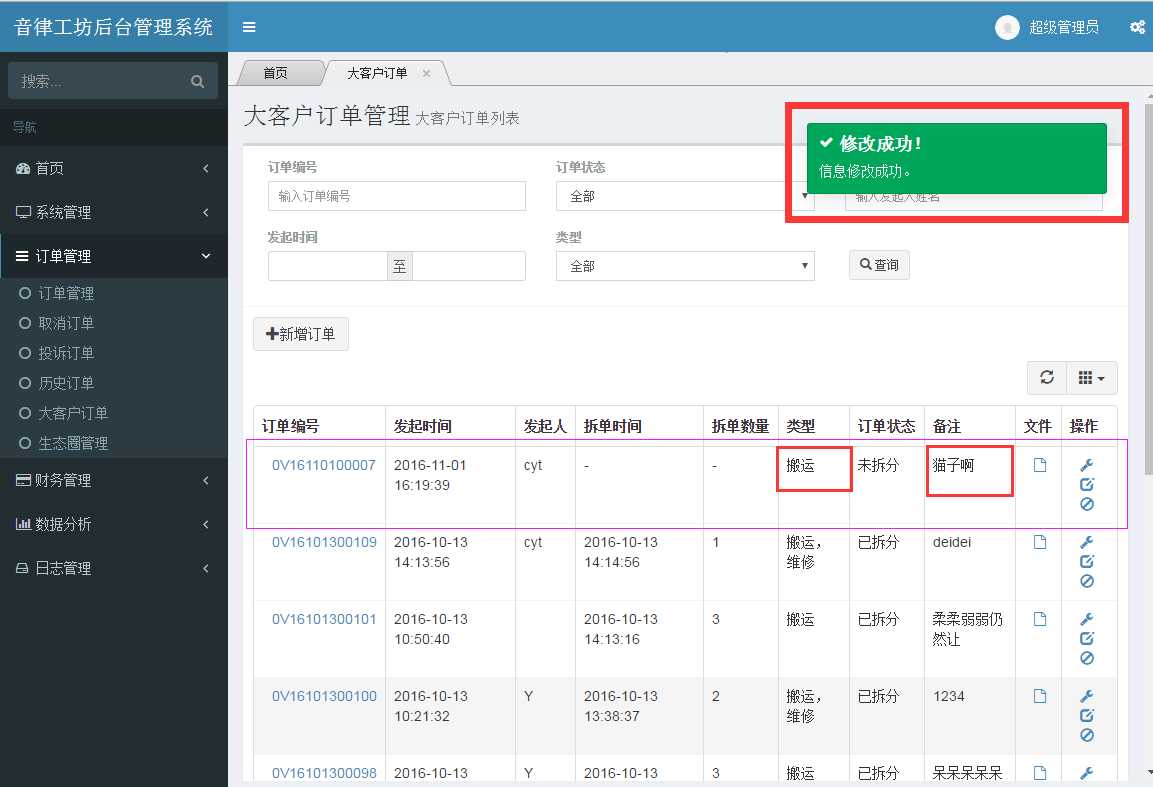
请求成功后,提示成功,并且表格更新为已改的数据。
删:
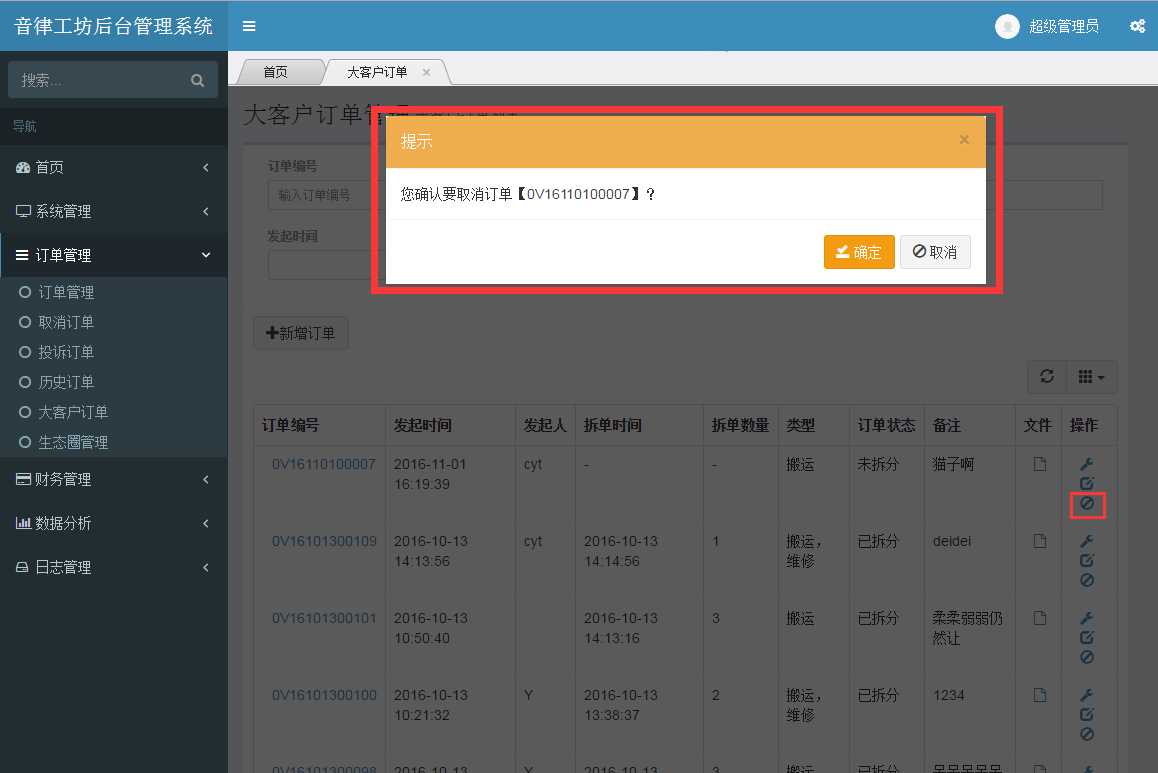
点击删除按钮。弹出删除信息。
js代码:
$.FORM.showConfirm({
       title: "提示",
       message: "您确认要取消订单【" + row.orderNo + "】?", //内置文字
       url: "${aapi}/orderVip/delete/" + row.orderNo, //删除的接口
       autoClose: true, //自动关闭
       successTitle: "成功",
       successMessage: "订单【" + row.orderNo + "】已取消!",
       onSuccess: function() {
              $("#table").bootstrapTable("refresh");
       }
});
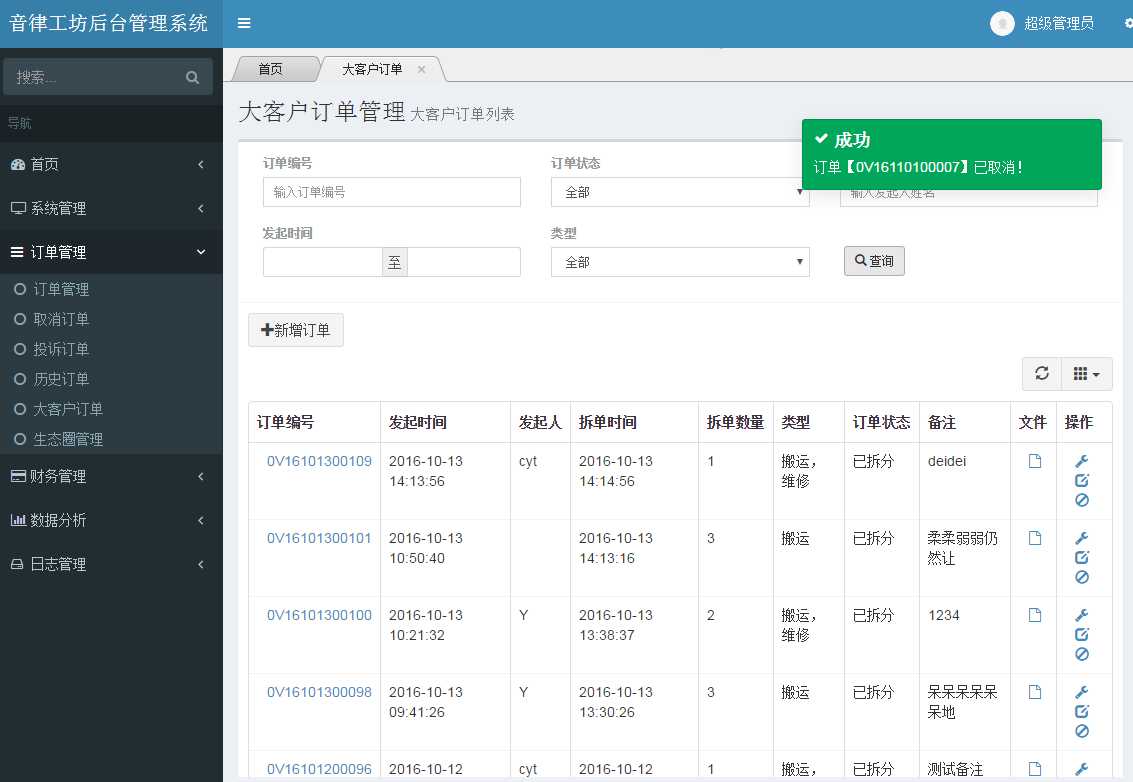
删除成功后消息提示,并且从表格中被删除。
详情:
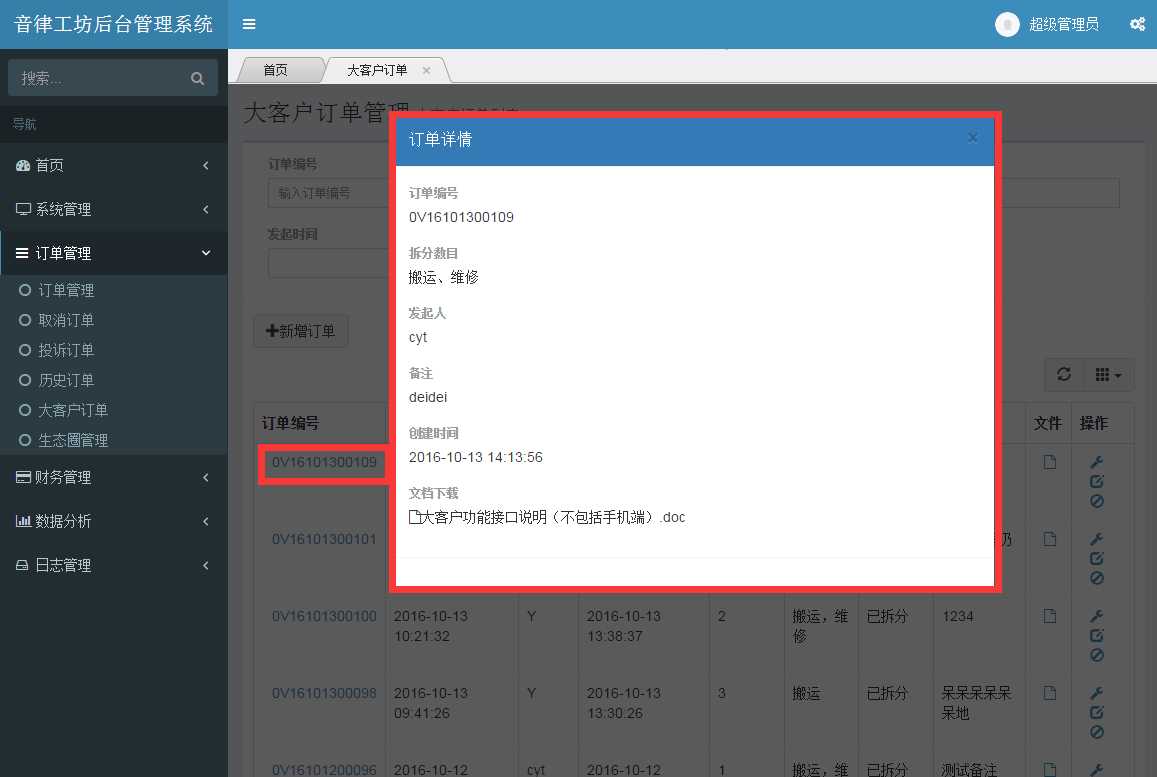
点击订单编号,弹出订单详情。
js代码:
$.FORM.showFormDialog({
      title: "订单详情",
      isReadOnly: true, //设置为true就没有保存的按钮了。
      dataSource: "${aapi}/orderVip/detail/2/" + row.orderNo,
      templateUrl: ‘${aapi}/page/custom/vipOrderDetail‘
});
artTemplate渲染模版:
<div id="messageForm">
    <input type="hidden" name="id">
    <div class="form-group ">
        <label>订单编号</label>
        <p>{{orderNo}}</p>
    </div>
    <div class="form-group ">
        <label>拆分数目</label>
        <p>{{if type==‘0‘}} 维修 {{else if type==‘1‘}}搬运{{else if type=="1,0"}}搬运、维修{{/if}}</p>
    </div>
    <div class="form-group ">
        <label>发起人</label>
        <p>{{cusName}}</p>
    </div>
    <div class="form-group ">
        <label>备注</label>
        <p>{{remark}}</p>
    </div>
    <div class="form-group ">
        <label>创建时间</label>
        <p>{{createdDtm}}</p>
    </div>
    <div class="form-group ">
        <label>文档下载</label>
        <p id="download" style="cursor: pointer;"><i class="fa fa-file-o" aria-hidden="true"></i>{{fileRealName}}</p>
    </div>
</div>
<script>
$("#download").on("click",function(){
location.href=‘${aapi}/orderVip/downLoad/{{orderNo}}‘;//下载文件的接口
});
</script>
Bootstrap-dialog的使用(续Bootstrap Table)
标签:custom nbsp 提交 cti height 看不见 npos point tail
原文地址:http://www.cnblogs.com/cryst/p/6020283.html