标签:system run systemd png load dev xxxx ramdisk rom
在Azure上目前已经有基于Samba协议的共享存储了。
但目前在Azure上,还不能把Disk作为共享盘。而在实际的应用部署中,共享盘是做集群的重要组件之一。比如仲裁盘、Shared Disk等。
本文将介绍,如果通过基于Samba的文件共享,加上Linux的Target、iscsid以及multipath等工具,提供带HA的共享Disk。
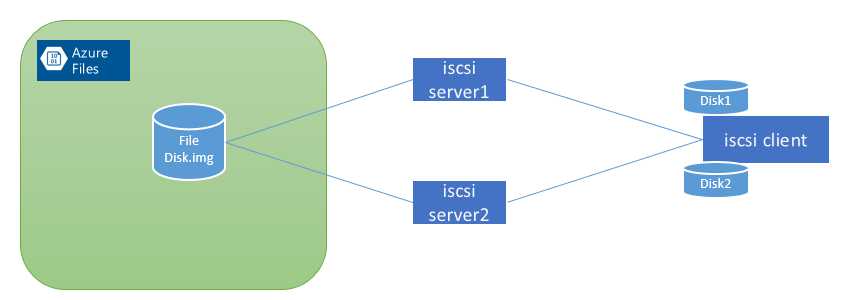
上图是整体架构:
通过两台CentOS7.2的VM都挂载Azure File;在Azure File上创建一个文件: disk.img,两个VM通过iscsi server的软件target,同时把这个disk.img作为iscsi的disk发布出去;一台装有iscsid的CentOS7.2的Server同时挂载这两个iscsi Disk;再采用multipath的软件把这两个盘合成一个。
在这种架构下,iscsi客户端获得了一块iscsi的disk。而且这块Disk是提供HA的网络Disk。
具体实现方式如下:
一、 创建File Service
1. 在Azure Portal上创建File Service
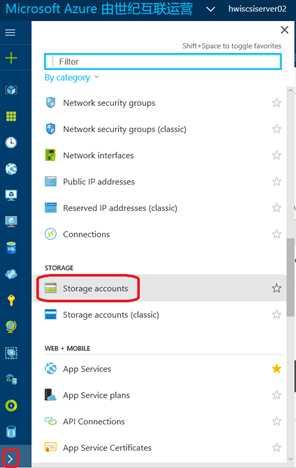
在Storage Account中点击Add:
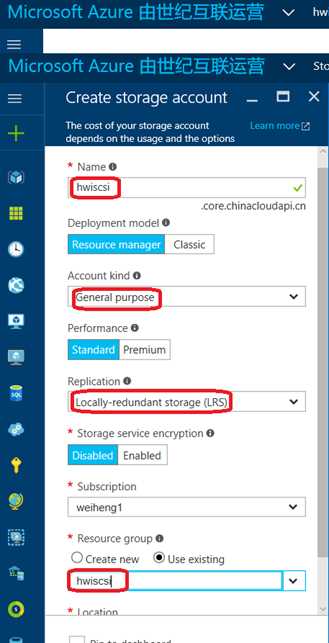
填写相关信息,点击Create。
创建成功后,在Storage Account中选择创建好的Storage Account:
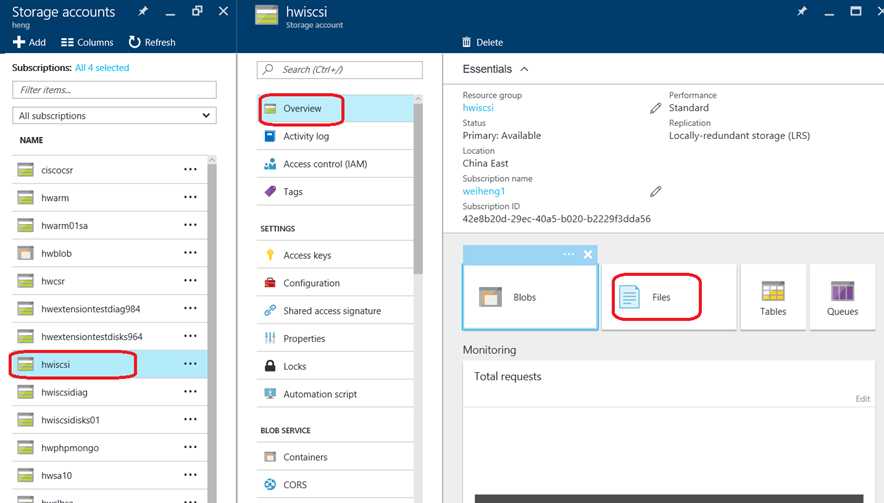
选择File:

点击+file Share后,填写File Share的名字,点击创建。
创建好后,可以看到在Linux中mount的命令提示:
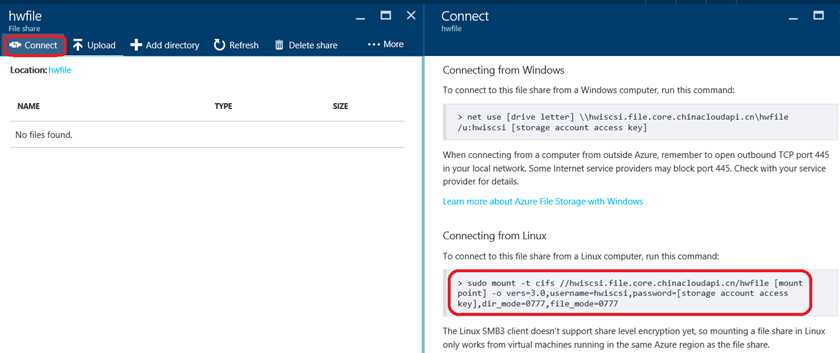
在Access Keys中复制key
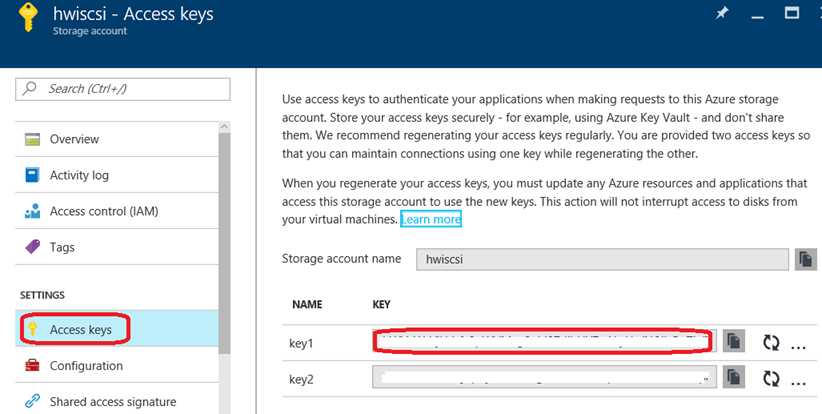
2. 在两台iscsi server上mount这个File Service
首先查看服务器版本:
[root@hwis01 ~]# cat /etc/redhat-release
CentOS Linux release 7.2.1511 (Core)
都是CentOS7.0以上的版本,可以支持Samba3.0。
根据前面File Service的信息执行下面的命令:
[root@hwis01 ~]# mkdir /file
[root@hwis01 ~]# sudo mount -t cifs //hwiscsi.file.core.chinacloudapi.cn/hwfile /file -o vers=3.0,username=hwiscsi,password=xxxxxxxx==,dir_mode=0777,file_mode=0777
[root@hwis01 ~]# df -h
Filesystem Size Used Avail Use% Mounted on
/dev/sda1 30G 1.1G 29G 4% /
devtmpfs 829M 0 829M 0% /dev
tmpfs 839M 0 839M 0% /dev/shm
tmpfs 839M 8.3M 831M 1% /run
tmpfs 839M 0 839M 0% /sys/fs/cgroup
/dev/sdb1 69G 53M 66G 1% /mnt/resource
tmpfs 168M 0 168M 0% /run/user/1000
//hwiscsi.file.core.chinacloudapi.cn/hwfile 5.0T 0 5.0T 0% /file
二、 在iscsi server上创建iscsi的disk
1. 在共享目录中创建disk.img
[root@hwis01 ~]# dd if=/dev/zero of=/file/disk.img bs=1M count=1024
1024+0 records in
1024+0 records out
1073741824 bytes (1.1 GB) copied, 20.8512 s, 51.5 MB/s
本机查看
[root@hwis01 ~]# cd /file
[root@hwis01 file]# ll
total 1048576
-rwxrwxrwx. 1 root root 1073741824 Nov 4 06:04 disk.img
在另外一台Server上查看:
[root@hwis02 ~]# cd /file
[root@hwis02 file]# ll
total 1048576
-rwxrwxrwx. 1 root root 1073741824 Nov 4 06:04 disk.img
2.安装相关软件
iscsi服务器端安装targetcli:
[root@hwis01 file]# yum install -y targetcli
iscsi客户端安装iscsi-initiator-utils:
[root@hwic01 ~]# yum install iscsi-initiator-utils -y
安装完成后,在iscsi的客户端机器上查看iqn号码:
[root@hwic01 /]# cd /etc/iscsi/
[root@hwic01 iscsi]# more initiatorname.iscsi
InitiatorName=iqn.2016-10.hw.ic01:client
3.用targetcli创建iscsi的disk
[root@hwis01 file]# targetcli
Warning: Could not load preferences file /root/.targetcli/prefs.bin.
targetcli shell version 2.1.fb41
Copyright 2011-2013 by Datera, Inc and others.
For help on commands, type ‘help‘.
/> ls
o- / ....................................................................................................................... [...]
o- backstores .............................................................................................................. [...]
| o- block .................................................................................................. [Storage Objects: 0]
| o- fileio ................................................................................................. [Storage Objects: 0]
| o- pscsi .................................................................................................. [Storage Objects: 0]
| o- ramdisk ................................................................................................ [Storage Objects: 0]
o- iscsi ............................................................................................................ [Targets: 0]
o- loopback ......................................................................................................... [Targets: 0]
/> cd backstores/
/backstores> cd fileio
/backstores/fileio> create disk01 /file/disk.img 1G
/file/disk.img exists, using its size (1073741824 bytes) instead
Created fileio disk01 with size 1073741824
/backstores/fileio> cd /iscsi/
/iscsi> create iqn.2016-10.hw.is01:disk01.lun0
Created target iqn.2016-10.hw.is01:disk01.lun0.
Created TPG 1.
Global pref auto_add_default_portal=true
Created default portal listening on all IPs (0.0.0.0), port 3260.
/iscsi> cd iqn.2016-10.hw.is01:disk01.lun0/tpg1/luns/
/iscsi/iqn.20...un0/tpg1/luns> create /backstores/fileio/disk01
Created LUN 0.
/iscsi/iqn.20...un0/tpg1/luns> cd ../acls/
/iscsi/iqn.20...un0/tpg1/acls> create iqn.2016-10.hw.ic01:client
Created Node ACL for iqn.2016-10.hw.ic01:client
Created mapped LUN 0.
/iscsi/iqn.20...un0/tpg1/acls> ls
o- acls ................................................................................................................ [ACLs: 1]
o- iqn.2016-10.hw.ic01:client ................................................................................... [Mapped LUNs: 1]
o- mapped_lun0 ......................................................................................... [lun0 fileio/disk01 (rw)]
/iscsi/iqn.20...un0/tpg1/acls> cd /
/> ls
o- / ....................................................................................................................... [...]
o- backstores .............................................................................................................. [...]
| o- block .................................................................................................. [Storage Objects: 0]
| o- fileio ................................................................................................. [Storage Objects: 1]
| | o- disk01 ..................................................................... [/file/disk.img (1.0GiB) write-back activated]
| o- pscsi .................................................................................................. [Storage Objects: 0]
| o- ramdisk ................................................................................................ [Storage Objects: 0]
o- iscsi ............................................................................................................ [Targets: 1]
| o- iqn.2016-10.hw.is01:disk01.lun0 ................................................................................... [TPGs: 1]
| o- tpg1 ................................................................................................. [no-gen-acls, no-auth]
| o- acls .............................................................................................................. [ACLs: 1]
| | o- iqn.2016-10.hw.ic01:client ............................................................................... [Mapped LUNs: 1]
| | o- mapped_lun0 ..................................................................................... [lun0 fileio/disk01 (rw)]
| o- luns .............................................................................................................. [LUNs: 1]
| | o- lun0 ..................................................................................... [fileio/disk01 (/file/disk.img)]
| o- portals ........................................................................................................ [Portals: 1]
| o- 0.0.0.0:3260 ........................................................................................................... [OK]
o- loopback ......................................................................................................... [Targets: 0]
查看配置文件中的wwn
[root@hwis01 file]# cd /etc/target
[root@hwis01 target]# ls
backup saveconfig.json
[root@hwis01 target]# vim saveconfig.json
[root@hwis01 target]# grep wwn saveconfig.json
"wwn": "acadb3f7-9a2d-44f4-8caf-de627ea98e27"
"node_wwn": "iqn.2016-10.hw.ic01:client"
"wwn": "iqn.2016-10.hw.is01:disk01.lun0"
记录下第一个disk的 "wwn": "acadb3f7-9a2d-44f4-8caf-de627ea98e27"
并将其复制到iscsi server2中的配置。
在server2上查看相关信息:
[root@hwis02 target]# grep wwn saveconfig.json
"wwn": "acadb3f7-9a2d-44f4-8caf-de627ea98e27"
"node_wwn": "iqn.2016-10.hw.ic01:client"
"wwn": "iqn.2016-10.hw.is02:disk01.lun0"
4.开启target服务
[root@hwis01 target]# systemctl enable target
Created symlink from /etc/systemd/system/multi-user.target.wants/target.service to /usr/lib/systemd/system/target.service.
[root@hwis01 target]# systemctl start target
[root@hwis01 target]# systemctl status target
target.service - Restore LIO kernel target configuration
Loaded: loaded (/usr/lib/systemd/system/target.service; enabled; vendor preset: disabled)
Active: active (exited) since Fri 2016-11-04 06:43:29 UTC; 7s ago
Process: 28298 ExecStart=/usr/bin/targetctl restore (code=exited, status=0/SUCCESS)
Main PID: 28298 (code=exited, status=0/SUCCESS)
Nov 04 06:43:29 hwis01 systemd[1]: Starting Restore LIO kernel target configuration...
Nov 04 06:43:29 hwis01 systemd[1]: Started Restore LIO kernel target configuration.
5.允许tcp3206
配置防火墙或者nsg,允许tcp3206的访问。
这里就不展开了。
三、 在iscsi客户端配置iscsi
1.发现并login iscsi的disk
发现:
[root@hwic01 iscsi]# iscsiadm -m discovery -t sendtargets -p 10.1.1.5
10.1.1.5:3260,1 iqn.2016-10.hw.is02:disk01.lun0
Login:
[root@hwic01 iscsi]# iscsiadm --mode node --targetname iqn.2016-10.hw.is02:disk01.lun0 --portal 10.1.1.5 --login
Logging in to [iface: default, target: iqn.2016-10.hw.is02:disk01.lun0, portal: 10.1.1.5,3260] (multiple)
Login to [iface: default, target: iqn.2016-10.hw.is02:disk01.lun0, portal: 10.1.1.5,3260] successful.
此时在如下文件中,就有了相关iqn的信息:
[root@hwic01 /]# ls /var/lib/iscsi/nodes
iqn.2016-10.hw.is01:disk01.lun0 iqn.2016-10.hw.is02:disk01.lun0
此时在dev中已经存在sdc和sdd两个新增加的disk。
2.安装multipath软件
[root@hwic01 dev]# yum install device-mapper-multipath -y
复制配置文件:
cd /etc
cp /usr/share/doc/device-mapper-multipath-0.4.9/multipath.conf .
修改配置文件:
vim multipath.conf

blacklist {
devnode "^sda$"
devnode "^sdb$"
}
defaults {
find_multipaths yes
user_friendly_names yes
path_grouping_policy multibus
failback immediate
no_path_retry fail
}
启动服务:
[root@hwic01 etc]# systemctl enable multipathd
[root@hwic01 etc]# systemctl start multipathd
[root@hwic01 etc]# systemctl status multipathd
multipathd.service - Device-Mapper Multipath Device Controller
Loaded: loaded (/usr/lib/systemd/system/multipathd.service; enabled; vendor preset: enabled)
Active: active (running) since Fri 2016-11-04 07:01:54 UTC; 11s ago
Process: 28366 ExecStart=/sbin/multipathd (code=exited, status=0/SUCCESS)
Process: 28363 ExecStartPre=/sbin/multipath -A (code=exited, status=0/SUCCESS)
Process: 28357 ExecStartPre=/sbin/modprobe dm-multipath (code=exited, status=0/SUCCESS)
Main PID: 28369 (multipathd)
CGroup: /system.slice/multipathd.service
└─28369 /sbin/multipathd

Nov 04 07:01:54 hwic01 systemd[1]: Starting Device-Mapper Multipath Device Controller...
Nov 04 07:01:54 hwic01 systemd[1]: PID file /run/multipathd/multipathd.pid not readable (yet?) after start.
Nov 04 07:01:54 hwic01 systemd[1]: Started Device-Mapper Multipath Device Controller.
Nov 04 07:01:54 hwic01 multipathd[28369]: mpatha: load table [0 2097152 multipath 0 0 1 1 service-time 0 2 1 8:32 1 8:48 1]
Nov 04 07:01:54 hwic01 multipathd[28369]: mpatha: event checker started
Nov 04 07:01:54 hwic01 multipathd[28369]: path checkers start up
刷新multipath:
[root@hwic01 etc]# multipath -F
查看:
[root@hwic01 etc]# multipath -l
mpatha (36001405acadb3f79a2d44f48cafde627) dm-0 LIO-ORG ,disk01
size=1.0G features=‘0‘ hwhandler=‘0‘ wp=rw
`-+- policy=‘service-time 0‘ prio=0 status=active
|- 6:0:0:0 sdc 8:32 active undef running
`- 7:0:0:0 sdd 8:48 active undef running
可以看到,两个iscsi的disk已经合并成一个disk了。
[root@hwic01 /]# cd /dev/mapper/
[root@hwic01 mapper]# ll
total 0
crw-------. 1 root root 10, 236 Nov 4 04:31 control
lrwxrwxrwx. 1 root root 7 Nov 4 07:02 mpatha -> ../dm-0
对dm-0进行分区:
[root@hwic01 dev]# fdisk /dev/mapper/mpatha
Welcome to fdisk (util-linux 2.23.2).
Changes will remain in memory only, until you decide to write them.
Be careful before using the write command.
Device does not contain a recognized partition table
Building a new DOS disklabel with disk identifier 0x44f032cb.
Command (m for help): n
Partition type:
p primary (0 primary, 0 extended, 4 free)
e extended
Select (default p): p
Partition number (1-4, default 1):
First sector (16384-2097151, default 16384):
Using default value 16384
Last sector, +sectors or +size{K,M,G} (16384-2097151, default 2097151):
Using default value 2097151
Partition 1 of type Linux and of size 1016 MiB is set

Command (m for help): p

Disk /dev/dm-0: 1073 MB, 1073741824 bytes, 2097152 sectors
Units = sectors of 1 * 512 = 512 bytes
Sector size (logical/physical): 512 bytes / 512 bytes
I/O size (minimum/optimal): 512 bytes / 8388608 bytes
Disk label type: dos
Disk identifier: 0x44f032cb

Device Boot Start End Blocks Id System
mpatha1 16384 2097151 1040384 83 Linux
格式化:
[root@hwic01 mapper]# mkfs.ext4 /dev/mapper/mpatha1
挂载、查看:
[root@hwic01 mapper]# mkdir /iscsi
[root@hwic01 mapper]# mount /dev/mapper/mpatha1 /iscsi
[root@hwic01 mapper]# df -h
Filesystem Size Used Avail Use% Mounted on
/dev/sda1 30G 1.2G 29G 4% /
devtmpfs 829M 0 829M 0% /dev
tmpfs 839M 0 839M 0% /dev/shm
tmpfs 839M 8.3M 831M 1% /run
tmpfs 839M 0 839M 0% /sys/fs/cgroup
/dev/sdb1 69G 53M 66G 1% /mnt/resource
tmpfs 168M 0 168M 0% /run/user/1000
/dev/mapper/mpatha1 985M 2.5M 915M 1% /iscsi
四、 检查iscsi disk的HA及其它属性
1. HA检查
将iscsi server1上的target服务停止掉:
[root@hwis01 target]# systemctl stop target
[root@hwis01 target]# systemctl status target
target.service - Restore LIO kernel target configuration
Loaded: loaded (/usr/lib/systemd/system/target.service; enabled; vendor preset: disabled)
Active: inactive (dead) since Fri 2016-11-04 07:24:28 UTC; 7s ago
Process: 28380 ExecStop=/usr/bin/targetctl clear (code=exited, status=0/SUCCESS)
Process: 28298 ExecStart=/usr/bin/targetctl restore (code=exited, status=0/SUCCESS)
Main PID: 28298 (code=exited, status=0/SUCCESS)

Nov 04 06:43:29 hwis01 systemd[1]: Starting Restore LIO kernel target configuration...
Nov 04 06:43:29 hwis01 systemd[1]: Started Restore LIO kernel target configuration.
Nov 04 07:24:28 hwis01 systemd[1]: Stopping Restore LIO kernel target configuration...
Nov 04 07:24:28 hwis01 systemd[1]: Stopped Restore LIO kernel target configuration.
在iscsi客户端查看:
[root@hwic01 iscsi]# multipath -l
mpatha (36001405acadb3f79a2d44f48cafde627) dm-0 LIO-ORG ,disk01
size=1.0G features=‘0‘ hwhandler=‘0‘ wp=rw
`-+- policy=‘service-time 0‘ prio=0 status=active
|- 6:0:0:0 sdc 8:32 failed faulty running
`- 7:0:0:0 sdd 8:48 active undef running
可以看到一条路径已经出现故障。但磁盘工作仍然正常:
[root@hwic01 iscsi]# ll
total 16
-rw-r--r--. 1 root root 0 Nov 4 07:23 a
drwx------. 2 root root 16384 Nov 4 07:18 lost+found
[root@hwic01 iscsi]# touch b
[root@hwic01 iscsi]# ll
total 16
-rw-r--r--. 1 root root 0 Nov 4 07:23 a
-rw-r--r--. 1 root root 0 Nov 4 07:27 b
drwx------. 2 root root 16384 Nov 4 07:18 lost+found
再恢复服务:
[root@hwis01 target]# systemctl start target
[root@hwis01 target]# systemctl status target
target.service - Restore LIO kernel target configuration
Loaded: loaded (/usr/lib/systemd/system/target.service; enabled; vendor preset: disabled)
Active: active (exited) since Fri 2016-11-04 07:27:41 UTC; 3s ago
Process: 28380 ExecStop=/usr/bin/targetctl clear (code=exited, status=0/SUCCESS)
Process: 28397 ExecStart=/usr/bin/targetctl restore (code=exited, status=0/SUCCESS)
Main PID: 28397 (code=exited, status=0/SUCCESS)

Nov 04 07:27:40 hwis01 systemd[1]: Starting Restore LIO kernel target configuration...
Nov 04 07:27:41 hwis01 systemd[1]: Started Restore LIO kernel target configuration.
客户端multipath仍然正常工作:
[root@hwic01 iscsi]# multipath -l
mpatha (36001405acadb3f79a2d44f48cafde627) dm-0 LIO-ORG ,disk01
size=1.0G features=‘0‘ hwhandler=‘0‘ wp=rw
`-+- policy=‘service-time 0‘ prio=0 status=active
|- 6:0:0:0 sdc 8:32 active undef running
`- 7:0:0:0 sdd 8:48 active undef running
2. iops
根据前面的一片iops测试的文章中的方法,进行iops的测试:
[root@hwic01 ~]# ./iops.py /dev/dm-0
/dev/dm-0, 1.07 G, sectorsize=512B, #threads=32, pattern=random:
512 B blocks: 383.1 IO/s, 196.1 kB/s ( 1.6 Mbit/s)
1 kB blocks: 548.5 IO/s, 561.6 kB/s ( 4.5 Mbit/s)
2 kB blocks: 495.8 IO/s, 1.0 MB/s ( 8.1 Mbit/s)
4 kB blocks: 414.1 IO/s, 1.7 MB/s ( 13.6 Mbit/s)
8 kB blocks: 376.2 IO/s, 3.1 MB/s ( 24.7 Mbit/s)
16 kB blocks: 357.5 IO/s, 5.9 MB/s ( 46.9 Mbit/s)
32 kB blocks: 271.0 IO/s, 8.9 MB/s ( 71.0 Mbit/s)
65 kB blocks: 223.0 IO/s, 14.6 MB/s (116.9 Mbit/s)
131 kB blocks: 181.2 IO/s, 23.7 MB/s (190.0 Mbit/s)
262 kB blocks: 137.7 IO/s, 36.1 MB/s (288.9 Mbit/s)
524 kB blocks: 95.0 IO/s, 49.8 MB/s (398.6 Mbit/s)
1 MB blocks: 55.4 IO/s, 58.1 MB/s (465.0 Mbit/s)
2 MB blocks: 37.5 IO/s, 78.7 MB/s (629.9 Mbit/s)
4 MB blocks: 24.8 IO/s, 103.8 MB/s (830.6 Mbit/s)
8 MB blocks: 16.6 IO/s, 139.2 MB/s ( 1.1 Gbit/s)
16 MB blocks: 11.2 IO/s, 188.7 MB/s ( 1.5 Gbit/s)
33 MB blocks: 5.7 IO/s, 190.0 MB/s ( 1.5 Gbit/s)
可以看到,这个盘的iops大约在500左右,带宽在1.5Gbps左右。
总结:
通过Azure的File Service可以通过文件创建iscsi disk的方式把File Service中的文件发布成Disk,供iscsi客户端挂载。在多个iscsi Server提供ha服务的情况下,通过multipath软件可以实现HA的iscsi disk方案。
这个方案适合于一些集群需要共享磁盘、仲裁盘的情况。
通过Azure File Service搭建基于iscsi的共享盘
标签:system run systemd png load dev xxxx ramdisk rom
原文地址:http://www.cnblogs.com/hengwei/p/6030508.html