标签:while follow wireless cin created computer change screen zed
The easiest way to configure the wireless networking is to connect a monitor, keyboard, and mouse and use the Network Manager interface.
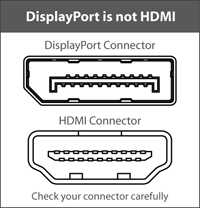
Referencing the picture of Access Board in the previous post, we should see an HDMI port on the real robot. While, actually we only get a Display port on the robot we have.

So we need to find a cable for the Display Port before everything goes on.
Then we need to connect a monitor, USB keyboard and USB mouse to the side panel ports. Then use them to select your network from the networking menu, it looks like an empty quarter circle pointed downward when disconnected, in the upper right hand corner of the screen. Once it is set it should remain connected through all reboots.
The robot has both internal and external Ethernet-based networks, as well as an external wireless network interface. The external network interfaces are intended for users to connect to the robot, while the internal networks are used to send data between the internal components of the robot.
The majority of communication between components onboard Fetch and Freight happen via the internal Ethernet network. This network is located in the 10.42.42.0/24 subnet and connects the robot computer to the devices listed in the table below. As such, it is important that your building networks do not use the same subnet.
| Device | IP Address |
|---|---|
| Laser range finder | 10.42.42.10 |
| Mainboard | 10.42.42.42 |
| Gripper | 10.42.42.43 |
There are two possible interfaces for connecting to the robot computer: the wireless interface and the wired interface. Most users will prefer to use the wireless interface, however the access panel also includes a Gigabit Ethernet interface for stationary tasks that require higher bandwidth.
Warning
Never drive the robot with an Ethernet cable attached to the access panel.
Once the robot is turned on and the robot is on the network, ssh into the computer of the robot using the default fetch user account:
>$ ssh fetch@<robot_name_or_ip>
Each robot ships with a default user account, with username fetch and password robotics. It is recommended to change the password when setting up the robot.
It is recommended that each user create their own account on the robot, especially when developing from source. To create an account on the robot, ssh into the robot as the fetch user, and run the following commands:
>$ sudo adduser USERNAME
>$ sudo usermod -G adm,cdrom,sudo,dip,plugdev,lpadmin,sambashare USERNAME
It is recommended to install the chrony NTP client on both robots and desktops in order to keep their time synchronized. By default, robots do not ship with chrony installed. To install chrony on Ubuntu:
> sudo apt-get update
> sudo apt-get install chrony
Fetch and Freight use upstart to start and manage various services on the robot. The following upstart services start when the robot is booted:
| Name | Description |
|---|---|
| roscore | starts a roscore |
| robot | starts robot drivers, requires roscore |
| sixad | driver for robot joystick over bluetooth |
| soundplay | starts the sound_play node for audio in ROS |
Upstart service can be restart with the service command. For instance, to restart the robot drivers:
>sudo service robot stop
>sudo service robot start
Since the roscore runs independently of the drivers, the drivers can be restarted without having to restart remote instances of RVIZ or similar ROS tools. Note that this also means the parameter server will not be reset when restarting the drivers, and so a roscore restart may be required if the parameter server has been corrupted by a user script.
A number of log files are created on the robot. Log files related to upstart services can be found in the /var/log/upstart folder, the name of the log will be service.log.
ROS logs for the robot and roscore upstart services will be created in the /var/log/ros folder.
The mainboard of Fetch and Freight contains a USB audio device. While the device enumerates as a standard Linux audio device, we recommend using the sound_play ROS package to access the speakers. sound_play is automatically started as an upstart service when the robot starts. This service is pre-configured to have the correct group-level access to the audio system. If using the speakers directly through a Linux interface, be sure to add your user to the audio group in order to actually access the speakers.
While the sound_play ROS interface allows users to set an audio level, the audio level set is a percentage of the audio level set for Linux. To adjust the Linux audio level, use the following command and follow the on-screen instructions:
>$ sudo su ros -c "alsamixer -c 1"
标签:while follow wireless cin created computer change screen zed
原文地址:http://www.cnblogs.com/casperwin/p/6049475.html