标签:etc 信息 prepare ide ber com src 控制 sig
一、思路
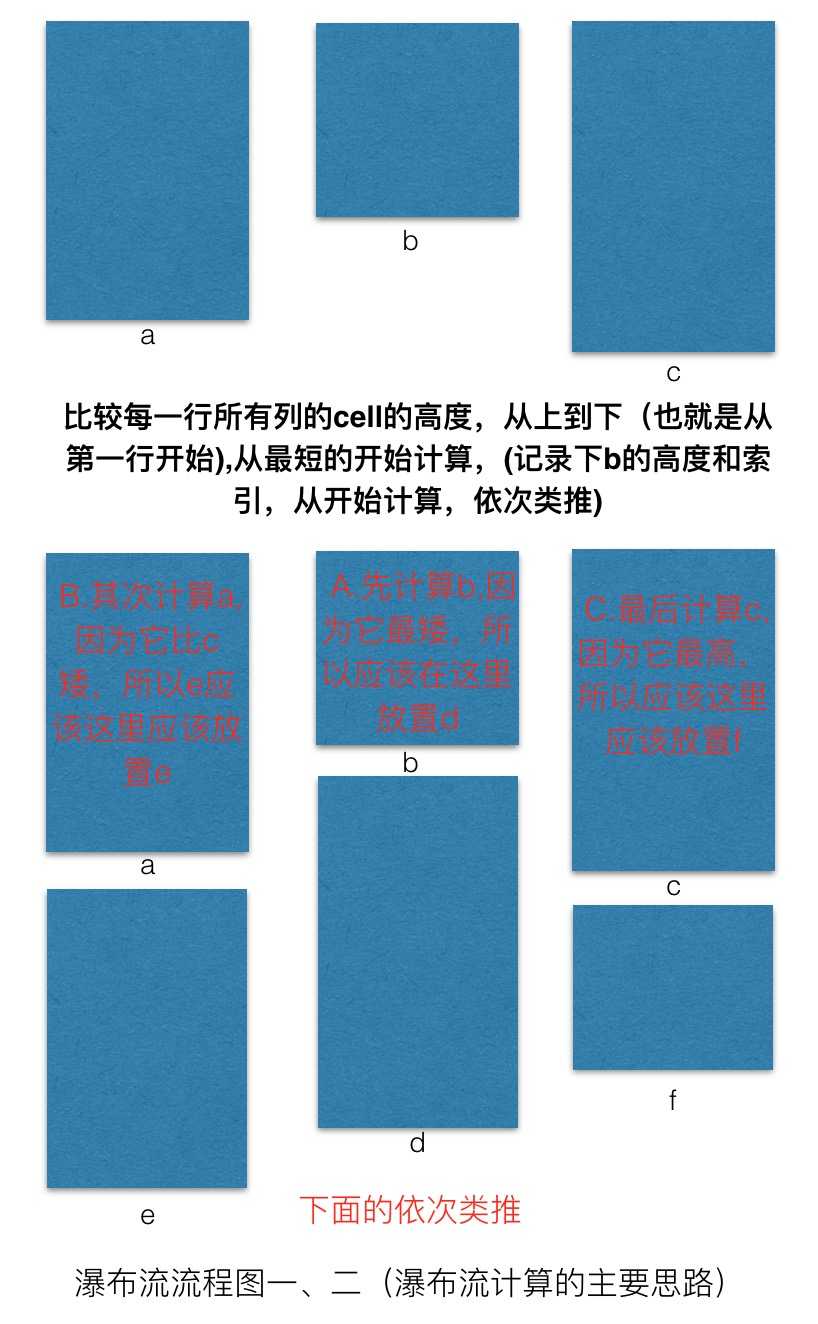
思路一:比较每一行所有列的cell的高度,从上到下(也就是从第一行开始),从最短的开始计算,(记录下b的高度和索引,从开始计算,依次类推)
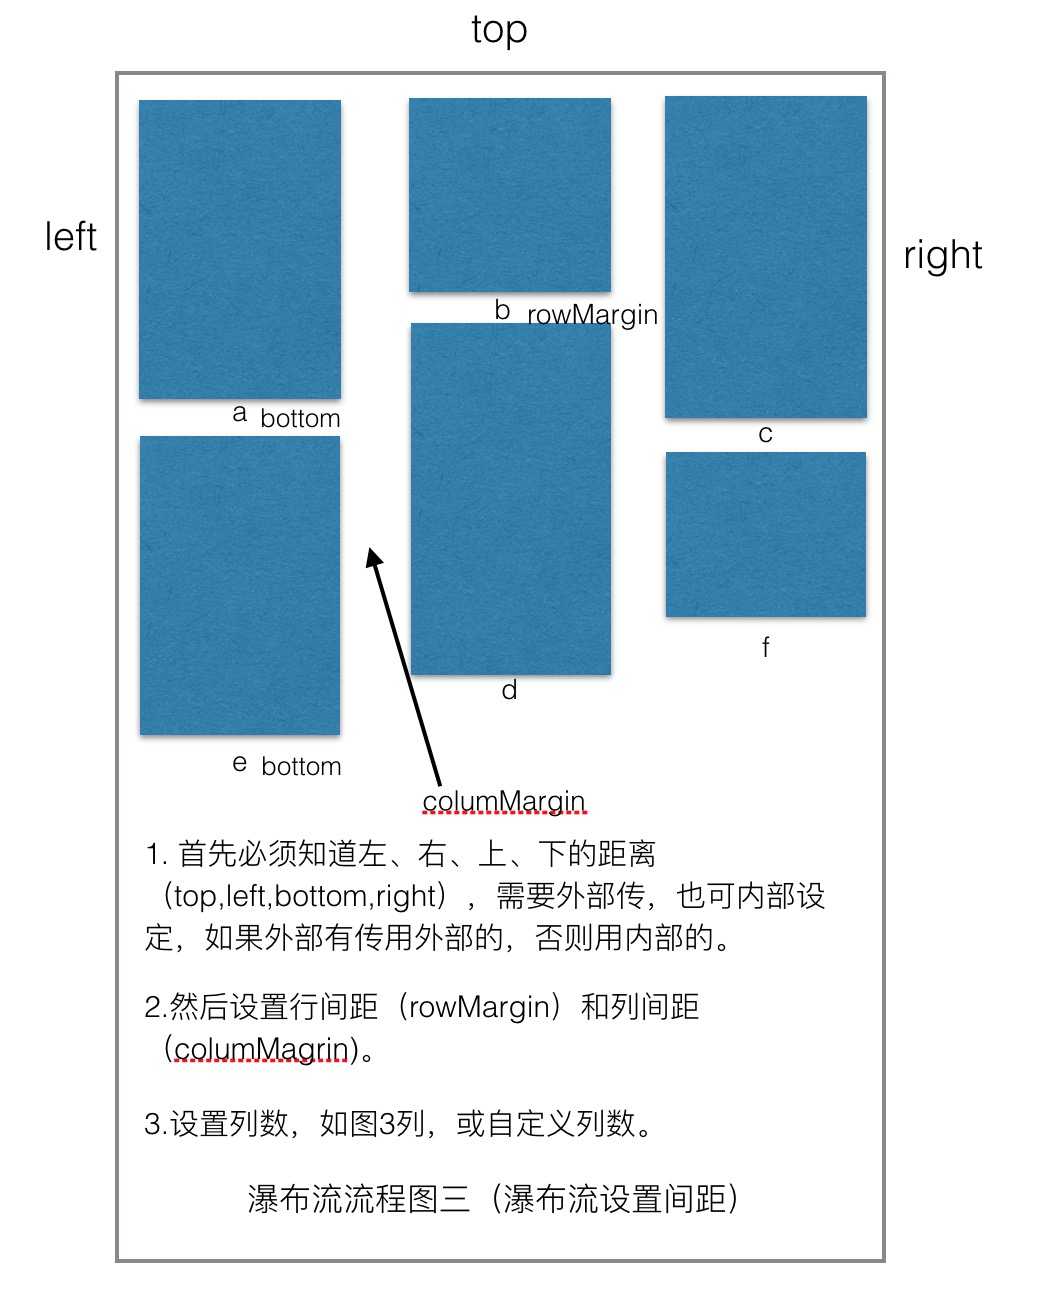
思路二:设置上、下、左、右间距和行间距、列间距及列数。
思路三:实现的重要的方法。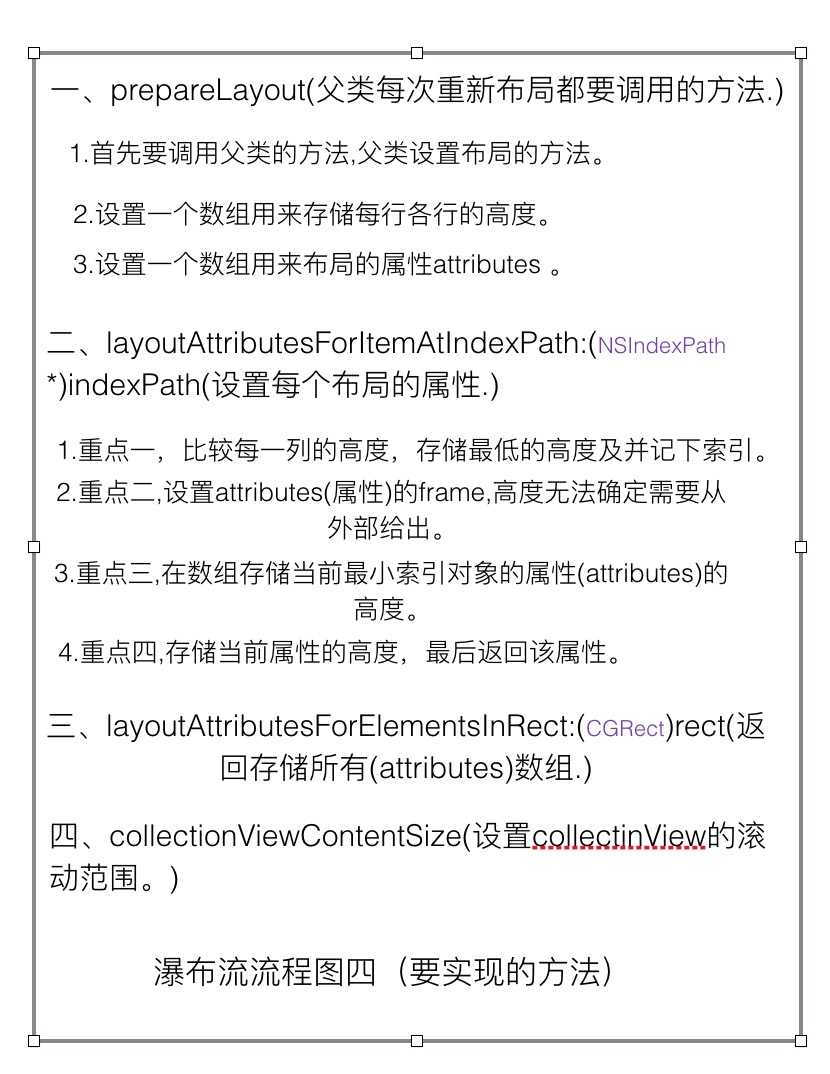
二、代码先行。
1.自定义layout类。
//入口
#import <UIKit/UIKit.h>

@protocol STRWaterLayoutDelegate;

@interface STRWaterLayout : UICollectionViewLayout

@property (nonatomic, weak)id<STRWaterLayoutDelegate>delegate;


@end
@protocol STRWaterLayoutDelegate <NSObject>

@required
- (CGFloat)waterLayout:(STRWaterLayout *)waterLayout layoutHeightAtindexPath:(NSIndexPath *)indexpath layoutItemWidth:(CGFloat)width;
@optional
- (UIEdgeInsets)edgeInsetsWithWaterLayout:(STRWaterLayout *)waterLayout;
- (CGFloat)columsNumberWithWaterLayout:(STRWaterLayout *)waterLayout;
- (CGFloat)rowsMarginWithWaterLayout:(STRWaterLayout *)waterLayout;
- (CGFloat)columsMarginWithWaterLaout:(STRWaterLayout *)waterLayout;
@end
//出口
#import "STRWaterLayout.h"
static const UIEdgeInsets layoutEdgeInsets = {10, 10, 10, 10}; //上、下、左、右的间距
static const CGFloat   columsMar = 10; //列间距
static const CGFloat   rowMar = 10;   //行间距
static const NSInteger columsNums = 3; //列数


@interface STRWaterLayout()

/**每个cell的高度等信息*/
@property(nonatomic, strong)NSMutableArray   *columMinGapArray;
/**所有布局信息的数组*/
@property(nonatomic, strong)NSMutableArray *layoutAttributesArray;
/**布局的最终的高度*/
@property(nonatomic, assign)CGFloat  contentHeight;


- (UIEdgeInsets)edgeInsets; //上、下、左、右的间距
- (CGFloat)columsNumber;   //列数
- (CGFloat)rowMargin;      //行间距
- (CGFloat)columsMargin;   //列间距
@end
@implementation STRWaterLayout


#pragma mark --- delegate methods

- (UIEdgeInsets)edgeInsets{

    if (self.delegate && [self.delegate respondsToSelector:@selector(edgeInsetsWithWaterLayout:)]){

        return [self.delegate edgeInsetsWithWaterLayout:self];
    }else{
        return layoutEdgeInsets;
    }
}
- (CGFloat)columsNumber{

    if(self.delegate && [self.delegate respondsToSelector:@selector(columsNumberWithWaterLayout:)]){
        return [self.delegate columsNumberWithWaterLayout:self];
    }else{
        return columsNums;
    }
}
- (CGFloat)columsMargin{
    if(self.delegate && [self.delegate respondsToSelector:@selector(columsMarginWithWaterLaout:)]){
        return [self.delegate columsMarginWithWaterLaout:self];
    }else{
        return columsMar;
    }
}
- (CGFloat)rowMargin{
    if(self.delegate && [self.delegate respondsToSelector:@selector(rowsMarginWithWaterLayout:)]){
        return [self.delegate rowsMarginWithWaterLayout:self];
    }else{
        return rowMar;
    }
}
#pragma mark --- private methods

/**在重新布局时会依次调用这四个方法*/

/**每次重新布局时都会调用它*/
- (void)prepareLayout{
    [super prepareLayout];
    self.contentHeight = 0;
    [self.columMinGapArray removeAllObjects];
    [self.layoutAttributesArray removeAllObjects];
    for (NSInteger i = 0; i< [self columsNumber]; i++) { //遍历所有的列数
        [self.columMinGapArray addObject: @([self edgeInsets].top)];
    }
    //当前只有一组,所以这么处理
    NSInteger numbers = [self.collectionView numberOfItemsInSection:0];
    //处理所有的布局数据
    for (NSInteger y = 0; y <numbers;y++) {
        //calls layouts methods,调用布局的方法
        UICollectionViewLayoutAttributes *layoutAttributes = [self layoutAttributesForItemAtIndexPath:[NSIndexPath indexPathForRow:y inSection:0]];
        //再把算出来的布局加到布局数组中。
        [self.layoutAttributesArray addObject:layoutAttributes];
    }
}
/**返回横向滚动或纵向滚动的contentSize*/
- (CGSize)collectionViewContentSize{
    return  CGSizeMake(self.collectionView.frame.size.width, self.contentHeight+[self edgeInsets].bottom);
}
/**返回所有UICollectionViewLayoutAttributes的属性的数组*/
- (nullable NSArray<__kindof UICollectionViewLayoutAttributes *> *)layoutAttributesForElementsInRect:(CGRect)rect{
    return self.layoutAttributesArray;
}
/**返回每个indexPath的布局UICollectionViewLayoutAttributes*/
// 1.首先通过indexPath取出每个collectionViewLayout的布局(uicollectionlayoutAttributes).
// 2.从存储每个cell的高度的数组中取出第一个cell的高度,然后遍历,存储最小高度的cell,并记下它的索引,然后在这个索引下的cell增加下一个cell,然后再遍历看看哪个cell的高度最低,再把它的高度和索引记下来,增加下下个cell,依次类推。
// 3.因为布局的宽度和x,y可以自己设定(也就是能控制),不能控制的是布局的高度,需要从外部传进来,因为需要等比例的,所以需要传当前indexPath的布局的宽度,然后外面传的时候用cell的实际宽度*实际高度/当前布局的宽度。
- (nullable UICollectionViewLayoutAttributes *)layoutAttributesForItemAtIndexPath:(NSIndexPath *)indexPath{

    UICollectionViewLayoutAttributes *layoutAttributes = [UICollectionViewLayoutAttributes layoutAttributesForCellWithIndexPath:indexPath];

    CGFloat minContentHeight = [self.columMinGapArray[0] doubleValue];
    NSInteger minIndex = 0;
    for (NSInteger i = 1; i < self.columMinGapArray.count; i++) {
        if (minContentHeight > [self.columMinGapArray[i] doubleValue]) {
            minContentHeight = [self.columMinGapArray[i] doubleValue];
            minIndex = i;
        }
    }
    CGFloat w = (self.collectionView.frame.size.width - [self edgeInsets].left - [self edgeInsets].right - ([self columsNumber]-1) * [self columsMargin])/[self columsNumber];

    CGFloat y = (minContentHeight == [self edgeInsets].top  ? minContentHeight : minContentHeight + [self rowMargin]);

    CGFloat x = [self edgeInsets].left + minIndex *(w+[self columsMargin]);

    CGFloat h = [self.delegate waterLayout:self layoutHeightAtindexPath:indexPath layoutItemWidth:w];

    layoutAttributes.frame = CGRectMake(x, y, w, h);
    self.columMinGapArray[minIndex] = @(CGRectGetMaxY(layoutAttributes.frame));

    CGFloat contentHeight = [self.columMinGapArray[minIndex] doubleValue];
    if (self.contentHeight < contentHeight) {
        self.contentHeight = contentHeight;
    }
    return layoutAttributes;
}

#pragma mark --- getters and setters
- (NSMutableArray *)columMinGapArray{
    if (_columMinGapArray == nil) {

        _columMinGapArray = [NSMutableArray array];
    }
    return _columMinGapArray;
}
- (NSMutableArray *)layoutAttributesArray{
    if (_layoutAttributesArray == nil) {
        _layoutAttributesArray = [NSMutableArray array];
    }
    return _layoutAttributesArray;
}
@end
2.设置collectionView.
1).注意事项1,需要设置布局,上面创建的layout布局。
2).注意事项2,需要设置代理和数据源,然后把必须实现的方法实现一下。
3).注意事项3,注册cell有两种形式,一个是xib,一个是自定义的cell类,自定义或xib的cell类一定是设置collectionViewcell方法中的cell对象。
- (UICollectionView *)collectionView{
    if (!_collectionView) {

        STRWaterLayout *layout = [[STRWaterLayout alloc] init];
        layout.delegate = self;
        UICollectionView *collectionView = [[UICollectionView alloc] initWithFrame:CGRectMake(0, 0, self.view.bounds.size.width,self.view.bounds.size.height) collectionViewLayout:layout];
        collectionView.delegate = self;
        collectionView.dataSource = self;
        collectionView.mj_header = [MJRefreshNormalHeader headerWithRefreshingTarget:self refreshingAction:@selector(headRefresh)];
        collectionView.mj_footer = [MJRefreshAutoNormalFooter footerWithRefreshingTarget:self refreshingAction:@selector(foorRefresh)];

        [collectionView registerClass:[CollectionViewCell class] forCellWithReuseIdentifier:customCell];
        [self.view addSubview:collectionView];
        self.collectionView = collectionView;
    }
    return _collectionView;
}
3.实现collectionView的数据源方法或代理方法。
- (NSInteger)collectionView:(UICollectionView *)collectionView numberOfItemsInSection:(NSInteger)section{
    return self.dataArray.count; //存储的是布局模型数据,有宽度、高度(最基本的)及其它对象数据。
}
// The cell that is returned must be retrieved from a call to -dequeueReusableCellWithReuseIdentifier:forIndexPath:
- ( UICollectionViewCell *)collectionView:(UICollectionView *)collectionView cellForItemAtIndexPath:(NSIndexPath *)indexPath{

    CollectionViewCell *cell = [collectionView dequeueReusableCellWithReuseIdentifier:customCell forIndexPath:indexPath];
    cell.layoutModel = self.dataArray[indexPath.row];
       return cell;
}
4.获取数据。(我这里是用的plist,这个可以根据项目来设置,这里是举例。)
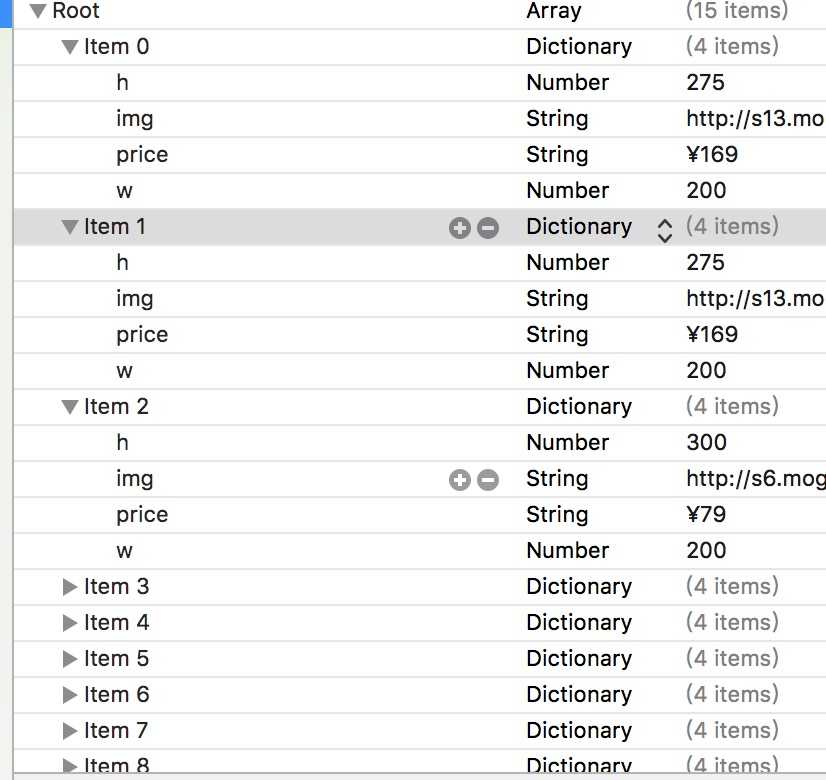
- (NSMutableArray *)dataArray{
    if (!_dataArray) {

        NSArray *data = [[NSArray alloc] initWithContentsOfFile:[[NSBundle mainBundle]pathForResource:@"1" ofType:@"plist"]];
        NSMutableArray *dataA = [NSMutableArray array];
        for (NSDictionary *dic in data) {
            STRWaterLayoutModel *layoutModel = [STRWaterLayoutModel getCollectionModel:dic];
            [dataA addObject:layoutModel];
        }
        _dataArray = dataA;

    }
    return _dataArray;
}
5.实现布局layout的代理,传入当前cell的高度和间距。
- (CGFloat)waterLayout:(STRWaterLayout *)waterLayout layoutHeightAtindexPath:(NSIndexPath *)indexpath layoutItemWidth:(CGFloat)width{
    STRWaterLayoutModel *waterLayoutModel = [self.dataArray objectAtIndex:indexpath.row];

//        return  width * [waterLayoutModel.h doubleValue] / [waterLayoutModel.w doubleValue];
    return [waterLayoutModel.h doubleValue];
}
- (CGFloat)columsNumberWithWaterLayout:(STRWaterLayout *)waterLayout{
    return 3;

}
- (CGFloat)columsMarginWithWaterLaout:(STRWaterLayout *)waterLayout{
    return 10;
}
- (CGFloat)rowsMarginWithWaterLayout:(STRWaterLayout *)waterLayout{
    return 10;
}
- (UIEdgeInsets)edgeInsetsWithWaterLayout:(STRWaterLayout *)waterLayout{
    return  UIEdgeInsetsMake(10,10, 10, 10);
}
三、总结。
1.通过上面瀑布流的核心思想。
2.创建collectionView的一些注意事项。
3.给某个类传数据时,可以用代理,这才是正儿八经遵守MVC的思想,后期改动的话,好扩展,如果用属性的话,后期会很麻烦。
4.代码地址:待后期上传。
自定义UICollectionLayout布局 —— UIKit之学习UICollectionView记录一《瀑布流》
标签:etc 信息 prepare ide ber com src 控制 sig
原文地址:http://www.cnblogs.com/TheYouth/p/6070061.html