标签:ext 存在 loading make setw 跳转 重置 normal layer
先看两行代码:
1.
label2.textColor = [UIColor colorWithHexString:@"707070"];2.
_table.header = [MJRefreshHeader headerWithRefreshingBlock:^{
            dispatch_after(dispatch_time(DISPATCH_TIME_NOW, (int64_t)(2.0 * NSEC_PER_SEC)), dispatch_get_main_queue(), ^{
               // 刷新时的相关处理
            });
        }];
相信大家对上面的两行代码都不会陌生
那么,How it happened?
Because of the Category!
- 利用Objective-C的动态运行时分配机制,可以为现有的类(自己的或系统的或三方库的)添加新方法,这种为现有的类添加新方法的方式称为类别category,他可以为任何类添加新的方法,包括那些没有源代码的类。
- 类别使得无需创建对象类的子类就能完成同样的工作。
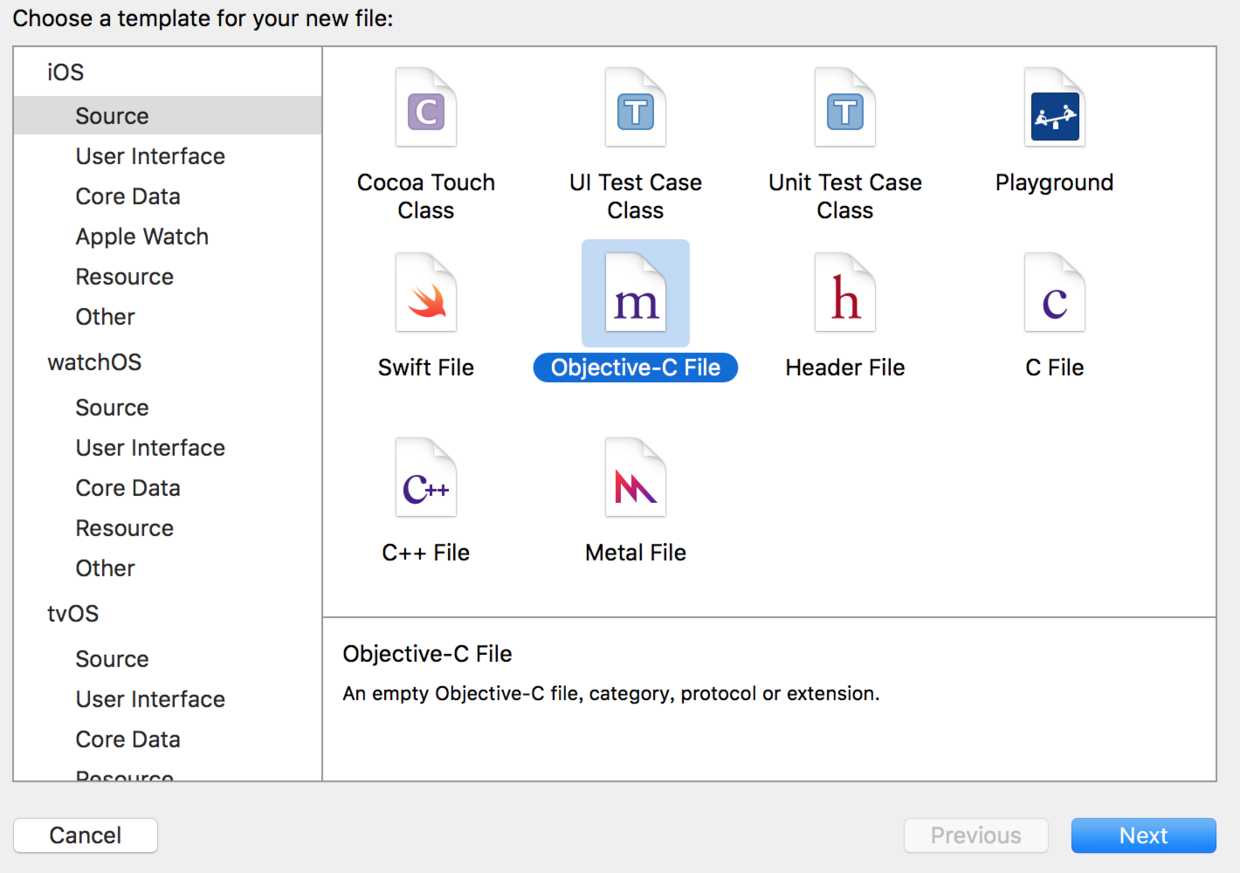
一. 扩展类的方法
这是我们用的最多的,现在就以扩展UIColor的一个读取16进制颜色的方法为例:
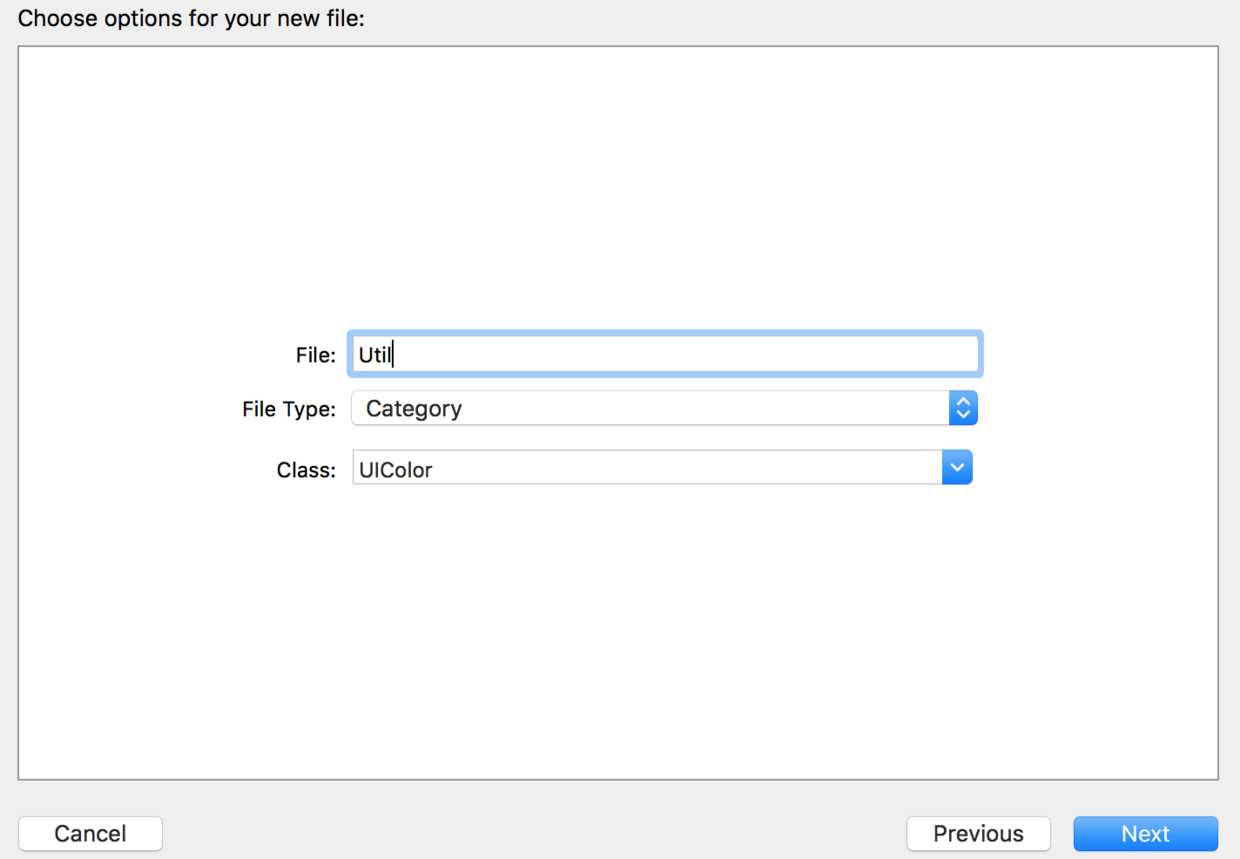
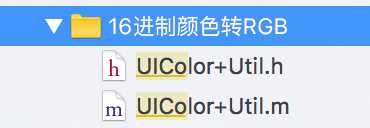
在.m文件中编写扩展的方法
+ (UIColor *)colorWithHexString:(NSString *)color alpha:(CGFloat)alpha
{
    //删除字符串中的空格
    NSString *cString = [[color stringByTrimmingCharactersInSet:[NSCharacterSet whitespaceAndNewlineCharacterSet]] uppercaseString];
    // String should be 6 or 8 characters
    if ([cString length] < 6)
    {
        return [UIColor clearColor];
    }
    // strip 0X if it appears
    //如果是0x开头的,那么截取字符串,字符串从索引为2的位置开始,一直到末尾
    if ([cString hasPrefix:@"0X"])
    {
        cString = [cString substringFromIndex:2];
    }
    //如果是#开头的,那么截取字符串,字符串从索引为1的位置开始,一直到末尾
    if ([cString hasPrefix:@"#"])
    {
        cString = [cString substringFromIndex:1];
    }
    if ([cString length] != 6)
    {
        return [UIColor clearColor];
    }

    // Separate into r, g, b substrings
    NSRange range;
    range.location = 0;
    range.length = 2;
    //r
    NSString *rString = [cString substringWithRange:range];
    //g
    range.location = 2;
    NSString *gString = [cString substringWithRange:range];
    //b
    range.location = 4;
    NSString *bString = [cString substringWithRange:range];

    // Scan values
    unsigned int r, g, b;
    [[NSScanner scannerWithString:rString] scanHexInt:&r];
    [[NSScanner scannerWithString:gString] scanHexInt:&g];
    [[NSScanner scannerWithString:bString] scanHexInt:&b];
    return [UIColor colorWithRed:((float)r / 255.0f) green:((float)g / 255.0f) blue:((float)b / 255.0f) alpha:alpha];
}
在.h文件中将方法暴露出来
/* 从十六进制字符串获取颜色 */
+ (UIColor *)colorWithHexString:(NSString *)color alpha:(CGFloat)alpha;
至此,扩展系统类UIColor的方法成功,需要时,导入头文件直接使用即可:
self.view.backgroundColor=[UIColor colorWithHexString:@"f7f7f9"];二. 扩展类的属性(结合runtime)
这个也是相当实用的,举个??:我们如果要给所有UIButton都添加一个name属性,怎么破?这个时候Category又可以秀一下了(都是套路):
.h文件里定义并暴露属性
/** button的name */
@property (nonatomic,copy) NSString *name;.m文件先导入<objc/runtime.h>,然后处理set和get方法
static void *strKey = &strKey;

- (void)setName:(NSString *)name{
    objc_setAssociatedObject(self, & strKey, name, OBJC_ASSOCIATION_COPY);
}

- (NSString *)name{
    return objc_getAssociatedObject(self, &strKey);
}
然后就可以使用了??
button.name = @"小button";
NSLog(@"%@",button.name);
三. 在没有源代码的情况下可以用来修复BUG
当知道已有类中某个方法有BUG,但是这个类是以库的形式存在的,我们无法直接修改源代码的时候,Category也可以用于替代这个已有类中某个方法的实体,从而达到修复BUG的目的。
说白了就是替换原有的方法,不过替换之前要先想好是否会影响原有的功能以及是否有更深层的bug在后面等着你。。。??
四. 整体替换
one day,产品跑来告诉我:系统的弹窗太丑了,要全部换成自定义弹窗。我怀着忐忑的心情在工程中输入UIAlertView进行搜索,尼玛,300多个搜索结果。。。当时我首先想到的是新建一个类,让它有和UIAlertView有相同的方法,然后将UIAlertView全部换成新类即可。不过后来仔细想想,方法虽行,但是要替换的太多了,万一出现什么差错就麻烦了。于是乎,我使用了Category,重置了UIAlertView的相关方法,仅仅新建了一个Category文件,没有在原来的工程中进行任何修改和替换。这里,应该有一波666??
关于这一点,你首先得清楚Category和继承的区别:
继承Inherit
这个是面向对象语言都有的一个特性,子类会继承父类的方法和属性。
继承会新建一个子类,但类别不会。
弄清Category和继承的区别后,才知道什么时候用Category,什么时候用继承,这个也是面试官喜欢问的,所以不管怎样请务必融会贯通。
有人说:
如果需要添加一个新的变量,则需添加子类。
如果只是添加一个新的方法,用Category是比较好的选择。
关于什么时候用Category,什么时候用继承,我个人经验如下:
以UIButon为例,如果你希望你项目中所有的UIButton都有一个属性:name,那么这个时候直接用Category给UIButton扩展个属性即可。
同样需要给button添加一个name属性,但是这种button只在某个或几个(反正就是用的情况不多)页面使用时,这时我通常采取继承的方式自定义一个button。
先看一张UI设计图:
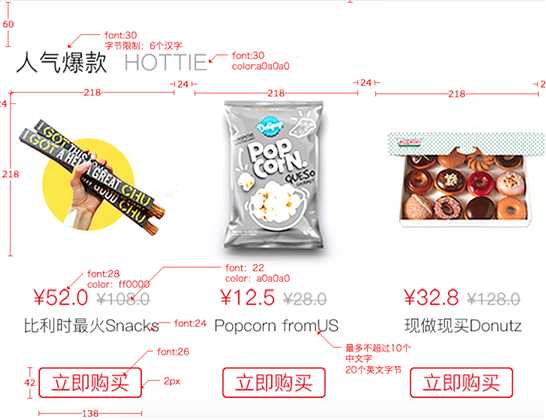
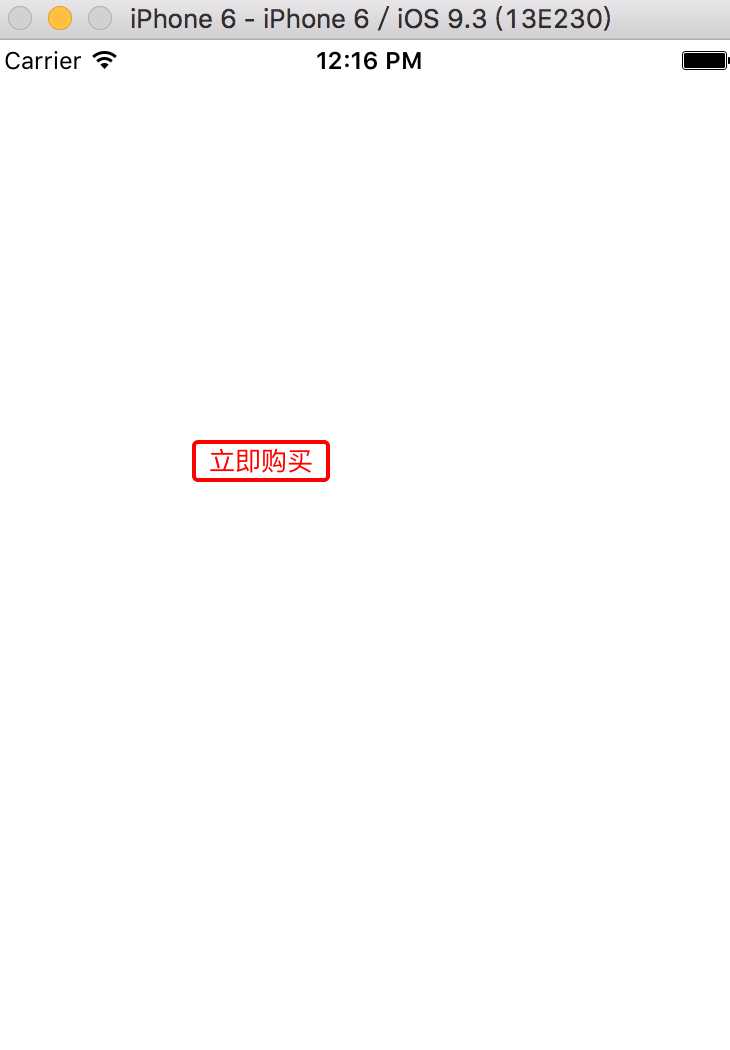
项目中会大量使用到带红色边框的button,如果我们每次都来实现这个边框效果必然非常繁琐。这个时候用Category给UIButton扩展一个自定义构造方法便可完美解决这个烦恼??
代码如下:
/**
 *  自定义带边框的button
 *
 *  @param frame       frame
 *  @param borderColor 边框颜色
 *  @param borderWidth 边框宽度
 *
 *  @return 自定义带边框的button
 */
- (instancetype)initWithFrame:(CGRect)frame borderColor:(UIColor *)borderColor borderWidth:(CGFloat)borderWidth{
    if (self = [super initWithFrame:frame]) {
        // 边框颜色
        self.layer.borderColor = borderColor.CGColor;
        // 边框宽度
        self.layer.borderWidth = borderWidth;
        // title颜色(与边框颜色一致)
        [self setTitleColor:borderColor forState:UIControlStateNormal];
        // 圆角
        self.layer.cornerRadius = 3;
        // 字号
        [self.titleLabel setFont:[UIFont systemFontOfSize:13]];
    }
    return self;
}
使用:
UIButton *button = [[UIButton alloc]initWithFrame:CGRectMake(100, 200, 69, 21) borderColor:[UIColor colorWithHexString:@"ff0000"] borderWidth:2];
    [button setTitle:@"立即购买" forState:UIControlStateNormal];
    [self.view addSubview:button];
效果图:
.h 文件
@interface UIView (frameAdjust)

// 左上角x坐标
- (CGFloat)x;
- (void)setX:(CGFloat)x;

// 左上角y坐标
- (CGFloat)y;
- (void)setY:(CGFloat)y;

// 宽
- (CGFloat)width;
- (void)setWidth:(CGFloat)width;

// 高
- (CGFloat)height;
- (void)setHeight:(CGFloat)height;

// 中心点x
- (CGFloat)centerX;
- (void)setCenterX:(CGFloat)x;

// 中心点y
- (CGFloat)centerY;
- (void)setCenterY:(CGFloat)y;

/** 获取最大x */
- (CGFloat)maxX;
/** 获取最小x */
- (CGFloat)minX;

/** 获取最大y */
- (CGFloat)maxY;
/** 获取最小y */
- (CGFloat)minY;

@end
.m 文件
@implementation UIView (frameAdjust)

- (CGFloat)x{
    return self.frame.origin.x;
}

- (void)setX:(CGFloat)x{
    self.frame = CGRectMake(x, self.y, self.width, self.height);
}

- (CGFloat)y{
    return self.frame.origin.y;
}

- (void)setY:(CGFloat)y{
    self.frame = CGRectMake(self.x, y, self.width, self.height);
}

- (CGFloat)width{
    return self.frame.size.width;
}

- (void)setWidth:(CGFloat)width{
    self.frame = CGRectMake(self.x, self.y, width, self.height);
}

- (CGFloat)height{
    return self.frame.size.height;
}

- (void)setHeight:(CGFloat)height{
    self.frame = CGRectMake(self.x, self.y, self.width, height);
}

- (CGFloat)centerX{
    return self.center.x;
}

- (void)setCenterX:(CGFloat)x{
    self.center = CGPointMake(x, self.center.y);
}

- (CGFloat)centerY{
    return self.center.y;
}

- (void)setCenterY:(CGFloat)y{
    self.center = CGPointMake(self.center.x, y);
}

/** 获取最大x */
- (CGFloat)maxX{
    return self.x + self.width;
}
/** 获取最小x */
- (CGFloat)minX{
    return self.x;
}

/** 获取最大y */
- (CGFloat)maxY{
    return self.y + self.height;
}
/** 获取最小y */
- (CGFloat)minY{
    return self.y;
}

@endCategory在项目中的运用不仅仅这些,以上只是抛砖引玉。那么现在问题来了:想必看官们也有自己的一些使用心得吧,真心求分享(不分享的木JJ,自己看着办??)。另,有任何问题欢迎提出??
今天敲代码时,有个功能要多次用到:让UILabel的宽度随文本内容多少而改变。UILabel有一个方法sizeToFit可以完成这个任务,但是,sizeToFit使用后,UILabel的文字就跑到左上角了,也就是说这个时候还要调整label的中心,一次还好,如果每次都这样就太繁琐了。所以这个时候Category又可以派上用场了,代码如下:
@interface UILabel (util)

/** 将label的宽度调整到适应文本内容的最低值 */
- (void)adjustWidthToMin;

@end@implementation UILabel (util)
/** 将label的宽度调整到适应文本内容的最低值 */
- (void)adjustWidthToMin{
// 先记录label原本的中心Y
CGFloat centerY = self.centerY;
// 调整label
[self sizeToFit];
// 调整中心
self.centerY = centerY;
}
@end当你敲代码时感觉系统提供的方法不够用时,尽情的使用Category扩展吧!
今天多次遇到需要在View里执行视图控制器跳转的情况,也就是说获取当前view所在的viewController然后跳转,它的原理是遍历当前view的superView,找到那个viewController。这个时候,又可以给view添加个category了,代码如下:
/** 获取当前view所在的viewController */
- (UIViewController *)getCurrentViewController{
    for (UIView* next = [self superview]; next; next = next.superview)
    {
        UIResponder *nextResponder = [next nextResponder];
        if ([nextResponder isKindOfClass:[UIViewController class]])
        {
            UIViewController *vc = (UIViewController *)nextResponder;
            return vc;
        }
    }
    return nil;
}
下面是一个简单的运用,改变一个button所在的视图控制器的背景颜色(UIButton继承于UIControl继承于UIView)
@interface ViewController (){
    UIButton *_button;
}

@end

@implementation ViewController

- (void)viewDidLoad {
    [super viewDidLoad];
    // Do any additional setup after loading the view, typically from a nib.

    // 创建一个button
    _button = [[UIButton alloc]initWithFrame:CGRectMake(90, 90, 90, 90)];
    [self.view addSubview:_button];
    _button.backgroundColor = [UIColor orangeColor];
    [_button addTarget:self action:@selector(changeColor) forControlEvents:UIControlEventTouchDown];
}

- (void)changeColor{
    // 获取button所在的viewController
    UIViewController *currentVC = [_button getCurrentViewController];
    // 改变viewController的背景颜色
    currentVC.view.backgroundColor = [UIColor redColor];
}
标签:ext 存在 loading make setw 跳转 重置 normal layer
原文地址:http://www.cnblogs.com/fengmin/p/6114202.html