标签:while tps string 自动生成 reader 写入 eve 1.2 idle
MyBatis 是支持普通 SQL 查询,存储过程和高级映射的优秀持久层框架。MyBatis 消除了几乎所有的 JDBC 代码和参数的手工设置以及结果集的检索。MyBatis 使用简单的 XML 或注解用于配置和原始映射,将接口和 Java 的 POJOs(Plan Old Java Objects,普通的 Java 对象)映射成数据库中的记录。
无论是用过的 hibernate,Mybatis,你都可以法相他们有一个共同点:
创建用户表:
Create TABLE `user` (
  `id` int(11) NOT NULL AUTO_INCREMENT,
  `userName` varchar(50) DEFAULT NULL,
  `userAge` int(11) DEFAULT NULL,
  `userAddress` varchar(200) DEFAULT NULL,
  PRIMARY KEY (`id`)
) ENGINE=InnoDB AUTO_INCREMENT=2 DEFAULT CHARSET=utf8;

Insert INTO `user` VALUES (‘1‘, ‘summer‘, ‘100‘, ‘shanghai,pudong‘);
结构图如下:
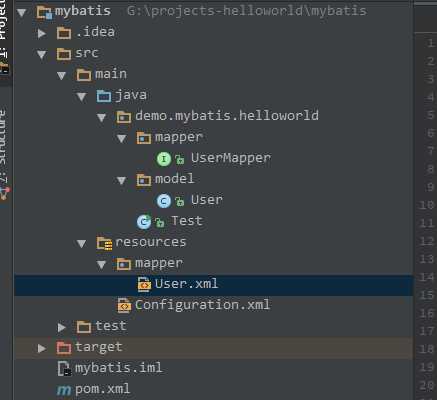
Configuration.xml: 这里使用mariadb作为开发环境
<?xml version="1.0" encoding="UTF-8" ?>
<!DOCTYPE configuration PUBLIC "-//mybatis.org//DTD Config 3.0//EN"
        "http://mybatis.org/dtd/mybatis-3-config.dtd">
<configuration>
    <typeAliases>
        <typeAlias alias="User" type="demo.mybatis.helloworld.model.User"/>
    </typeAliases>

    <environments default="development">
        <environment id="development">
            <transactionManager type="JDBC"/>
            <dataSource type="POOLED">
                <property name="driver" value="org.mariadb.jdbc.Driver"/>
                <property name="url" value="jdbc:mariadb://192.168.1.202:3306/demo" />
                <property name="username" value="root"/>
                <property name="password" value="111111"/>
            </dataSource>
        </environment>
    </environments>

    <mappers>
        <mapper resource="mapper/User.xml"/>
    </mappers>
</configuration>
pom.xml:
<?xml version="1.0" encoding="UTF-8"?>
<project xmlns="http://maven.apache.org/POM/4.0.0"
         xmlns:xsi="http://www.w3.org/2001/XMLSchema-instance"
         xsi:schemaLocation="http://maven.apache.org/POM/4.0.0 http://maven.apache.org/xsd/maven-4.0.0.xsd">
    <modelVersion>4.0.0</modelVersion>

    <groupId>demo</groupId>
    <artifactId>mybatis</artifactId>
    <version>1.0-SNAPSHOT</version>
    <dependencies>
        <!-- https://mvnrepository.com/artifact/org.mybatis/mybatis -->
        <dependency>
            <groupId>org.mybatis</groupId>
            <artifactId>mybatis</artifactId>
            <version>3.2.8</version>
        </dependency>

        <!-- https://mvnrepository.com/artifact/org.mariadb.jdbc/mariadb-java-client -->
        <dependency>
            <groupId>org.mariadb.jdbc</groupId>
            <artifactId>mariadb-java-client</artifactId>
            <version>1.4.6</version>
        </dependency>

    </dependencies>
    <build>
        <plugins>
            <plugin>
                <groupId>org.apache.maven.plugins</groupId>
                <artifactId>maven-compiler-plugin</artifactId>
                <version>3.1</version>
                <configuration>
                    <source>1.8</source>
                    <target>1.8</target>
                </configuration>
            </plugin>
        </plugins>
    </build>
</project>
User.xml:
<?xml version="1.0" encoding="UTF-8" ?>
<!DOCTYPE mapper PUBLIC "-//mybatis.org//DTD Mapper 3.0//EN"
        "http://mybatis.org/dtd/mybatis-3-mapper.dtd">

<mapper namespace="demo.mybatis.helloworld.mapper.UserMapper">
    <select id="selectUserByID" parameterType="int" resultType="User">
        select * from `user` where id = #{id}
    </select>
</mapper>
User.java:
public class User {
    private int id;
    private String userName;
    private Integer userAge;
    private String userAddress;
    //get and set...
}
UserMapper:
public interface UserMapper {
    User selectUserByID(int id);
}
Test.java:
import java.io.Reader;

import demo.mybatis.helloworld.mapper.UserMapper;
import demo.mybatis.helloworld.model.User;
import org.apache.ibatis.io.Resources;
import org.apache.ibatis.session.SqlSession;
import org.apache.ibatis.session.SqlSessionFactory;
import org.apache.ibatis.session.SqlSessionFactoryBuilder;

/**
 * Created by carl.yu on 2016/12/8.
 */
public class Test {
    private static SqlSessionFactory sqlSessionFactory;
    private static Reader reader;

    static {
        try {
            reader = Resources.getResourceAsReader("Configuration.xml");
            sqlSessionFactory = new SqlSessionFactoryBuilder().build(reader);
        } catch (Exception e) {
            e.printStackTrace();
        }
    }

    public static SqlSessionFactory getSession() {
        return sqlSessionFactory;
    }

    public static void main(String[] args) {
        SqlSession session = sqlSessionFactory.openSession();
        try {
            UserMapper userOperation=session.getMapper(UserMapper.class);
            User user = userOperation.selectUserByID(1);
            System.out.println(user.getUserAddress());
            System.out.println(user.getUserName());
        } finally {
            session.close();
        }
    }
}
这里直接用接口的方式编程。这种方式,要注意的一个地方就是。在 User.xml 的配置文件中,mapper namespace="demo.mybatis.helloworld.mapper.UserMapper" ,命名空间非常重要,不能有错,必须与我们定义的 package 和 接口一致。如果不一致就会出错,这一章主要在上一讲基于接口编程的基础上完成如下事情:
查询出列表,也就是返回 list, 在我们这个例子中也就是 List , 这种方式返回数据,需要在 User.xml 里面配置返回的类型 resultMap, 注意不是 resultType, 而这个 resultMap 所对应的应该是我们自己配置的
<!-- 为了返回list 类型而定义的returnMap -->
    <resultMap type="User" id="resultListUser">
        <id column="id" property="id" />
        <result column="userName" property="userName" />
        <result column="userAge" property="userAge" />
        <result column="userAddress" property="userAddress" />
    </resultMap>
查询列表的语句在 User.xml 中
<!-- 返回list 的select 语句,注意 resultMap 的值是指向前面定义好的 -->
    <select id="selectUsers" parameterType="string" resultMap="resultListUser">
        select * from user where userName like #{userName}
    </select>
在 UserMapper接口中增加方法:public List selectUsers(String userName);
现在在 Test 类中做测试
public void getUserList(String userName){
        SqlSession session = sqlSessionFactory.openSession();
        try {
            UserMapper userOperation=session.getMapper(UserMapper.class);
            List<User> users = userOperation.selectUsers(userName);
            for(User user:users){
                System.out.println(user.getId()+":"+user.getUserName()+":"+user.getUserAddress());
            }

        } finally {
            session.close();
        }
    }
现在在 main 方法中可以测试:
public static void main(String[] args) {
        Test testUser=new Test();
        testUser.getUserList("%");
    }
可以看到,结果成功查询出来。如果是查询单个数据的话,用第二讲用过的方法就可以了。
在 UseMapper接口中增加方法:
public void addUser(User user);
在 User.xml 中配置
<!--执行增加操作的SQL语句。id和parameterType
       分别与UserMapper接口中的addUser方法的名字和
       参数类型一致。以#{name}的形式引用Student参数
       的name属性,MyBatis将使用反射读取Student参数
       的此属性。#{name}中name大小写敏感。引用其他
       的gender等属性与此一致。seGeneratedKeys设置
       为"true"表明要MyBatis获取由数据库自动生成的主
       键;keyProperty="id"指定把获取到的主键值注入
       到Student的id属性-->
    <insert id="addUser" parameterType="User"
        useGeneratedKeys="true" keyProperty="id">
        insert into user(userName,userAge,userAddress)
             values(#{userName},#{userAge},#{userAddress})
    </insert>
然后在 Test 中写测试方法:
/**
     * 测试增加,增加后,必须提交事务,否则不会写入到数据库.
     */
    public void addUser(){
        User user=new User();
        user.setUserAddress("人民广场");
        user.setUserName("飞鸟");
        user.setUserAge(80);
        SqlSession session = sqlSessionFactory.openSession();
        try {
            UserMapper userOperation=session.getMapper(UserMapper.class);
            userOperation.addUser(user);
            session.commit();
            System.out.println("当前增加的用户 id为:"+user.getId());
        } finally {
            session.close();
        }
    }
方法类似,先在 UserMapper中增加方法:
public void updateUser(User user);
然后配置 User.xml
<update id="updateUser" parameterType="User" >
        update user set userName=#{userName},userAge=#{userAge},userAddress=#{userAddress} where id=#{id}
   </update>
Test 类总的测试方法如下:
public void updateUser(){
        //先得到用户,然后修改,提交。
        SqlSession session = sqlSessionFactory.openSession();
        try {
            UserMapper userOperation=session.getMapper(UserMapper.class);
            User user = userOperation.selectUserByID(4);
            user.setUserAddress("原来是魔都的浦东创新园区");
            userOperation.updateUser(user);
            session.commit();

        } finally {
            session.close();
        }
    }
同理,UserMapper增加方法:public void deleteUser(int id);
配置 User.xml
<delete id="deleteUser" parameterType="int">
        delete from user where id=#{id}
    </delete>
然后在 Test 类中写测试方法:
 /**
     * 删除数据,删除一定要 commit.
     * @param id
     */
    public void deleteUser(int id){
        SqlSession session = sqlSessionFactory.openSession();
        try {
            IUserOperation userOperation=session.getMapper(IUserOperation.class);
            userOperation.deleteUser(id);
            session.commit();
        } finally {
            session.close();
        }
    }
这样,所有增删改查都完成了,注意在增加,更改,删除的时候要调用 session.commit(),这样才会真正对数据库进行操作,否则是没有提交的。
到此为止,简单的单表操作,应该都会了,接下来的时间了,我会讲多表联合查询,以及结果集的选取。
参考文章:http://www.mybatis.org/spring-boot-starter/mybatis-spring-boot-autoconfigure/
MyBatis-Spring-Boot-Starter will:
可以配置的信息有:
| Property | Description |
|---|---|
| config-location | MyBatis xml config file (optional) |
| mapper-locations | Mapper xml config files (optional) |
| type-aliases-package | Package to search for type aliases (optional) |
| type-handlers-package | Package to search for type aliases (optional) |
| executor-type | Executor type: SIMPLE, REUSE, BATCH (optional) |
文件图:
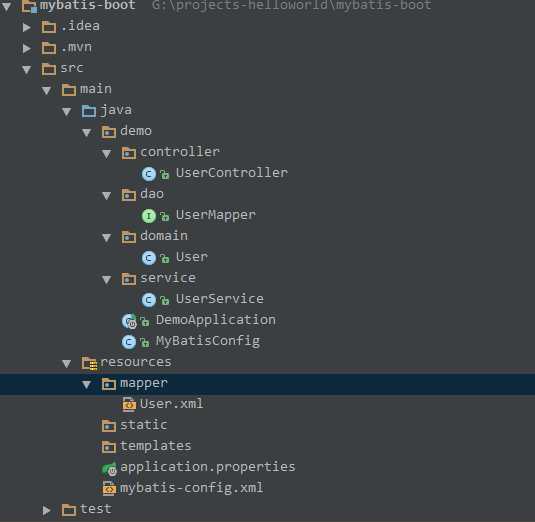
pom.xml:
<?xml version="1.0" encoding="UTF-8"?>
<project xmlns="http://maven.apache.org/POM/4.0.0" xmlns:xsi="http://www.w3.org/2001/XMLSchema-instance"
         xsi:schemaLocation="http://maven.apache.org/POM/4.0.0 http://maven.apache.org/xsd/maven-4.0.0.xsd">
    <modelVersion>4.0.0</modelVersion>

    <groupId>demo</groupId>
    <artifactId>demo.mybatis</artifactId>
    <version>0.0.1-SNAPSHOT</version>
    <packaging>jar</packaging>

    <name>demo</name>
    <description>mybatis spring boot demo</description>

    <parent>
        <groupId>org.springframework.boot</groupId>
        <artifactId>spring-boot-starter-parent</artifactId>
        <version>1.4.2.RELEASE</version>
        <relativePath/> <!-- lookup parent from repository -->
    </parent>

    <properties>
        <project.build.sourceEncoding>UTF-8</project.build.sourceEncoding>
        <project.reporting.outputEncoding>UTF-8</project.reporting.outputEncoding>
        <java.version>1.8</java.version>
    </properties>

    <dependencies>
        <dependency>
            <groupId>org.mybatis.spring.boot</groupId>
            <artifactId>mybatis-spring-boot-starter</artifactId>
            <version>1.1.1</version>
        </dependency>
        <dependency>
            <groupId>org.springframework.boot</groupId>
            <artifactId>spring-boot-starter-web</artifactId>
        </dependency>

        <!-- https://mvnrepository.com/artifact/com.alibaba/druid -->
        <dependency>
            <groupId>com.alibaba</groupId>
            <artifactId>druid</artifactId>
            <version>1.0.18</version>
        </dependency>
        <!-- https://mvnrepository.com/artifact/org.mariadb.jdbc/mariadb-java-client -->
        <dependency>
            <groupId>org.mariadb.jdbc</groupId>
            <artifactId>mariadb-java-client</artifactId>
            <version>1.4.6</version>
        </dependency>

        <dependency>
            <groupId>org.springframework.boot</groupId>
            <artifactId>spring-boot-starter-test</artifactId>
            <scope>test</scope>
        </dependency>
    </dependencies>

    <build>
        <plugins>
            <plugin>
                <groupId>org.springframework.boot</groupId>
                <artifactId>spring-boot-maven-plugin</artifactId>
            </plugin>
        </plugins>
    </build>
</project>
application.properties:
jdbc.driverClassName=org.mariadb.jdbc.Driver
jdbc.url=jdbc:mariadb://192.168.1.202:3306/demo
jdbc.username=root
jdbc.password=111111

mybatis.config-location=classpath:mybatis-config.xml

logging.level.root=WARN
logging.level.sample.mybatis.mapper=TRACE
mybatis-config.xml
<?xml version="1.0" encoding="UTF-8" ?>
<!DOCTYPE configuration
        PUBLIC "-//mybatis.org//DTD Config 3.0//EN"
        "http://mybatis.org/dtd/mybatis-3-config.dtd">
<configuration>
    <typeAliases>
        <!--<package name="sample.mybatis.domain"/>-->
        <typeAlias alias="User" type="demo.domain.User"/>
    </typeAliases>
    <mappers>
        <mapper resource="mapper/User.xml"/>
    </mappers>
</configuration>
MyBatisConfig: 配置数据源
package demo;

import com.alibaba.druid.pool.DruidDataSourceFactory;
import org.springframework.beans.factory.annotation.Autowired;
import org.springframework.context.annotation.Bean;
import org.springframework.context.annotation.Configuration;
import org.springframework.core.env.Environment;

import javax.sql.DataSource;
import java.util.Properties;

/**
 * Created by carl.yu on 2016/12/8.
 */
@Configuration
public class MyBatisConfig {
    @Autowired
    private Environment env;

    /**
     * 创建数据源
     *
     * @Primary 该注解表示在同一个接口有多个实现类可以注入的时候,默认选择哪一个,而不是让@autowire注解报错
     */
    @Bean
    //@Primary
    public DataSource getDataSource() throws Exception {
        Properties props = new Properties();
        props.put("driverClassName", env.getProperty("jdbc.driverClassName"));
        props.put("url", env.getProperty("jdbc.url"));
        props.put("username", env.getProperty("jdbc.username"));
        props.put("password", env.getProperty("jdbc.password"));
        props.put("testWhileIdle", "false");
        return DruidDataSourceFactory.createDataSource(props);
    }
}
配置User.xml:
<?xml version="1.0" encoding="UTF-8" ?>
<!DOCTYPE mapper PUBLIC "-//mybatis.org//DTD Mapper 3.0//EN"
        "http://mybatis.org/dtd/mybatis-3-mapper.dtd">

<mapper namespace="demo.dao.UserMapper">
    <select id="selectUserByID" parameterType="int" resultType="User">
        select * from `user` where id = #{id}
    </select>

    <resultMap type="User" id="resultListUser">
        <id column="id" property="id"/>
        <result column="userName" property="userName"/>
        <result column="userAge" property="userAge"/>
        <result column="userAddress" property="userAddress"/>
    </resultMap>

    <!-- 返回list 的select 语句,注意 resultMap 的值是指向前面定义好的 -->
    <select id="selectUsers" parameterType="string" resultMap="resultListUser">
        select * from user where userName like #{userName}
    </select>
    <!--执行增加操作的SQL语句。id和parameterType
       分别与UserMapper接口中的addUser方法的名字和
       参数类型一致。以#{name}的形式引用Student参数
       的name属性,MyBatis将使用反射读取Student参数
       的此属性。#{name}中name大小写敏感。引用其他
       的gender等属性与此一致。seGeneratedKeys设置
       为"true"表明要MyBatis获取由数据库自动生成的主
       键;keyProperty="id"指定把获取到的主键值注入
       到Student的id属性-->
    <insert id="addUser" parameterType="User"
            useGeneratedKeys="true" keyProperty="id">
        insert into user(userName,userAge,userAddress)
        values(#{userName},#{userAge},#{userAddress})
    </insert>

    <update id="updateUser" parameterType="User">
        update user set userName=#{userName},userAge=#{userAge},userAddress=#{userAddress} where id=#{id}
    </update>

    <delete id="deleteUser" parameterType="int">
        delete from user where id=#{id}
    </delete>
</mapper>
配置UserMapper:
package demo.dao;


import demo.domain.User;
import org.apache.ibatis.annotations.Mapper;

import java.util.List;

/**
 * Created by carl.yu on 2016/12/8.
 */
@Mapper
public interface UserMapper {
    User selectUserByID(int id);

    public List selectUsers(String userName);

    public void addUser(User user);

    public void updateUser(User user);
}
可以直接使用了: UserService
package demo.service;

import demo.dao.UserMapper;
import demo.domain.User;
import org.springframework.beans.factory.annotation.Autowired;
import org.springframework.stereotype.Service;
import org.springframework.transaction.annotation.Transactional;

import java.util.List;

/**
 * Created by carl.yu on 2016/12/8.
 */
@Service
public class UserService {
    @Autowired
    private UserMapper userMapper;

    @Transactional(readOnly = true)
    public List<User> findAll() {
        return userMapper.selectUsers("%");
    }
}
标签:while tps string 自动生成 reader 写入 eve 1.2 idle
原文地址:http://www.cnblogs.com/carl10086/p/6146455.html