首先简单说下为什么会用grafana,最近公司在新机房上了300多台物理机,其中有60台分配给我做OpenStack的私有云环境。OpenStack部署很快,三下五除二很快就上线了Mitaka的版本。但是在分给各个运维使用一段时间后,暴露一些问题。
场景一
某个干坏事的小朋友在虚拟机里面搞性能测试,直接打满cpu使用率和物理机的网络IO,影响这个物理机上的其他虚拟机。
场景二
OpenStack的Cinder卷采用的LVM + Iscsi方式提供,线上虚拟机的某个在某个时间点同步大量数据到数据卷,造成打满存储网络。直接表现的现象就是虚拟机里面的/dev/vdb设备掉线,造成异常。
种种现象表明,我需要接入一个监控系统,实现快速定位到某个物理机或者虚拟机的异常指标。之前打算采用公司现有的zabbix监控框架,但是有两个点让我放弃使用zabbix的方案。其一,zabbix在绘图制表以及对指标排序方面相比grafana来还是有一定差距;二来,部门负责监控的同事太忙了,没时间开发我提出的需求,没办法只有自己动手(苦笑脸)。
选择
既然要自己动手,那就要选择合适自己监控系统。目前网上的方案太多,刚开始找的时候简直一脸懵逼,直到我看到一片文章,标题我忘了,大概内容是利用Collectd + Influxdb + Grafana来做虚拟机监控。遗憾的是,那篇文章讲得很短,几乎没有实质性的内容。好吧,既然有人提出过方案,那我没理由不试一下。
Collectd
简单来说Collectd是用C开发一套高性能的监控指标采集agent,官网上已经有丰富的插件,实现各种监控指标。同时也支持通过Shell、Python、Ruby、Perl等一些编程语言实现扩展的监控指标。这里需要注意的是,自定义的监控指标是没有在Collectd默认的类型数据库里面(/usr/share/collectd/types.db),所以如果要自定义监控,需要创建一个自己的types.db,然后在collectd的配置文件里面加上
TypesDB "/usr/local/share/types.db.custom"
Github上有个collectd-rabbitmq插件,可以让我们很好的理解collectd的采集机制。
另外,无意间发现一位大神的博客bolg.kankanan.com,里面Collectd相关的文章相当不错。
Influxdb
又一个用go语言写出来的时序数据库神器,广泛用于监控系统的后端存储,对计算大量数据的指标有着不俗的表现。同时提供丰富的查询函数。最重要的是提供collectd的插件,可以让collectd直接将采集到的指标通过udp协议发往数据库。
Grafana
不用多说,炫酷的监控前端数据展示工具。支持多种数据源接入,以及多种插件。
开工
既然选好工具,那就开始动手吧。首先我选择CentOS7系统,添加EPEl源。
1.安装Collectd
yum install collectd collectd-lvm collectd-virt
collectd 采集普通指标
collectd-lvm 用来采集cinder-volumes指标
collectd-virt 用来采集虚拟机指标
配置文件
#cat /etc/collectd.conf |grep -v ^#|sed ‘/^$/d‘
LoadPlugin syslog
LoadPlugin cpu
LoadPlugin df
LoadPlugin disk
LoadPlugin interface
LoadPlugin load
LoadPlugin lvm
LoadPlugin memory
LoadPlugin network
<Plugin network>
    server "<influxdb ip>" "25826"
</Plugin>
Include "/etc/collectd.d"
libvirt插件配置
 cat /etc/collectd.d/libvirt.conf

 LoadPlugin virt
<Plugin virt>
       Connection "qemu:///system"
       RefreshInterval 60
#       Domain "name"
#       BlockDevice "name:device"
#       InterfaceDevice "name:device"
#       IgnoreSelected false
       HostnameFormat uuid
#       InterfaceFormat name
       PluginInstanceFormat  uuid
</Plugin>
配好后启动collectd即可
2.安装InfluxDB
#axel -n 20 wget https://dl.influxdata.com/influxdb/releases/influxdb-1.1.1.x86_64.rpm
#yum localinstall -y influxdb-1.1.1.x86_64.rpm
配置文件
/etc/influxdb/influxdb.conf
[[collectd]]
  enabled = true
  bind-address = "10.16.30.47:25826"
  database = "collectd"
  retention-policy = ""
  typesdb = "/usr/share/collectd/types.db"
3.安装Grafana
#axel -n 20 https://grafanarel.s3.amazonaws.com/builds/grafana-4.0.2-1481203731.x86_64.rpm
#yum localinstall -y grafana-4.0.2-1481203731.x86_64.rpm
4.构建OpenStack的Influx索引表
由于通过Collectd采集上来的指标中,没有宿主机AZ,也没有物理机与虚拟的映射关系,更没有租户和虚拟机的信息。这个时候就需要自己动手去构建索引表了。我这里写了一个很Low逼的Shell脚本,来帮助我定时向InfluxDB里面Post最新的OpenStack信息。
脚本.
#!/bin/bash
influxdb_url="http://<InluxDB ip>:8086"
database="collectd"
write_data="${influxdb_url}/write?db=${database}"
log_file="/var/log/mitaka/mapping_hosts.log"
log_time=`date +%Y-%m-%d\ %T`
tmp_file="/tmp/.measurement.tmp"
map_file="/tmp/.map.tmp"
tenant_file="/tmp/.tenant_map"
function delete_mensurement_hosts(){
    echo "$(date +%Y-%m-%d\ %T)    Delete measurement from databases collectd." >> ${log_file}
    curl -Ss -POST ${influxdb_url}/query?db=collectd --data-urlencode "q=DROP measurement hosts"  >> ${log_file}
    if [[ $? -eq 0 ]];then
    echo "$(date +%Y-%m-%d\ %T)    Delete successfully" >> ${log_file}
    return 0
    else
    echo "$(date +%Y-%m-%d\ %T)    Delete faild, unknown error." >> ${log_file}
    return 1
    fi
}
function get_mapping(){
    touch ${tmp_file}
    source /root/.keystonerc_admin
    openstack server list --all --long -f value 2>&1 >> ${tmp_file}
    echo "$(date +%Y-%m-%d\ %T)    Get mapping host." >> ${log_file}
    nova list --all-tenants|grep vlan |awk  -F ‘|‘ ‘{print $2 $4}‘ > ${map_file}
    for uuid in `cat ${tenant_file} |awk ‘{print $1}‘`;
    do
    user=`cat ${tenant_file} |grep $uuid | awk ‘{print $2}‘`
    sed -i "s/${uuid}/${user}/g" ${map_file}
    done
}
function Post_measurements_hosts(){
    for uuid in `cat ${tmp_file}|awk ‘{print $1}‘`;
    do
    availability_zone=`cat ${tmp_file} |grep -w $uuid |awk ‘{print $7}‘`
    instance_name=`cat ${tmp_file} |grep -w $uuid |awk ‘{print $2}‘`
    host=`cat ${tmp_file} |grep -w $uuid |awk ‘{print $8}‘`
    ipaddress=`cat ${tmp_file} |grep -w $uuid |awk ‘{print $6}‘`
    tenant=`cat ${map_file} |grep -w $uuid |awk ‘{print $2}‘`
        echo "$(date +%Y-%m-%d\ %T)    Post $write_data  $uuid $availability_zone $instance_name $host ${ipaddress#*=} ${tenant}." >> ${log_file}
        curl -Ss -i -XPOST "${write_data}" --data-binary "hosts,uuid=${uuid},instance=${instance_name},ip=${ipaddress#*=},availability_zone=${availability_zone},host=${host},tenant=${tenant} value=1" >> ${log_file}
    done
}
get_mapping
delete_mensurement_hosts
Post_measurements_hosts
rm -rf ${tmp_file}
rm -rf ${map_file}
然后实现的效果就如下
现在有了这个表,就可以愉快的在Grafana上创建templating了。
5.绘图
DashBoard
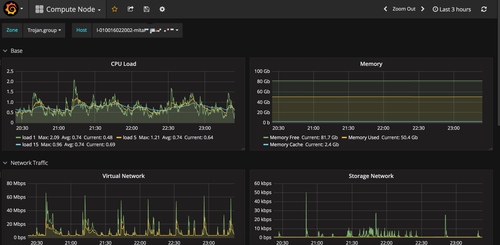
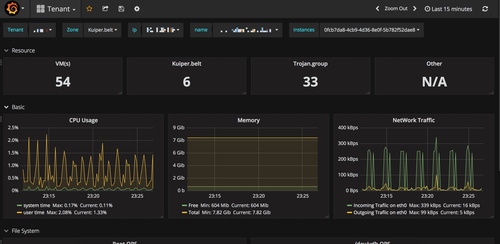
dashboard主要汇总OpenStack的资源使用情况,同时对物理机和虚拟机的使用情况做排序。这样在单位时间内,我就能知道是哪台物理机或虚拟机占用的资源最多。
计算节点
templating
计算节点当然需要索引availabilit_zone和host信息了。所以templating的配置如下
show tag values from hosts with key = "availability_zone"
show tag values from hosts with key="host" where availability_zone =~ /$Zone$/
指标

租户信息
templating
show tag values from hosts with key = "tenant"
show tag values from hosts with key = "availability_zone" where tenant=~ /$Tenant$/
show tag values from hosts with key = "ip" where tenant=~ /$Tenant$/ and availability_zone =~ /$Zone$/
show tag values from hosts with key = "instance" where ip =~ /$ip$/show tag values from hosts with key = "uuid" where ip =~ /$ip$/
指标

本文出自 “Magine” 博客,谢绝转载!
原文地址:http://magine.blog.51cto.com/2807795/1886375