标签:beginning apache 数据源 file ash ack uid ;; stash
官方文档:https://www.elastic.co/guide/en/logstash/5.x/deploying-and-scaling.html
流程图
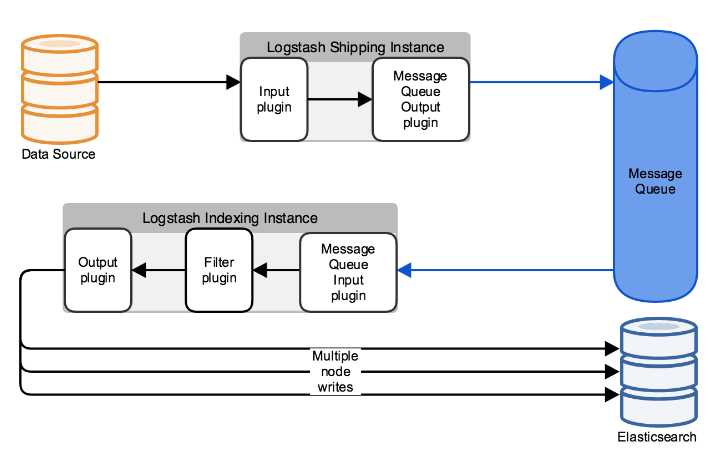
流程:数据源 --> logstash(input收集、output消息队列) --> MQ --> logstash (input收集消息队列、filter过滤、output ES) --> ES
使用这个流程,主要是基于性能考虑,第一层logstash主要做原始数据收集,不对数据进行处理,提高对数据源的收集性能。同时部署第一层logstash需要放在生产环境的服务器上,做为agent端,这样使用也是基于尽量少消耗服务器性能的考量。
本章使用redis做消息队列
yum install -y redis
配置/etc/redis.conf
daemonize yes
bind 192.168.137.11
启动 systemctl start redis
官方文档:https://www.elastic.co/guide/en/logstash/5.x/plugins-outputs-redis.html
1、标准输入、redis输出
input {
    stdin {}
}

filter {
}

output{
    redis {
        host => ["192.168.137.11"]
        port => 6379
        db => 1
        data_type => "list"
        key => "demo"
        timeout => 10
    }
}
启动/opt/logstash/bin/logstash -f /etc/logstash/conf.d/redis.conf


2、apache日志输入,redis输出
input {
    file {
        path => "/etc/httpd/logs/access_log"
        start_position => "beginning"
    }
}

filter {
}

output{
    redis {
        host => ["192.168.137.11"]
        port => 6379
        db => 1
        data_type => "list"
        key => "apache"
        timeout => 10
    }
}
启动/opt/logstash/bin/logstash -f /etc/logstash/conf.d/apache.conf

标签:beginning apache 数据源 file ash ack uid ;; stash
原文地址:http://www.cnblogs.com/shhnwangjian/p/6259080.html